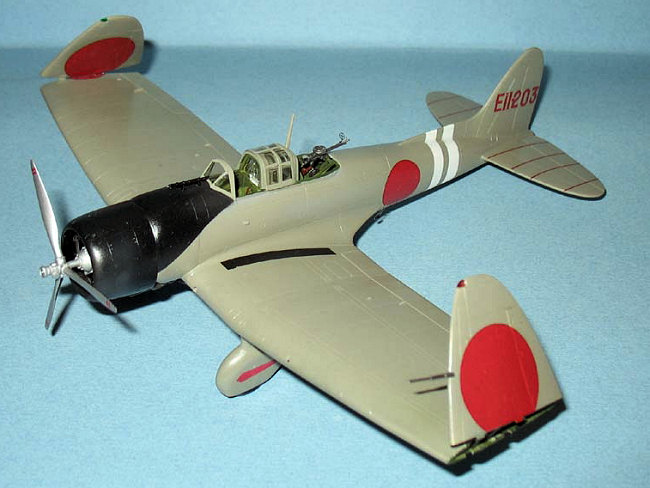
Hasegawa 1/48 D3A1 'Val' - "Pearl Harbor"
| KIT #: | JT 55 |
| PRICE: | $30.95 |
| DECALS: | Two options |
| REVIEWER: | Dan Lee |
| NOTES: | CMK cockpit and wing fold set used |
| HISTORY |
The Aichi Val had one of the most successful combat records of any plane in the Pacific War from 1941 to late 1942. It had fixed landing gear, but proved to be faster, longer ranged and more agile than the more modern US Navy dive bomber SBD-3. The Val was also a decent dogfighter if required, but only against an unsuspecting fighter.
 The Val was armed with a pair of
7.7mm machine guns in the cowling and one 7.7mm aimed by the rear gunner. It
carried a 250kg (550 pound) AP bomb on a centerline sling type mechanism similar
to the SBD’s that threw the bomb beyond the propeller and two wing racks for
60kg bombs.
The Val was armed with a pair of
7.7mm machine guns in the cowling and one 7.7mm aimed by the rear gunner. It
carried a 250kg (550 pound) AP bomb on a centerline sling type mechanism similar
to the SBD’s that threw the bomb beyond the propeller and two wing racks for
60kg bombs.
In skilled hands, the Val was a deadly weapon. It had helped destroy several warships, among them the carriers HMS Hermes, USS Hornet, USS Yorktown, the heavy cruisers Devonshire and Cornwall as well wreaking devastation in the Pearl Harbor raid.
The Val performed the most successful naval dive bomber strike of all time during Nagumo’s foray into the Indian Ocean when a couple of squadrons attacked the heavy cruisers HMS Devonshire and Cornwall, and sank them both scoring a hit rate (direct and near misses) of 80% which was unheard till the advent of the laser guided bomb.
By the end of the Guadalcanal campaign, the Val ceased to be a feared threat as most of the crews were dead. Among them, Akira Sakamoto, the markings were used for this model.
| THE KIT |
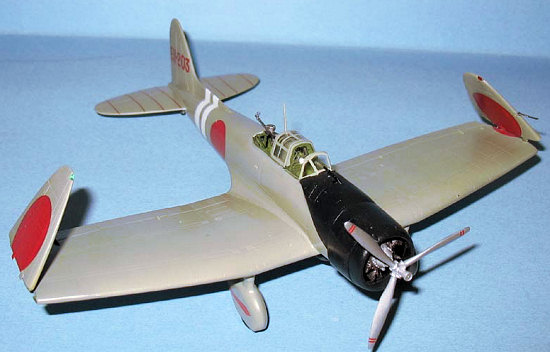
It is a typical Hasegawa kit with finely molded details and few parts with flash. The cockpit detail is good, but lacking in some details. The canopy bits are rather thick considering that they have to be stacked together when the canopies are open.
The CMK cockpit set for the Val is a mix of resin parts, a vacuformed canopy and a PE fret which provides a much better level of detail than the cockpit set, but also increases the complexity of assembly. The CMK wing fold set is nice, but my copy had some slight damage which was easily fixed as it is a very delicate assembly
I bought this kit from thru the MM forum along with the resin sets as it was a package deal.
| CONSTRUCTION |
 As with most aircraft, it all begins
with the cockpit .The CMK was a nice representation of the Val’s cockpit, with a
finer degree of detail than the kit pit as it comes with resin and PE parts.
As with most aircraft, it all begins
with the cockpit .The CMK was a nice representation of the Val’s cockpit, with a
finer degree of detail than the kit pit as it comes with resin and PE parts.
Removing the resin casting blocks was a pain in the arse as I broke the main cockpit piece in the process. Fortunately, I broke it in a place where it would not be noticed.
I was at a loss as to what color the interior of the Val was. As not many real examples remain around (ah, if only MacArthur took the concerns of modelers in consideration when he melted down much of the remaining IJA and IJN Air Forces.) Some photos show a green while Hasegawa claims it is a yellow olive brown mix. I opted for the green based on the colors from the Planes of Fame Val and wreck photos from j-aircraft.com.
I ended up using a mix of Tamiya XF-5 and XF-71 to approximate the “bamboo” green. I had to do some touch ups after I cleaned off the resin dust so I sprayed on Poly S FS34102 and/or XF-5.
The PE for this cockpit set was easier to deal with as I simply followed the installation guide. I did some dry fitting to ensure that the PE would not be crushed or broken off when it was glued.
I used wood carving tools to remove the parts guides and internal detail of the fuselage parts to ensure that the resin cockpit would fit (I had neglected to remove these when I started building models with resin cockpits and came back to haunt me when I glued the fuselage together.)
 My experience with the installation
of resin cockpits has been mixed because of the fit (some self inflected, but
others due to poor fit.) I will state that the installation of the CMK cockpit
into the Hasegawa bits is rather fiddly because you have to juggle the sidewalls
and the various internal pieces while hoping the glue doesn’t harden while you
adjust all the pieces. I managed to snake the resin cockpit in without freaking
out or yelling (which is a feat for me.)
My experience with the installation
of resin cockpits has been mixed because of the fit (some self inflected, but
others due to poor fit.) I will state that the installation of the CMK cockpit
into the Hasegawa bits is rather fiddly because you have to juggle the sidewalls
and the various internal pieces while hoping the glue doesn’t harden while you
adjust all the pieces. I managed to snake the resin cockpit in without freaking
out or yelling (which is a feat for me.)
Although it was very tricky to install, the one thing that surprised me was that it fit without huge gaps along the sidewalls that needed to be dealt with (as typical with my experience.) Don’t get me wrong, there were still gaps and I still had to use Mr Surfacer to fill said gaps, but they were manageable.
The one place that I did not like at all was the gunner’s seat. I wished that I had a third and fourth hand while trying to glue it together. Then I had a hard time installing it as it did not want to go into the rear cockpit. Eventually, after I broke the seat a couple of times, I managed to stick it in. It is not perfectly in place, but I did not want to try it again.
I also bought the CMK wingfold set (it was a package deal with the model and cockpit set) which I used in an effort to save space in my display cabinet. Wingfold sets can be even worse to deal with than resin cockpits because of the delicate resin bits and the fact that it takes a lot of careful work to get them to fit. The wing tips were cut off by using a knife to score along the panel lines. I then took a Dremmel with a cylindrical grinding bit and took my time to thin the wing. When I got the thickness down to roughly where I wanted then I used some 220 grit sandpaper for final adjustments. I glued in the resin wing inserts with CA glue and then I glued the tops of the wing to the bottom piece. The gaps (along the leading and trailing edges and the wing inserts) were filled with Mr Surfacer and the wing edges were sanded and polished while the excess Mr Surfacer in the wing fold was removed with Q-tips soaked in lacquer thinner.
 The external landing gear and wheels
were easy to deal with filling and sanding. The landing gear was glued onto the
wings. Also glued on were the dive flaps and tail wheel.
The external landing gear and wheels
were easy to deal with filling and sanding. The landing gear was glued onto the
wings. Also glued on were the dive flaps and tail wheel.
The fuselage was then glued to the wing assembly with Tamiya Thin Liquid cement and then clamped together till the joins hardened.
The rest of the construction went down without as much hassle. The wings needed a bit of Mr Surfacer in the wing fuselage join, but I have come to expect that from Hasegawa kits. Also there was a bit of a step on the underside of the fuselage wing join which needed some CA glue and sanding. All the other gaps were filled with Mr Surfacer and dealt with using various grades of sand paper.
The engine was easy to do. I decided to improve the detail by adding engine wiring. This was done by drilling holes into the cylinders with a #70 drill bit and sticking in cut lengths of 30 gauge wire. The engine was painted with burnt iron, silver and the push rods painted gloss black. Unlike some of my past attempts, the engine face can actually be seen.
| COLORS & MARKINGS |
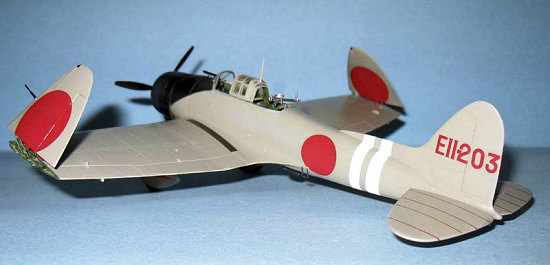
I decided to use the Hasegawa kit decals. I thought about doing the one (Soryu) shown on the box, but it seems to have been done to death while the second option from the Zuikaku has not so I selected doing that one for the sake of being “different.”
The markings are for Akira Sakamoto, who led the Pearl Harbor 2nd wave airstrikes on the USMC Ewa Airbase and Wheeler Air Field. For reasons unclear to me, Akira did not fly in the battle of Coral Sea. He returned to lead the Ziukaku’s dive bombers at Santa Cruz in Oct 1942. He was hit in the deadly air strike that helped cripple the USS Hornet and deliberately crashed his plane into the flight deck with his bomb load.
 I
did not pre-shade the model as I read that the planes used on the Pearl Harbor
raid were kept in pristine condition. As mentioned by those who know more than
I, there has been much discussion about the original “light grey” paint and
after much research the light grey was actually a caramel color aka Amerio.
Hasegawa provides their version of the mix, but I opted for the closest
equivalent handy color which is Gunze RLM02. I sprayed on two light coats and
after it dried, I wet sanded it with 3200/3600/4000 and 6000 grit micro mesh
sanding pads to smooth it out. I ended up doing touchup on the Val due to over
vigorous sanding and then sanded some more. The folded wing tips were done at
this time.
I
did not pre-shade the model as I read that the planes used on the Pearl Harbor
raid were kept in pristine condition. As mentioned by those who know more than
I, there has been much discussion about the original “light grey” paint and
after much research the light grey was actually a caramel color aka Amerio.
Hasegawa provides their version of the mix, but I opted for the closest
equivalent handy color which is Gunze RLM02. I sprayed on two light coats and
after it dried, I wet sanded it with 3200/3600/4000 and 6000 grit micro mesh
sanding pads to smooth it out. I ended up doing touchup on the Val due to over
vigorous sanding and then sanded some more. The folded wing tips were done at
this time.
Hasegawa does not provide the white stripes for the fuselage which is okay with me as I really dislike fuselage band decals due to the fact that I never seem to get them right. I masked off the fuselage and did each band one at a time and sprayed on Tamiya Flat white. I ended up doing a bit of touchup as the thinned white bled thru the tape.
I then masked off the nose and sprayed on a mix of Non Spec Sea Blue and Flat Black for the Cowling Black Blue. I don’t think I used enough Non Spec Sea blue as one can barely see any blue in the paint.
The Zuikakau decals were very easy as not many stencils were included. One of the things I discovered was that the Himorus for the wings needed to be split when doing the folded wing option. The majority of the himorus are on the folded wing tip. Cutting the decal was easy to do as I based it on the decal placement diagram. Touch up was done with Citadel Blood Red.
Once done, I sprayed on three thin coats of Gunze Clear for the final glossy look.
| FINAL CONSTRUCTION |
I used a combination of the
vaccuformed CMK and Hasegawa canopy. The reason why the CMK vaccuformed canopy
was rather brittle and I cracked the forward windscreen to my dismay when I was
removing the excess plastic. The Val’s greenhouse canopy was a pain to mask,
but I took my time with it. The interior color was sprayed first then RLM02 and
then finally the Gunze Clear. It
 was attached in open position with Elmer’s
white glue.
was attached in open position with Elmer’s
white glue.
I added various resin and PE bits to the machine gun and brush painted it with Citadel Chainmetal before using CA glue to stick it to the gun mount.
The rest of the pieces (landing lights, pitot tube etc) were added. I left off the wing bombs and racks as I read that the Pearl Harbor dive bombers only carried the centerline bomb (the parts were painted and installed according to instructions.)
The resin wing tips required some thought. I took some cut lengths of steel wire and bent them at a 60 degree angle. I carefully drilled out the locator holes on both the wing and the tip and glued the wires to the plane in with CA glue. The wing tips were then glued where the wing tip touches the wing and the mounting hole. I had to use accelerator to secure the tips in place. I then took cut lengths (one cm) and glued them where the instructions said they would go.
| CONCLUSIONS |
The Hasegawa Val is a good kit OOB, but with some after market sets and a lot of patience, it can be made into a very good kit (despite my own average representation here.) I recommend this model kit (and the CMK sets, too) to anyone who has built a couple of kits.
September 2007
Copyright ModelingMadness.com
If you would like your product reviewed fairly and fairly quickly, please contact the editor or see other details in the Note to Contributors.