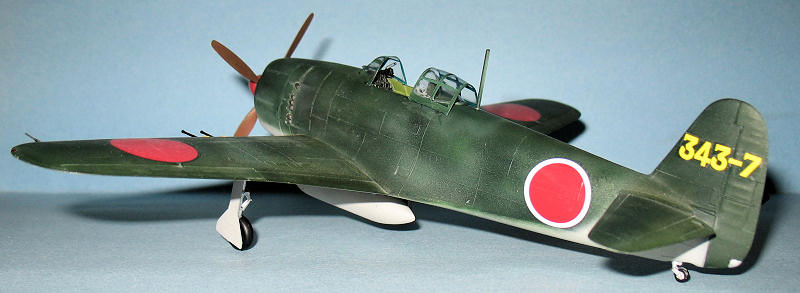
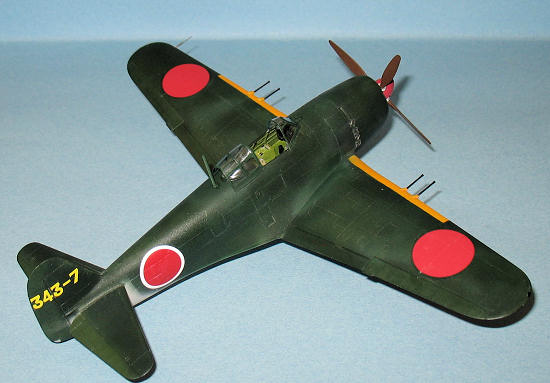
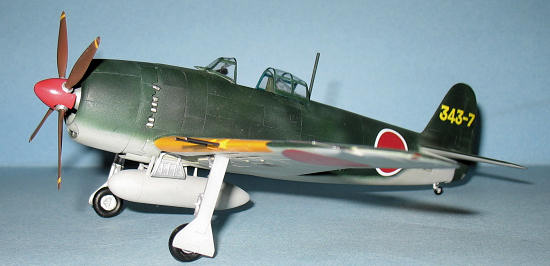
Hasegawa 1/48 N1K2-J Shiden-Kai
| KIT #: | ? |
| PRICE: | $Out of Production |
| DECALS: | Three options |
| REVIEWER: | Dan Lee |
| NOTES: |
Decals from spares, Seatbelts, pitot tube and cannon barrels
from Tamiya A6M5 Zero set and Vaccufom Canopy from Falcon |
| HISTORY |
The Shiden was a radial engine equipped
land based fighter based on the Kyofu seaplane fighter. It had excellent
maneuverability based on an automatic maneuvering flap system and had a powerful
yet unreliable engine as well as robust construction.
One critical drawback was that the N1K1 had an awkward
landing gear due to its midwing design that complicated
 maintenance
and manufacturing.
The N1K2 was the ultimate version of the Shiden (Violet
Lightening) with four 20mm wing mounted cannons, a lower wing to accommodate a
simpler more conventional landing gear and 1/3 fewer parts than the earlier N1K1
series of fighters.
This redesigned maneuverable, rugged and fast fighter
proved to be a serious challenge to the Corsair and Hellcats especially in the
hands of a capable fighter pilot.
maintenance
and manufacturing.
The N1K2 was the ultimate version of the Shiden (Violet
Lightening) with four 20mm wing mounted cannons, a lower wing to accommodate a
simpler more conventional landing gear and 1/3 fewer parts than the earlier N1K1
series of fighters.
This redesigned maneuverable, rugged and fast fighter
proved to be a serious challenge to the Corsair and Hellcats especially in the
hands of a capable fighter pilot.
It would prove to be
a matter of too little too late as the USAAF Strategic Bombing Campaign,
submarine attacks on merchant shipping and fuel shortages would slow down
production so that the Shiden Kai would be a meager compliment to the Zero
rather than replace it in the Imperial Japanese Navy Air Force. Only some
400 N1K2s were produced and given to elite fighter wings of the IJN including
Minoru Genda’s 343rd Kokutai aka the Wing of Experts.
After the war, most
of the surviving Shidens and other Japanese aircraft were melted down as per
MacArthur’s orders with only a few planes surviving in museums (mostly captured
evaluation birds or recovered wrecks.)
From Wikipedia and my older review of the N1K1-Ja
| THE KIT |
It is the older Hasegawa N1K2-J Shiden
kit as reboxed by Minicraft.
It comes with a decent early 80s cockpit and those
dreaded raised panel lines.
The kit was actually in fairly good shape except for a
couple of items (detailed below) and the parts were pretty good for a 1980s kit
except mold marks in very painful to remove areas (especially the landing gear.)
 This is a
review kit from DaBoss.
Being an old kit, I noticed several things.
This is a
review kit from DaBoss.
Being an old kit, I noticed several things.
1)
There were only three cannons remaining of the four
2)
The canopy was scratched up
3)
The decals were pretty old and I thought they looked like they would
disintegrate in water
4)
There was a lot of dried tape gum from where someone test fitted the
parts and left the tape on them for a long long time.
Being the adaptable sort, I figured out
what I was going to do.
Fortunately, I found what I was looking for searching
the web.
Tamiya has a a PE set that goes with their recent A6M5 kit.
Among the bits include a IJN seatbelt/harness, a pitot
tube and machined 20mm cannon barrels.
I bought two of these sets for the cannon barrels but I
don’t think it is a waste of money as I can always use the extra metal pitot
tube or IJN harness.
Also I picked up the Falcon IJN vaccuform canopy set to
replace the canopy.
Again, I can always use the canopies in future builds.
The decals proved harder as I don’t have flashes that can fit the Shiden’s fuselage. I would try to use the kit flashes and serial numbers if they held together. Otherwise, I would cobble them together from my rather small Japanese decal stash/leftovers and planned to paint the stripes.
| CONSTRUCTION |
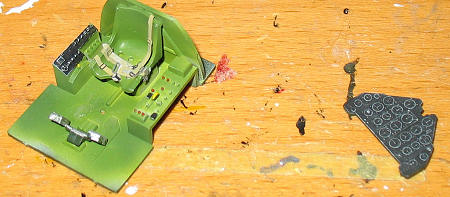
It all began with the cockpit.
I tossed the kit seat as I felt it was rather simplified
as compared to the actual seat.
I rummaged through my spares box and found a seat from
an earlier Zero build that fit the bill much better than the kit seat.
One very obvious feature about the seat is that it has
holes in the seat pan.
A little bit of drilling and I had a decent
representation of the Shiden’s seat.
 Initially I
wanted to go to town on the cockpit as it was missing many of the levers and the
rather large and obvious throttle.
After thinking it over, I passed which is rare for me as
I didn’t have the time or energy to do the work (at the time I was working
weekends and my energy levels were still a bit low some four months after
surgery.)
The cockpit/interior was painted with a mix of IJN cockpit color
and Flat Green while the control panel was painted black, the details were
painted using a dry brush of white and the dials were coated with Future to
stand out.
Initially I
wanted to go to town on the cockpit as it was missing many of the levers and the
rather large and obvious throttle.
After thinking it over, I passed which is rare for me as
I didn’t have the time or energy to do the work (at the time I was working
weekends and my energy levels were still a bit low some four months after
surgery.)
The cockpit/interior was painted with a mix of IJN cockpit color
and Flat Green while the control panel was painted black, the details were
painted using a dry brush of white and the dials were coated with Future to
stand out.
The cockpit was glued in place and the
fuselage was assembled.
The fit was very good and showed that Hasegawa really
knew their stuff when they made this kit almost 30 (!) years ago.
When I glued the wings in place, I was not surprised
that there was a rather noticeable gap of the wing to fuselage join which is a
common issue among many Hasegawa kits.
I let the kit sit a couple of weeks to
allow for outgassing of glue fumes so as to prevent those annoying phantom seams
before I filled/sanded the seams.
One thing that had to go was the antenna as it got in
the way of sanding.
Later, I replaced it with piece of plastic rod.
 I can
understand why some folks don’t like raised panel lines, but I don’t find them
to be a big deal.
All it takes is a few swipes of a knife to replace the
lost panel lines (same as engraved ones.)
Some folks would prefer to rescribe them which is fine,
but I’m lazy, get bored rather quickly doing it and would rather spend the ample
amount of time that it takes to do other things.
I can
understand why some folks don’t like raised panel lines, but I don’t find them
to be a big deal.
All it takes is a few swipes of a knife to replace the
lost panel lines (same as engraved ones.)
Some folks would prefer to rescribe them which is fine,
but I’m lazy, get bored rather quickly doing it and would rather spend the ample
amount of time that it takes to do other things.
One area that proved to be a pain to
fill/sand was a certain area on the wings.
If you guessed the area between the cannon stubs then
you guessed correctly.
Sanding in small areas is not really popular with me
which is why I’ll spend money for intakes (if they’re available) or not do it
all if I can get away with it.
Once done, I drilled out the stubs for the replacement
barrels.
The prop was easy to paint and
assemble.
The spinner was painted flat white then red as my intention was
to do the markings of Captain Oshibuchi of the 701st Squadron of the 343rd IJN
Wing.
The last parts to assemble, fill and sand was the fuel tank. The fit on this piece wasn’t the best and required a lot of filling and sanding.
| COLORS & MARKINGS |
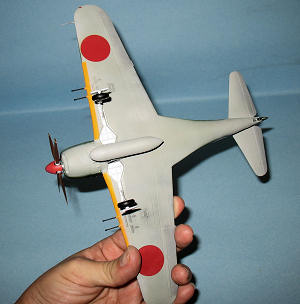
Painting
First thing I did was wash the model of
plastic dust/sanding residue.
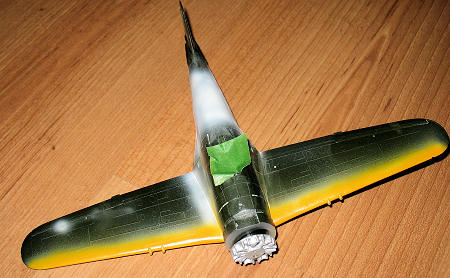
Next I sprayed the leading edges white and then Gunze
Orange Yellow for the ID stripes.
When they were dry, I masked them and then sprayed
Tamiya IJN Light Gray for the underside and on the landing gear doors.
The flaps and ailerons were painted dark grey to show
tonal variation between the fabric and the metal areas.
 Next I
sprayed on Tamiya IJN Green and opted to freehand the demarcation lines rather
than mask them.
To vary the color tones, I added in some flat green and gray to
the IJN Green and lightly sprayed on a second coat.
After I sprayed on Tamiya Flat Green on the rudder,
flaps and ailerons to show the tonal variation between the topside fabric and
metal areas.
Next I
sprayed on Tamiya IJN Green and opted to freehand the demarcation lines rather
than mask them.
To vary the color tones, I added in some flat green and gray to
the IJN Green and lightly sprayed on a second coat.
After I sprayed on Tamiya Flat Green on the rudder,
flaps and ailerons to show the tonal variation between the topside fabric and
metal areas.
Once these areas were dry, I removed
the ID strip masks and masked the landing gear wells.
I used a combination of Tamiya Chrome Silver and Talon
Aluminum.
Lastly I sprayed on Tamiya Gloss coat in preparation for the
decals.
Decals
The first thing I did was put one of
the flashes in water.
It promptly disintegrated and I threw the decal sheet
into the garbage.
 I wanted
to paint on the fuselage stripes and discovered that it was a major pain in the
butt.
One stripe I can do.
Two?
Maybe.
Two angled parallel lines?
Hahahahahaha, no way.
I laid tape down so many different ways it still looked
crappy so I threw the tape ball of failure into the trash and opted for a less
flashy aircraft.
So much for Capt Oshibuchi’s plane and it was onto plan
B.
I wanted
to paint on the fuselage stripes and discovered that it was a major pain in the
butt.
One stripe I can do.
Two?
Maybe.
Two angled parallel lines?
Hahahahahaha, no way.
I laid tape down so many different ways it still looked
crappy so I threw the tape ball of failure into the trash and opted for a less
flashy aircraft.
So much for Capt Oshibuchi’s plane and it was onto plan
B.
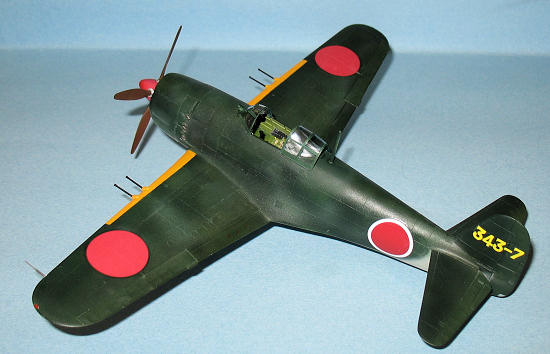
The Himorus were from various kits, but
I used the correct sizes while the serial numbers were a cut and paste job.
I used the (fictional?) serial 343-7 for a plane
assigned to the
701st Sq of the 343rd Wing.
I even managed to snag some left over Japanese stencils
and thankful in more ways than one that the Japanese (at the time) didn’t go
overboard on maintenance stencils.
MicroSet was used as
the decal setting solution while I saved Solvaset for the stubborn ones (it
seems most if not all Japanese decals can be thought of as stubborn.)
Weathering and Final
Coat
Strangely, I opted not to weather the plane much and pretty left it as is except some slight exhaust stains and staining around the cannon ejection ports. The last thing I did was spray on two light coats of Vallejo Flat Coat for the final coat.
| FINAL CONSTRUCTION |
The cannon barrels
and pitot tube were glued in with CA glue and the external fuel tank and doors
were installed with Tamiya Extra Thin glue.
 Assembling
the landing gear was straight forward except for noticeable ejection pin marks
which needed to be sanded and filled.
After the gears were painted with a base of Tamiya
Chrome Silver and a top coat of Talon Aluminum, I glued them in place but they
needed some adjusting as the alignment wasn’t right.
Assembling
the landing gear was straight forward except for noticeable ejection pin marks
which needed to be sanded and filled.
After the gears were painted with a base of Tamiya
Chrome Silver and a top coat of Talon Aluminum, I glued them in place but they
needed some adjusting as the alignment wasn’t right.
I have to admit that I’m not entirely
comfortable using vaccuform canopies and tend to be rather paranoid when cutting
them out which is why I took my time to carefully cut away the canopy from the
vaccuform sheet using a brand new number 11 Exacto Knife blade and then sanded
down the edges.
Next I washed the parts before masking with Tamiya tape.
The canopy colors were airbrushed with Aotake for the
interior, Light Grey and the base color.
Why light gray?
The last time I used Aotake for the interior, I
discovered to my dismay that the blue bled through the green top coat giving the
canopy a different color than the rest of the exterior.
The light gray acts as a buffer to prevent that.
Masking was removed from the Falcon Canopy bits and
secured to the model using white glue.
The last touch was
painting the exhausts using steel and flat black.
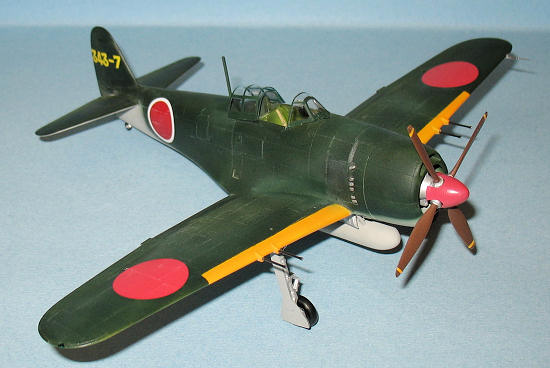
| CONCLUSIONS |
The older Hasegawa N1K2-J kit makes a
nice model with a bit of patience and some extra market details (if you want)
and you don’t need to be afraid of raised panel lines.
The cockpit could use a bit more detail (aftermarket pit
probably), but you don’t need to go overboard with it (again, unless you really
want to.)
It makes for a cheaper alternative to
the newer Hasegawa uber kit of the N1K2-J Shiden with a result that despite
lacking in some interior details, looks almost as good.
I certainly had fun with this kit and recommend it for a
builder of any level who wants a fairly easy build and decent representation of
a 1/48 scale Shiden or Japanese aircraft in general.
Review kit courtesy of the DaBoss.
August 2010
Copyright ModelingMadness.com. All rights reserved. No reproduction in part or in whole without express permission from the editor.
If you would like your product reviewed fairly and quickly, please contact the editor or see other details in the Note to Contributors.