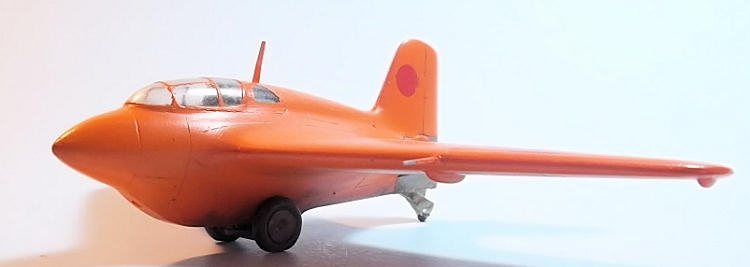
MPM 1/72 J8M1 'Shusui'
| KIT #: | |
| PRICE: | $18.00 |
| DECALS: | Two options |
| REVIEWER: | Ralph Koziarski |
| NOTES: | Short run |
| HISTORY |
In late
1944 when US bombing of
| THE KIT |
 MPM have
become a giant in the short-run kit industry, but there was a time when they
were just another garage outfit producing crude models of little known subjects.
The Shusui kit was produced around the time when MPM were just beginning their
transformation and hence features elements of both the old and new MPM. The kit
comes on two very light gray sprues with reasonably sized sprue gates, and no
more flash than is typically expected from a short run kit. Panel lines are
lightly recessed and look appropriate for 72nd scale. Also included
are a beautiful vacuform canopy and a small fret of photoetched parts that
includes seat harnesses, an instrument panels and a few other small bits. There
is a clear acetate sheet with instrument faces that you sandwich between the PE
instrument panel and plastic canopy front. A small Propagteam decal sheet of
generic Japanese markings completes the kit.
MPM have
become a giant in the short-run kit industry, but there was a time when they
were just another garage outfit producing crude models of little known subjects.
The Shusui kit was produced around the time when MPM were just beginning their
transformation and hence features elements of both the old and new MPM. The kit
comes on two very light gray sprues with reasonably sized sprue gates, and no
more flash than is typically expected from a short run kit. Panel lines are
lightly recessed and look appropriate for 72nd scale. Also included
are a beautiful vacuform canopy and a small fret of photoetched parts that
includes seat harnesses, an instrument panels and a few other small bits. There
is a clear acetate sheet with instrument faces that you sandwich between the PE
instrument panel and plastic canopy front. A small Propagteam decal sheet of
generic Japanese markings completes the kit.
I saw this kit sitting on the shelf of a local hobby shop for nearly two years, and since the guy who runs this store generally only stocks Revell/Monogram kits, I always try to pick up the odd kits to encourage him to stock more interesting things. It turned out to be a great purchase. I’m rarely disappointed by MPM, Special Hobby, or Azur kits, and this one was no exception.
| CONSTRUCTION |
I began
construction by cleaning up the major parts. These included the top and bottom
halves of the fuselage/wing structure, and the left and right halves of the
tail. I used a sanding block to thin out the trailing edges of the flight
surfaces, and removed most of the flash with a knife. I then built up the
cockpit bulkhead and floor assembly and glued it into the bottom fuselage half,
 sanding. I then glued together the
two tail halves and glued the tail to the body. The fit back there was also
pretty horrible, and I ended up using styrene shims and generous amounts of gap
filling super glue to fill the holes. Once everything got cleaned up I rescribed
the lost panel lines and turned my attention back to the cockpit.
sanding. I then glued together the
two tail halves and glued the tail to the body. The fit back there was also
pretty horrible, and I ended up using styrene shims and generous amounts of gap
filling super glue to fill the holes. Once everything got cleaned up I rescribed
the lost panel lines and turned my attention back to the cockpit.
The
cockpit provided in the kit is rather basic. The two side consoles don’t have
any surface detail and don’t conform to the inner curve of the fuselage. The
control stick is a crude and clunky, and the two cylinders which are installed
in back of the seat were also devoid of detail. Still, in 72nd scale
the only interior detail which really seems to count is the seat, the rest not
being especially visible. I glued in the seat, the two cylinders, and a control
stick I dug out of my spares bin. I painted all of this with Tamiya cockpit
green (XF-71) and gave it a dark brown wash. I then painted the PE instrument
panel a very dark gray and glued the acetate instruments to the back with white
glue. Once dry, this was installed to the front bulkhead part which I fashioned
from scrap styrene. I glued the nice PE seat belts to the seat, and painted them
a leathery brown shade.
 Next came
the part I dreaded most: the vacuformed canopy. I first cut out the piece with a
pair of nail scissors leaving plenty of extra plastic along the edges. Then I
trimmed and smoothed out the edges against a piece of sand paper glued to block
of wood. I frequently checked the fit of the part as I sanded it to make sure I
didn’t remove too much. Wouldn’t you know it I still somehow managed to take too
much off the back! I inserted a styrene shim, painted it cockpit green and then
glued on the canopy with a few tiny spots of super glue, filling in the rest
with
Next came
the part I dreaded most: the vacuformed canopy. I first cut out the piece with a
pair of nail scissors leaving plenty of extra plastic along the edges. Then I
trimmed and smoothed out the edges against a piece of sand paper glued to block
of wood. I frequently checked the fit of the part as I sanded it to make sure I
didn’t remove too much. Wouldn’t you know it I still somehow managed to take too
much off the back! I inserted a styrene shim, painted it cockpit green and then
glued on the canopy with a few tiny spots of super glue, filling in the rest
with
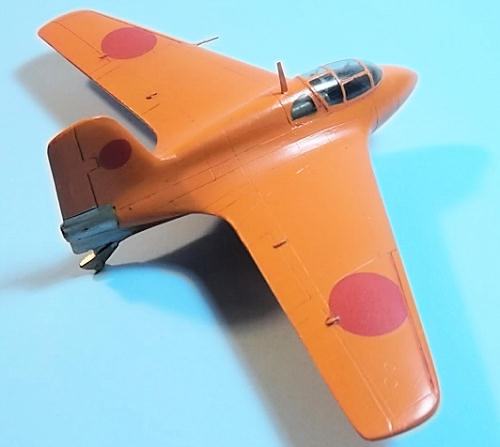
At this
stage I prepped to model for painting, added on a few small bits and filled in
the gun ports. I wanted to build the first prototype, which to my understanding
was not armed. This was driven in part by wanting to have an orange aircraft in
my collection, and also by the awful representations o cannon barrels that MPM
provided. These were little more than two elongated roughly cylindrical plastic
blobs. I must admit though that I did forget to fill in the shell ejection
chutes under the wing. I wiped the kit down with rubbing alcohol and was ready
to paint.
| COLORS & MARKINGS |
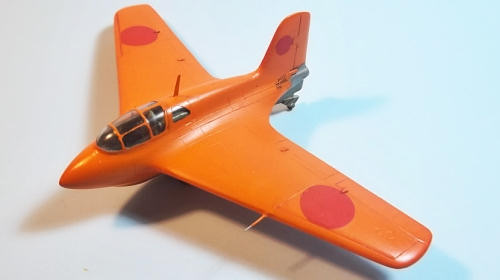 The
instructions describe two marking options for the kit, the first in overall
orange, and the second in a dark green over natural metal finish. I chose the
orange for reasons discussed above. Orange, like yellow, is a nightmare to
paint. It works best over a light colored undercoat, so I began by spraying the
kit with a light gray primer. I should have used white, but I had run out. I
then mixed Tamiya orange with flat yellow at a ratio of about 5:1. After this
had dried I masked off the exhaust and tail wheel assembly and hand painted them
with Citadel’s chainmail silver. I applied a coat of floor wax to the whole kit
and then put on the decals. These were very thin and went on without hassle. The
kit got a very light wash of Van Dyke brown oil paint, which was concentrated
around the exhaust area, control surfaces and around the skid where most dirt
would have accumulated. Finally, I sealed everything in under a coat of Model
Master Acrylic flat coat mixed with a few drops of floor wax.
The
instructions describe two marking options for the kit, the first in overall
orange, and the second in a dark green over natural metal finish. I chose the
orange for reasons discussed above. Orange, like yellow, is a nightmare to
paint. It works best over a light colored undercoat, so I began by spraying the
kit with a light gray primer. I should have used white, but I had run out. I
then mixed Tamiya orange with flat yellow at a ratio of about 5:1. After this
had dried I masked off the exhaust and tail wheel assembly and hand painted them
with Citadel’s chainmail silver. I applied a coat of floor wax to the whole kit
and then put on the decals. These were very thin and went on without hassle. The
kit got a very light wash of Van Dyke brown oil paint, which was concentrated
around the exhaust area, control surfaces and around the skid where most dirt
would have accumulated. Finally, I sealed everything in under a coat of Model
Master Acrylic flat coat mixed with a few drops of floor wax.
| FINAL CONSTRUCTION |
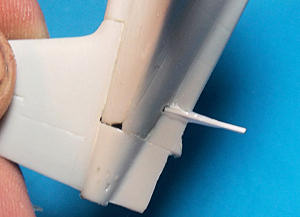
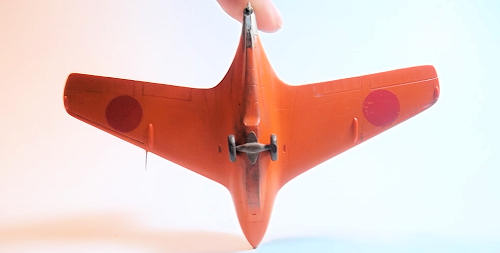
Final
assembly consisted of adding the radio mast and pitot. I made my own pitot from
a piece of tapering metal rod, but used the kit part for the mast. Then I
assembled the small landing gear trolley, painted that up and glued it to the
bottom of the model. The final touch was to splatter some earth colored paint
along the bottom of the landing skid, and unmask the clear parts.
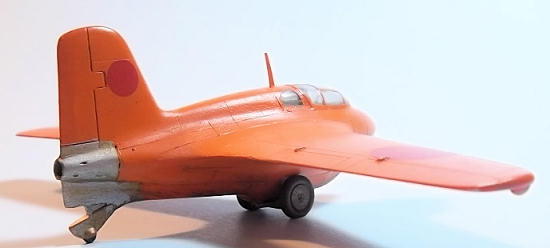
| CONCLUSIONS |
 I’m very
happy with this build. It was something of a diversion and I invested perhaps
only four or five modeling sessions spread out over a week and a half to
complete it. I really enjoy MPM et al.’s products, but I had forgotten how
simple their earlier models were. Nevertheless, I found it rewarding to take a
somewhat crude kit and turn it into a neat and tidy little model. The build was
at times challenging, but never frustrating (I’m looking your way Classic
Airframes Fairey Battle!). If you haven’t taken the plunge into short-run kits
yet, then consider making MPM’s Shusui your first one. The kit is a good one to
start with. It is simple yet teaches you many of the essential skills necessary
(cutting and fitting vac canopies, working with PE, thinning parts, cleaning
flash) to successfully build these off the beaten path subjects.
I’m very
happy with this build. It was something of a diversion and I invested perhaps
only four or five modeling sessions spread out over a week and a half to
complete it. I really enjoy MPM et al.’s products, but I had forgotten how
simple their earlier models were. Nevertheless, I found it rewarding to take a
somewhat crude kit and turn it into a neat and tidy little model. The build was
at times challenging, but never frustrating (I’m looking your way Classic
Airframes Fairey Battle!). If you haven’t taken the plunge into short-run kits
yet, then consider making MPM’s Shusui your first one. The kit is a good one to
start with. It is simple yet teaches you many of the essential skills necessary
(cutting and fitting vac canopies, working with PE, thinning parts, cleaning
flash) to successfully build these off the beaten path subjects.
May 2012
Copyright ModelingMadness.com. All rights reserved. No reproduction in part or in whole without express permission from the editor.
If you would like your product reviewed fairly and fairly quickly, please contact the editor or see other details in the Note to Contributors.
Back to the Review Index Page 2023