Special Hobby 1/32 A5M2 'Claude'
|
KIT #: |
32034 |
|
PRICE: |
$62.95 MSRP
|
|
DECALS: |
Two options |
|
REVIEWER: |
Bill Koppos |
|
NOTES: |
Nice short run kit |
Tom Cleaver, in his earlier review, did an excellent history on this
aircraft. I will defer (be very lazy) to Tom and refer you to his history
here.
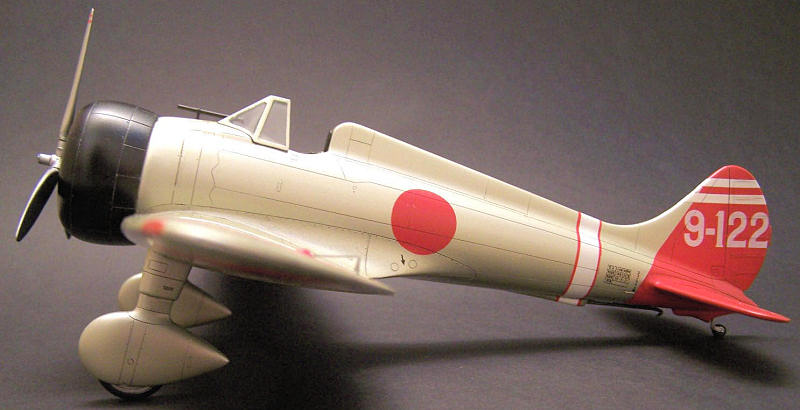
 Some beautiful airplanes came out of the late 1930's, even military ones.
The first monoplanes were Art Deco attempts at streamlining, finally
slipping through the air instead of fighting it. In my eye the Mitsubishi
A5M fighter, known to most by it's allied code name "Claude", is one of the
most nice looking, elliptical-winged and all curves from nose to tail. Add
to this some colorful pre-war paint schemes, and it makes for an
eye-catching model for sure. So I was very happy to see the latest release
in my favorite big 1/32 scale from Special Hobby is the A5M2 "Claude Over
China".
Some beautiful airplanes came out of the late 1930's, even military ones.
The first monoplanes were Art Deco attempts at streamlining, finally
slipping through the air instead of fighting it. In my eye the Mitsubishi
A5M fighter, known to most by it's allied code name "Claude", is one of the
most nice looking, elliptical-winged and all curves from nose to tail. Add
to this some colorful pre-war paint schemes, and it makes for an
eye-catching model for sure. So I was very happy to see the latest release
in my favorite big 1/32 scale from Special Hobby is the A5M2 "Claude Over
China".
The big box has a nice painting on it of an A5M chasing a Chinese SB-2
bomber. Inside we have typical Special Hobby limited run grey, soft plastic,
with thick sprue gates but nice surface detail. The engine is good enough
but no pushrods are provided. Cockpit is again good enough, but has
considerable room for improvement. For a 1/32 kit it is kind of simple, but
is a good basic model. Decals are provided for two "China Incident" A5M's,
it has a small photo-etched fret that includes a seat harness, and a nicely
done clear windscreen.
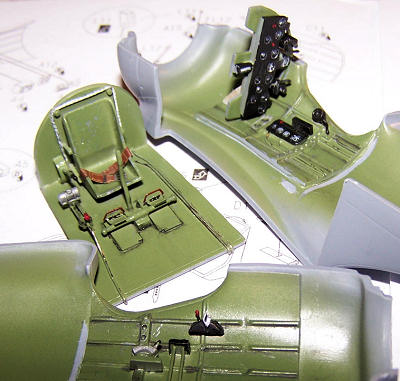 I started in the cockpit. The sides are glued to the fuselage walls
first. I referred to a website found here
http://www.colesaircraft.com/A5M2.html for
cockpit photos, and proceeded to add levers, handles, wiring etc. to somewhat
match the photos. From another reference I found the kit seat to be quite
close, but needed better mounts. These I made from scraps, and installed a
supporting "bungee" system similar to the A6M Zero's. The instrument panel
was quite good, and painted with black dials and dyrbrushed needles, a drop
of future wax added to simulate glass. The main interior color used was
Tamiya's Cockpit green, XF-71, suitably chipped and scuffed with aluminum. I
had a set of Eduard 1/32 JNAF seat belts and used these on the finished
seat. At this point I recommend taping the fuselage together, and test
fitting the cockpit floor from below, making adjustments so the seat back is
just about even with the headrest area., and watching the left/right
alignment also. When all looks good, take it apart and put in the instrument
panel onto one side, checking for level, then dry fit again. These steps are
usually necessary in a limited run kit due to vague location areas, and this
one is no exception. But all came out well in the end and the fuselage was
glued up. Fit was good and seam cleaning easy.
I started in the cockpit. The sides are glued to the fuselage walls
first. I referred to a website found here
http://www.colesaircraft.com/A5M2.html for
cockpit photos, and proceeded to add levers, handles, wiring etc. to somewhat
match the photos. From another reference I found the kit seat to be quite
close, but needed better mounts. These I made from scraps, and installed a
supporting "bungee" system similar to the A6M Zero's. The instrument panel
was quite good, and painted with black dials and dyrbrushed needles, a drop
of future wax added to simulate glass. The main interior color used was
Tamiya's Cockpit green, XF-71, suitably chipped and scuffed with aluminum. I
had a set of Eduard 1/32 JNAF seat belts and used these on the finished
seat. At this point I recommend taping the fuselage together, and test
fitting the cockpit floor from below, making adjustments so the seat back is
just about even with the headrest area., and watching the left/right
alignment also. When all looks good, take it apart and put in the instrument
panel onto one side, checking for level, then dry fit again. These steps are
usually necessary in a limited run kit due to vague location areas, and this
one is no exception. But all came out well in the end and the fuselage was
glued up. Fit was good and seam cleaning easy.
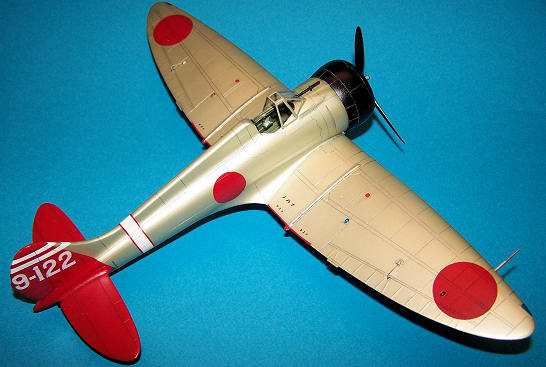
The wings are really simple, no wheel wells, armament or moveable
control surfaces, just slap the halves together. Fit of the wing to the
fuselage wasn't as bad as some Special Hobby planes. Some trimming is
necessary, as well as a spreader made from
 scrap sprue, to make the wing
roots wide enough to match the fuselage contours. Careful and patient
trimming and fitting here will save a lot of filling later. The stabilizers
feature mounting tabs, a first for Special Hobby. Whoopee. I ended up
cutting them off as they did not line up at all, and sanded the surfaces
nice and flat for a good fit. At this point I glued the wheel spats
together, leaving out the wheels till later for easier painting. DON'T do
this as the wheels required lots of carving and a split pant to get in
later. Glue them in now and paint carefully later. After seam clean-up on
the pants, I deepened the small mounting holes and glued them up, watching
the alignment till dry.
scrap sprue, to make the wing
roots wide enough to match the fuselage contours. Careful and patient
trimming and fitting here will save a lot of filling later. The stabilizers
feature mounting tabs, a first for Special Hobby. Whoopee. I ended up
cutting them off as they did not line up at all, and sanded the surfaces
nice and flat for a good fit. At this point I glued the wheel spats
together, leaving out the wheels till later for easier painting. DON'T do
this as the wheels required lots of carving and a split pant to get in
later. Glue them in now and paint carefully later. After seam clean-up on
the pants, I deepened the small mounting holes and glued them up, watching
the alignment till dry.
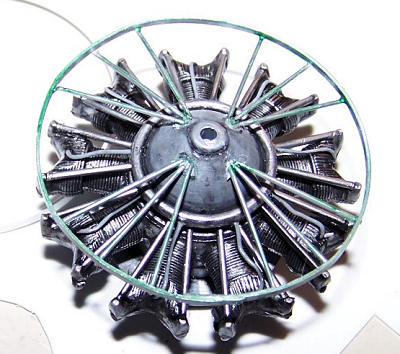
Time to power up. The engine is simple as mentioned, and needs
sprucing up. I stretched some sprue and added the proper two pushrods per
cylinder. The crankcase has dimples where the rods come out, I drilled holes
here with a small bit in a pin vise, putting the sprue rods between these
holes and the rocker boxes on the cylinder tops. A circular wire harness
tube is in the kit, more holes are drilled here for the spark plug wires, as
well as in the cylinder fronts. I use very thin solder, available at radio
Shack, for these, as they are quite flexible and take CA glue well. The
whole shebang was sprayed Aluminum and given a heavy wash of black. Now I
noticed the cowl in the web photos was mounted with a set of braces visible
from the front, so I made up some more sprue and built a facsimile of this.
The engine and cowl can be installed last, after painting the mainframe and
I set them aside.
 Paint prep involves masking off the cockpit opening and engine hole in
front, checking the airframe for flaws and rubbing the whole thing down with
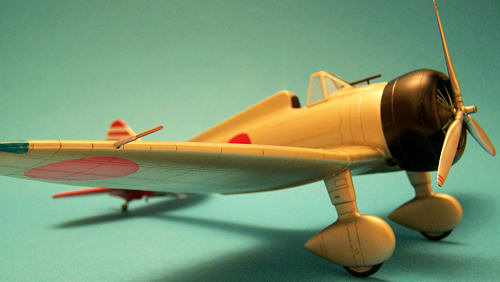
alcohol. I decided on the captured Chinese option, which has a red tail and
fuselage stripe. All of the markings will be sprayed except the tail
numbers. The main color is a representation of the Japanese Navy Sea finish
of natural metal coated with a protective varnish, which had a golden cast
to it, according to research. This was done with Alclad II "White Aluminum"
with a small amount of Testor's flat yellow mixed in. Alclad, if a good jar
is found, can be masked over repeatedly with no problems of peeling. So the
tail, stripes and hinomarus (meatballs) were all masked off and sprayed.
When all is done a coat of Testor's Metallizer Sealer was oversprayed on the
tail as a decal base and the numbers put on. These decals took a lot of
fussing to settle down right and silvered some, so it's a good thing I
sprayed most of the markings. Now I gave the whole thing a panel line wash
of water-based black. Now everything was sealed up with another coat of
gloss.
Paint prep involves masking off the cockpit opening and engine hole in
front, checking the airframe for flaws and rubbing the whole thing down with
alcohol. I decided on the captured Chinese option, which has a red tail and
fuselage stripe. All of the markings will be sprayed except the tail
numbers. The main color is a representation of the Japanese Navy Sea finish
of natural metal coated with a protective varnish, which had a golden cast
to it, according to research. This was done with Alclad II "White Aluminum"
with a small amount of Testor's flat yellow mixed in. Alclad, if a good jar
is found, can be masked over repeatedly with no problems of peeling. So the
tail, stripes and hinomarus (meatballs) were all masked off and sprayed.
When all is done a coat of Testor's Metallizer Sealer was oversprayed on the
tail as a decal base and the numbers put on. These decals took a lot of
fussing to settle down right and silvered some, so it's a good thing I
sprayed most of the markings. Now I gave the whole thing a panel line wash
of water-based black. Now everything was sealed up with another coat of
gloss.
 The masking removed, the engine hoist is bought out and the engine put
in place. The black-painted cowling attaches over it, glued to the fuselage
with two little bumps top and bottom. Keep an eye on this till the glue
sets. Fiddly bits follow, the exhausts, wheels, windcreen, gunsight. The kit
propeller had no hub in front, so I made one out of scrap to match photos. I
primed the prop with gloss black and hit it with Alclad polished aluminum,
and masked and sprayed the red warning stripes. As a bonus this version had
no radio, so no antenna to bother with here. The gloss finish was left as
is, as these machines were polished to the nines by their crews.
The masking removed, the engine hoist is bought out and the engine put
in place. The black-painted cowling attaches over it, glued to the fuselage
with two little bumps top and bottom. Keep an eye on this till the glue
sets. Fiddly bits follow, the exhausts, wheels, windcreen, gunsight. The kit
propeller had no hub in front, so I made one out of scrap to match photos. I
primed the prop with gloss black and hit it with Alclad polished aluminum,
and masked and sprayed the red warning stripes. As a bonus this version had
no radio, so no antenna to bother with here. The gloss finish was left as
is, as these machines were polished to the nines by their crews.
As I said, this is a handsome airplane. All in all a good kit and fun
build, very little aggravation involved. Maybe give it a try as your first
limited-run kit?
Famous Airplanes of the World Type 96 Carrier Fighter No. 27 Bunrin
Do Co. 1991
A5M Claude Mushroom Yellow Series Tadeusz Januszewski No 6107 2003
Bill Koppos
November 2010
Copyright ModelingMadness.com.
If you would like your product reviewed fairly and quickly, please
contact
the editor or see other details in the
Note to
Contributors.
Back to the Main Page
Back to the Review
Index Page 2019