Revell 1/72 P1Y1/2 'Ginga'
| KIT #: | H-103 |
| PRICE: | $10 on auction |
| DECALS: | Eight Options |
| REVIEWER: | Peter Hobbins |
| NOTES: | Straight from the box |
| HISTORY |
Meeting a 1940 Imperial Japanese Navy requirement, the
Yokosuka P1Y1 first flew in 1943 but ongoing problems with the Nakajima Homare
engines meant that it did not enter service until October 1944. It was an
outstandingly clean design, largely eschewing defensive armament in favour of
overall performance. Known as the Ginga (Milky Way) to the Japanese and
codenamed Frances by the Allies, the P1Y1 had a maximum speed of 345 mph/556 kph
and a range of 2728 miles/4390 km. It could
 carry a torpedo of 1874 lb/850 kg or
a bomb load of up to 2204 lb/1000 kg, although some of these loads had to be
carried externally, reducing overall performance. Unlike some of the lumbering
Army bombers such as the Ki-49, the P1Y1 was not an easy aircraft to intercept
or to shoot down. In fact, the main problem with the Ginga was the unsuitability
of its complex design for mass production at a time when Japan’s industrial
facilities and skilled workers were both dwindling rapidly; even the creditable
total of 1002 delivered P1Y1 airframes was offset by the lack of trained crews
in the final year of the war. Not surprisingly, several were used in suicide
attacks during the final Pacific campaigns.
carry a torpedo of 1874 lb/850 kg or
a bomb load of up to 2204 lb/1000 kg, although some of these loads had to be
carried externally, reducing overall performance. Unlike some of the lumbering
Army bombers such as the Ki-49, the P1Y1 was not an easy aircraft to intercept
or to shoot down. In fact, the main problem with the Ginga was the unsuitability
of its complex design for mass production at a time when Japan’s industrial
facilities and skilled workers were both dwindling rapidly; even the creditable
total of 1002 delivered P1Y1 airframes was offset by the lack of trained crews
in the final year of the war. Not surprisingly, several were used in suicide
attacks during the final Pacific campaigns.
Given the aircraft’s general performance, a B-29 interceptor version was mooted, resulting in the P1Y1-S prototype, which flew even before the bomber version entered service. This led to a request for Kawanishi to develop the P1Y2-S Kyokko (Aurora), a dedicated night-fighter which replaced the original powerplants with Mitsubishi Kasei radials. These afforded a modest increase in speed, partly offset by the introduction of heavier fixed armament, including two 20 mm cannon angled obliquely upward and a further two 20 mm on a flexible mount in the rear cockpit or in a powered dorsal turret. Unfortunately for the Kyokko, its rate of climb was insufficient to meet the Superfortresses and many of the 96 (or 97) P1Y2 were converted to bombers.
Several Frances were captured and tested by the Allies at the end of the war, and one (apparently a P1Y1-S) resides in an unrestored state at the National Air and Space Museum’s Garber facility in Maryland.
| THE KIT |
 There are two 1:72 kits of the Frances; this Revell kit dates
from about 1970, whereas in the 1990s Hasegawa released two new-mould kits (a
P1Y1 and P1Y2-S). The latter are apparently exquisite if expensive kits – but
wait! - that doesn’t mean that the Revell kit should be fed to your dog. In
fact, it is a beautiful model, perhaps one of the finest of its era.
There are two 1:72 kits of the Frances; this Revell kit dates
from about 1970, whereas in the 1990s Hasegawa released two new-mould kits (a
P1Y1 and P1Y2-S). The latter are apparently exquisite if expensive kits – but
wait! - that doesn’t mean that the Revell kit should be fed to your dog. In
fact, it is a beautiful model, perhaps one of the finest of its era.
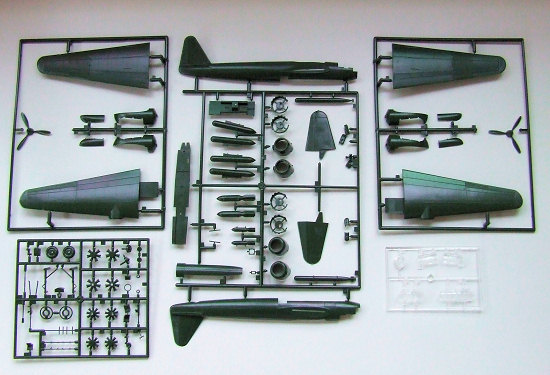
All of the parts are moulded in dark green plastic, and on
the sprue you can see that it’s a nice-looking model. I’ll admit that there is
plenty of raised detail, including rivets and panel lines, but these are quite
fine if still inevitably overscale. There are also some
 engraved details too,
with crosshatched ‘fabric’ effect on the control surfaces; thankfully there are
no gimmicky moveable parts that were common during the era. The cockpit is
amazingly complete, including seats, control column, radio, bomb panel and
bombsight. The bomb doors are moulded as one piece but can be cut apart to
display the bay, which displays some structural detail and allows the
positioning of either one or two bombs, or a torpedo. The kit also supplies two
reasonably detailed engine options (Homare or Kasei), plus various armament
choices and additional details such as ASV and air interception aerial arrays.
While the latter are way over-scale and can’t really be used, this remains a
problem for many current kits so one can’t blame Revell for not trying their
best back in 1970!
engraved details too,
with crosshatched ‘fabric’ effect on the control surfaces; thankfully there are
no gimmicky moveable parts that were common during the era. The cockpit is
amazingly complete, including seats, control column, radio, bomb panel and
bombsight. The bomb doors are moulded as one piece but can be cut apart to
display the bay, which displays some structural detail and allows the
positioning of either one or two bombs, or a torpedo. The kit also supplies two
reasonably detailed engine options (Homare or Kasei), plus various armament
choices and additional details such as ASV and air interception aerial arrays.
While the latter are way over-scale and can’t really be used, this remains a
problem for many current kits so one can’t blame Revell for not trying their
best back in 1970!
Overall, the kit parts and decal options allow you to build no less than 8 different machines, including the P1Y1 prototype, five Gingas in service, two P1Y2-S night fighters and a P1Y2 bomber. The 6-page quarto instructions are very clear about the assembly sequences and options. The decal sheet delivers the requisite Hinomaru and a host of serials, although naturally no stencils. My only real beef with the instructions was that they did not show the option I wanted to build, although the serial is on the decal sheet and the aircraft is illustrated (albeit incorrectly) on the box top.
| CONSTRUCTION |
This has to be one of the best engineered models I have ever built, period. I think that is saying something for a kit produced nearly 40 years ago, and I hope it will convince some folks to climb their rickety attic ladder and dust off this old Revell gem. The wing slots ensure the correct dihedral, the tailplanes slide in absolutely perpendicular to the fin, the engine and cowling assemblies practically click together and the clear parts all fit perfectly into their allotted space.
After fondling the plastic after my eBay win, I decided that
this was going to be a 100% out of the box build, something I like to do
 from
time to time. The key to doing this successfully, I think, is to start with a
decent kit, and this P1Y1 certainly fit the bill. And while I’m normally a “sand
‘em off and rescribe the lot” sort of modeller, in this case I boldly decided to
leave the raised detail intact so as not to spoil the hassle-free feeling of a
genuine out-of-box experience.
from
time to time. The key to doing this successfully, I think, is to start with a
decent kit, and this P1Y1 certainly fit the bill. And while I’m normally a “sand
‘em off and rescribe the lot” sort of modeller, in this case I boldly decided to
leave the raised detail intact so as not to spoil the hassle-free feeling of a
genuine out-of-box experience.
For these reasons, I won’t bore readers with a blow-by-blow
assembly tale. Rather, there were only a few aspects that I think are worth
discussing. The two slightly tricky fit problems I found were on the upper wing
roots, whic h required some
filler to avoid a slight step, and the bomb-bay doors, which took some fiddling
and slicing before they would sit flush with the fuselage. Neither of these
issues couldn’t be overcome with a bit of care and patience. The only difficulty
is that the raised detail lost on sanding the join lines has to be replaced with
engraved rivet detail, but this discrepancy isn’t too apparent on the finished
model.
h required some
filler to avoid a slight step, and the bomb-bay doors, which took some fiddling
and slicing before they would sit flush with the fuselage. Neither of these
issues couldn’t be overcome with a bit of care and patience. The only difficulty
is that the raised detail lost on sanding the join lines has to be replaced with
engraved rivet detail, but this discrepancy isn’t too apparent on the finished
model.
The kit instructions would have you insert the landing gear legs into their solidly engineered slots before attaching the nacelles to the wings; we all know that this is a recipe for disaster. Looking at the inside of the nacelle pieces, I realised that if I carefully removed about 90 degrees from the round slot near the wing join, I would be able to wait until assembly was finished before inserting the undercarriage leg into the opposite elongated slot, then clicking the remaining peg into the modified round slot. This may not make sense unless you have the kit in front of you, but it did work! Finally, while the kit is nicely engineered it was constrained by the moulding technology of its day, meaning I had to fill and remove ejector pin marks from the landing gear doors, sand the aerial and cannon down to a more scale thickness, and generally avoid the options like ASV radar that could not be fixed in the out-of-box setting. This is what led me to the particular aircraft I modelled, as it carried no external fuel tanks, no radar, only one cannon; I also reluctantly shut the bomb-bay doors as the kit’s ordnance was somewhat crude.
| COLORS & MARKINGS |
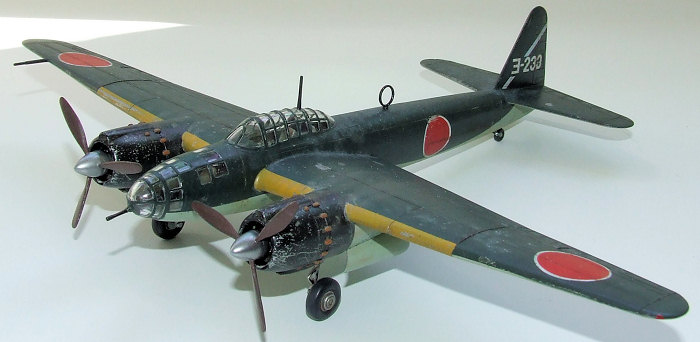
Based on pictures of the stored P1Y1 at Garber, I ended up painting the cockpit a variation on Aeromaster’s British interior grey-green. After assembly, I sprayed the wheel wells in Gunze’s Aotake colour, then closed them up and masked the clear parts with Tamiya tape. The whole airframe was then sprayed in Tamiya gloss black, in preparation for an Alclad duralumin coat, which was duly applied. After this had dried, I then set out on an experiment in salt weathering.
 Following the lead of other modellers, I sprayed my Ginga
with a mist of water and then sprinkled it with a mixture of flaked and powdered
salt. This was repeated a few times to get the distribution about right, and
also because the salt has only a slight hold on the surface and tends to crumble
off at the merest touch. Once I had an approximately correct distribution (being
careful not to include any on the fabric-covered control surfaces), I began
painting the aircraft. This included Gunze orange-yellow for the inner leading
edge identification bands and Gunze white for the Hinomaru and tail stripe. I
chose to paint the markings because I was concerned about how Revell’s ancient
decals would hold up, and I wanted to keep this kit out of the box. Therefore my
next step was to mask off the white outers and spray a custom-mixed red, after
which all of the national markings were masked again using Eduard’s very handy
Hinomaru templates. This was followed with Tamiya IJN grey for the undersurfaces,
their IJN green for the uppers, and finally a custom mixed blue-black for the
cowlings. These colours were generally post-faded with a lightened mix of the
relevant shade to give a fairly hard-worn appearance.
Following the lead of other modellers, I sprayed my Ginga
with a mist of water and then sprinkled it with a mixture of flaked and powdered
salt. This was repeated a few times to get the distribution about right, and
also because the salt has only a slight hold on the surface and tends to crumble
off at the merest touch. Once I had an approximately correct distribution (being
careful not to include any on the fabric-covered control surfaces), I began
painting the aircraft. This included Gunze orange-yellow for the inner leading
edge identification bands and Gunze white for the Hinomaru and tail stripe. I
chose to paint the markings because I was concerned about how Revell’s ancient
decals would hold up, and I wanted to keep this kit out of the box. Therefore my
next step was to mask off the white outers and spray a custom-mixed red, after
which all of the national markings were masked again using Eduard’s very handy
Hinomaru templates. This was followed with Tamiya IJN grey for the undersurfaces,
their IJN green for the uppers, and finally a custom mixed blue-black for the
cowlings. These colours were generally post-faded with a lightened mix of the
relevant shade to give a fairly hard-worn appearance.
 Because I had used acrylic (i.e. water-based) paints, I
found that these actually dissolved some of the salt, leading to many
discoloured dots in the paint finish. At first I was going to strip the kit and
start again, but when I started rubbing the paint back with a plastic pot
scourer I actually found that I didn’t mind the effect so much. In fact, once it
was coupled with the exposed ‘metal’, faded panels and – later – the pastel
weathering, I found that it all seemed to come together well, albeit as a
completely over-the-top weathering package. Some Gingas really did go through
the wringer toward the end of the war, but I still think my finish is too
extreme. However, as an experiment in technique, it was interesting; I’m still
deciding whether I’ll use the salt method again. As a final step, I
brush-painted Future on the fin and applied the kit’s serial decal – it worked
well and even coped with setting solution, just confirming what a nice package
this long-forgotten Revell kit really is!
Because I had used acrylic (i.e. water-based) paints, I
found that these actually dissolved some of the salt, leading to many
discoloured dots in the paint finish. At first I was going to strip the kit and
start again, but when I started rubbing the paint back with a plastic pot
scourer I actually found that I didn’t mind the effect so much. In fact, once it
was coupled with the exposed ‘metal’, faded panels and – later – the pastel
weathering, I found that it all seemed to come together well, albeit as a
completely over-the-top weathering package. Some Gingas really did go through
the wringer toward the end of the war, but I still think my finish is too
extreme. However, as an experiment in technique, it was interesting; I’m still
deciding whether I’ll use the salt method again. As a final step, I
brush-painted Future on the fin and applied the kit’s serial decal – it worked
well and even coped with setting solution, just confirming what a nice package
this long-forgotten Revell kit really is!
| CONCLUSIONS |
This model was meant to be a break from my typical Allied projects, and from my usual mucking around with engraved detail, vacform canopies and photoetch doo-dads. I wasn’t prepared for it to be such a delightful build, but it really was a great option for an out-of-box model. In fact, there are few details that I would want to add: the extensive canopy framing means that the kit’s interior is quite adequate, apart from a lack of seat harnesses. While several other Revell kits of this era are equally nice (their A-20 comes to mind), this model really was a delight, resulting in a fun build with an accurate outline. And you know, I’m really quite warming to the raised rivets …
| REFERENCES |
Japanese Aircraft, Ships & Historical Research (www.j-aircraft.com)
WWII Japanese Aircraft Photos (www.ijnafphotos.com)
January 2008
Copyright ModelingMadness.com
If you would like your product reviewed fairly and fairly quickly, please contact the editor or see other details in the Note to Contributors.