Hasegawa 1/48 J2M3 Raiden 'Prisoner of War'
| KIT #: | 52105 (SP 305) |
| PRICE: | 2240 yen |
| DECALS: | Two options |
| REVIEWER: | Andrew Garcia |
| NOTES: | Aires 484538 Resin Cockpit, Eduard FE117 Etched |
| HISTORY |
Per the Hasegawa folks: “Feeling the need for a high-speed, quick climbing interceptor work began in 1938 on what was to become the Raiden (Thunderbolt). Total production of all variants totaled approximately 500 by war’s end. In service, the Raiden, code named “Jack” by the allies –proved a fine aircraft and it was the preferred bomber-destroyer of IJN pilots late in the war, where it frequently faced incoming U.S. B-29’s with some success.” But, “many advocated the faster Shiden (George) in the interceptor role.”
| THE KIT |
First
released in February of 1996 (as Hasegawa 9145 JT45 J2M3 Type 21) the kit is
similar to the many Japanese WWII kits released by Hasegawa. Excellent surface
detail, good tight fit, clear and easy assembly with decals for the instrument
panels gives you a great cockpit out-of-the-box (OOB) build. The
 cockpit is
excellent and when compared to the superb Aires resin cockpit it stands up well
in a comparison. The Aries resin has finer details, some additional details
provided in etched metal including a very fine instrument panel but overall the
OOB cockpit Hasegawa provided is very nice when properly painted (see comparison
photo).
cockpit is
excellent and when compared to the superb Aires resin cockpit it stands up well
in a comparison. The Aries resin has finer details, some additional details
provided in etched metal including a very fine instrument panel but overall the
OOB cockpit Hasegawa provided is very nice when properly painted (see comparison
photo).
Hasegawa has re-boxed it many times and kits number 09145, 09199, 09667, 09890, 09977, and 52105 are identical and build the J2M3 with either narrow or wider chord bladed prop. Kit number 09146 only builds the rare J2M6 with cutback forward fuselage top. Kit number 09196 only builds the less common J2M5 with cutback forward fuselage top and different carb intake. Kit # 09248 is similar but includes oblique wing root cannon of a night fighter conversion adding component UB1, a turned brass part for the oblique wing root cannon barrel. Although a 30mm wing cannon is found as part #3 on the “K” tree it is never pointed out. Markings for the 30mm gun version is found in kit # 09196 JT136 J2M5 Type 33. A web photo search will show some photos of the 30mm gunned aircraft.
This kit, number 52105 (SP305) is a “special” release from Hasegawa probably reflecting the unusual nature of the subject of the kit decals since there are no additional resin or white metal parts that usually accompany a Hasegawa “special release”. This latest incarnation of the Raiden family features two very unique subjects whose decals represent two captured aircraft. There have been about nine releases of new mould Raiden kits by Hasegawa. Notably, one of them, kit number 09248, Jt 148, had a single, very small brass 20mm gun barrel, part number UB1, but was not marked as a “special release”.
Hasegawa is the master of kit re-boxing and for most releases it is just a new
set of decals and no new plastic. This is one of those as it appears with no new
parts or resin enhancements that sometimes accompany
 Hasegawa “Special Issue”
kits. I have come to appreciate their superb package which includes nice decals,
instructions, etc. with the required research to enable me to correctly portray
some unique aircraft. This release contains the normal highly detailed hard
plastic Hasegawa trees from previous releases. The primary component of this
release is the decal with some unique markings representing Allied, USAAF and
RAF, captured Raiden’s. Unlike some recent releases featuring flat paint this
one is thinly printed and has a gloss coat and is printed by Cartograph so you
know it will be perfect. Since Hasegawa does good research on its Japanese
subjects, the gloss decals represent the actual markings on the depicted
airframes.
Hasegawa “Special Issue”
kits. I have come to appreciate their superb package which includes nice decals,
instructions, etc. with the required research to enable me to correctly portray
some unique aircraft. This release contains the normal highly detailed hard
plastic Hasegawa trees from previous releases. The primary component of this
release is the decal with some unique markings representing Allied, USAAF and
RAF, captured Raiden’s. Unlike some recent releases featuring flat paint this
one is thinly printed and has a gloss coat and is printed by Cartograph so you
know it will be perfect. Since Hasegawa does good research on its Japanese
subjects, the gloss decals represent the actual markings on the depicted
airframes.
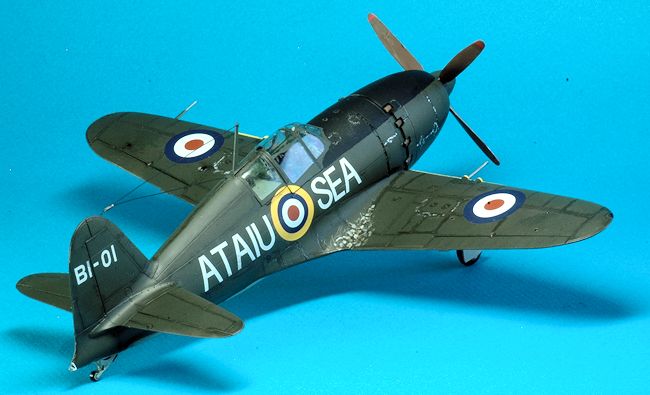
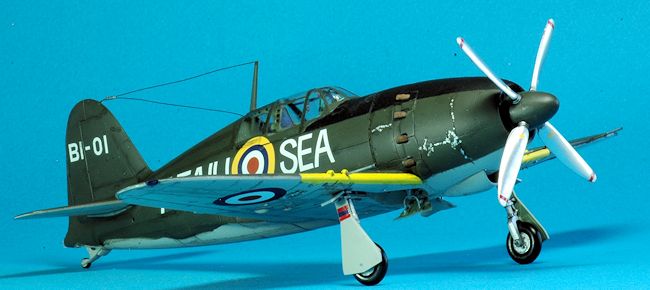
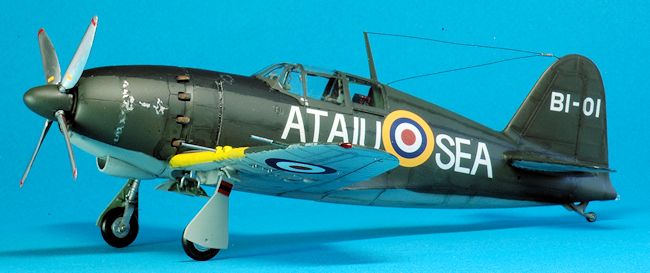
This release, Kit # 52105 SP305, features two aircraft. The first option is a J2M3 Model 21 captured in Malaya by the U.K. and used by the ATAIU-SEA (Allied Technical Air Intelligence Unit – Southeast Asia) in 1945. Its previous owner was the 381st Kokutai featuring paint and markings from its original owners. These Raiden’s of the 381 Kokutai were captured in British Malaya and were flown by Japanese naval aviators under the close supervision of RAF officers from Seletar Airfield in December 1945-1946. The RAF staff was from the Allied Technical Air intelligence Unit, South East Asia hence the markings on the airframe "ATAIU - SEA".
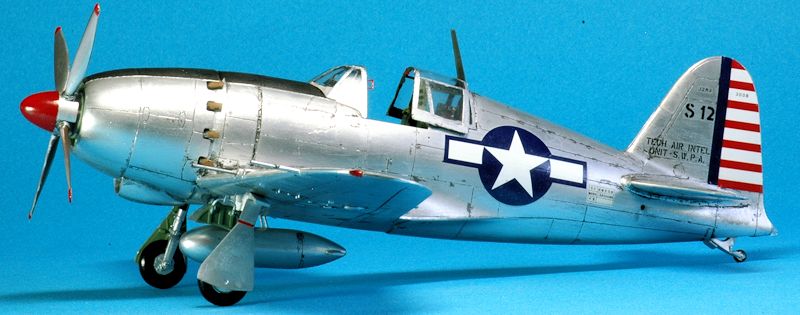
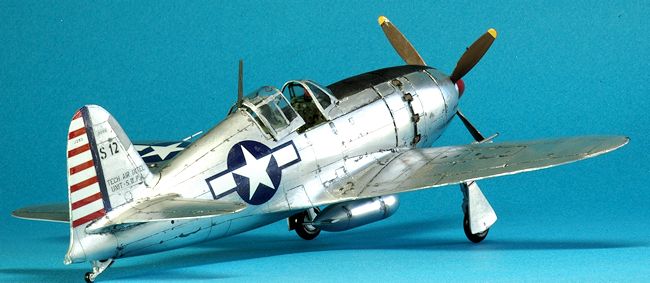
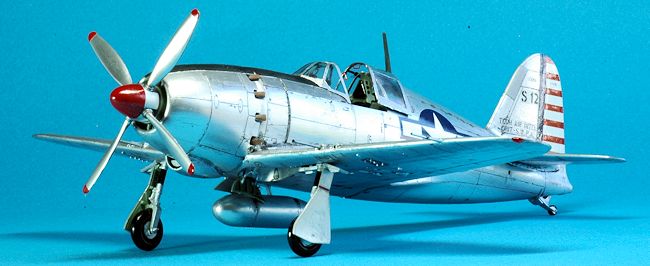
The second marking option is a J2M3 Model 21, serial number 3008, captured in the Philippines by the U.S. and stripped down to a natural metal finish before the stars and bars were applied. It was used by the TAIU - S.W.P. (Technical Air Intelligence Unit – Southwest Pacific) in June 1945 with tail code “S12”. This J2M3 was captured on the emergency airstrip at Dewey Boulevard, Manila, Philippine Islands. It was designated TAIC-SWPA # S12, and flown at Clark Field in Manila. The aircraft had a unique finish featuring a natural metal finish with pre-war USAAF rudder stripes and a red painted nose spinner to good visual affect. Unfortunately, the engine of this aircraft seized on its second flight and that stopped the technical evaluation.
 Two
captured J2M's were TAIC tested using 92 octane fuel with some methanol added.
In this configuration the J2M2 achieved a 407 mph speed in level flight at 17,
400 feet of altitude. A J2M3 version achieved 417 mph at 16, 600 feet. There
were four Raiden’s shipped to the USA for evaluation. The J2M5, USAAF FE-318 and
FE-319 were scrapped at Middletown in 1946. The J2M3, # FE-320 was scrapped at
Park Ridge in 1950 and FE-321 was scrapped in Middletown in 1946.
Two
captured J2M's were TAIC tested using 92 octane fuel with some methanol added.
In this configuration the J2M2 achieved a 407 mph speed in level flight at 17,
400 feet of altitude. A J2M3 version achieved 417 mph at 16, 600 feet. There
were four Raiden’s shipped to the USA for evaluation. The J2M5, USAAF FE-318 and
FE-319 were scrapped at Middletown in 1946. The J2M3, # FE-320 was scrapped at
Park Ridge in 1950 and FE-321 was scrapped in Middletown in 1946.
I bought two of these kits when they were released knowing I wanted to build both the USAAF and the RAF captured aircraft. I am pleased I did this!
| CONSTRUCTION |
This is a very easy to build kit with no vices or problems including the typical Hasegawa bad wing to fuselage fit. The wing to fuselage fit was perfect. I only used a bit of filler along the wing leading edge. After building five of these kits I recommend deviating in just a few places. The first step I would suggest should be to glue those parts that can be overlooked in the instructions and are very hard to place after the fact.
There
are three items you may want to glue in place before you follow the kit
instructions. From step #10 – glue part G15 which is the support bar for the
bullet proof cockpit glass onto part C1 which is an upper cowl part designed to
avoid a seam across the center. From Step # 2 glue part K4 the horizontal stab
onto its fuselage half A1 or A2. A1 or A2 should be laying on its side. By doing
this you can easily get a 90 degree join on the tail surface, part K4, to
fuselage connection avoiding any droop that usually occurs while the glue is
setting. Leave it in this position until the glue dries and is firm. The last
suggested deviation from kit instructions is from step #3 where I recommend you
glue part G2 onto the main wing
 part J6. I glued on the horizontal stabilizers
as one of my initial steps while the painted cockpit parts were drying. I found
by placing the kit fuselage half on its side I could get a perfect alignment of
the horizontal tail. Once this dried and it was time to put the two fuselage
halves together I had a perfectly positioned horizontal tail which is one of my
usual concerns when building a kit.
part J6. I glued on the horizontal stabilizers
as one of my initial steps while the painted cockpit parts were drying. I found
by placing the kit fuselage half on its side I could get a perfect alignment of
the horizontal tail. Once this dried and it was time to put the two fuselage
halves together I had a perfectly positioned horizontal tail which is one of my
usual concerns when building a kit.
There are some Hasegawa Raiden releases for a Night Fighter version that contain a small turned brass 20mm gun barrel that goes into the left side below the cockpit floor. Cut out the access hole and glue on part UB1 (UB1 is a turned brass part, which is the oblique wing root cannon barrel) before closing the fuselage halves. Be careful it does not interfere with the cockpit floor when you fix it in place. It is easy to overlook this part and very hard to correctly retrofit it if done during the final construction phase.
I chose to model the USAAF version with an open cockpit since this one had the Aires resin & etched metal cockpit. I have the Squadron vac-form canopy but felt it is far easier to attach the Hasegawa kit clear plastic canopy parts. I cut the canopy apart using a scriber with the final cut using an etched metal hobby knife saw. The kit plastic canopy is far more ridged after they are cut than a vac-form. The kit canopy is also thin and very clear so I took that option for this build. Hasegawa should provide it in an open option as well.
I
followed the kit instructions after doing the above deviations from the plan and
everything fell into
 place. I would suggest you take a look at the area where
the upper and lower part of the wing joins to the fuselage. On every kit (of the
5 I built) there is a tendency for the wing to separate and have a small gap at
this location. It is the area where the “step” decal would go. I used a very
strong metal clip to hold the part together while the glue was setting and it
worked eliminating the gap that appeared in my first build which required putty
and sanding.
place. I would suggest you take a look at the area where
the upper and lower part of the wing joins to the fuselage. On every kit (of the
5 I built) there is a tendency for the wing to separate and have a small gap at
this location. It is the area where the “step” decal would go. I used a very
strong metal clip to hold the part together while the glue was setting and it
worked eliminating the gap that appeared in my first build which required putty
and sanding.
The Aires resin cockpit is a kit by itself. I washed and brushed it gently with a large, soft, modeling paint brush to remove the mould release agent. This problem often shows up in resin parts as a spot that won’t take any paint adherence and ruins the finish. I air brushed the resin parts while they were on the pouring blocks and completed the smaller detail painting before assembling the parts. The Aires resin mimic the kit plastic parts in terms of assembly which is simple and the fit was perfect. The floor had a slight warp but it was not noticeable once I glued it into the kit fuselage. I did not have to do any additional cutting or sanding of the kit plastic parts or Aires resin to complete the fit of the cockpit.
| COLORS & MARKINGS |
I used
AK Interactive AK458 True Metal silver wax paste as the overall NMF finish on
the USAAF version. It was easy to use and adhered well. There is a You Tube “How
to Apply” video that I used to get started with this new to me NMF. The results
made me very pleased. I also polished it out with some SNJ aluminum powder. I
used the AK paste because I usually have areas of metallic paint wear through
due to 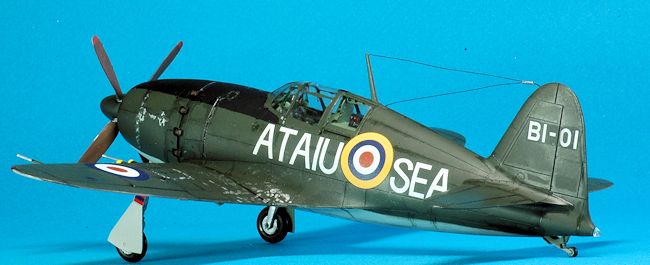 handling during post painting final steps. I found this to be a more
durable finish. I anticipate using it in combination with Alclad or Testors
Metalizer in the future. I did not use any clear coat on the NMF painted
airframe.
handling during post painting final steps. I found this to be a more
durable finish. I anticipate using it in combination with Alclad or Testors
Metalizer in the future. I did not use any clear coat on the NMF painted
airframe.
All interior parts were painted with Tamiya XF-71 Cockpit Green. The RAF version exterior was painted with Tamiya XF-61 Dark Green on the topside. The underside was painted with Gunze H61 IJN Gray. A black panel wash was applied to both aircraft. The RAF version has some aluminum chipping applied with a brush and a Prismacolor PC949 metallic silver pencil. I trimmed the front canopy window armor edge, the clear glass plate part N3, with Tamiya clear green. It had the same appearance as bullet proof glass would once edged with transparent green. Once decals were applied I finished the RAF version with Testors Dullcote # 1160 but used no cover coat on the NMF version.
The kit decals were used. I have looked forward to making models depicting the two captured Raiden’s for some time. I purchased the Rising Decal “Dying Sun” a three part series depicting captured Japanese aircraft as well as Max Models Decals Parts I, II and III in order to build these types of airframes. Max Models Decals with its similar series also called “Dying Sun” is a more recent release. Max Models Decals, MM48-0101, Part 2, has five captured aircraft, two of them are the ones represented by Hasegawa in this release. Hasegawa’s #52105/SP305 release decals were so good I did not wish to use the aftermarket decals from my stash.
 The
Hasegawa kit decals are printed by Cartograph. They were outstanding. They were
easy to apply and have opaque colors. They are thin and conform to all panel
lines. I used Micro Sol to ensure they would look painted on and they did once
they dried. Even the clear carrier film did not need an undercoating of a gloss
finish. I applied them directly to the paint and once the Testors Dullcote
finish went on the carrier film disappeared. The decal stencils were clear and
very readable. One of them shows airframe number 3008 is used. When I looked at
the clear USAAF photo of the aircraft it shows the stencil as “JJW3”. I have no
answer for this discrepancy at this time. I think Zouki-mura got this correctly
as “JJW3” is used in their book and on their kit decal. It is possible both
appeared at different times.
The
Hasegawa kit decals are printed by Cartograph. They were outstanding. They were
easy to apply and have opaque colors. They are thin and conform to all panel
lines. I used Micro Sol to ensure they would look painted on and they did once
they dried. Even the clear carrier film did not need an undercoating of a gloss
finish. I applied them directly to the paint and once the Testors Dullcote
finish went on the carrier film disappeared. The decal stencils were clear and
very readable. One of them shows airframe number 3008 is used. When I looked at
the clear USAAF photo of the aircraft it shows the stencil as “JJW3”. I have no
answer for this discrepancy at this time. I think Zouki-mura got this correctly
as “JJW3” is used in their book and on their kit decal. It is possible both
appeared at different times.
| FINAL CONSTRUCTION |
I prefer to use E-Z-line for my antennas. But, for this build I had to use some nylon Dai-riki fishing line since I needed some firmness in the material and E-Z-line is not firm. I made a very small spring by wrapping wire around a tiny drill bit. I ran two of the antenna wires into the tail through the spring and connected the other end to the fuselage and top of antenna mast on the RAF version. The USAAF version does not appear to have any antenna wires visible in the very clear series of photos taken during its evaluation.
I used
Eduard 49-004 Seatbelts IJN (pre-painted color etch) rather than the Aires or
Eduard unpainted FE117 Zoom seat belts in order to get the better definition on
the belts such as the stitching and silver
 grommets which are very visible on
Japanese seatbelts and so very hard to paint. They added a lot to the cockpit
appearance.
grommets which are very visible on
Japanese seatbelts and so very hard to paint. They added a lot to the cockpit
appearance.
The Hasegawa kit decals for the instrument dials required a dull wash around the instrument faces as well. The whole decal sheet has a gloss coating but that does not look good for the area around the dials. I tried to keep the raised dials glossy while making the areas around them a flat cockpit color. I used Micro Sol solution before and after applying the kit instrument dial decal so they would conform to their dial apertures. Using individually punched out instrument decals would be a good alternative allowing the use of a flat cockpit interior color for the instrument panel as seen in the reference photos.
I used a Gunze H4 yellow for the leading edge wing ID stripe. I would have preferred using a more golden yellow for this area. I should have used Gunze C58/H24 orange yellow for this area to get a darker yellow.
| CONCLUSIONS |
Overall
this is another very nice release for anyone who likes the J2M Raiden. There are
several components that make the kit “pop”. Examples such as the front window
armor clear glass plate, keyed wheels for a stronger join and perfect alignment,
the clear taillight cone part N5, and overall superlative fit, with an accurate
shape make it a delightful build. The clear part # N5 for the tail light dome is
also a 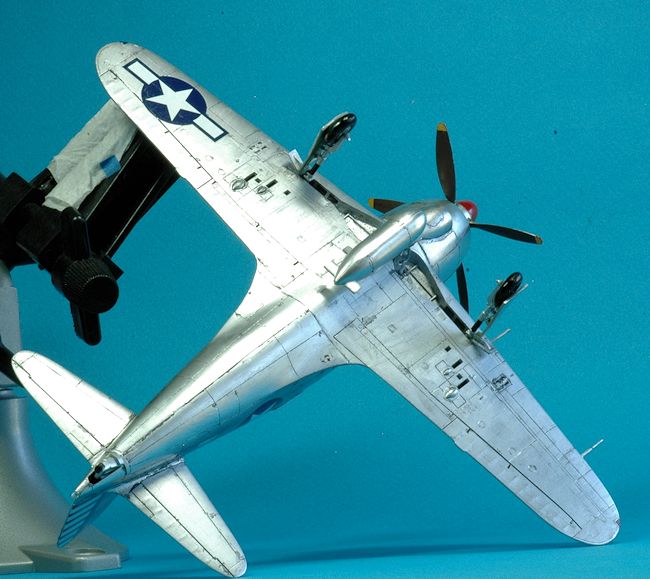 very nice touch. I really like the unique markings which had previously
only been available on a random basis in aftermarket decals. Those decals were
usually hard to find. I think the combination of the United Kingdom and United
States markings is a superb touch and I bought and built two of these kits as a
result.
very nice touch. I really like the unique markings which had previously
only been available on a random basis in aftermarket decals. Those decals were
usually hard to find. I think the combination of the United Kingdom and United
States markings is a superb touch and I bought and built two of these kits as a
result.
There are a few minor concerns with this kit. It has a one piece canopy. It should offer a choice of open and closed canopies. The instructions did not include use of decals 17, 18 and 27 which are found on the decal sheet. The # 17 & 18 decals are probably for the landing gear covers to indicate oleo compression as a rough measure of aircraft weight. I could not find where decal # 27, a small black rectangle went. The kit instructions note “r,u,ia,j decals not used”. There are no alpha character call-outs on the decal sheet, just numbers, so it looks like a left-over error from reuse of the previous kit instructions and decals. The two small clear wing light parts are better than just a scribed area approach but do not fit as well as the rest of the airframe parts.
The instructions call out color H35
or C61 as a Green (Mitsubishi) color. It is incorrect and should read as “H61
IJN Gray”. While the decal is outstanding it has two small flaws. The decals
should have the tail stencil “JJW3” and a large black stencil “Step” to show
where the pilot boarding walking and maintenance personnel should walk on the
wing. While I give high marks to the Hasegawa kit it appears a comparison to the
actual aircraft shows the rear sheet metal overlaps rather than having the
butt-joined connection appearing in the Hasegawa kit plastic. “The surface of
the rear fuselage section was made of
 a succession of overlapping panels. The
joints between the panels are not smooth, and like a tile roof, they build up
from the bottom to the top.” Zoukei-mura explains this in their superb reference
text with photos and an illustration (see Zoukei-mura SWS Concept Note No. VI,
page 35 photo 07). There is a small teardrop shape on the top fuselage edge
behind the antenna mast (see ZM pages 52, 53). This looks like the area the
antenna wires would connect to and then run into the radio compartment. It is
missing on the kit plastic. Overall it was a delightful kit to build so these
are just observations for rivet counters and you can overcome them with some
additional effort.
a succession of overlapping panels. The
joints between the panels are not smooth, and like a tile roof, they build up
from the bottom to the top.” Zoukei-mura explains this in their superb reference
text with photos and an illustration (see Zoukei-mura SWS Concept Note No. VI,
page 35 photo 07). There is a small teardrop shape on the top fuselage edge
behind the antenna mast (see ZM pages 52, 53). This looks like the area the
antenna wires would connect to and then run into the radio compartment. It is
missing on the kit plastic. Overall it was a delightful kit to build so these
are just observations for rivet counters and you can overcome them with some
additional effort.
| REFERENCES |
Koku-Fan FAOW # 61 Nov. 1996 Navy Interceptor "Raiden"
Model Art Profile #11 Mitsubishi J2M Raiden
Zoukei Mura Concept Note SWS No. VI J2M3 Raiden
Gakken No. 29 J2M3 Raiden
Maru Mechanic #43 1983/11 J2M3 Raiden
Maru Mechanic #7 1977/11 J2M3 Raiden
Koku-Fan Illustrated No.1 Imperial Japanese Navy Aircraft
August 2015
If you would like your product reviewed fairly and fairly quickly, please contact the editor or see other details in the Note to Contributors.