F-Toys 1/72 A6M2 Model 21
| KIT #: | Vol 6 |
| PRICE: | $10.00 'used' |
| DECALS: | Three options |
| REVIEWER: | George Schembri |
| NOTES: |
| HISTORY |
The Mitsubishi A6M entered service in the Japanese Imperial Year of 2600 (or 1940) and was thus was designated Mitsubishi Navy Type “0” due to the last digit of it’s year of entering service. Pilots usually referred to the aircraft as the Rei-sen, which meant ‘Zero Fighter’. Given the Allied code name ‘Zeke’, it was more commonly referred to as simply the ‘Zero’.
Addition historical info can be found on other posting on Modeling Madness, Tom Cleavers posts give much appreciated details on the aircraft development and service history.
| THE KIT |
 This ‘F-Toys
Connect’ kit version is identified as ‘Full Action Type 0 Model 21’ Part.2 Vol.6
Limited Edition and was issued in 2020, but the kit was originally released in
2017 with kit ID# FC-100. It’s labeled as a ‘Full Action Kit’ with poseable
control surfaces, removable cowling and gun cover, siding canopy and poseable
landing gear/arrestor hook as well as exposed wing canon bays – all in 1/72nd
scale. The kit has 55 pieces in total and comes pre-painted with a IJN
Green/Grey scheme including a black cowling and yellow ID leading edges on the
wings. Provided decals are for aircraft in the 253rd,
263rd and 281st
Air Groups along with insignia and seatbelts with minimal stencilling detail.
The base plastic is a light green colour, is of good quality and is a bit firm
but is still easy to cut and trim. There is the slightest bit of flash
throughout the molding with the finer parts needing some cleaning up prior to
assembly. As stated, the model is pre-painted including finer optic details such
as navigation lighting and fuel caps and canopy components. Instructions are on
a single side of the 6x8 inch sheet and all notes are in Japanese, but all parts
are properly identified and assembly is accurately shown. The opposite side of
the sheet shows decals placement and part number identification. There is a
website identified which provided generic comments of tools required and
precautions during assembly.
This ‘F-Toys
Connect’ kit version is identified as ‘Full Action Type 0 Model 21’ Part.2 Vol.6
Limited Edition and was issued in 2020, but the kit was originally released in
2017 with kit ID# FC-100. It’s labeled as a ‘Full Action Kit’ with poseable
control surfaces, removable cowling and gun cover, siding canopy and poseable
landing gear/arrestor hook as well as exposed wing canon bays – all in 1/72nd
scale. The kit has 55 pieces in total and comes pre-painted with a IJN
Green/Grey scheme including a black cowling and yellow ID leading edges on the
wings. Provided decals are for aircraft in the 253rd,
263rd and 281st
Air Groups along with insignia and seatbelts with minimal stencilling detail.
The base plastic is a light green colour, is of good quality and is a bit firm
but is still easy to cut and trim. There is the slightest bit of flash
throughout the molding with the finer parts needing some cleaning up prior to
assembly. As stated, the model is pre-painted including finer optic details such
as navigation lighting and fuel caps and canopy components. Instructions are on
a single side of the 6x8 inch sheet and all notes are in Japanese, but all parts
are properly identified and assembly is accurately shown. The opposite side of
the sheet shows decals placement and part number identification. There is a
website identified which provided generic comments of tools required and
precautions during assembly.
| CONSTRUCTION |
 The
pre-painted model can be assembled as received, but in order to get proper
engine compartment and cockpit colours and to cover up any flash removal, some
additional painting will be needed prior to assembly. The instructions are very
small in size, but steps are straightforward and diagrams have excellent detail.
Starting with the engine and cockpit, there are no less than 17 components in
this first step. One must take care cutting away the engine brace assembly
components and cleaning them up prior to assembly. Several test fits ensured
proper alignment, the word that comes to mind is ‘precise placement’ as all 17
components need to fit into the forward fuselage area with exact fitting
required or else you’ll end up with a misaligned engine or the fuselage won’t
close up properly. When all parts are together, everything fits like a glove
with impressive fit. The kit does have a ‘snap-tight’ feel but components can be
carefully separated if needed and gluing is required to hold things properly
together. For the fuselage, I found that no putty is required but top and bottom
seams on the fuselage do need a bit of sanding and this does remove some of the
paint scheme. Wing assembly comes next, with landing gear and wing cannons
placed prior to putting the upper and lower halves loosely together. The folding
wing tips – characteristic of the Model 21 – are put in place prior to final
glueing. Wheel bays and cannon bays
The
pre-painted model can be assembled as received, but in order to get proper
engine compartment and cockpit colours and to cover up any flash removal, some
additional painting will be needed prior to assembly. The instructions are very
small in size, but steps are straightforward and diagrams have excellent detail.
Starting with the engine and cockpit, there are no less than 17 components in
this first step. One must take care cutting away the engine brace assembly
components and cleaning them up prior to assembly. Several test fits ensured
proper alignment, the word that comes to mind is ‘precise placement’ as all 17
components need to fit into the forward fuselage area with exact fitting
required or else you’ll end up with a misaligned engine or the fuselage won’t
close up properly. When all parts are together, everything fits like a glove
with impressive fit. The kit does have a ‘snap-tight’ feel but components can be
carefully separated if needed and gluing is required to hold things properly
together. For the fuselage, I found that no putty is required but top and bottom
seams on the fuselage do need a bit of sanding and this does remove some of the
paint scheme. Wing assembly comes next, with landing gear and wing cannons
placed prior to putting the upper and lower halves loosely together. The folding
wing tips – characteristic of the Model 21 – are put in place prior to final
glueing. Wheel bays and cannon bays
 do require
painting prior to assembly. I had a bit of a gap on the leading edges of the
wings and tried some gentle persuasion with a trigger clamp but gave up when I
realized the gap will not close up totally. There was a hairline crack and a few
applications of Tamiya liquid cement closed up the gap enough that putty was not
required. The fit of the cannon bay covers are impressive and are very tight, I
did loosen up the fit with some very light sanding and did use tiny pieces of
sticky tack to check them in place. The wings and fuselage joint fitted very
well, with no putty required. The stabilizers do come in upper and lower halves
just like the wing, and there is a bit of a wide seam on the underside of the
stabilizer but I chose not to use any putty as the seam will be out of sight.
When placing the poseable control surfaces, all components lightly ‘snapped’
into place and are impressively snug when seated properly. The engine cowling
received with my kit and a little bit of excess plastic on its side, thus it had
to be lightly sanded to get the rough edges cleaned up. This meant the cowling
had to be painted to cover up the now bare plastic edges. The upper gun cover
and cowling does fit snuggly in place and with a little pressure, they both fit
with minimal gaps, again an impressive fit.
do require
painting prior to assembly. I had a bit of a gap on the leading edges of the
wings and tried some gentle persuasion with a trigger clamp but gave up when I
realized the gap will not close up totally. There was a hairline crack and a few
applications of Tamiya liquid cement closed up the gap enough that putty was not
required. The fit of the cannon bay covers are impressive and are very tight, I
did loosen up the fit with some very light sanding and did use tiny pieces of
sticky tack to check them in place. The wings and fuselage joint fitted very
well, with no putty required. The stabilizers do come in upper and lower halves
just like the wing, and there is a bit of a wide seam on the underside of the
stabilizer but I chose not to use any putty as the seam will be out of sight.
When placing the poseable control surfaces, all components lightly ‘snapped’
into place and are impressively snug when seated properly. The engine cowling
received with my kit and a little bit of excess plastic on its side, thus it had
to be lightly sanded to get the rough edges cleaned up. This meant the cowling
had to be painted to cover up the now bare plastic edges. The upper gun cover
and cowling does fit snuggly in place and with a little pressure, they both fit
with minimal gaps, again an impressive fit.
| COLORS & MARKINGS |
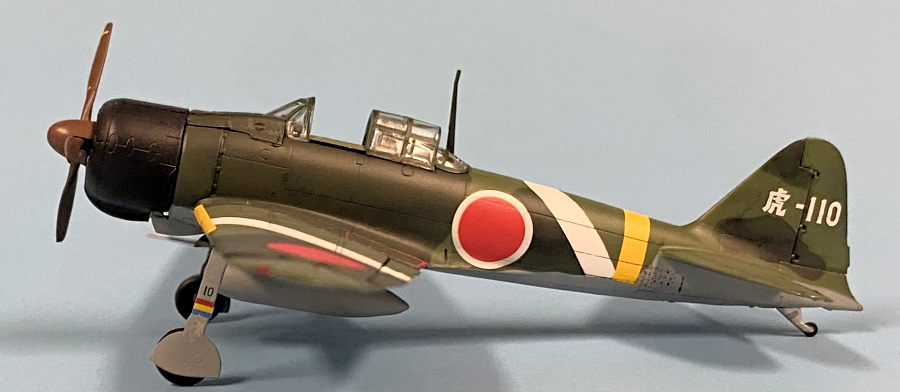
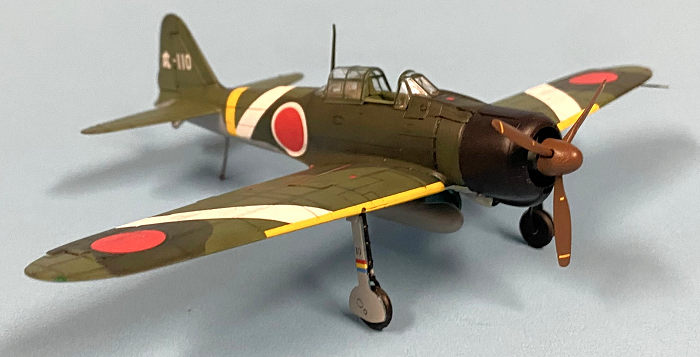
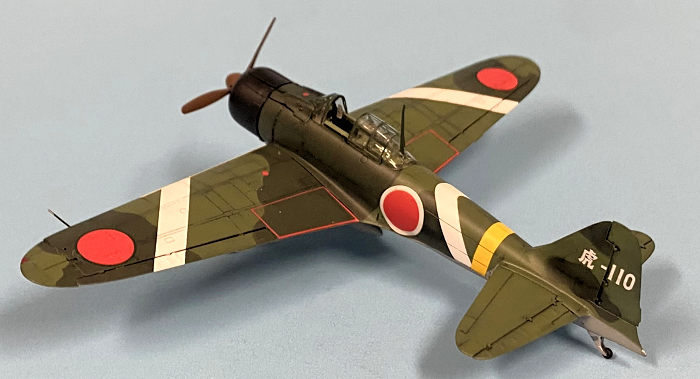
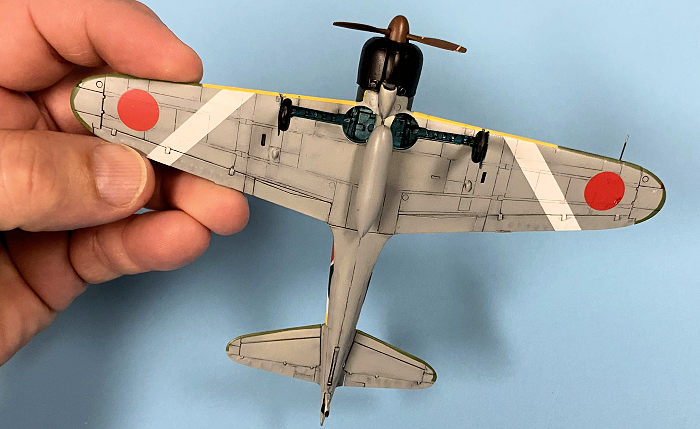
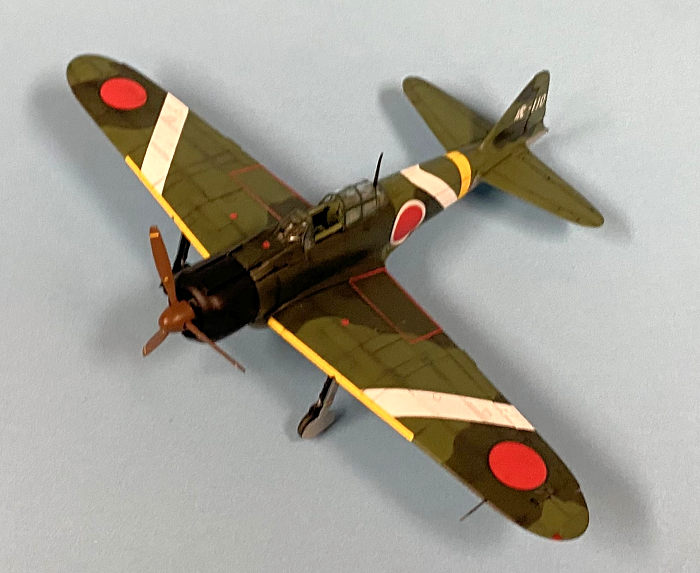
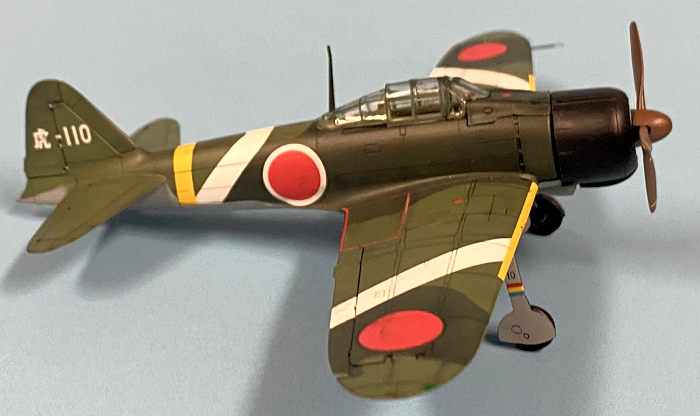
With a few areas needing a bit of paint to cover the flash removal and the minimal sanding, I decide to completely paint the model. The pre-painted surface had a satin/flat finish and figured the existing colour scheme did provide a decent enough base coat. I decided that no primer would be required but did use some thinned out Tamiya Flat Black to preshade the panel lines. Looking through my stash of decals and other Zero kits, I decided to give the aircraft a more colourful appearance and focused on finishing it as Tiger-110 from the 261st Kokutia. I did have TechMod decals #72041 and I also had kit decals from Hasegawa #00451 for this chosen scheme. The camo scheme has been described and interpreted in several colours, heck there’s even differences between the paint schemes from TechMod and Hasegawa. There also was what I call a ‘red-tail demon’ scheme with red rear fuselage and tail, but I might actually try that scheme for a project at a later date.
 Referring
to the Hasegawa colour key, the mixed shades appeared to be close to Mr. Hobby
H60 IJA Green and H423 RLM82 for the upper surfaces with H61 IJN Gray for the
undersides. The camo scheme was traced on making tape and sprayed with thinned
paints. I did not have much trust in either set of white stripe and yellow
banding decals, thinking that the decals may not be opaque enough or probably
would have torn. Instead of decals, I used a photocopy of the decal sheet to
provide trace templates for tape masks. Tamiya XF-2 and XF-3 was thinned and
sprayed for these areas. The cowling was sprayed with a 50/50 mix of Royal Blue
and Semi-Gloss Black. XF-3 was also used to spray the yellow identification
leading edges.
Referring
to the Hasegawa colour key, the mixed shades appeared to be close to Mr. Hobby
H60 IJA Green and H423 RLM82 for the upper surfaces with H61 IJN Gray for the
undersides. The camo scheme was traced on making tape and sprayed with thinned
paints. I did not have much trust in either set of white stripe and yellow
banding decals, thinking that the decals may not be opaque enough or probably
would have torn. Instead of decals, I used a photocopy of the decal sheet to
provide trace templates for tape masks. Tamiya XF-2 and XF-3 was thinned and
sprayed for these areas. The cowling was sprayed with a 50/50 mix of Royal Blue
and Semi-Gloss Black. XF-3 was also used to spray the yellow identification
leading edges.
When it came time for decals, I brush coated with Future and started to use the TechMod insignia decals only to have them break and crack. Not sure if this was an age-related issue or a reaction to MicroSet and MicroSol, but it was not the first time it happened to me with TechMod decals. I switched to the Hasegawa decals and they did seem a bit thick but did go on well enough. The smaller Techmod data decals worked well and caused no further issues. The Hasegawa wing insignia seem to be on the small side and one may question actual positioning, but I could not find any upper or lower photos of the aircraft so I trusted the Hasegawa diagram placement.
The External tank was added and the sliding canopy was easily snapped in place. I lopped the wing probe and replaced it with a brass rod. All was coated with Future again and panel shading applied with cleanup using X-20 enamel thinner. I guess haven’t mastered panel lining just yet, the area with painted layers and decaled areas took the lining solution differently. Final spray coat was a thinned 50/50 mix of MicroSatin and MicroFlat.
| CONCLUSIONS |
 This is an
impressive kit with more components than a couple of 1/32nd
scale kits I’ve built. The F-Toy name may be misleading as this is no toy, with
engine assembly being delicate and involved. The factory paint may be convenient
but does really provide any purpose if a refined finished look is desired.
This is an
impressive kit with more components than a couple of 1/32nd
scale kits I’ve built. The F-Toy name may be misleading as this is no toy, with
engine assembly being delicate and involved. The factory paint may be convenient
but does really provide any purpose if a refined finished look is desired.
The only true critique of the kit is the action folding wing tips, they remind me of old Matchbox kit folding tips. They have double tabs on each tip and are inaccurate of the actual folding mechanism. If you decide to fill in the gaps on the folding tips, be careful to regain any panel lines filled in. Everything else on the kit looks finely detailed.
In order to allow viewing of the engine and machineguns, one cannot glue the cowling and prop but these components do fit snuggly in place and don’t really need glue. The control surfaces can be positioned in place to add more activity to the finished build.
A very enjoyable build that is highly recommended.
15 May 2025 Copyright ModelingMadness.com.
All rights reserved. No reproduction in part or in whole without express
permission. If you would like your product reviewed fairly and
fairly quickly, please
contact
the editor or see other details in the
Note to
Contributors.