Hasegawa 1/48 J7W1 Shinden
| KIT #: | 5428 |
| PRICE: | $ |
| DECALS: | One option |
| REVIEWER: | Jonathan Prestidge |
| NOTES: | Eduard seat harness. |
| HISTORY |
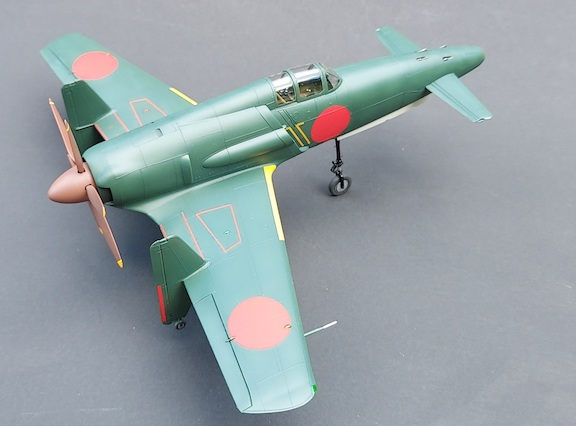
From the kit instructions: “The Shinden was the first canard wing Japanese fighter, developed as an interceptor for heavy bombers. The canard design allowed for more efficient use of space within the aircraft as well as a smaller fuselage design. The lift provided by the front wings allowed for smaller main wings, providing major advantages in reduced aircraft weight and air resistance, points which contributed greatly in the development of a high speed fighter aircraft. Another major characteristic of the design was the capability to concentrate high caliber cannon in the nose. Much was expected of the Shinden in the air war over Japan, but its development was not completed in time for combat; the first prototype flew only three 45 minute sorties before the war ended.” - I believe these were simply unarmed test flights.
 The design specifications for the Shinden were ambitious with a maximum speed to
be 465 mph (750 kph) at 26,000 ft (8,700m). Fixed armament was to consist of
four 30mm cannon in the nose of the aircraft.
The design specifications for the Shinden were ambitious with a maximum speed to
be 465 mph (750 kph) at 26,000 ft (8,700m). Fixed armament was to consist of
four 30mm cannon in the nose of the aircraft.
To my knowledge, the three test flights flown by the Shinden were all made without armament or radio equipment. There are many photos of the Shinden prototype but none that I could find showed the nose guns or radio antenna mounted on the plane.
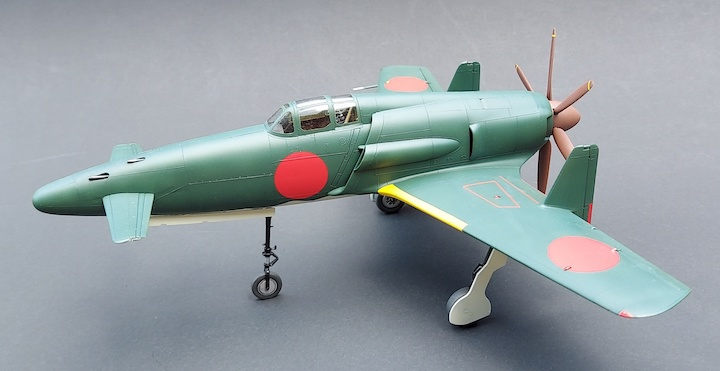
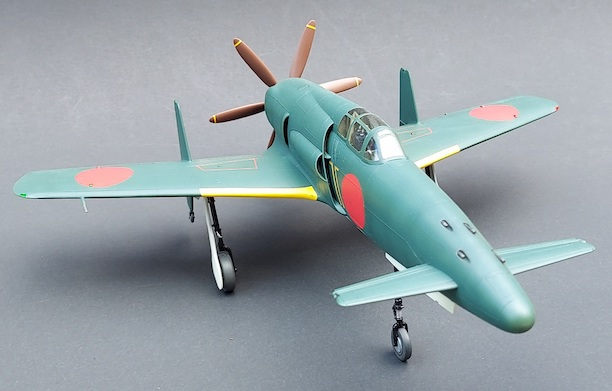
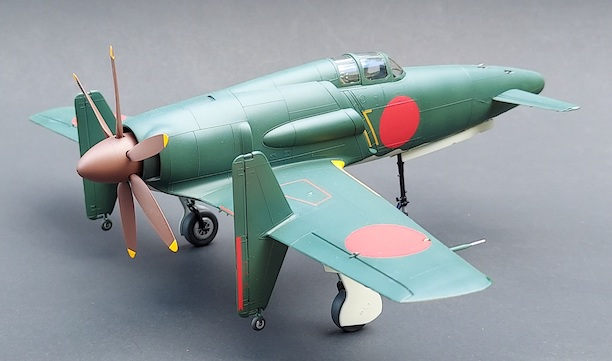
Let’s face it, the J7W1 is a great looking airplane. Yeah, it is a little storkish with its oddly long, forward- angled landing gear. But when the gear comes up, the lines of the Shinden become shockingly modern. It is difficult to imagine that the design originated in the mid 1940s. I would argue that the jet fighter looks of the Shinden are the main reason for its current popularity. In fact, it has achieved almost mythical fame in recent years due to its appearance in so many Anime films and video games. This is all the more astounding considering that it was never mass produced and it made absolutely no contribution to the war effort.
| THE KIT |
 I believe this kit was first released by a Japanese kit maker called Mania way
back in the 1970s. Hasegawa picked up the molds for this kit (and many others)
when Mania went bankrupt. Hasegawa has re-released this kit many times over the
years and it remains readily available today.
I believe this kit was first released by a Japanese kit maker called Mania way
back in the 1970s. Hasegawa picked up the molds for this kit (and many others)
when Mania went bankrupt. Hasegawa has re-released this kit many times over the
years and it remains readily available today.
The surface detailing and accuracy of the J7W1 were state-of-the-art in the
1970s and are still respectable today. The kit plastic parts have very fine
raised panel lines and some engraved detail, great parts fit overall, and good
clear parts. Parts count is low by todays standards. The decals are opaque with
great color in this boxing which was dated 2008. There is one marking option.
| CONSTRUCTION |
This was a simple build. It is difficult to botch things up if one follows the directions. Instead of a comprehensive build log here, I will touch on the few problem areas to watch out for.
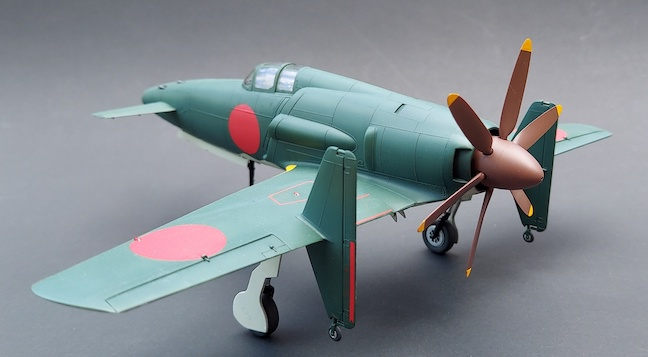
Before starting assembly, I made a few simple modification to the kit parts. First, I took the two main landing gear wheels and flat spotted them using a file. This flat spot helps keep the rear landing gear legs from squatting once final assembly is complete. Next, I grabbed a few metal nuts to use as weight in the nose of the airplane so it wouldn’t tail sit. Finally, I drilled out the ends of the four cannon barrels with a #11 Exacto blade.
 While assembling the interior, it was unclear (to me at least) where the four
oxygen bottles (parts E4) were to mount. I put them where the instructions seem
to indicate but there is no positive locator for these parts.
While assembling the interior, it was unclear (to me at least) where the four
oxygen bottles (parts E4) were to mount. I put them where the instructions seem
to indicate but there is no positive locator for these parts.
Once the Interior was assembled and painted using Pollyscale French Khaki for the interior green color, I installed the Eduard pre-painted, metal seat belts. They really dress up what is visible through the canopy on the completed model.
Continuing with construction, I took extra care on the fuselage seams, wing root fit, and rudders. Because of the raised panel lines, sanding of any seems is naturally more tedious as one tries not to destroy the raised detail in the process. The design of part B11 (canards and canon cover) seems questionable because the seams don’t fall on panel lines. This makes cleanup far more difficult than necessary. I also had to shim the base of the rudders with thin plastic strips to eliminate a seam where they met the wing.
During final construction, I found that the main landing gear legs fit somewhat loosely in their sockets and were able to move until the glue fully dried. I left my main wheels free to turn on the axles so that I could position the flat spot properly once the gear legs dried.
| COLORS & MARKINGS |
Polyscale IJN Green and IJN Gray were sprayed with my Badger Anthem dual-stage
airbrush. The weathering on the this aircraft was done by pre-shading the paint,
applying pastels with a closely-cropped paint brush, minor chipping done with a
silver Prismacolor colored pencil, washes, etc. B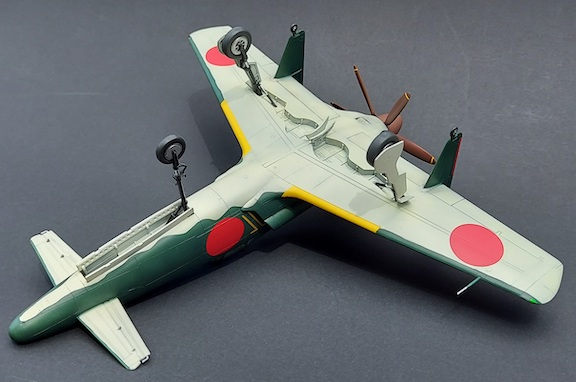 ecause this aircraft was only
flown three times, I kept weathering to a minimal level. I did most of the
weathering prior to sealing everything with an airbrushed coat of Future in
preparation for decals.
ecause this aircraft was only
flown three times, I kept weathering to a minimal level. I did most of the
weathering prior to sealing everything with an airbrushed coat of Future in
preparation for decals.
I used the kit-supplied markings for the prototype J7W1. The kit decals were a bit thick and required lots of setting solution to conform to the raised detail. I cut out the clear center of the trapezoidal wing-walk markings to help them settle around the directional lights. It took patience and time to get the Japanese national insignias (hinomarus) to conform to the wing detail. It took many further applications of Micro Sol to settle the decals into place. Once the decals dried, I gave the plane an airbrushed coat of Polyscale Satin clear. Final detail painting, weathering and touchups were then completed. Because I could not find a picture of the prototype with the radio antennas mounted, I left those kit-supplied parts off. If I had wished to be totally historically accurate, I would have removed the cannon detail as well.
| CONCLUSIONS |
 Overall, this is still a fun kit that can be turned out well. The surface detail
looks fine under a coat of dark paint and the kit provides a good starting point
if one wished to super detail it by re-scribing the panel lines. There are a few
tricky areas to be careful of - namely raised detail around the seams, the main
landing gear angle, and the rudder to wing fit. The decals also require patience
and lots of setting solution. However, if you take your time and get these
right, you will be rewarded with a great model. Hasegawa’s Kyushu J7W1 is still
the only game in town if you want this aircraft in 1:48 scale. Recommended for
modelers with a little experience.
Overall, this is still a fun kit that can be turned out well. The surface detail
looks fine under a coat of dark paint and the kit provides a good starting point
if one wished to super detail it by re-scribing the panel lines. There are a few
tricky areas to be careful of - namely raised detail around the seams, the main
landing gear angle, and the rudder to wing fit. The decals also require patience
and lots of setting solution. However, if you take your time and get these
right, you will be rewarded with a great model. Hasegawa’s Kyushu J7W1 is still
the only game in town if you want this aircraft in 1:48 scale. Recommended for
modelers with a little experience.
8 September 2022
Copyright ModelingMadness.com. All rights reserved. No reproduction in part or in whole without express permission.
If you would like your product reviewed fairly and fairly quickly, please contact the editor or see other details in the Note to Contributors.
Back to the Main Page Back to the Review Index Page Back to the Previews Index Page