Hasegawa 1/48 J7W1 Shinden
| KIT #: | 09122 |
| PRICE: | 16 Euros (2007) |
| DECALS: | One option |
| REVIEWER: | Spiros Pendedekas |
| NOTES: | Standing pilot figure included |
| HISTORY |
The Kyūshū J7W Shinden (震電, "Magnificent Lightning") was a World War II Japanese propeller-driven prototype fighter with wings at the rear of the fuselage, a nose-mounted canard, and pusher engine. Developed by the Imperial Japanese Navy (IJN) as a short-range, land-based interceptor, the J7W was a response to Boeing B-29 Superfortress raids on the Japanese home islands. For interception missions, the J7W was to be armed with four forward-firing 30 mm cannons in the nose. The Shinden was expected to be a highly maneuverable interceptor, but only two prototypes were finished before the end of war. A jet engine–powered version was considered, but never even reached the drawing board.
The construction of the first two prototypes started in earnest by
June 1944, stress calculations were finished by January 1945,[8] and the
first prototype was completed in April 1945. The 2,130hp Mitsubishi MK9D
(Ha-43) radial engine and its supercharger were installed behind the cockpit
and drove a six-bladed propeller via an extension shaft. Engine coo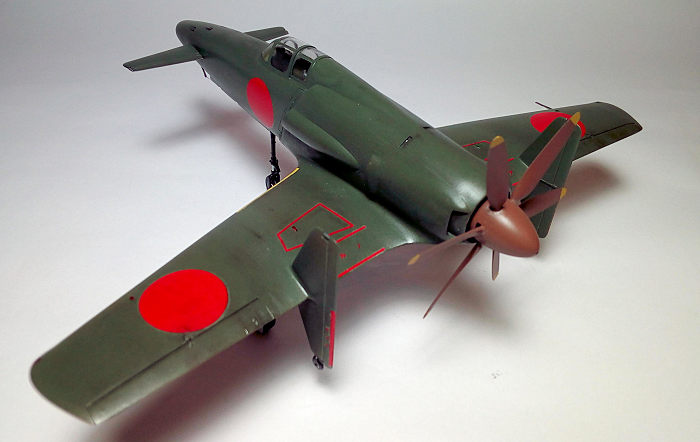 ling was
to be provided by long, narrow, obliquely mounted intakes on the side of the
fuselage. It was this configuration that caused cooling problems while
running the engine while it was still on the ground. This, together with the
unavailability of some equipment parts postponed the first flight of the Shinden.
ling was
to be provided by long, narrow, obliquely mounted intakes on the side of the
fuselage. It was this configuration that caused cooling problems while
running the engine while it was still on the ground. This, together with the
unavailability of some equipment parts postponed the first flight of the Shinden.
On 3 August 1945, the prototype first flew,with Lieutenant Commander Masayoshi Tsuruno, of the technical staff of the IJN at the controls, from Itazuke Air Base. Two more short flights were made, a total of 45 minutes airborne, one each on the same days as the atomic bombings of Hiroshima and Nagasaki occurred, before the war's end. Flights were successful, but showed a marked torque pull to starboard (due to the powerful engine), some flutter of the propeller blades, and vibration in the extended drive shaft.
The two prototypes were the only examples of the Shinden ever completed. After the end of the war, one was scrapped; the other was claimed by a U.S. Navy Technical Air Intelligence Unit in late 1945, dismantled, and shipped to the United States (some sources claim that the USN took the first built while others state that it was the second.)
The sole surviving J7W1 was reassembled, but has never been flown in the United States; the USN transferred it to the Smithsonian Institution in 1960. Its forward fuselage is currently on display at the Steven F. Udvar-Hazy Center annex (at Dulles Airport) of the National Air and Space Museum in Washington DC.
| THE KIT |
I bought this kit around 2007, at an ubelievable low price of 16 Euros new. There's a beautiful dramatic boxart of a flying Shinden, by “Master” Koike Shigeo. According to Scalemates, this kit dates back from 1981, mine seeming to be a 2003 rebox.
Upon opening the box, everything looks Hasegawa familiar. There are five
crisply molded hard plastic sprues with mostly raised detail, all packed
together, meaning some chaffing scratches might be present. There's a reasonably
detailed cockpit, including, among ohters, trim wheel, fire extinguisher, oxygen
bottles and the distinctive frame aft of the seat. It looks busy enough,
satisfying most of us, especially as I build mostly in closed canopy
configuration, to preserve aircraft lines (translation: I am lazy to superdetail....).
The gunsight is mol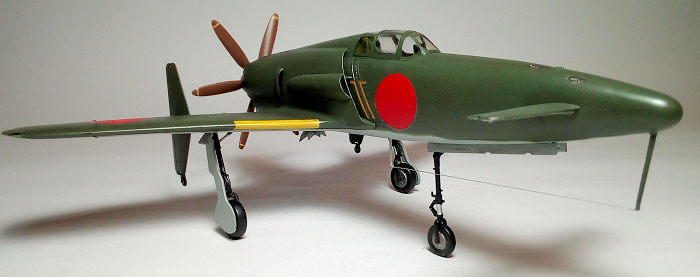 ded together with the one fuselage half, meaning it's not
made of clear styrene. You may want to cut replace its upper part with a clear
acetate piece for a more realistic look, as I did. Otherwise you can paint the
upper part silver, for a “glass” look.
ded together with the one fuselage half, meaning it's not
made of clear styrene. You may want to cut replace its upper part with a clear
acetate piece for a more realistic look, as I did. Otherwise you can paint the
upper part silver, for a “glass” look.
The fuselage is split in two, trapping the cockpit and front wheel well in between. A one piece affair contains the two canards, together with the corresponding fuselage part that contains the guns. This arrangement has the benefit of positive canards alignment and easiness of weight installation, with a side effect of having to fill and sand the inevitable gaps after assembly. The two retracted guns are molded with the cover, whereas the two extended are provided as separate. I would prefer to have them all separate.
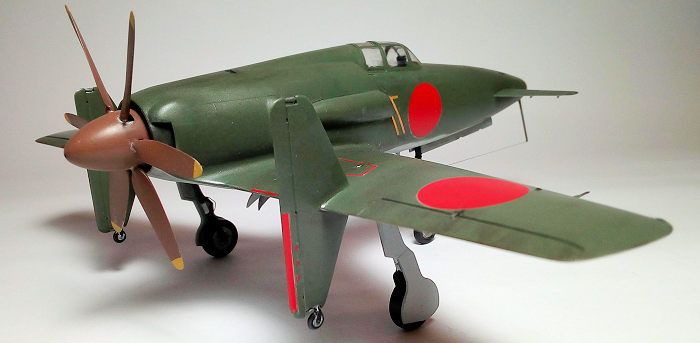
There's a one piece lower wing, left and right top wings and the distinctive left and right fins. The landing gear itself, doors and wheel wells included, are nicely cast with good detail and depth. Wheels look well detailed too. The impressive six blade propeller's main part is thankfully molded in one piece, with the hub and the rear base and axle supplied as separate pieces. Well done Hasegawa here! The clear parts are crystal clear, nicely cast as separate pices and not overly thick.
The decals, printed in 1998, depict the No.1 aircraft in August 1945. They look excellent, and even more so, as there are no whites here to be plagued with the “ivory” status of the then Hasegawa decals. Instructions are great, as expected from “modern” Hasegawa kits: printed in a pamphlet, with nice history and a completed model at the front, clear 8 step assembly and colour calling, and excellent 3 view marking and painting guide. Colours are typically given in Gunze and Mr Color codes, together with a helpful explanation (eg IJN GREEN).
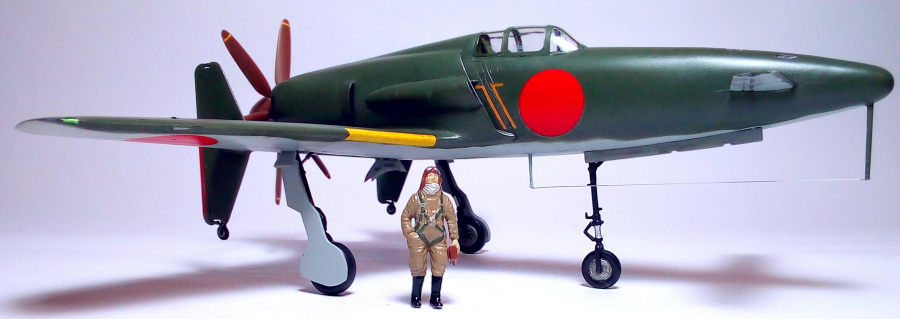
There's also a nice two piece standing pilot figure provided, Lieutenant Commander Masayoshi Tsuruno himself! He will look nice by the completed Shinden!
| CONSTRUCTION |
Starting with the cockpit, I glued the rear bulkhead, the distinctive frame and the rudder pedals at the cockpit tub. The seat back was drilled for a more realistic look. It was painted IJN green, as per instructions, with leather cushion and light green doped seatblets made of masking tape. IJN green was also th colour of the stick column with black grip. Instrument panel, throttle and “other” boxes, trim wheel, gunsight base and oxygen bottles were painted black. Fire extinguisher was painted red. Details and knobs were picked out with silver drybrushing and some white and red paint.
Basic cockpit colour was Hu226 Interior Green. I did almost no weathering to the cockpit, as this plane only performed a few flights and supposedly equally few taxiing checks. The cockpit and front wheel well were trapped between the two fuselage parts, that were glued together. Fit was very good.
I deviated from the instructions and attached the underwing to the
fuselage; then I attached the two wing halves in such a way that there would be
minimal or no gaps at the wing/fuselage spot (ie the wing root).
I didn't like that the upper/lower wings are not split at the wingtip edges, but
the full wingtip is part of each upper wing half. This means that an underwing
seam will have to be dealt with.
After having the basic airframe assembled, I went on and added some fishing weights at the front. Hasegawa recommends only 1g, but I went on and added as much weight was needed for the center of gravity to be positively in front of the main wheels, bearing in mind that the fins and propeller were not installed yet. I've heard Shinden tailsitting tales, so I played it safe, but not overdone, as the supplied landing gear is flimsy and weak. After securing the weights with my son's modelling clay, I installed the top fuselage cover. Fit was also good.
I then glued the fins to the wings. Fit is ok, needing some careful filling and sanding at the mating surfaces. Having learned my past lessons from similar endless looping situations (snap- glue – resnap -reglue and so on...), I bravely cut the tiny fragile whells located under each fin, to be installed just before finishing. The two delicate side fuselage air intakes were glued, their fit being ok, but not perfect.
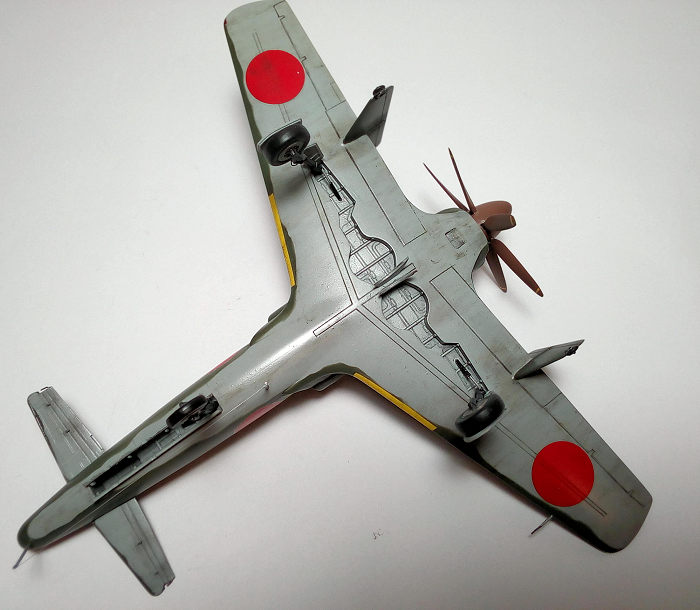
It was then landing gear time. The main long gear legs were screaming for some detail, so I beefed them up with brake lines, made of stretched sprue and bent accordingly. Landing gear was painted black with silver oleos. The wheels look nice and simple as they were in reality. They were painted steel with flat black tyres. The very impressive propeller was assembled, sanded smooth and painted Hu113, to represent the “propeller colour”, with yellow egdes (solid outwards and a small line inwards).
Lieutenant Commander Masayoshi Tsuruno's excellent figure was painted khaki pilots suite, with leather helmet and gloves, dark green strap belts with silver buckles, white scarf, my custom made “flesh” for his face and black boots. He looks very imposing and authoritative, yet calm and optimistic indeed!
The basic airframe was filled wherever needed and, after sanded smooth, headed to the paint shop.
| COLORS & MARKINGS |
The underside, together with the wheel wells and doors inner and outer faces, were painted Hu127, which is my representation of the IJN Gray. Upon drying I masked the undersides, using UHU tac at the camo edges, to obtain that uneven “hardsoft” demarcation lines. After masking the cockpit with wet tissue, I gave the topsides and fins a coat of darkened Hu102, to represent the IJN Green. Upon drying, I gave the model a coat of Future, to prepare the surfaces for decalling.
I used the kit decals to represent the No. 1 aircraft, as of August 1945. Despite being a 1998 print, they went on without any issues, with Mr Mark Softer taking care of them, snuggling around any surface detail. Inasmuch I admire well painted yellow ID stripes, I am lazy to paint them, so I used leftover yellow decals, cut at the required size. The canopy was carefully hand painted and then Futured to restore any missed clarity, looking crystal clear indeed!
| FINAL CONSTRUCTION |
I installed all leftover cockpit components and did any required micro touchup. I then proceeded to install the very delicate landing gear. Not only it is very long and fragile, but also the MLG is fitted at an akward front leaning angle, comromising the overal rigidity even further. So, I glued all three legs at their correct angles and let the glue cure completely. The main gear retraction cylinders were also glued at the same time. Those cylinders will double as a reinforcement for the MLG legs. The next day the wheels were also glued and waited for another day for the glue to cure. The following day, all LG doors were glued.
 Since the small outer MLG doors were in reality connected to be dragged
by the landing gear struts, I took advantage of it and glued those doors in such
a way, as to provide an extra supporting link between the leg and the fuselage.
After all those actions, the landing gear is a tad stronger (still fragile and
shaky, though). To sum up, take your very qualitative time with the landing gear
and you will be rewarded with a good result.
Since the small outer MLG doors were in reality connected to be dragged
by the landing gear struts, I took advantage of it and glued those doors in such
a way, as to provide an extra supporting link between the leg and the fuselage.
After all those actions, the landing gear is a tad stronger (still fragile and
shaky, though). To sum up, take your very qualitative time with the landing gear
and you will be rewarded with a good result.
I glued the two distinctive underside antennas, the two fin small wheels and the two nose guns, followed by a final touching up wherever was needed. Since this was a prototype, and based on reference photos, only subtle weathering was applied, mainly consisting of engine staining, underside (and a very little bit topside) oiling/dirtying and minimal chipping.
A coat of Future sealed everything, followed by an almost gloss satin finish. I spot glued the canopy in place with styrene glue, followed by an application of white glue to fill any smallish gap. The six (!) wing navigation lights were represented by painting the corresponding areas silver, with my PILOT extrafine silver pen, followed by clear red/green Hubrol clear paints. I run a stretched sprue antenna wire between the two masts, placed Lieutenant Commander Masayoshi Tsuruno near the plane and called this beauty done!
| CONCLUSIONS |
This is a raised panel line (no problem for me), but otherwise typical modern Hasegawa kit, meaning well detailed cockpit, easy assembly, good to very good fit and well behaving decals. A novice can undertake it and come up with a good result Out Of the Box (OOB), even without using an airbrush (although strongly advised to), taking some care when assembling the landing gear and afterwards handling of the model. Of course, an experienced modeller can move many steps ahead and superdetail everything, though most of it will have to be scratchbuilt, as the only “extras” I am aware of are white metal LG.
Due to the prototype nature of the Shinden, combined with the truly magnificent (and a tad on the surreal side?) Shinden looks, a “what if” IJN'46 operational scheme wouldn't be out of place: in fact it might look quite spectacular! Having said all that, I can definitely recommend this kit to anyone, especially if luck takes care of a low bargain price, as it was my case.
Happy modelling!
| REFERENCES |
Wikipedia (for the historical section)
The net (for pics, drawings and any other info)
Back to the Main Page Back to the Previews Index Page
Back to the Previews Index Page