Tamiya 1/48 A6M3 Zero
| KIT #: | 61108 |
| PRICE: | $61.00 SRP |
| DECALS: | Several options |
| REVIEWER: | Dan Lee |
| NOTES: | Eduard seat belts and Tamiya metal pitot |
| HISTORY |
The A6M series of fighter needs no major introduction to modellers as it was the primary Imperial Japanese Navy fighter of WW2. From the unbelievable performance/exploits (to Western intelligence) in China and spectacular combat record in the early part of the Pacific Campaign to its fall in the mid/later part of the Pacific Campaign as better trained Allied pilots and tactics nullified most of its advantages.
 The A6M3/3a was the replacement for the not quite
successful A6M3 Model 32 aka “Hamp” which had hampered range and performance
compared to the earlier Model 21. It added back the rounded folding wingtips
and extended range with more fuel but did not add any power, firepower,
armor or self sealing fuel tanks which was desperately needed.
The A6M3/3a was the replacement for the not quite
successful A6M3 Model 32 aka “Hamp” which had hampered range and performance
compared to the earlier Model 21. It added back the rounded folding wingtips
and extended range with more fuel but did not add any power, firepower,
armor or self sealing fuel tanks which was desperately needed.
Hiroyoshi Nishizawa was probably the greatest IJN Zero Ace who began his combat tour with the Chitose Air Group. Later his Chutai was transferred to the greatest of all Japanese fighter units, the Tainan Air Group where he would be renowned for his air combat skills. He would be part of the Cleanup Trio (along with Saburo Saki and Toshio Ota) that made life for USAAF and RAAF pilots extremely short. One of his most famous missions was the aerial demonstration he did over Port Moresby to the stunned surprise of the Aussies and Americans defending it. Later during the Leyte Gulf campaign, he led the first Kamikaze strike which was on hard luck Taffy 3 and sank the USS St Lo.
He scored some 86-87 kills in his two years of flying and was never bested in combat. However, he died at the hands of Hellcats from the USS Wasp flying in a Ki-49 (Helen) transport on Oct 26, 1944.
| THE KIT |
Please see Bob Kudyba's preview of the kit from the Archives.
| CONSTRUCTION |
It all begins with the highly detailed cockpit. The various parts were painted a mix of Xf-71 Mitsubishi cockpit green and XF-71 with a touch of yellow added for the upper areas sun faded effect. Any other colors were brush painted and the decal dials added as per instructions. When the paint was dry, I added Eduard Photo Etched Pre Painted Seat belts to the seat. After the entire cockpit was assembled I used a dirty oil paint wash to highlight all the detail and interior plus dry brushed silver paint using a small brush to represent chipped paint.
 Once all the interior details were done, I glued
together the fuselage (exterior seams with CA glue and interior joins with
Tamiya extra thin cement.) I only needed to lightly sand down the centerline
seams.
Once all the interior details were done, I glued
together the fuselage (exterior seams with CA glue and interior joins with
Tamiya extra thin cement.) I only needed to lightly sand down the centerline
seams.
Next the cowling and engine were assembled and painted various interior colors as per instructions. The internal parts also received a dirty oil paint wash.
The various wing interior parts were painted first before assembly before the wing was glued together using the same glue combo as the fuselage (CA glue on the exterior seams and Tamiya extra thin cement on the interior.) Again, the seams were sanded down. I chose the extended wingtips configuration and not the folded wing tips. The wings were then added to the fuselage and I added a shim of 5 thou plastic card into the rear wing/fuselage join which is the only problematic spot on this kit (I built the earlier A6M5/5a kit and found out the hard way.) I lightly sanded the area smooth.
I painted and assembled the prop as well as well as the fuel tank. The rudder was added as well, but I used some Vallejo plastic putty to fill in the gaps at the rudder/fuselage join.
At this point I cut out and removed the masks for the canopy parts and added them on before painting.
| COLORS & MARKINGS |
 I glued the canopy parts to the fuselage using white
glue while I added foam cut to shape for the various interior areas like the
wheel wells before painting.
I glued the canopy parts to the fuselage using white
glue while I added foam cut to shape for the various interior areas like the
wheel wells before painting.
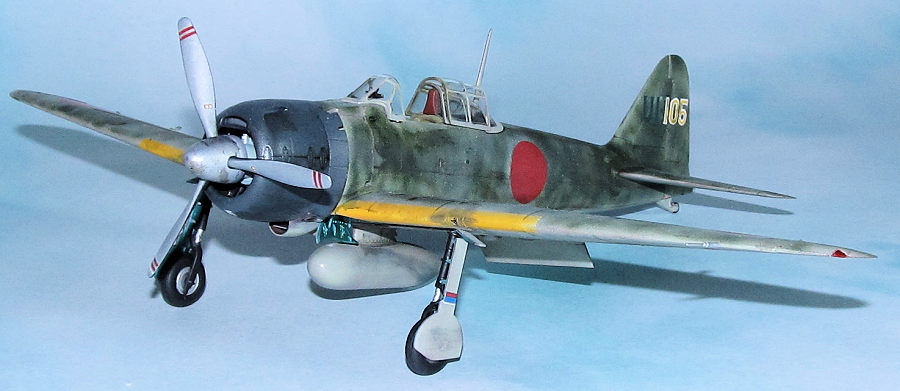
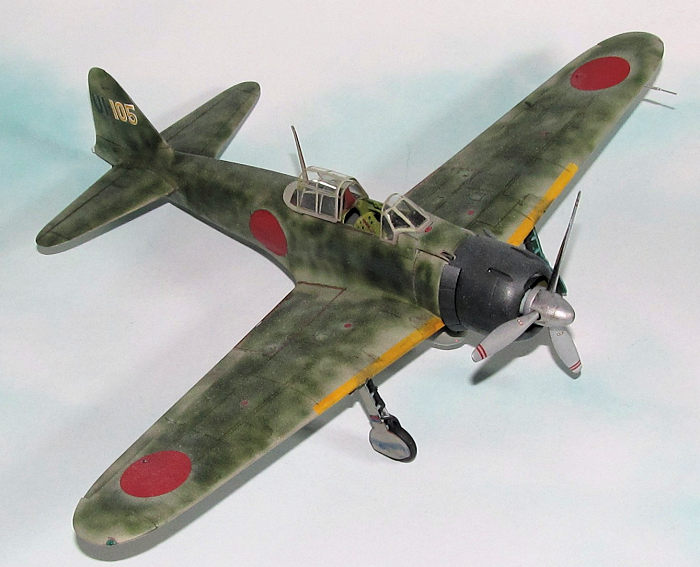
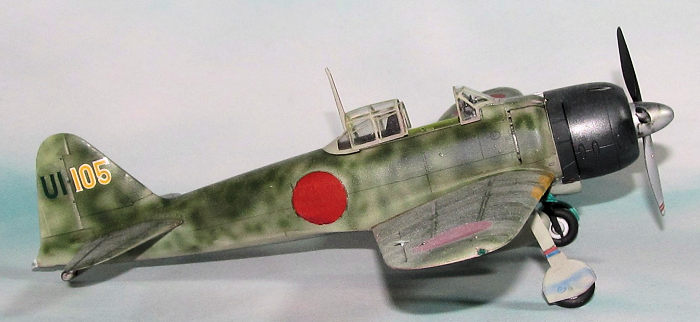
The exterior was first primed using Stynylrez and when that was dry, I sprayed on Tamiy'a XF-76 which is now considered “incorrect.” When that was dry I broke out my Iwata fine line airbrush and sprayed on IJN Dark Green in a wavy/mottled pattern as seen in the famous photo of Nishizawa's plane including leaving the areas around the Hinomarus free of IJN Dark Green.
The canopy was only painted the interior color and the exterior XF-76 color as per photos. Meanwhile, the cowling was sprayed with black primer and then a light dusting of XF-24 grey along the top and sides to represent sun fading. Various small parts including the landing gear and the fuel tank were painted as well. Once everything was done to my satisfaction I sprayed on a gloss coat for the decals.
The decals for the Zero are pretty straight forward
as they didn't have hundreds of stencils to apply. These are still the rather
thick but not as thick as the older Tamiya decals, but they wo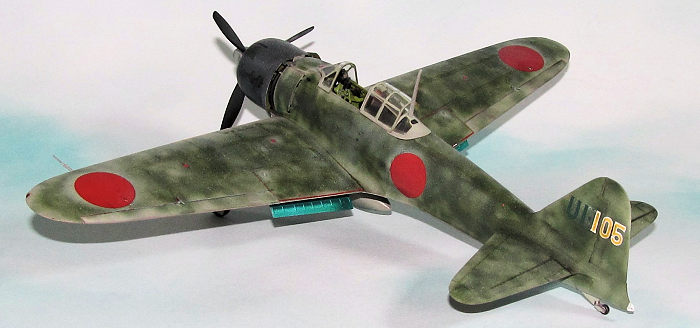 rk with a bit of Solvaset and/or MicroSet. I wiped down the model after the decals were done to
remove the setting solution.
rk with a bit of Solvaset and/or MicroSet. I wiped down the model after the decals were done to
remove the setting solution.
I used a dark oil paint wash for this plane, but I didn't make it too heavy as even Japanese aces planes had pretty good maintenance. Some light gunfire and exhaust stains were added. Once it was done, I sprayed on XF-86 Tamiya Clear Flat coat.
The various tiny prepainted, washed and sealed bits were added to the model. I used a spare metal pitot tube instead of the plastic part which looks a lot better. I glued on the radio antenna before adding the rear canopy to the rear deck.
The gunsight was painted and added before the windscreen was glued in place.
| CONCLUSIONS |
The Tamiya A6M3/3a is a very fine kit of an important warplane of WW2. Outside of the rear wing/fuselage join, there isn't any area of build issues with this model. Tamiya made a true shake and bake of the Zero.
The 2010 Tamiya A6M3 and A6M5 kits are fun easy builds for modellers of all skill levels with only the price of this kit as a stopping point.
Dan Lee
24 April 2023 Copyright ModelingMadness.com. All rights reserved. No
reproduction in part or in whole without express permission of the editor.
If you would like your product reviewed fairly and fairly quickly, please contact the editor or see other details in the
Note to
Contributors. Back to the Main Page
Back to the Review
Index Page
Back to the Previews Index Page