Tamiya 1/48 J2M Raiden
| KIT #: | 89759 |
| PRICE: | $10.00 used |
| DECALS: | Two options |
| REVIEWER: | Christopher Campbell |
| NOTES: | What-if build |
| HISTORY |
The origins of the J2M3 Raiden date to a 1939 specification for a land based interceptor, specifically to tackle allied bombers likely at high altitude. The aircraft was an all new design, centered around the Mitsubishi MK4R-A Kasei 23a 14-cylinder air-cooled radial engine producing over 1,800 horsepower.
Its tight cowling necessitated a cooling fan, as on the Fw.190 and others. Teething problems with this would be encountered. Still, with its broad, elliptical wings it was made to climb and to maneuver. With a top speed of over 380 mph and a maximum ceiling of over 38,000 feet, it was poetential game changer in the Pacific.
This powerful airframe was coupled with a powerful punch. Quad wing mounted 20mm cannons were standard armament, two being of the Type 99 Mk.1 and the other Type 99 Mk.2, with 210 and 190 round per gun, respectively. This was enough to shred almost any allied fighter and hammer most bombers to junk.
There were problems, though. Intended for a time to mount a turbocharger. This proved troublesome to develop and field in sufficient numbers, however, and was ultimately abandoned, with the expected result in a loss in altitude performance and rate of climb. This left the Raiden inevitably unable to live up to its full performance potential potential until a supercharger was added in the J2M5.
Initially entering service in 1942, various difficulties hampered its being delivered in any significant numbers until 1944, by which time Japan was effectively on the ropes in the fight for the Pacific. There is no doubt that it made an impact, though too little and too late.
 Ultimately,
it would be used as a B-29 interceptor. While its armament made it ideal for
this, it was hampered by its high altitude performance in this role, with
the exception of the J2M5 models. As B-29’s switched to night bombing, it
was adapted as a night fighter, though was only moderately effective in this
role.
Ultimately,
it would be used as a B-29 interceptor. While its armament made it ideal for
this, it was hampered by its high altitude performance in this role, with
the exception of the J2M5 models. As B-29’s switched to night bombing, it
was adapted as a night fighter, though was only moderately effective in this
role.
The J2M was, by all accounts, an excellent design. Like many Japanese aircraft, it was hamstrung the peripheral factors delaying its development and once in service by a lack of resources, including labor and raw materials preventing it from every being fielded in the sorts of numbers even reflecting the barest shadow of its Mitsubishi sibling, the Zero. Only 621 would be built by war’s end.
In the hands of a skilled pilot, it could hold its own most Allied fighters if flown to its full potential. Unfortunately for Japan, by the time that it was introduced, skilled, experienced pilots were in short supply, as fuel and ammunition even were rapidly becoming. It was one of so many cases of too little and too late. A single J2M survives today, on exhibit in the Planes of Fame museum in Chino. This is the story of some a possible survivor that found a new life after the Japanese surrender.
| THE KIT |
 The kit
used for this build was the venerable Tamiya 1/48 (or by some accounts 1/50) kit
of the J2M3 Raiden or Jack as it was known to the allies. This kit dates from
1973 and was effectively cutting edge when it was released. It has nicely
recessed panel detail, a reasonable cockpit, and nice molding overall. My kit
was from the 2008 release, though from what I can tell, this kit has remained
effectively unchanged since its initial release.
The kit
used for this build was the venerable Tamiya 1/48 (or by some accounts 1/50) kit
of the J2M3 Raiden or Jack as it was known to the allies. This kit dates from
1973 and was effectively cutting edge when it was released. It has nicely
recessed panel detail, a reasonable cockpit, and nice molding overall. My kit
was from the 2008 release, though from what I can tell, this kit has remained
effectively unchanged since its initial release.
It features decals for two Japanese aircraft. One of these features the well known paint scheme with the lighting bolt markings. I was going a different route here, so neither was used.
As I noted, the kit has been listed as both 1/50 and as 1/48. I did not scale this out against drawing. However, mine is on the shelf next to a build of the Otaki/Arii kit built in Japanese markings and they look absolutely the same in scale. That along with my having shown both of these kits alongside other 1/48 kits leads me to believe that this kit was always actually 1/48.
| CONSTRUCTION |
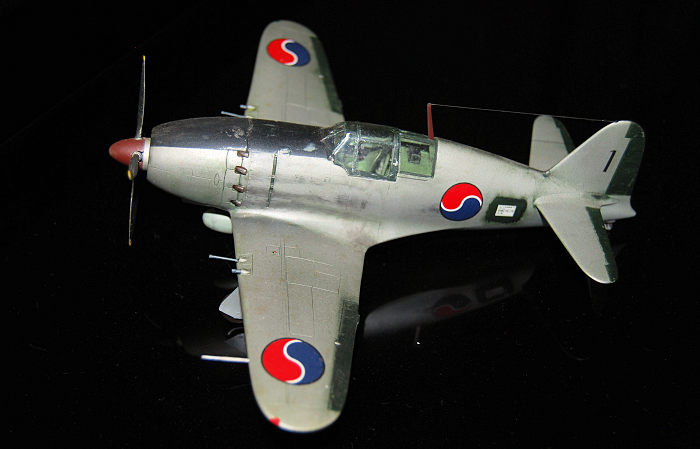
So, here we go into the world of mystery, what if’s, and what might have been and may have been. About a decade ago, I ran across a number of references on the Internet to a handful, three or less, J2M Raidens abandoned in Korea and subsequently salvaged and put into service by the fledgling R.O.K.A.F., which had no true fighters as such at the time.
Salvaged Japanese aircraft being refitted to service are well known on both side of the border during the pre-Korean War period. They seem to have been more common in North Korea, but there were definitely some in South Korea as well. Both countries were scrambling to field aircraft for a conflict that was already brewing. Numerous German aircraft were used post-War, though Japanese types are notably less common. The most prominent usage was by French forces in Indochina, fielding rarther well maintained aircraft for some time. However, I was immediately intrigued by the idea of a South Korean Jack, in no small part due to having, at the time, recently met my wife, who is from South Korea.
Information on the purported J2M Jacks is rather apocryphal. Finding solid references or photos proved fruitless. Still, there is precedence in such things. In the book Under the Red Star: German Aircraft in the Soviet Air Force by Carl-Frederik Guest, there is a well-documented account of a German defector flying a Fw.190 in support of the Soviets, its German markings replaced by red crosses ((!) ironic, given that it was still a belligerent)) on its fuselage and wings and a Weimar Republic fin flash on its tail.
While it was shot down, it was not the only such aircraft or defector that was encountered, though records of such defections and allegiances are decidedly fragmentary. The inspection of this particluar downed aircraft and its pilot, who bore no identification, but upon physical examination appeared to be German left those who downed it with more questions than answers. The full truth may never be known. I had previously built a model of this based on the description provided in the book. At this point, it opened the door to my building the South Korean J2M Raiden.
As noted, no photographs of these aircraft exist. However, there are some things common to most of the aircraft that I have seen photographed. Many seem to have had their original Japanese paint completely or partially stripped off. Always, photos seem to show that this was done with rags and some sort of solvent, presumably lacquer thinner or something similar. A photo of a North Korean Ki.55 (a trainer type impressed into service post war by both Koreas) clearly shows swirl marks on the metal, making it quite obvious that the paint was wiped off by hand with rags soaked in some sort of thinner. This would be touchstone that I would use in my build.
 Documentation
of salvaged Japanese aircraft in either North or South Korean service is
decidedly limited. One could surmise that this is in no small part to the
well-known, continued animosity between the two Korean nations and Japan
relating to the decades long occupation by the latter. Given that, it comes as
little surprise that neither Korean nation wishes to document their use of
Japanese aircraft to any real extent. There was unquestionably Japanese
equipment in use from aircraft and other vehicle, small arms, some watercraft,
and even some artillery.
Documentation
of salvaged Japanese aircraft in either North or South Korean service is
decidedly limited. One could surmise that this is in no small part to the
well-known, continued animosity between the two Korean nations and Japan
relating to the decades long occupation by the latter. Given that, it comes as
little surprise that neither Korean nation wishes to document their use of
Japanese aircraft to any real extent. There was unquestionably Japanese
equipment in use from aircraft and other vehicle, small arms, some watercraft,
and even some artillery.
An interesting side note to this is that I once talked to a fellow modeler at an IMPS show regarding my J2M build who noted that his father had seen a Mitsubishi J3M “Nell” in use by the South Korean Air Force during the Korean War. He noted that his father had photographed it and shown him the pictures, though he had not subsequently located them after his passing a year or so before when I spoke to him.
What he was able to confer however seemed realistic. The aircraft still wore its Japanese paint, though it was notably weathered and worn. The dorsal gun position was missing its faring and was essentially an open hole. The insignia had been overpainted in South Korean roundels, though sans the bars that would be introduced as P-51s’, T-6’s, and eventually F-86’s found their way into the R.O.K.A.F. during the Korean War. The aircraft was being used strictly as a transport, which sounds reasonable. As to whether or not it still mounted its original Mitsubishi engines is unknown. I personally suspect that, if this aircraft was still flying, it very likely had been reengined with readily available Pratt-Whitney twin wasps, which would have unquestionably extended its service life.
Personally, my gut tells me that the R.O.K.A.F. Nell was probably real. It seemed to be a genuine recollection and not some fanciful “war story.” I have even considered building up one of the 1/72 LS kits as it was described to me. Whether or not that was the case, there is no doubt that that both North and South Korea employed former Japanese aircraft until they either wore out completely or a better replacement came along. With all of this in mind, I embarked on building an R.O.K.A.F. Mitsubishi J2M3 Raiden.
This Tamiya kit provides a simple and easy build. There were no unpleasant surprises, thankfully. I would recommend it to anyone who would like a simple, easy, and essentially accurate Raiden build.
I started with Tamiya kit, as mentioned, knowing that it would be a simple, straight forward build with a minimum of fuss. It is typical of kits of this era, with around fifty parts featuring nice, recessed detail. It presented no problems at all.
I began by spraying the cockpit parts and walls with Tamiya Cockpit Green. At this point I would uusually turn my attention to the engine on a radial aircraft. However, the Raiden being so tightly cowled with a broad spinner, cooling fins, and cooling fan obscuring any possibility of viewing the cylinders in this scale, Tamiya wisely omitted it.
At this point though, with the cockpit drying and little else to do. I chose to spray the cooling fan and the inner cowl fins in Testors Steel. This color was chosen mainly to differentiate it from the exterior metal, as these parts would have shown heat wear.
With this was completed, I went back to the cockpit, painting the instruments and various controls and boxes in Testors Flat black and drybrushed everything with Testors Silver to pop details out and imply wear as needed. A few switches were picked out in black or flat red with the tip of a toothpick.
 The
seatbelts were molded into the seat, so these were painted and accented.
Everything as given an oil wash of Flat Black to simulate age and a lot of wear,
especially the floor. While it did not show well through the canopy, I
deliberately roughed up the circular headrest cushion with some knicks from an
X-Acto blade and painted the are in a dirty white color to make it look as
though the cushion was split and the much of the stuffing was visible.
The
seatbelts were molded into the seat, so these were painted and accented.
Everything as given an oil wash of Flat Black to simulate age and a lot of wear,
especially the floor. While it did not show well through the canopy, I
deliberately roughed up the circular headrest cushion with some knicks from an
X-Acto blade and painted the are in a dirty white color to make it look as
though the cushion was split and the much of the stuffing was visible.
Everything was then assembled per the instructions with CA glue, followed by attaching the cockpit in place and closing up the fuselage with the same glue. Fit was good and no real filling was needed, only some basic sanding.
The wings went together without any problems and only some minor seam fill with CA glue and light sanding. The tail planes were single pieces, no work other than simple trimming and clean up was needed. The wing mated to fuselage, as expected, with only some minor glue fill and light sanding needed. Thus went the stabilizers as well.
This is one of the briefer summaries of construction that I have given, but there was really very little to it. Even as an earlier Tamiya kit, it was still much of the shake and bake variety, as is often said of their newer kits. Now it was ready to paint and that was where things would really get interesting.
| COLORS & MARKINGS |
As I mentioned, the photos that I have seen of salvaged and impressed Japanese aircraft in use South or North Korea usually featured the paint having been stripped to some degree. They also looked accordingly rough, and worse for the wear. This also seems to hold true for the aircraft impressed in Indonesia and China. While some of these aircraft were doubtless simply left where they were sitting at war’s end, some were likely already derelict and may have been assembled out of two or three partially serviceable planes. In any case, the hard life that they had was plainly evident. Many of these looked as though they had been through the bad part of hell.
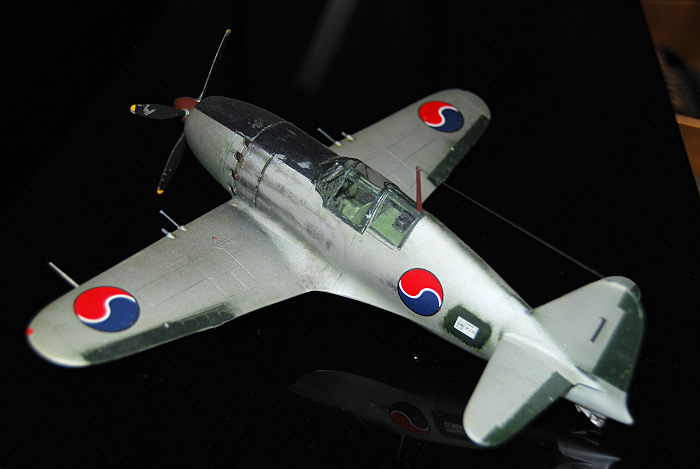
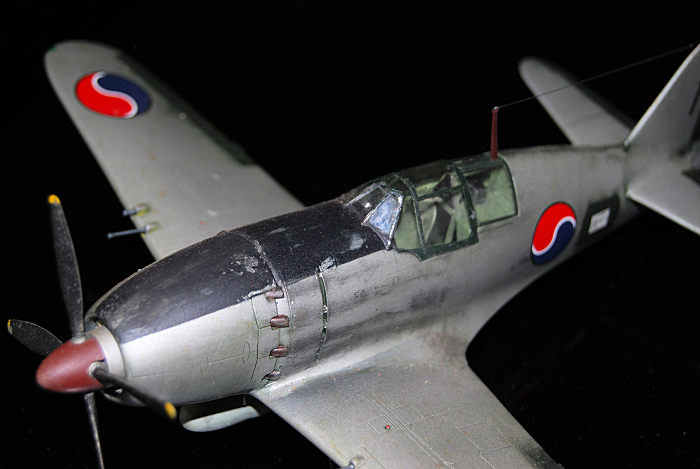
In any case, I had decided to follow that course on this one. I thought of a number of ways to simulate the finish and ultimately decided that the best way would be to essentially duplicate what was actually done. I would first finish it with an oil based natural metal. Then I would over paint it in the appropriate colors in acrylic and wipe this off using alcohol to try and get as close as I could to the actual effect.
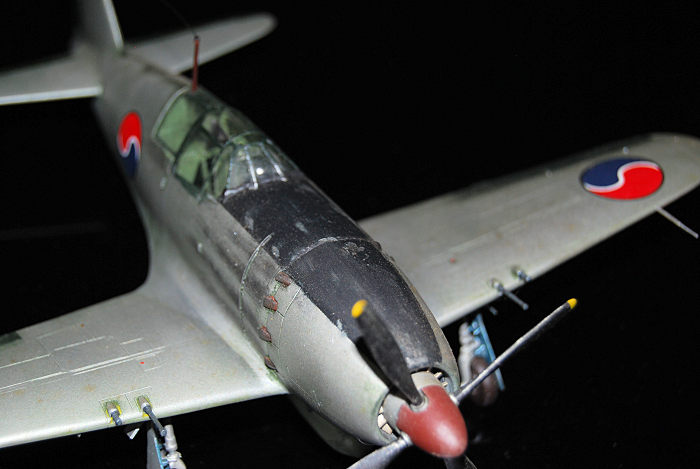
Of course, there were a few places that they would have retained paint. There was no doubt that long nose and cowl would have an antiglare panel and I suspected that the Japanese data stencil on the aft fuselage would have been retained. Additionally, some of the photos that I have seen appeared to show the original paint on the fabric control surfaces, which seemed logical out of practicality.
To begin, temporarily fitted the cowl to the fuselage and plugged the opening there and the cockpit with damp paper towels. Then I sprayed the entire aircraft in Testors Aluminum and let it dry for a bit. While I did this, I also sprayed the propeller, landing gear covers and the gear themselves.
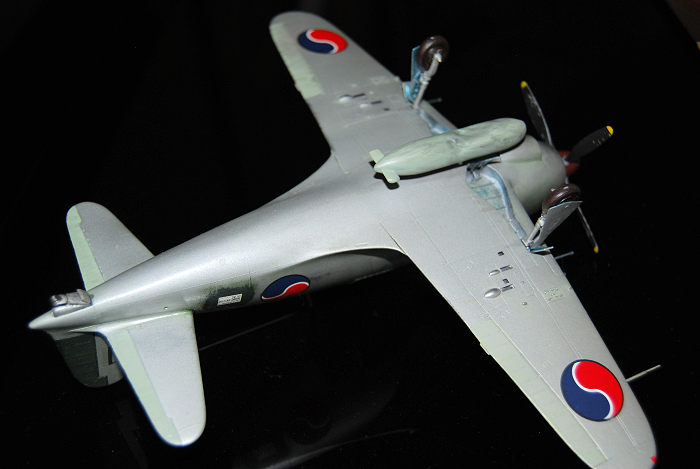
While waiting for the paint to dry, I decided to do something with the external fuel tank. In keeping with my well-worn look, I decided that the tank should look dinged up, as if it had been perhaps reclaimed from an airfield dump. I had, after all, seen photos of dented tanks in use on wartime aircraft on all sides, so I thought that this make for a realistic touch.
I assembled the tank and smoothed out the seams. Then I lit a small candle and warmed one of the fins just enough so that it could be bent a little. Then I heated up the center ventral section and dinged it significantly by poking and prodding at it with a paintbrush handle until I had some very noticeable wrinkles and dents. Finally, a small ding was added to the forward area.
I had never tried this before, at least not since I went to extremes making a crashed P-39 from the Monogram kit as a child. That one had a lot of realistic looking dents and damage, and a lot more that looked like Beavis & Butthead had gotten ahold of it, though before their time. I had half expected to turn this into a pile of plastic glop, but it came out almost exactly as I had envisioned it.
 Once the
paint on the aircraft was thoroughly dry, I masked off the area around the glare
panel with Tamiya tape and sprayed it in Testors Flat Black. While this was
drying, I turned my attention back to propeller, spraying it in Tamiya Flat
Black and the prop tips in Tamiya Flat Yellow.
Once the
paint on the aircraft was thoroughly dry, I masked off the area around the glare
panel with Tamiya tape and sprayed it in Testors Flat Black. While this was
drying, I turned my attention back to propeller, spraying it in Tamiya Flat
Black and the prop tips in Tamiya Flat Yellow.
This was done so that I could use the tape-ripping method of peeling of chunks of acrylic paint to show significant wear. As soon as the paint was judged to be dry enough to attempt it, I did so with ordinary masking tape, achieving excellent results. The aluminum shone through in many places, giving it just the look that I wanted. The propeller hub was then hand painted in Aluminum and set aside.
Now it was time to mask off the glare panel Tamiya tape and spray the standard Japanese Navy paint colors on the aircraft. The upper surfaces were painted in Tamiya XF-11 Imperial Japanese Navy Green. Since this was all going be wiped off, there was very little in the way of masking needed. One area that did require attention was the landing bay, though.
Before spraying the underside in in Tamiya XF-12 Imperial Japanese Navy Grey, I first sprayed the gear wells in Tamiya X-13 Metallic Blue. This was then my choice of paints to simulate the unique Japanese Aotake varnish. (I now have created my own version, using a mix of Tamiya Clear Blue and Clear Green sprayed over Aluminum, creating a very realistic effect.) In any case, the plan was also to remove much of this as well. The same was also applied to the insides of the gear covers. Once the gear bays were dry, they too were stuffed with damp paper towel bits. Then the underside was shot in XF-11, as well as the external fuel tank.
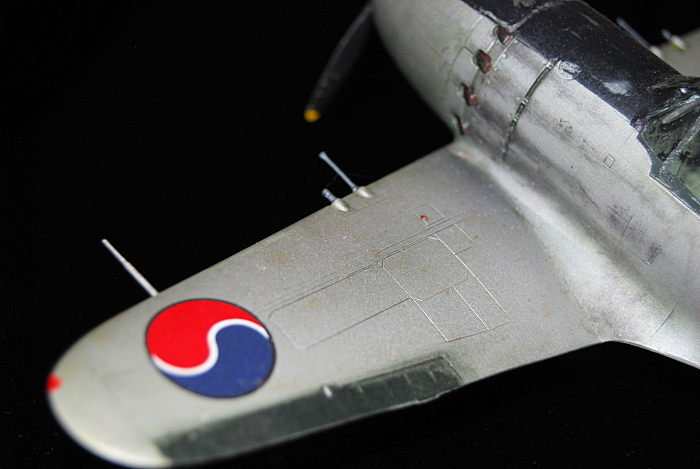
Only waiting for the paint to dry enough to be handled, I went to work stripping it off. To do so, I took a paper towel and dampened it with alcohol and began making little swirls, more or less mimicking what would have been done on the real aircraft with paint thinner of some sort. Care was taken to avoid the glare panel and also the control surfaces. However, the latter were given a very light pass, just to give the impression of wear and the proetctive dope showing through old paint. The same was also done on the glare panel to show some wear as well.
Traces of the paint were deliberately some places and served to accentuate panels in others. A roughly rectangular section was left on the after left fuselage where the Japanese data stencil would remain. The worn Aotake was simulated by rubbing down the gear bays and inner landing gear covers with an alcohol soaked Q-tip. The overall effect was almost exactly what I had hoped for.
The landing gear was now installed and the wheels painted in Testors Rubber. The brakes hand painted Testors rust, overbrushed in Model Master Burnt Iron. The same was done with the exhausts.
The cowl was removed and the exhaust installed as well as the spindle and cooling fan. The propeller spinner had been sprayed in Tamiya Hull Red. There was no particular reason for this color. However, I thought that it gave the look of temporary primer paint of some sort that was sprayed on and generally forgotten. I then weathered it by dry brushing with aluminum. The propeller and spinner where then attached and the cowl was permanently glued in place. A few more paint scuffs and dings were added the to the glare panel using both light tape-ripping and Q-tip method.
The fuel tank filler cap was then painted black and the Aluminum dry brushing was done over much of it, especially in the dents and wrinkles. I wanted this to look very grimy and gave it a fairly heavy oil wash, being certain to make it look as through fuel had dripped down around the filler cap. It was then attached and the landing gear covers were glued into place. Now it was time to decal it.
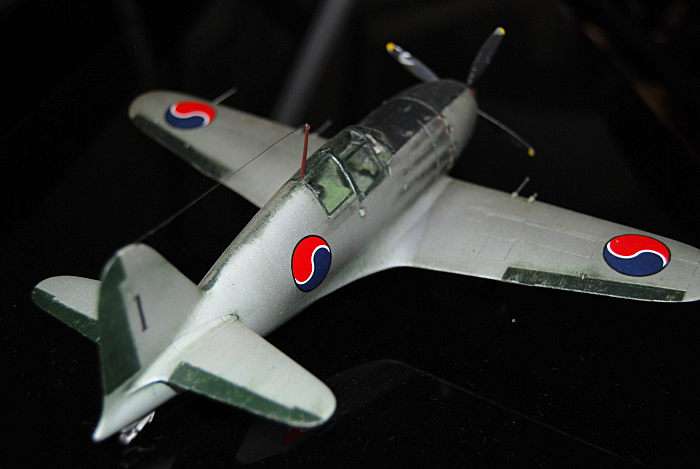
Prior to the U.N. entry into the Korean War, South Korean aircraft insignia was a usually only a roundel with the red over blue yin and yang insignia from the national flag. There are a few instances of some having white bars (Mainly some L-4 Cubs) where this was overpainted over former U.S. insignia. This is the same way that the current bars were acquired and the modern insignia created, having the U.S. center overpainted on the T-6’s and P-51’s that they received during the war.
However, most photos show only this roundel on prewar aircraft. It is noteworthy that photos of such aircraft are on the rare side. Also as noted, there are no photos of the Jacks, if they in fact existed. However, there is little doubt that this is the insignia that they would have worn.
The aircraft was given a coat of rattle can Model Master Gloss. Then the kit data stencil was applied to the green panel on the fuselage. The wing and fuselage insignia were carried on most prewar aircraft in six places, so this pattern was followed. The insignia was taken from Aero Master decal sheet 48-099 Mustangs Over Korea. These were the markings provided for the aircraft of Col. Dean Hess. The bars were carefully trimmed away and then these were applied as well. All went with no difficulties, requiring only a mild setting fluid.
I suspected that some sort of tail number would have been carried and picked a somewhat random number 1 from the decal file and applied it as well. When these were thoroughly dry, the whole thing was overcoated in Model Master rattle can Flat.
| FINAL CONSTRUCTION |
 There was
now very little to do. The canopy had previously been dunked in Future and set
aside to dry. The canopy framing was masked off and painted in Aluminum, then
overpainted in Tamiya XF-11 Imperial Japanese Navy green. The tape method was
then used to weather and remove bits of paint here as well. It was then glued
into place with CA glue.
There was
now very little to do. The canopy had previously been dunked in Future and set
aside to dry. The canopy framing was masked off and painted in Aluminum, then
overpainted in Tamiya XF-11 Imperial Japanese Navy green. The tape method was
then used to weather and remove bits of paint here as well. It was then glued
into place with CA glue.
The wing guns were painted in Model Master Gun Metal and glued into place, though I did not add any weather for gun blast, as I question if they would ever have been fired. Heavy exhaust streaking was added though. I suspect that the engines were far from first rate and the fuel being used may not even have been aircraft grade. What little information that is out there on the pre-1950 South Korean Air Force shows that there was a lot of scrounging, salvaging of equipment, creative acquisition, and generally operating on a threadbare shoestring budget.
There was some general weathering done with light acrylic wash to the step area at the wing root and more on the underside in the appropriate areas. Finally, the radio mast was fitted and an aerial made from stretch sprue was attached. Now it was done. I had a South Korean J2M Raiden or “Jack” that did pretty much look, a I previously put it, as though it had been through the bad part of hell.
| CONCLUSIONS |
The old Tamiya kit is still a very nice build, and quite moderately priced. It offers few challenges and can easily be assembled in a day or two with first rate results. I would recommend it to any modeler who wants a 1/48 Raiden. Even with the unorthodox painting, it was an easy build and only took around twelve to fourteen hours to complete and I was very pleased with the results. Amusingly, the model show where I debuted it also featured three other Jacks, all in 1/48 and all in capture markings. Two were U.S. and one Australian. However, there were none in Japanese colors.
As to whether or not they actually existed, I do not know. Most stories tall, war, or other stories have at least some basis in truth. I suspect that there may have at least been an attempt to repair and return to at least one or two such aircraft to flight status. How far that got is anyone’s guess.
How far that actually went is anyone’s guess. It or they may have been permanent hanger or ramp queens. However, given the number of Japanese aircraft that were left behind and subsequently made it into service being at least a few dozen between the two Korean nations, I find it plausible if not likely. There are confirmed reports of Ki.43’s and Ki.84’s in North Korea, Ki.55’s and Ki.54’s in both countries, Tachikawa Ki-9’s in South Korea, the G3M that I previously mentioned, and doubtless others. I have always been somewhat surprised that no A6M Zeros showed up there as they did in China.
In any case, it was a fun build, even if possibly only a whimsical what-if. It is certainly an attention getter. As noted before I would recommend Tamiya’s Raiden to almost any modeler who wants one of these distinctive aircraft in their collection.
| REFERENCE |
Japanese Aircraft of the Pacific War by Rene J. Francillon, Putnam Aeronautical Books, 1970
https://en.wikipedia.org/wiki/Mitsubishi_J2M
https://wwiiafterwwii.wordpress.com/2015/06/19/wwii-japanese-weapons-in-the-korean-war/
10 February 2023 Copyright ModelingMadness.com.
All rights reserved. No reproduction in part or in whole without express
permission. If you would like your product reviewed fairly and
fairly quickly, please
contact
the editor or see other details in the
Note to
Contributors.