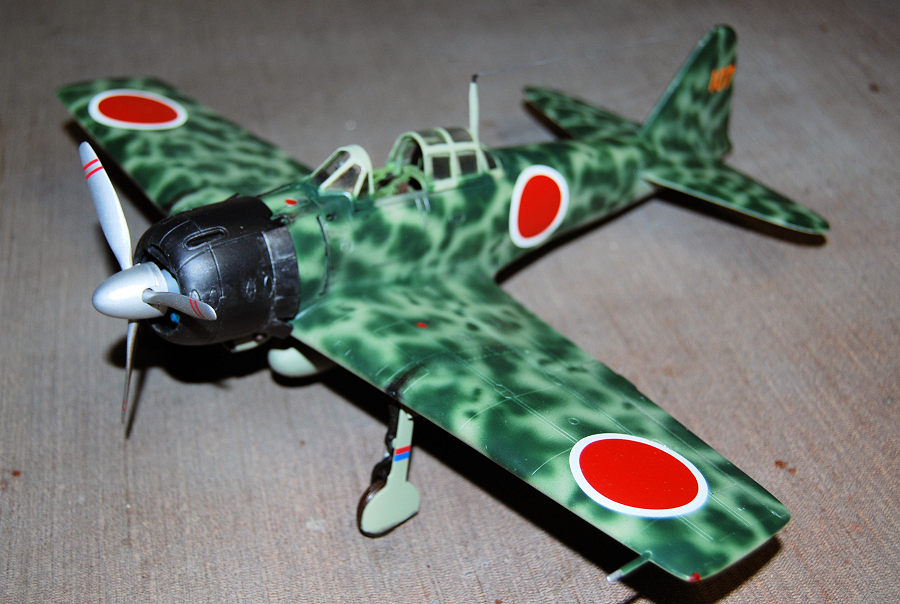
21st Century Toys 1/32 A6M3 type 32
| KIT #: | 22201 |
| PRICE: | $15.00 |
| DECALS: | Three options |
| REVIEWER: | Christopher Campbell |
| NOTES: | More of an ordeal than anticipated. |
| HISTORY |
The initial idea for the A6M3 type 32 was to include the shortened, “clipped” wingtips to improve aircraft carrier storage. However, due to the construction techniques in use, this new wing was more damage prone, and any serious hit would necessitate the replacement of the entire wing. (This was not an entirely new problem. The A6M3 and A6M2 were both built with weight savings at a premium. Resilience under fire was never a strong point for the Zero, and particularly so in these early varaints.)
Handling also suffered. Roll rate was improved. That, however, was one of the only aspects in which the new type exceeded its predecessor. The Type 32 was inferior in its turn rate to its vaunted predecessor, the legendary A6M2 “Zero” that had been the terror of the Pacific and Asian theater for nearly two years at the time of the Type 32’s introduction. Range suffered and speed improved only marginally. This made it something of a bust as a carrier fighter, having sacrificed a number of its strengths in favor space saving aboard carriers. It would ultimately find its niche mainly being used as a land-based fighter and proved reasonably effective in this role.
It featured an improved, longer and streamlined cowl and a
more powerful Nakajima Sakae type 21 fourteen-cylinder air-cooled radial pumping
out more than 1,100 horsepower, up more than 100 from the A6M2. This new look
combined with its angular, clipped wingtips initially had Allied pilots miside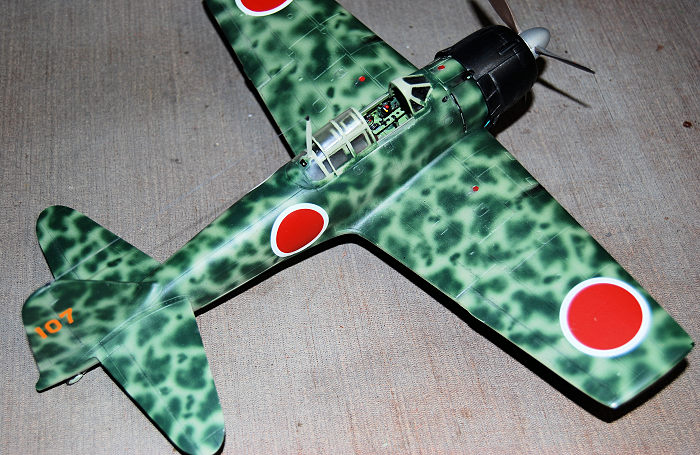 ntifying
it as a new type of aircraft. In keeping with the established process of
code-naming Japanese fighters with male names, the A6M3 Type 32 was initially
given the nomenclature of Hap, purportedly in honor of U.S.A.A.F. commander
General Hap Arnold. Most unamused by this “honor,” this was quickly changed to
Hamp.
ntifying
it as a new type of aircraft. In keeping with the established process of
code-naming Japanese fighters with male names, the A6M3 Type 32 was initially
given the nomenclature of Hap, purportedly in honor of U.S.A.A.F. commander
General Hap Arnold. Most unamused by this “honor,” this was quickly changed to
Hamp.
Only around three hundred Type 32’s were built. While well known as a land-based Japanese fighter type, some did serve on aircraft carriers, it originally intended roll. However, in addition to the wing being more damage prone than its predecessor, it was, again, only marginally faster, its rate of climb suffered, and its range dropped by over five hundred miles. Cannon ammunition capacity was increased by forty rounds for each gun and the dive rate was improved.
Still, overall, it could hardly be called much of an improvement from the A6M2. The type 22 with rounded, folding wingtips similar to those of the A6M2 quickly replaced it. This improved range, climb, and maneuverability (aside from roll rate) over the Hamp, while retaining modest gains in speed. The phenomenal range of the A6M2 was gone forever as the Zero grew increasingly heavier with each subsequent type. Nearly twice as many of this revised type were produced before it was superseded by what is sometimes considered the definitive version of the legendary Mitsubishi fighter, the A6M5 which would go through numerous variants and incarnations by the end of the War.
An interesting footnote here is that photographs of A6M3 Type 32’s seem to be rather scarce. Even for an aircraft with a production run totally only three-hundred-forty-three, there seem to be very few surviving photographs. In my references from my personal library, I found less than ten. A further search of the internet gleaned only four or five more. Overall, that is somewhat surprising given how many photos there are of Zeros on the whole.
One can debate the case for the A6M3 from both sides. The the original A6M2 was superlative in its purity of design and extraordinary performance in virtually every aspect. It was also, in certain respects fragile when compared to its successors. The A6M3 variants represented something of a compromise between this design and the increasing combat requirements placed upon it by the evolving Pacific war. The A6M5 saw it grow increasingly heavier and more survivable, yet still remaining and effective and in many ways improved. Still, efforts to turn the A6M5 into an aerial Japanese Navy Swiss Army knife capable of being a long range carrier fighter, bomber interceptor, tactical support aircraft (hanging a bomb rack on the Zero initially considered heresy by almost all concerned), and sadly, an expendable mount for Kamikaze missions ultimately left it lacking in most of these roles.
By the time that the A6M5 was being fielded, as a design, it was rapidly growing long in the tooth compared to many of the Allied types that it was facing. Its intended replacement, the potentially formidable A7M Reppu (“Sam”) seemed to be eternally stuck in some sort of design and development purgatory with less than a dozen ever being completed. None seem to have ever seen action and the Zero soldiered on until the bitter end. While the J2M Raiden (“Jack”) and N1K Shiden (“George”) were exceptional types developed for the Japanese Navy, both were land based types. No capable carrier based fighter would replace the Zero on the ever dwindling number of Japanese aircraft carriers left to face the juggernauts of the American and British fleets closing in on the home islands, leaving the few that rose to face the onslaught often little more targets for now battle hardened Allied pilots.
| THE KIT |
Previously I had built the 21st. Century Toys 1/32 offerings of the Macchi Mc.202 and Junkers Ju.87B Stuka. While lacking in detail and with some rather peculiar assembly quirks, I found them to be generally decent kits with great potential for the modeler with some scratchbuilding and parts bin resourcing skills. The A6M3 Type 32 cannot be said to be quite up to the bar set by the aforementioned kits.
It is packaged the same way, without sprues, parts being sealed in multiple plastic bags and clear plastic box of sorts containing many of the smaller bits. However, there is some weirdness in this one compared to the other two kits that I had tried.
 While this
had what was, in general, the best detailed cockpit of any of the kits that I
had seen on any of their kits, the instrument panel was just plain odd. One gets
an instrument panel with a bunch of holes where the instruments should be. My
initial thought was that there would be a printed acetate insert or something
that fit behind those holes. Nope! If built straight from the box, one has a
fairly detailed cockpit with an instrument panel looking like some aircraft
boneyard derelict. To say the least, the general effort that they had put into
the cockpit (Aside from the instrument panel, I would otherwise rate it better
than the venerable 1/32 Hasegawa kit), this was odd.
While this
had what was, in general, the best detailed cockpit of any of the kits that I
had seen on any of their kits, the instrument panel was just plain odd. One gets
an instrument panel with a bunch of holes where the instruments should be. My
initial thought was that there would be a printed acetate insert or something
that fit behind those holes. Nope! If built straight from the box, one has a
fairly detailed cockpit with an instrument panel looking like some aircraft
boneyard derelict. To say the least, the general effort that they had put into
the cockpit (Aside from the instrument panel, I would otherwise rate it better
than the venerable 1/32 Hasegawa kit), this was odd.
The rest of the parts were nicely molded, though featuring the rather odd, toyish, screw assembly for the main pairs with the scale dinnerplates sized caps that look nothing like any panel line found on the aircraft and have to be address accordingly. Panel lines are recessed overall, though a bit heavy handed. Also, there is the most annoying 21st. Century Toys nameplate emblazoned in raised detail on the underside of the tailplane that also has to be dealt with. It has a few more quirks that will be addressed in the build details. Overall, like their other offerings that I have delved, it still has fair bones to work with. However, these were a little more lacking than those of the Stuka or Macchi.
| CONSTRUCTION |
Shortly after I had completed a very rewarding build of the somewhat ancient Tomy, Swallow, Doyusha mold of the A6M2, built as Saburo Sakai’s legendary mount, I became intrigued by the idea of building a 1/32 A6M3 Type 32 Hamp. I have always liked the clipped wing version of the Zero and its mottled, jungle paint schemes.
In truth, these may be somewhat apocryphal. Even for an aircraft with low production numbers, there seem to be surprisingly few photos of the Type 32, even given its low numbers. I wa able to lacate only around a dozen verifiable photos, and very few of these showed the fabled jungle mottling.
There were a number of ways that I could have gone about it, to be certain. However, having had a fairly enjoyable experience in building the Stuka and the Macchi, I decided to give their A6M3 Type 22 a whirl for my conversion. It ultimately worked, though I think I would have now preferred to have started with the classic Hasegawa kit.
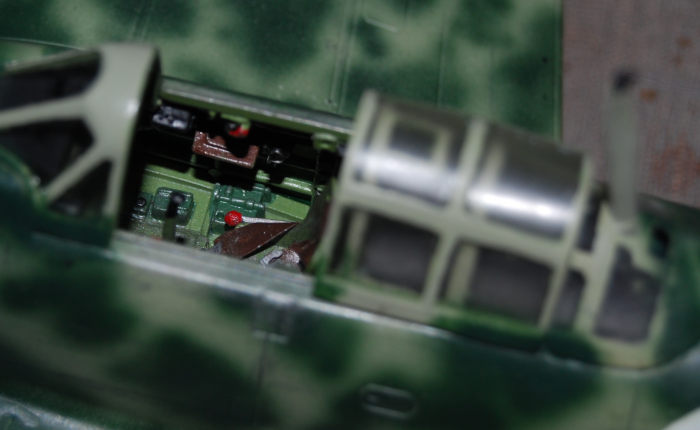
I began with the cockpit, which other than the aforementioned instrument panel, I found to be generally detailed. Everything was painted in Tamiya Cockpit Green and appropriate panels detailed in black with dry brushing Testors silver and various switches and knobs picked out in red and yellow. Areas of wear were given some dry brushing with silver and everything given an oil wash to give it a slightly grimy used look.
The instrument panel issue was address with an aftermarket. pre-painted photoetch intended for the Tamiya kit. Seatbelts were made from Tamiya tape, painted and fitted with scratchbuilt buckles. As mentioned before, from my perspective, the instrument panel was really the only disappointment in the cockpit, and it can easily be dealt with by using aftermarket photo etch.
The engine and cowl were the next items. The former was somewhat oddly executed. It consists of a cylinder bank molded into the firewall along with a second bank, pushrod ring, and hub. However, both banks of cylinders are rendered in half bank form. This seemed a bit odd to me and I had a nasty feeling that it was going to look rather toyish when complete. I was pleasantly surprised when it did not, though.
The firewall and its bank were sprayed in Tamiya Flat Black, along with the forward cylinder bank. This would subsequently serve as some pre-shading. The cylinders were then painted in Model Master Anodonic Grey and given a wash of Tamiya smoke diluted in denatured alcohol. The hub and crankcase were painted in Testors Flat Grey.
 The pushrod
tubes required considerable cleanup, as there is a somewhat heavy mold line
present on all of them. This was accomplished by scraping with a #11 X-Acto
blade. However, the soft nature of the plastic used in this kit made it
difficult to erase this completely. Characteristically of some soft plastic. It
almost seems to regrow of its own accord.
The pushrod
tubes required considerable cleanup, as there is a somewhat heavy mold line
present on all of them. This was accomplished by scraping with a #11 X-Acto
blade. However, the soft nature of the plastic used in this kit made it
difficult to erase this completely. Characteristically of some soft plastic. It
almost seems to regrow of its own accord.
Still, once it looked as though it had been sufficiently removed it was painted in Testors Gloss Black and the rod knuckles were painted in Silver. The engine was then assembled. And attached to the firewall. I omitted the metal propeller shaft at this point. I have done this on all 21st. Century Toys kits that I have built, as I found it easier to deal with as a part of the final assembly.
There was some issue with this part of the assembly and in general from this point on. The instructions are vague. While well illustrated, the assembly order of some pieces is not indicated. Some test fitting is required, and some parts do not go on in what would be considered the logical order, or in what would seem like a normal alignment. This had not been my experience with the Macchi or the Stuka however.
The cowl was a bit problematic. In its unassembled state, the flaps actually look lopsided. It is only an optical illusion, however, which I confirmed by test fitting. There were still some things to deal with tough.
The cowl intake scoop is nicely molded and has good, realistic depth to it. However, the aforementioned cowl flaps are positioned open, but have no separation between them. This would be unacceptable in the finished kit. It was simple enough to create the opening with a fine razor saw and then clean with up with and X-Acto knife and some light sanding.
There is one other problem with the cowl flaps. The innermost bottom flaps through which the exhaust pipes should protrude have no provision for the pipes or representation thereof. Additionally, they are positioned open. I looked at numerous photos of A6M3 through A6M5 variants, all of which use this version of the cowl or one very similar. I could not find a photo that showed this.
The soft plastic was an asset to the build here, as it was easy to bend them back into the appropriate position. The engine was glued into place and the cowl itself assembled and glued together with gap filling CA glue. It closed up nicely and only a modicum of sanding was required to finish it out.
Once this was completed, exhausts pipes were made from some plastic tube and glued in place. The cowl was then painted with my own mixture that I use to represent blue-black color of Japanese aircraft cowls. (Testors Flat Black and Flat Dark Blue at around a 6:1 mixture.) This was now set aside and turned my attention back to the fuselage.
The cockpit was installed, and the fuselage assembled per the instructions. As noted, these instructions are vague side with the illustrations, so be certain to test fit everything. I used gap filling CA glue along with their bizarre screw fittings. The screws allowed everything to snugged down tightly, excess glue that seeped being wiped away (It’s a weird system and it does work, but it makes for additional work with these dinner plate sized holes.).
These screw holes were closed up with the supplied caps, sealed with CA glue and sanded until any sign of them was obliterated. One note here- these covers are made of the same plastic as the kit, as on the Stuka I built. Their first kit that I built, the Macchi, featured rubber covers that did not work well, as they did not respond well to CA glue or any other filler I tried at all. I finally filled the holes with Squadron Green putty, sanded and then sealed in thin CA, and sanded again.)
The only fit issue that I had was with the rudder and tail. It wanted to gap and even when filled, looked too thick, so there was a lot of filling, and sanding to get a more appropriate look.
I then assembled the horizontal stabilizers. As is standard on all of these kits, the underside of one was emblazoned with scale 5x3 foot, give or take, raised lettering of the 21st. Century Toys logo. This was first scraped off with a sharp X-Acto blade, then sanded thoroughly to remove. There were also some noticeable swirls in the plastic which were dealt with by sanding as well, using 320 to 400 grit, finally 0000 steel wool and polished with a dryer sheet. The assembly of the stabilizer halves was simple, simply gluing them with gap filling CA, followed by some cleanup and sanding on the edges. No gaps were in evidence.
Now it was time to attack the wings. Attack was an appropriate way to look at it. There was a lot of work to be done here.
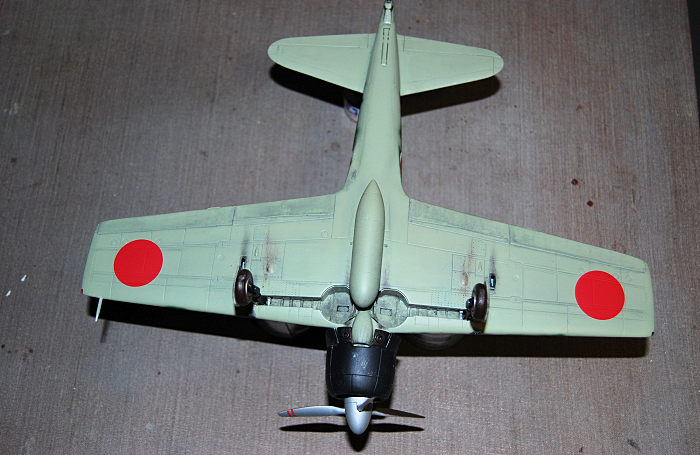
The landing gear wells looked decent enough, but had some odd, square openings in them that did not match any photos that I had. I sealed these with sections of plastic card from behind. There are panels there in photos that I have seen, but no illustrations that I found showed them as openings.
Additionally, the real aircraft has longitudinal structural braces or supports of some sort visible in the gear wells there were not completely represented, only on the kit sidewalls. These were added over the top areas by cutting some thin, square Plastruct rod of the appropriate thickness and gluing them in place with thin CA glue.
 The
biggest problem here is the rather toylike nature of the landing gear and its
working component. While I have managed to modify a number of kits with this
sort of feature to add the gear afterwards, this one was not going to lend
itself well to that kind of modification. I was going to have to add the gear
when I assembled the wing and just deal with flopping around and try not to
break it. On the plus side, the gear casting are pretty sturdy.
The
biggest problem here is the rather toylike nature of the landing gear and its
working component. While I have managed to modify a number of kits with this
sort of feature to add the gear afterwards, this one was not going to lend
itself well to that kind of modification. I was going to have to add the gear
when I assembled the wing and just deal with flopping around and try not to
break it. On the plus side, the gear casting are pretty sturdy.
I cleaned them up with an X-Acto and assembled them with their keepers. Then I did some test fitting on the wings and satisfied with it enough to commit to glue. Thick CA glue was used, as I wanted a very solid bond. I glued them together, clamped them with heavy rubber bands and set them aside to cure for the better part of a day.
While this was glue was drying, I decided to assemble the external fuel tank. Like the Swallow A6M2 that I built a few years ago, this fairly simple part had some of the worst fit in the kit. It looks to a degree as if 21st. Century copied this part.
While most tanks are molded in two halves, this one has three parts, aft halves with a forward cap that has poor fit. It was very gappy and required a lot of filling, sanding and some rescribing, as when the gaps are filled, the panel line that should be there is mostly gone. I managed this by careful scoring with a sharp #11 X-Acto blade. Still, bizarre how they could make such a simple part fit so badly.
With the wings solidly glued, I sanded all of the edges with the same grits of sandpaper previously used. During this process, I opened the wing cannon ports slightly, as I wanted to insert actual barrels into them. For this I used some copper tubing, cut to fit, and inserted with a drop of thick CA glue. Once this had set, I sanded the ports again.
The wings also feature the screw attachments and have four holes to be capped and filled. This worked reasonably well, as on the fuselage. One of them, however proved quite stubborn to erase and requires three filling and sanding sessions. Now for the hard part: clipping the wings.
The best illustration that I could find of the A6M3 Type 32 wings was in the classic Squadron Signal Zero in Action. I also looked up a few pictures on the Internet, finding mostly the same detail. My plan was to cut down the wings and then use sections of two sets of the wing caps from a Hasegawa Spitfire Mk.Vb.
I have found some references to actual resin wingtip parts for this conversion on the Internet. However, I never found any current source for these. There were only two Internet references to a buildup having been done, or at least posted. Again, given the popularity of the Zero, this surprised me a little. I doubt it, but I began to wonder if I was the first modeler attempting such a build in this manner, using this kit as my basis.
Now it was time to suck it up and go for it. I measured and measured again, and again. Then I marked it off with a pencil and straight edge and went removing the rounded wingtips with a razor saw. The cuts seemed straight enough and were subsequently cleaned up with some scraping with an X-Acto and light sanding. I then cut the Spitfire wingtips to fit in two sections for each side.
Then came the messy part. I initially attached them with a somewhat liberal application of gap filling CA glue and hit them with accelerator. Then I filled the gaps with more CA glue until I was satisfied that there was more than enough, all while trying to keep mess from flowing into the ailerons, which I managed, mostly.
Once this was dry there was a lot of sanding and shaping and some more filling and sealing. In the end I would say that my wingtips were around 60% Hasegawa Spitfire and 40% glue fill. Still, it worked, and it was starting to look like a Hamp. The outer aileron lines had unfortunately been partially filled. This proved relatively easy to clean up with my one of my late father’s sheet metal scribes.
Now, time to mate the wings to the fuselage. The fit was not bad, but not great either. I would compare it to many of the classic 1/32 Hasegawa kits here. There was some filling and sanding needed, but what I had more or less expected. It was no worse than building a Hasegawa Spitfire of Bf.109E, just part of the job as it were.
The horizontal stabilizers were mostly trouble free as well. I need a little filling and sanding. Unfortunately, I got a couple of small, what would amount to almost pinholes in the underside joint that I did not notice until I was readying it for its first model show. It was too late to fix them then, but I will do so by the time this is published on Modelling Madness. \
The tail hook was glued in place along with the tail wheel. The tail hook was removed from many of these, being land base. However, I opted to leave this one in, as given the general lack of info on this variant, I was not certain if the well for it was left open, or fared over. I decided that retaining the hook was a better option. Now, time to paint.
| COLORS & MARKINGS |
First, I will note that I had initially made the mistake of shooting the landing bays in my own personal Aotake concoction (A mix of around 3:1 Tamiya Clear Blue to Clear Green over silver). Tom Cleaver pointed out to me that A6M3’s had their gear bays painted in the underside color. Thank you, Tom. This at least saved me from having to mask it off. Thus, the cockpit was plugged with pieces of damp paper towel after which I began by preshading the panel lines in Tamiya Flat Black.
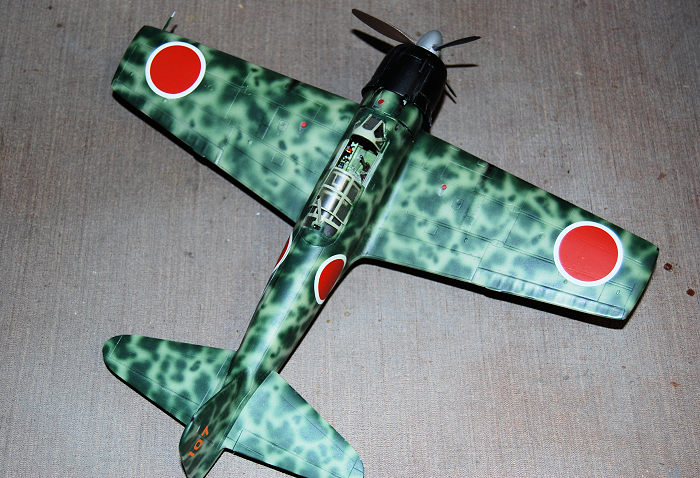
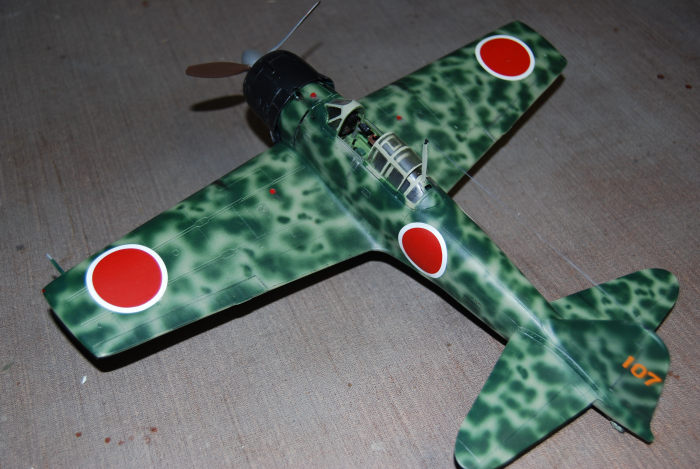
Then I painted everything in Tamiya XF-76 IJN Grey Green. I painted the landing covers and the external fuel tank at this point as well, as they would all wear the same colors. Satisfied with this, it was time for the green mottling for which these aircraft are well known.
Based on photos, illustrations and 1/48 builds that I had seen of the classic Tamiya 1/48 kit and more recent kits, standard Tamiya XF-11 seemed a little to dark. Tamiya XF-70, Dark Green 2, seemed a little to bright. I tried a few experiments until I settled on a mix of 6:4 Tamiya XF-11 and XF-70. This seemed to impart to tonal quality and shading that looked right to me.
I mixed a full bottle of this in an old Tamiya paint bottle, labeling it Alt. Hamp Green. While uncertain that I will use it again, I have sometimes found that the best solution on some of Japanese field colors sometimes are “roll your own.” I suspect that a number of these were mixed up out of what they had on hand, far from unusual in the field. Some of the colors of Malta based Hurricanes and Spitfires show blues that do not quite match anything. I often analogize these field mixes to the creation of the now patented “Petty Blue” used throughout most of the career of the legendary NASCAR driver Richard Petty and on so many cars fielded by the Petty team.
 By his own
admission in his biography, this was mostly an accident. Early in his career, he
needed to paint a race car. He had neither enough white nor dark blue paint on
hand. His solution was a simple a practical one, mix what he had. The result was
a distinctive, light blue that fans liked. It is now patented, despite its most
humble origins. Doubtless this was the case with many aircraft, tanks, and more
painted in the field during W.W.II and a number of other wars.
By his own
admission in his biography, this was mostly an accident. Early in his career, he
needed to paint a race car. He had neither enough white nor dark blue paint on
hand. His solution was a simple a practical one, mix what he had. The result was
a distinctive, light blue that fans liked. It is now patented, despite its most
humble origins. Doubtless this was the case with many aircraft, tanks, and more
painted in the field during W.W.II and a number of other wars.
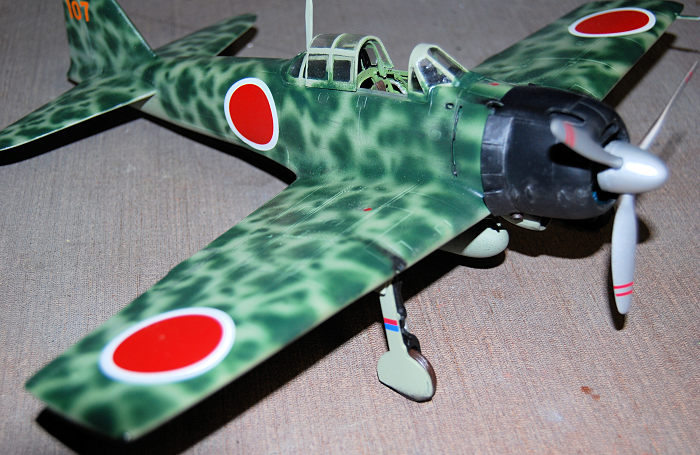
As mentioned before, there a not a lot of photos of these aircraft. Some are in simple IJN Grey. Some look as through they were brush painted with green mottling in the field and some with a spray gun. I wanted to create the latter effect and simply applied it freehand with my airbrush, recalling what I once read a Luftwaffe crewman note that they “just scribbled on their aircraft with their sprayguns” to create the more well-known, similar Luftwaffe paint schemes. That was what I attempted to channel with my airbrush on moderate pressure and with a light touch, trying to keep things somewhat irregular. I was quite pleased with the results. Now it was really starting to look like a Hamp.
Once this had dried and was good to handle, I brush painted the tail wheel in Testors rubber and the strut in Testors Silver. The landing gear was painted in Testors Gloss black, and the compression struts in the same Testors Silver.
A mix of kit decals and others gleaned from my Japanese W.W.II decal file were used here. First the model was sprayed in Testors rattle can Gloss. Not having found a photo of a specific aircraft that I wanted to model, I created a somewhat generic, possibly, maybe probably inaccurate tail number from part of the kit decal sheet. These went on with no trouble, using only a little Solvaset.
The underwing insignia were also from the kit. However, the fuselage and wing insignia came from Eagle Strike decal sheet 32025- The Beginning of the Legend-Early Zeroes. These also went without issue, mostly, again using Solvaset, my decal poison of choice. A slight wrinkle appeared on the white surround of one of the upper wing hinomaru’s that was corrected by carefully painting it in with Model Master Flat White. While there were ostensibly some decals to be applied on the upper wing above the flap area (No Step warnings, doubtless), Hamps that were so camouflaged seem to have largely had these painted over. I elected not to add them.
Once the decals had dried overnight, the entire model was shot in Testors Model Master rattle can Semi-Gloss. After this was dried, it was given light overcoats of Tetsors Model Master Dullcoate until I was satisfied with the appearance.
| FINAL CONSTRUCTION |
The wheels were now sprayed in Testors Rubber and the hubs hand painted in Model Master Dark Anodonic Grey. The brake drums were given a dry brushing in a mix of Testors Rust and Model Master Burnt Iron. Once dry, these were then glued in place on the landing gear. Landing gear covers were glued in place as well, followed by the fuel tank. The inner gear covers have almost no positive attachment, so this is a case of put there where they look right and shoot them with accelerator before they move.
The wing pitot tube was painted an installed and wing tip lights were created by carefully painting them in with Tamiya Clear Red and Clear Green. Fuel filler caps were painted in Testors Flat Red. Then some weathering was added by drybrushing various areas in Testors Aluminum followed by the same sort of grimy black oil wash used in the cockpit. Exhaust and gun blast staining was created by drybrushing Tamiya Flat Black.
The propeller and spinner were cleaned up, assembled and prepared for painting. First the back of the propeller was painted in Tamiya NATO Brown. This was masked off and the rest was painted in Testors Aluminum, decal warning stripes added and clear coated when this was dry. The propeller shaft was cut down from the metal piece provided in the kit and glued into the spinner. This will allow the propeller turn and would allow its removal if needed.
The cowl and engine assembly were test fitted and found not to fit with the proper alignment. This was corrected by trimming the attachment point on the fuselage assembly until the proper fit was achieved after which it was attached with gap filling CA glue to achieve a very solid mount.
The kit does not include the small outer landing gear covers. I found reasonably appropriate pieces from my spares drawers, trimmed them, then painted them in Tamiya IJN Grey Green, and glued them in place at what looked like the correct angle. Now all that was left was the final fitting on the cockpit parts, the canopy, radio mast, and aerial.
 I had
initially planned to paint the interior cockpit framing in Mitsubishi Cockpit
Green, the mask off the framing and spray it in the same colors as the upper
fuselage. However, framing on the canopy was an odd mix. It was heavily rendered
in some areas and so light as to be considered vague and indefinite in others.
This effectively precluding masking it with any ease. I elected to hand paint it
as well, the green mottling being applied in most areas in the same manner,
though some airbrushing being done on the aft canopy. Once satisfied, I gave it
a quick dunk in Future, then set it aside to dry.
I had
initially planned to paint the interior cockpit framing in Mitsubishi Cockpit
Green, the mask off the framing and spray it in the same colors as the upper
fuselage. However, framing on the canopy was an odd mix. It was heavily rendered
in some areas and so light as to be considered vague and indefinite in others.
This effectively precluding masking it with any ease. I elected to hand paint it
as well, the green mottling being applied in most areas in the same manner,
though some airbrushing being done on the aft canopy. Once satisfied, I gave it
a quick dunk in Future, then set it aside to dry.
I then finished out the cockpit, adding the instrument panel cowl piece and painting it and area aft of the cockpit in Tamiya Flat Black. The reflector gunsight was molded as a clear part. This was painted in Tamiya Flat Black, save the reticle that was left unpainted. Then the reflector area was painted in Model Master Chrome and glued in place.
Some drybrushing in Testors Aluminum was added to the canopy railing and then the windscreen was glued in place with CA glue applied with a toothpick. A small gap was filled with Elmer’s Glue and painted with my Hamp Green to match when dry. The aft canopy was a little more troublesome. There was a noticeable gap that was filled with several applications of Elemer’s Glue and painted as needed. The sliding portion snapped in place without issue and can be moved if so desire.
The radio mast was painted in the same IJN Grey Green. Then a drop of gap filling CA glue was applied it was carefully slid through the slot in the canopy and aligned. The tip was then painted flat black and the aerial was rigged with heavy E-Z Line affixed with CA glue and a squirt of accelerator. Now it looked like I had a 1/32 A6M3 Type 32 Hamp. That was most satisfying indeed.
| CONCLUSIONS |
This was not as easy a build as I had expected. Had I known what I was getting into, I probably would have backdated the Hasegawa kit. Still, I have a Hamp in 1/32, a rare bird indeed. This kit is much less user friendly than the Ju.87 or Macchi kits that I built previously, at least for the serious modeler. I plan to build their Bf.109F, as a cursory examination reveals that it does not have many of the issues presented in this kit. I also have their Corsair. While I have not yet built it, I now have some reservations about it. I had considered building their A6M2 kit as a Pearl Harbor attack Zero. However, based on my experiences with this kit, and having not yet purchased one, I think I may pass.
21st. Century Toys kits were manufactured initially to be semi-completed, pre-painted kits for the collector. The “model kits” seem to have been a bit of an afterthought. The ones that I tackled previously went together nicely, and I suspect that several more that I have not tried could be built up nicely. This one, not so much, though. It was kind of a mess. While some of this can be attributed to my conversion, most of it lies with flaws in the kit as presented.
Would I recommend this it? Probably not. Still, if you want to build an A6M2 Type 32 in 1/32, nothing exists out of the box. The Hasegawa kit might be a better starting point. However, one will have to deal with the late model A6M5 exhaust and the cowl designed to depict this.
Would I do it again? Questionable. I did not enjoy this build as I had expected. There were a lot of unwanted and equally unenjoyable surprises. Still, I probably would have put just as much work in backdating a Hasegawa kit, perhaps more even. The simple fact that this was intended as an A6M3 variant was why I chose it, even if it might not have been the best choice.
I spent somewhere in the neighborhood of forty hours creating this beast. I would not recommend that a modeler without some conversion experience attempt it. It was often very frustrating, though conversions are rarely simple or enjoyable. I am happy with what I ended up with, aside from correcting those little errors.
My father, who was a master wood worker, among many other things, once noted when I was complaining about a fault in cabinet that I was building, “Carpenters don’t make mistakes. And when they do, they hide them. This was a lesson I quickly learned. I would say that this is imminently applicable to modelers as well. I would advise all reading this to remember those genuine words of wisdom. Everything may not be able to be built perfection, but you can make it look that way if you try hard enough.
I have a few very minor glitches to fix on this one. I watched the judges at the show where I debuted this one analyzing against a competing Fw.190 and I did not make the grade. And that is okay. We all have those little spots we need to address on most builds. Do not let little errors ruin your enthusiasm for an otherwise rewarding build or conversion. You can always go back and touch it up. Remember, even if you enjoy competition, as I do, this is first and foremost a hobby.
I hear endless modelers at the shows that I attend complain that they have not finished anything in years. That is rather sad, as they are doubtless denying themselves the enjoyment of building to their own genuine satisfaction. I doubtless sound like a broken record but have fun. If you win awards, that’s great. Yet, if you always wanted a model of whatever plane or tank or ship or spacecraft in whatever scale and you built one, isn’t that really your reward?
That being said, while I cannot endorse this kit as such, if you desire a 1/32 A6M3 Hamp, your options are unquestionably limited. This is probably as good an option as anything else out there. If you choose to attempt it as I did, just know what you are getting into. It is not going to be easy, but how many conversions are? My advice is ultimately, follow your heart, have fun, and happy modeling!
| REFERENCES |
A6M Zero in Action, by Shigeru Nohura & Don Greer, Aircraft Number 59, Squadron Signal Publications, 1983
Mitsubishi A6M1/2/-2N Zero Sen in Imperial Japanese Naval Air Service, ARCO-Aircam Series No.18, Osprey Publications, 1970
Japanese Aircraft of the Pacific War by Rene J. Francillon, Naval Institute Press, 1979
https://en.wikipedia.org/wiki/Mitsubishi_A6M_Zero
http://rwebs.net/avhistory/history/zeke32.htm
https://www.daveswarbirds.com/Nippon/aircraft/Hamp.htm
31 January 2023
Copyright ModelingMadness.com. All rights reserved.
No reproduction in part or in whole without express permission. If you would like your product reviewed fairly and fairly quickly, please
contact
the editor or see other details in the
Note to
Contributors.