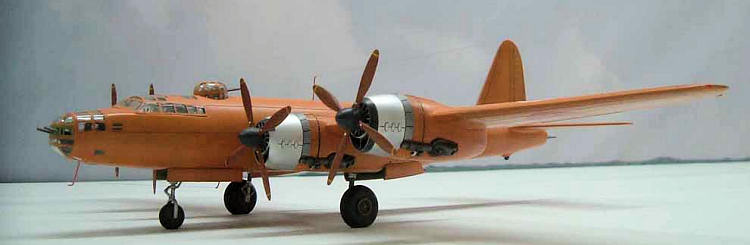
Hasegawa 1/72 Nakajima G8N1 'Renzan'
| KIT #: | JS22/K3 |
| PRICE: | $24.00 about 25 years ago |
| DECALS: | Two options |
| REVIEWER: | Aldo Chetcuti |
| NOTES: | Old Hasegawa quality |
| HISTORY |
 The Nakajima G8N Renzan
or "Mountain Range" was a heavy bomber design submitted in response to the
Imperial Japanese Navy’s need for a long range, land-based four engine bomber.
The prototype commenced trials late in October 1942 and the whole program was
severely limited due to the shortage of available wartime materials, in
particular aluminum. Total production including prototypes amounted to just
seven aircraft of which only four were completed.
The Nakajima G8N Renzan
or "Mountain Range" was a heavy bomber design submitted in response to the
Imperial Japanese Navy’s need for a long range, land-based four engine bomber.
The prototype commenced trials late in October 1942 and the whole program was
severely limited due to the shortage of available wartime materials, in
particular aluminum. Total production including prototypes amounted to just
seven aircraft of which only four were completed.
The G8N was powered by
Nakajima NK9K-L 24 Homare 18-cylinder radial engines and could carry a maximum
internal bombload of nearly 9,000 pounds. In addition to the internal offensive
armament, the Nakajima G8N was armed with six 20mm Type 99 cannons mounted in
two-gun turret assemblies and in a ventral turret position, with a twin Type 2
13mm machine guns also fitted in the nose along with an additional machine gun
in each waist gunner position.
The
sole surviving aircraft, probably the fourth prototype, was shipped to the
| THE KIT |
My model of the Renzan was a present some 25 years ago but
somehow it never got around to my workshop until the big box started bothering
me in the Japanese kits’ wall unit earlier this year and almost simultaneously,
I obtained a couple of books with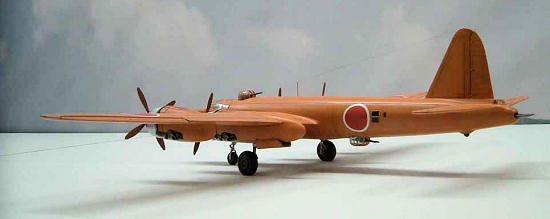 excellent references.
The model comes in the standard hard dark green plastic and
true to 60’s and 70’s tradition with millions of rivets.
The overall shape and dimensions are quite accurate
and the fit is good. My observations during the dry-fitting stage indicated that
filler will be required in the wings to fuselage joint and in the engine cowl
areas. There are other minor mould defects that require filler but nothing
serious.
The small bits are a little unrefined but can be upgraded with a little work.
| CONSTRUCTION |
The first thing I did was to remove all
rivets with wet and dry sandpaper applied very wet. I then proceeded to scribe a
few panel lines in select areas.
When this is done, attention is focused on the vacant cockpit which is
detailed with plastic card items from Evergreen plastic profiles. A couple of
control columns and an instrument panel are added, even though once the canopy
is fitted and painted, very little can be seen. The interior is painted in green
FS34258 (I used Compucolor 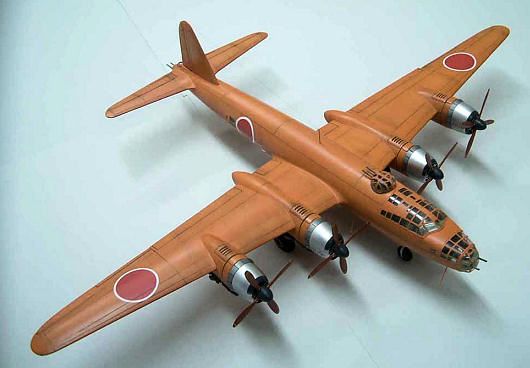 fuselage sides and closed the
bomb bay doors.
Two small side windows are opened at the front.
The small fuselage transparencies were very thick so I made my own by
heating thermoforming clear acetate against appropriately sized pvc blocks. The
fuselage halves were closed after filling all possible front areas with lead
weight and making sure I had enough to get a proper front sit.
fuselage sides and closed the
bomb bay doors.
Two small side windows are opened at the front.
The small fuselage transparencies were very thick so I made my own by
heating thermoforming clear acetate against appropriately sized pvc blocks. The
fuselage halves were closed after filling all possible front areas with lead
weight and making sure I had enough to get a proper front sit.
The turret bases were reworked and detailed to give a see
through effect.
Masking the turret transparencies was completed by
first applying a frame using a coloured vinyl tape and then masking with Tamiya
tape.
When this is complete, the vinyl is removed to expose the
frame which is later sprayed first in interior green and then in orange.
These will be fitted on last so a balsa plug in the
turret hole served as a mask.
With the fuselage now done, I turned my attention to the
wings.
These were constructed, sanded down, re-scribed and fitted
to the fuselage. The rear cowls were attached and this was the worst fitting
part of the model.
I included plastic card spacers in certain areas to
get a reasonably good and straight fit. The top cowl detail was added using very
thin card.
The tailplanes were subjected to the same treatment and
also attached.
The front cowls as represented are very plain and benefit
from scribing.
I manage to scribe the gills and the 3 latches sets
on each side.
I tried to scribe the leading section of the cowl but found
this to be too hazardous to achieve on the hard plastic so I left it at that.
There are no engines inside the cowls but you would
not be able to make out any even if there were. The exhaust parts were drilled
out, detailed with an intake, and generally cleaned up. Care must be taken if
making another of the three aircraft as the exhausts differ on each individual
aircraft.
The transparencies were polished using one of my little secrets – Whiteboard cleaner. I didn’t like the look of the front nose transparency as it has an overscale canon shelf which bothered me, so I made an acetate alternative and opened up the cannon ports.
| COLORS & MARKINGS |
When everything was fitted in place and the model masked, I
primed it with auto primer, rubbed it down and applied the first orange coat in
medium tone.
In this case I used auto paint matched to a colour photo of
the prototype in U.S. captivity matched to
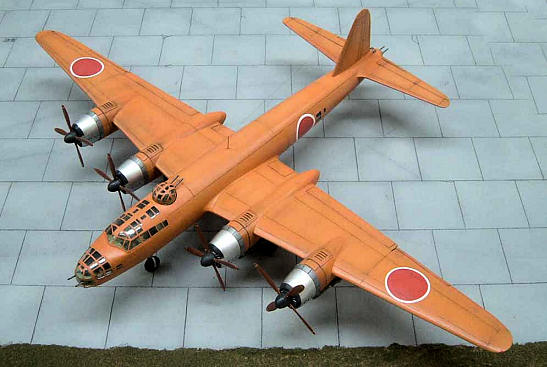 FS32246.
Next I applied the darker shade (orange mixed with
dark brown) along the panel lines and when this had cured, I filled in with
light tone colour (orange and white) to get the weathered panelling effect.
The engines are sprayed in auto colour silver, the
gills are sprayed a shade darker metallic shade (Model Master Magnesium) and the
engine cowl leading edge is sprayed black – slightly toned down - as per
references.
Please note that every engine had a varying degree of black
perimeter painted on each respective leading edge.
FS32246.
Next I applied the darker shade (orange mixed with
dark brown) along the panel lines and when this had cured, I filled in with
light tone colour (orange and white) to get the weathered panelling effect.
The engines are sprayed in auto colour silver, the
gills are sprayed a shade darker metallic shade (Model Master Magnesium) and the
engine cowl leading edge is sprayed black – slightly toned down - as per
references.
Please note that every engine had a varying degree of black
perimeter painted on each respective leading edge.
The propellers are coloured rust (I used Compucolor CSF7)
and the spinners are painted black as per photos. All undercarriage legs are
natural metal with suitable black acrylic wash to highlight the indents.
Tyres are dark grey with interior green hubs.
When the paint was done, I applied the gloss lacquer
(definitely not a floor polish!) which is an auto adaptation.
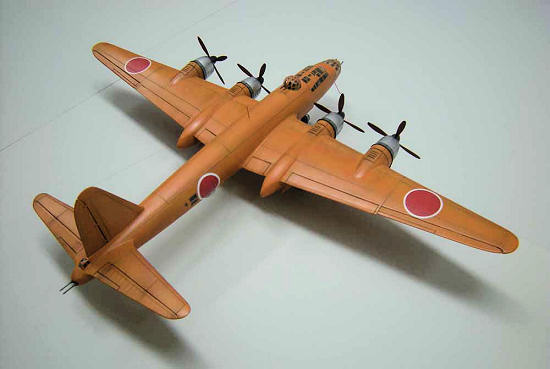
The decals from the kit turned out to be out of
register so I resorted to Aeromaster alternatives as they have a better shade of
red than the kit decals.
I built the fourth machine and this did not have any
numerals on the tail, just the six roundels and nothing else.
Next, I weathered the model using mostly brown acrylic for
the panel lines and black in the engine areas.
Finally, a few streaks of pastels and the model was
ready for a second coat of gloss.
After this had cured and the gloss rubbed down with
1000 grade wet and dry, the matt varnish is applied, the masking comes off the
transparencies and undercarriage, aerials and turrets are attached. Each
propeller blade is detailed with a small white marking at the base and a yellow
flash across the tip.
| CONCLUSIONS |
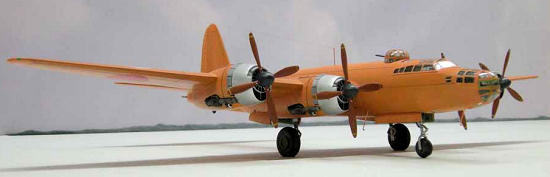 The resulting model is quite a satisfactory representation
of this sleek bomber and makes a colourful splash in the showcase. It is
pleasant to build and in spite of its age, it can easily be brought up to modern
day standards with a few elementary additions.
I would recommend this model to anyone with even the
most basic knowledge of model making.
The resulting model is quite a satisfactory representation
of this sleek bomber and makes a colourful splash in the showcase. It is
pleasant to build and in spite of its age, it can easily be brought up to modern
day standards with a few elementary additions.
I would recommend this model to anyone with even the
most basic knowledge of model making.
| REFERENCES |
Copyright ModelingMadness.com. All rights reserved. No reproduction in part or in whole without express permission.
If you would like your product reviewed fairly and quickly , please contact the editor or see other details in the Note to Contributors.