
| KIT #: | Jt 76 |
| PRICE: | $45.00 |
| DECALS: | Two options |
| REVIEWER: | Blair Stewart |
| NOTES: | Level bomber version |
| HISTORY |
The Nakajima B5N Kate was the standard carrier-based torpedo bomber of the Imperial Japanese Navy (IJN) for much of World War II. It also served as a high-level bomber. Although the B5N was substantially faster and more capable than its Allied counterparts - the American Douglas TBD Devastator monoplane (the U.S. Navy's first all-metal, carrier-borne monoplane of any type with retracting gear), and the British Fairey Swordfish and Fairey Albacore torpedo biplanes - it was nearing obsolescence by 1941. Nevertheless, the B5N operated throughout the whole war, due to the delayed development of its successor, the B6N. In the early part of the Pacific War, when flown by well-trained IJN aircrews and as part of well-coordinated attacks, the Japanese successfully employed the B5N at the battles of Pearl Harbor, Coral Sea, Midway, and Santa Cruz Islands.
A team led by Katsuji Nakamura designed the B5N in response to a 1935 Navy specification for a torpedo bomber to replace the Yokosuka B4Y. Internally designated the Type K by Nakajima, the B5N successfully competed with the Mitsubishi B5M for a production contract. The first prototype flew in January 1937 and was ordered into production soon afterwards with the full designation Type 97 Carrier Attack Bomber.
 Japanese combat experience during the Second
Sino-Japanese War revealed several weaknesses in the original B5N1 production
model. These mainly centered around the lack of protection that the design
offered its crew and its fuel tanks. Keen to maintain the high performance of
the B5N, the Japanese Navy was reluctant to add weight in the form of armor, and
instead looked to obtaining a faster version of the aircraft in the hopes of
outrunning enemy fighters. The B5N2 received a much more powerful engine -
Nakajima's own Sakae Model 11, 14-cylinder twin-row radial, as used in the
initial models of the Mitsubishi A6M fighter – and various modifications were
made to streamline the aircraft. Although its performance was only marginally
better, and its weaknesses remained unremedied, this version replaced the B5N1
in production and service from 1939 forward.
Japanese combat experience during the Second
Sino-Japanese War revealed several weaknesses in the original B5N1 production
model. These mainly centered around the lack of protection that the design
offered its crew and its fuel tanks. Keen to maintain the high performance of
the B5N, the Japanese Navy was reluctant to add weight in the form of armor, and
instead looked to obtaining a faster version of the aircraft in the hopes of
outrunning enemy fighters. The B5N2 received a much more powerful engine -
Nakajima's own Sakae Model 11, 14-cylinder twin-row radial, as used in the
initial models of the Mitsubishi A6M fighter – and various modifications were
made to streamline the aircraft. Although its performance was only marginally
better, and its weaknesses remained unremedied, this version replaced the B5N1
in production and service from 1939 forward.
The navigator/bombardier/observer position was equipped with a Type 90 bombsight, which was a long vertical tube located in the front-left of the seat. There was also a Type 3 reflector compass for precise navigation that was mounted on the top of the cockpit frame. The radio-operator/gunner position was equipped with one of the standard-issue radio sets for navy three-seater aircraft (Type 96 Mk3 earlier and Type 2 Mk3 later) that was mounted in front of the radio-operator/gunner's seat and behind the navigator/bombardier/observer's seat.
The radio-operator/gunner also operated one flexible 7.7 mm (.303 in) Type 92 machine gun at the rear end of the cockpit. One Type 91 torpedo could be mounted on the racks that were fixed eccentrically to the right bottom of the fuselage. Alternatively, the torpedo racks could be replaced to carry either one 800 kg armor-piercing bomb or two 250 kg bombs or six 60 kg bombs. Replacing the racks and exchanging between the torpedo and bombs was not a trivial process and could take more than two hours to complete.
 Initially, the Japanese painted most of the B5N
bombers silver, which was the color used throughout the early stages of the
Second Sino-Japanese War. The Navy eventually changed the overall color to dark
green before the start of the Pacific War.
Initially, the Japanese painted most of the B5N
bombers silver, which was the color used throughout the early stages of the
Second Sino-Japanese War. The Navy eventually changed the overall color to dark
green before the start of the Pacific War.
The IJN primarily used the B5N as a carrier-based aircraft and occasionally as a land-based bomber. As with other IJN multi-seat aircraft, an individual bomber was commanded by the senior ranking crew member aboard, which could be the observer rather than the pilot.
The initial model B5N1 first saw action in the Second Sino-Japanese War in 1938. The updated B5N2 played a major role in the Attack on Pearl Harbor. One of the B5N2s carried Mitsuo Fuchida, the commander of the attack. The first attack wave included 49 Kates armed with 800kg bombs and employed as high-level horizontal bombers. One high-level bomber from the carrier Hiryū sank the American battleship Arizona. The first wave attack formation also included 50 B5N2s equipped with Mark 91 torpedoes. B5ns also sank the battleships West Virginia, California, Oklahoma and Utah. Five torpedo bombers were shot down in the first wave. Apart from the Pearl Harbor attack, the greatest successes of the B5N2 were the key roles this aircraft played in sinking the United States Navy aircraft carrier Lexington at the Battle of the Coral Sea and the aircraft carrier Hornet at the Battle of the Santa Cruz Islands, and the disabling of the aircraft carrier Yorktown at the Battle of Midway, later sunk by the Japanese submarine I-168.
B5N2 torpedo bombers normally performed a coordinated attack on enemy carriers with Aichi D3A dive bombers. Ideally, dive bombers would help to suppress the ship's anti-aircraft fire, which improved the chances of success for the slow-flying torpedo bombers. During the Battle of the Eastern Solomons, the IJN tried to minimize losses to torpedo bombers and initially sent only the dive bombers to attack and cripple US carriers for the subsequent torpedo strikes, but this proved unsuccessful as the torpedo bombers did not launch until the battle was over.
The B5N served as the basis for a follow-on design, the B6N, which eventually replaced it in front-line service. The B5N continued to fly in secondary roles, such as training, target towing, and anti-submarine warfare. Some of the aircraft used for this latter purpose were equipped with early radars and magnetic anomaly detectors. B5Ns were also used as bombers during the unsuccessful defense of the Philippines in October 1944, suffering severe losses. Later in the war, they were used for kamikaze attacks.
The Japanese produced 1,150 B5Ns, none of which survived World War II intact. There are currently only two partially recovered B5Ns in the world – one at the Wings Museum in Balcombe, West Sussex, UK, and one at the Pacific Aviation Museum in Honolulu, Hawaii.
| THE KIT |
 Hasegawa first released
this kit in 2001 as a high-level bomber version of the aircraft. In 2002,
Hasegawa released a torpedo-carrying version of the aircraft. The kit contains
some 87 parts molded in gray plastic on 9 sprues and a sprue of 15 clear parts.
The kit contains 24 parts to assemble a nicely detailed cockpit. The decals
include markings for two Pearl Harbor first attack wave B5Ns: Commander
Fuchida’s aircraft launched from the carrier Akagi; and Warrant Officer Sato
Haruo’s aircraft launched from the carrier Soryu.
Hasegawa first released
this kit in 2001 as a high-level bomber version of the aircraft. In 2002,
Hasegawa released a torpedo-carrying version of the aircraft. The kit contains
some 87 parts molded in gray plastic on 9 sprues and a sprue of 15 clear parts.
The kit contains 24 parts to assemble a nicely detailed cockpit. The decals
include markings for two Pearl Harbor first attack wave B5Ns: Commander
Fuchida’s aircraft launched from the carrier Akagi; and Warrant Officer Sato
Haruo’s aircraft launched from the carrier Soryu.
| CONSTRUCTION |
Construction begins with
the multi-part cockpit, and Hasegawa has done a great job of detailing here. The
instructions call for painting the cockpit “Nakajima cockpit color.” After much
research, I concluded that Tamiya XF-71 was as good a choice as any for the
cockpit, although I am sure there are those who could advance a well-researched
argument for a different color. I then painted the instrument panel with acrylic
black hobby paint, which I then coated with Future for application of the
excellent instrument decals provided by Hasegawa. I spent quite a bit of time
detailing the cockpit with various colors per the excellent instru ctions.
Finally, I cut out and glued in a colored paper seatbelt and harness that I had
purchased on Ebay, thus avoiding my long-standing hatred for using photo-etched
parts on my models.
ctions.
Finally, I cut out and glued in a colored paper seatbelt and harness that I had
purchased on Ebay, thus avoiding my long-standing hatred for using photo-etched
parts on my models.
I assembled and painted the nicely detailed engine, highlighting details via dry brushing with Testors’ flat aluminum. I sandwiched the finished cockpit in between the two fuselage halves. I left off the rear machine gun and side skylights until a later time in the assembly and painting process.
Step 4 involved gluing the flaps to the lower wing assembly and then the top halves of the wings and then gluing that assembly to the fuselage. The flaps can be displayed in the down or up position, and one does this by removing some tabs on the flaps.
Step 5 includes the assembly of the 800kg bomb and the landing gear. Again, I left these off until final assembly to avoid breakage – but, alas, as has become my custom, I broke one of the landing gear AFTER attaching it to the wing (thank goodness for pin vises, paper clip metal, and super glue!).
I then moved to assembly of the nicely detailed (at least the front half of) engine, painted it Testors steel, and glued it to the front of the fuselage. At this point, I was finally ready for overall painting of the model’s exterior
| COLORS & MARKINGS |
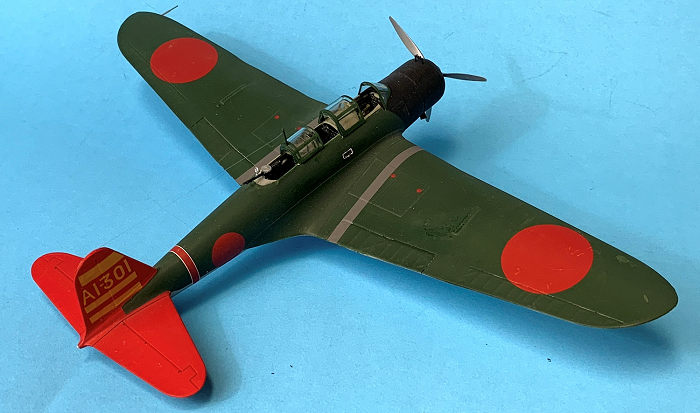
I opted for the overall dark green Pearl Harbor aircraft of Commander Fuchida, given its colorful tail markings. I first primed the model with Rustoleum flat primer white. Once the primer was dry, I airbrushed the bottom of the model with Tamiya Lp-11 silver lacquer (I love this stuff!). For the dark green upper surfaces, I used Tamiya XF-13 Green Note: Tamiya lists this as a Japanese Army green, but it seemed to match the dark green used by the Japanese Navy – at least in the paintings I could find on the web and in reference books).
I then masked off the
tail and vertical stabilizer and painted it with Model Masters Gloss Guards Red,
having decided to use gloss paint to avoid the step of applying a clear
gloss-coat to apply the tail decals. I also masked off the front of the fuselage
and painted it Testors Gloss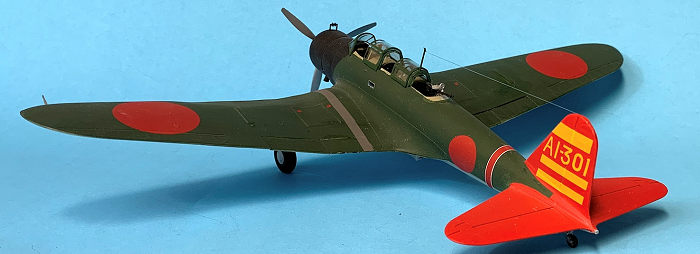 Black, with the intent of attaining a semi-gloss
sheen when I applied a final flat coat to the entire model.
Black, with the intent of attaining a semi-gloss
sheen when I applied a final flat coat to the entire model.
To apply the decals, I opted to coat the entire model (except the tail) with Future applied with a flat brush. To my horror, as the Future dried it began to appear “milky.” After agonizing over removing the Future and starting over, I consulted the web, where I found that others had discovered this Future drying problem. The solution: illuminate the model’s surfaces with a 60-watt bulb (not too close!) and watch the milky appearance disappear as the warmth from the bulb thoroughly dries the Future. Whew: disaster averted!
Once the decals were settled, I applied Testors Dull Cote to the entire model. At this stage, I attacked the painting of the seven-piece canopy (I chose the open canopy position; thus, the seven pieces!). I opted to paint these off the model. I carefully masked off the canopy parts using Tamiya masking tape, cut around the framing, and then taped over the undersides of each piece to avoid overspray on the inside of the canopy parts
After painting, I glued on the prop and spinner, the landing gear, and the bomb. I used fine fishing line for the radio antenna and superglued it to the radio mast and vertical stabilizer.
| CONCLUSIONS |
This is a good kit from Hasegawa. It has considerably more detail than the Nichimo kit, which I built in the mid-seventies (and still have hanging from my basement ceiling). The fit is excellent and requires little to no filing and sanding. I highly recommend this kit for your World War II aircraft collection.
| REFERENCES |
“Nakajima B5N,” Wikipedia, Worldwide Web, September 2024.
Smith, Carl, “Pearl Harbor 1941: The Day of Infamy,” Osprey Publishing Ltd., Botley Oxford, UK, 1999.
Blair Stewart
13 October 2024
Copyright ModelingMadness.com. All rights reserved. No reproduction in part or in whole without express permission from the editor.
If you would like your product reviewed fairly and fairly quickly, please contact the editor or see other details in the Note to Contributors.