| KIT #: | 4813 |
| PRICE: | €15 in mid 2000s |
| DECALS: | Four options |
| REVIEWER: | Spiros Pendedekas |
| NOTES: | Oldie but goodie |
| HISTORY |
The B5N "Kate" was designed by a team led by Katsuji
Nakamura in response to a 1935 specification by the Navy for a torpedo bomber to
replace the Yokosuka B4Y. The first prototype flew in January 1937 and was
ordered into production soon afterwards with the full designation “Type 97
Carrier Attack Bomber”.
Carrying a crew of three (pilot, navigator/bombardier/observer, and
radio-operator/gunner), it was primarily employed as a carrier-based aircraft
and occasionally as a land-based bomber.Like with other IJN multi-seat aircraft,
each individual bomber was commanded by the senior ranking crew member aboard,
which could be the observer rather than the pilot.
The navigator/bombardier/observer position was equipped with a Type 90
bomb-sight and a Type 3 reflector compass for precise navigation. The
radio-operator/gunner also operated one flexible 7.7 mm (.303 in) Type 92
machine gun at the rear end of the cockpit.
 One Type 91
torpedo could be mounted on the racks that were fixed eccentrically to the right
at the bottom of the fuselage. Alternative racks could be used to carry either
one 800 kg bomb or two 250 kg bombs or six 60 kg bombs. Replacing those racks
and exchanging between the torpedo and bombs configuration was not a trivial
process and could take more than two hours to complete.
One Type 91
torpedo could be mounted on the racks that were fixed eccentrically to the right
at the bottom of the fuselage. Alternative racks could be used to carry either
one 800 kg bomb or two 250 kg bombs or six 60 kg bombs. Replacing those racks
and exchanging between the torpedo and bombs configuration was not a trivial
process and could take more than two hours to complete.
The lack of adequate protection for both the crew and the fuel tanks soon became
evident during the Second Sino-Japanese War, where the type was first put to
combat. The IJN opted not to provide any means of protection, but instead
decided to make the plane faster by streamlining it and equipping it with a more
powerful engine in the hopes of outrunning enemy fighters. The resulting B5N2,
however, only offered marginally better performance, whilst, of course,
retaining its weaknesses in full…
Nevertheless, in the early part of the Pacific War, the updated B5N2, flown by
well-trained IJN aircrews and as part of well-coordinated attacks, achieved
particular successes at the battles of Pearl Harbor, Coral Sea, Midway, and
Santa Cruz Islands.
In the torpedo bomber role, the type normally performed coordinated attacks on
enemy carriers with Aichi D3A dive bombers. Ideally, dive bombers would help to
suppress the ship's anti-aircraft fire, which improved the chances of success
for the slow-flying torpedo bombers. During the Battle of the Eastern Solomons,
the IJN tried to minimize losses to torpedo bombers and initially sent only the
dive bombers to attack and cripple US carriers for the subsequent torpedo
strike, however this proved unsuccessful, as the torpedo bombers did not launch
until the battle was over.
The B5N served as the basis for the B6N Tenzan follow-on design, which
eventually replaced it in front-line service. The B5N continued to fly in
secondary roles, such as training, target towing, and anti-submarine warfare.
Some of the aircraft used for this latter purpose were equipped with early
radars and magnetic anomaly detectors. B5Ns were also used as bombers during the
unsuccessful defense of the Philippines in October 1944, suffering severe
losses. Later in the war, they were used for kamikaze attacks.
 The second
planned wave during the Pearl Harbor Attack consisted of 171 planes: 54 B5Ns, 81
D3As, and 36 A6Ms,. They were divided in three groups and commanded by
Lieutenant-Commander Shigekazu Shimazaki. Four planes failed to launch because
of technical difficulties. All 54 B5Ns belonged the the 1st Group and were
loaded with either two 250 kg or six 60 kg general-purpose bombs. Half of the
planes were targeted to aircraft and hangars on Kaneohe, Ford Island and Barbers
Point, with the other half targeted to Hickam field. EI-311 was one of these
planes and, indeed, there is at least one good photo depicting it with the
6-bomb racks attached, flying in formation with other Kates.
The second
planned wave during the Pearl Harbor Attack consisted of 171 planes: 54 B5Ns, 81
D3As, and 36 A6Ms,. They were divided in three groups and commanded by
Lieutenant-Commander Shigekazu Shimazaki. Four planes failed to launch because
of technical difficulties. All 54 B5Ns belonged the the 1st Group and were
loaded with either two 250 kg or six 60 kg general-purpose bombs. Half of the
planes were targeted to aircraft and hangars on Kaneohe, Ford Island and Barbers
Point, with the other half targeted to Hickam field. EI-311 was one of these
planes and, indeed, there is at least one good photo depicting it with the
6-bomb racks attached, flying in formation with other Kates.
A nevertheless capable aircraft compared to its Allied counterparts when
introduced, this important plane was nearing obsolescence by 1941. The fact that
it became the standard carrier-based torpedo bomber of the Imperial Japanese
Navy (IJN) for much of World War II was mostly due to the delayed development of
its B6N successor. A total of 1149 were built with no intact example known to
having survived today.
| THE KIT |
 It is really
hard to believe that Nichimo issued such a great kit back in 1972, featuring
nice engraved external details, equally nice wheel bays and an acceptable
cockpit. That it is not in direct comparison with the 30 years younger very good
Hasegawa tooling is self explanatory, but, still, it looks very promising in the
box.
It is really
hard to believe that Nichimo issued such a great kit back in 1972, featuring
nice engraved external details, equally nice wheel bays and an acceptable
cockpit. That it is not in direct comparison with the 30 years younger very good
Hasegawa tooling is self explanatory, but, still, it looks very promising in the
box.
Nichimo reboxed this kit twice, in the late 80’s and in the early 2000s. The
specific copy was the 80’s issue, forgotten at a hobby shop in my hometown and
discovered in 2005, together with a Ki-45 Nick, an Aichi Jake and a second copy
of the Kate, all at killer prices. I bought them all but the second Kate (I
should have bought it too…). For a more detailed view at the kit contents, you
may read the preview here.
| CONSTRUCTION |
I started by putting the cockpit together, attaching
in position the rudder pedals, all boxes, consoles, ammo magazines, the
bomb-sight and what I think are oxygen bottles onto the cockpit floor, then
trapped it, together with the engine firewall, between the fuselage halves. The
instrument panel was then attached in position, followed by the overhead panels.
The pilot’s head rest framing looked too crude to my eye, so I fabricated a more
delicate looking part with styrene sheet. The pilot and navigator seats had
their backs drilled out for more realistic looks and a leftover pilots aiming
sight was added, as the kit did not provide any and its absence would be quite
prominent.
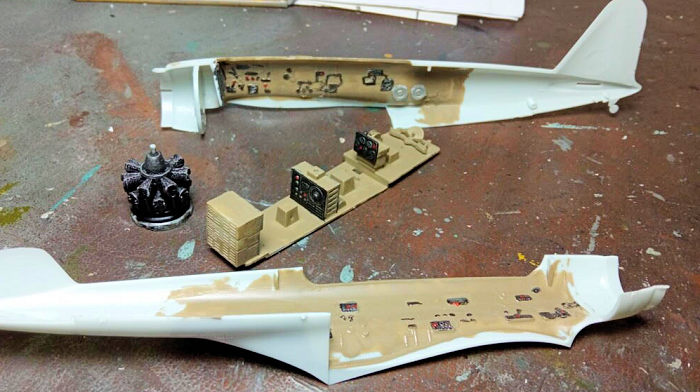 Basic
cockpit color was Hu79 Khaki Drill. The instrument panels, stick grip, consoles
and various boxes (including the shallow but good looking sidewall-molded ones)
were painted black, brushed with silver and had some “knobs” done with red paint
and a fine brush. The pedal pads and stick boot were painted “leather” and the
ammo magazines “steel”.
Basic
cockpit color was Hu79 Khaki Drill. The instrument panels, stick grip, consoles
and various boxes (including the shallow but good looking sidewall-molded ones)
were painted black, brushed with silver and had some “knobs” done with red paint
and a fine brush. The pedal pads and stick boot were painted “leather” and the
ammo magazines “steel”.
Regarding the basic cockpit color, instructions state “bamboo green”, whereas in
many credible net “discussions” various green or gray-ish green, or even tan-ish
shades are mentioned, so I went for my “khaki drill” shade. Tom Cleaver has
witnessed a “US interior green towards olive” shade by having a look at a Kate
cockpit carrying original paint, which I believe is a solid approach in order to
achieve a realistic “Nakajima cockpit green” shade.
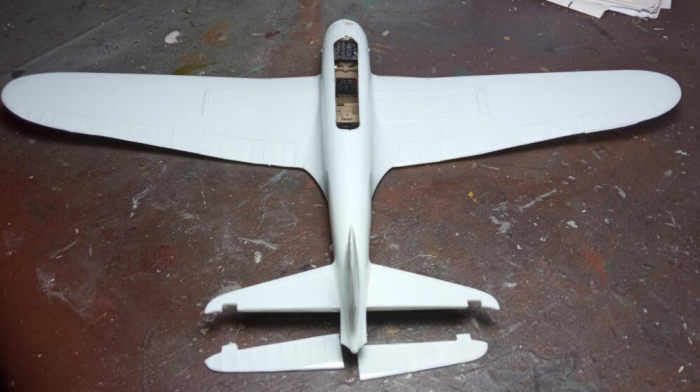
Moving onto the main wing, I attached the impressive one piece lower half under
the fuselage, then affixed the upper halves, which I glued only at the wing
roots. Having removed all locating pins beforehand, I then let the upper halves
“rest” onto the lower half, gluing them with water thin glue by using capillary
action. This way, I ensured the best possible fit at the wing roots, reducing
the chances of emerging gaps or mis-matches, the only “extra” effort required
being paying some additional attention to the alignment of the upper and lower
halves.
In order to breathe some life to this somehow not over detailed kit, I decided
to droop the elevators. For this, I carefully ran the back side of my hobby
knife through the hinge line, which took some extra effort due to the latter
being not straight. Upon separation and trimming of the cut surfaces, the
stabilizers were attached in position. The two-piece main wheels were assembled
at this time and were tad filed, in order to look “weighted”.
 The nice
looking engine was then assembled and installed, followed by attachment of the
engine cowling with the oil cooler intake underneath. I did not bother super
detailing the engine rears, omitting some bits that would nevertheless be
invisible once the cowling would be attached. The engine was painted black, then
heavily dry brushed with silver, whereas I took the decision to paint the
cowling innards Aotake (though there are good chances to have been black or
silver), for which I used Hu52 Baltic Blue (a metallic color), onto where I
applied a very light coat of clear green paint.
The nice
looking engine was then assembled and installed, followed by attachment of the
engine cowling with the oil cooler intake underneath. I did not bother super
detailing the engine rears, omitting some bits that would nevertheless be
invisible once the cowling would be attached. The engine was painted black, then
heavily dry brushed with silver, whereas I took the decision to paint the
cowling innards Aotake (though there are good chances to have been black or
silver), for which I used Hu52 Baltic Blue (a metallic color), onto where I
applied a very light coat of clear green paint.
It has to be stated that the engine, built straight out of the box, is really
well detailed, something almost beyond belief taking into account the molds’
origins! Giving the engine a full build treatment, even tad super detailing it
and not permanently gluing the cowling might not be such a bad idea: both the
cowling and the prop can be press fitted, the only area of concern being to
attach the oil cooler intake in a precise way that it will neither present a
significant gap, nor interfere when the cowling will be entered.
Apart from some amounts of flash that had to be cleaned and seams to be
addressed, fit was more or less acceptable, with some small gaps arising mainly
at the undersides where the wing meets the fuselage. Liquefied styrene was used
as primary filler at the “nastier” area, followed by a normal allover putty
session afterwards. Upon sanding, I blanked the cockpit and cowling openings
with wet tissue and took Kate to the paint shop!
| COLORS & MARKINGS |
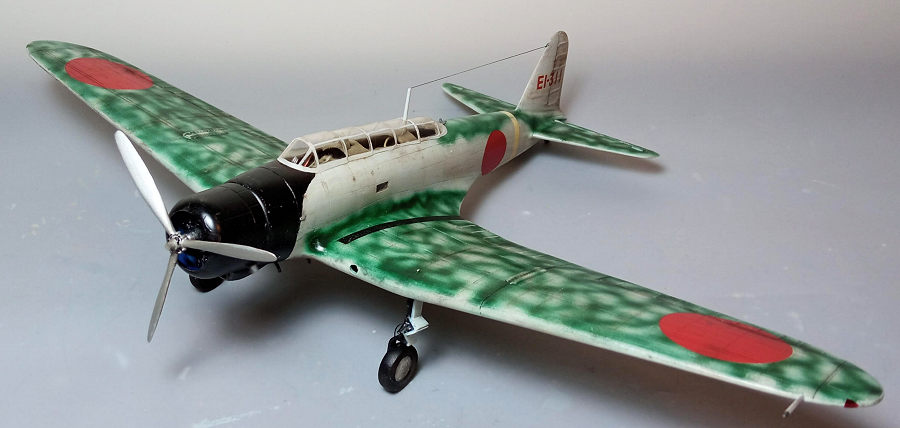
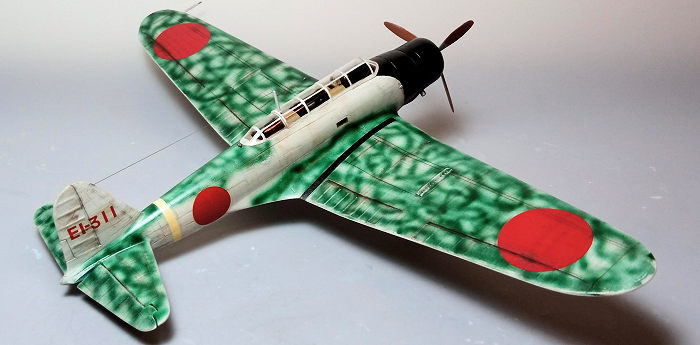
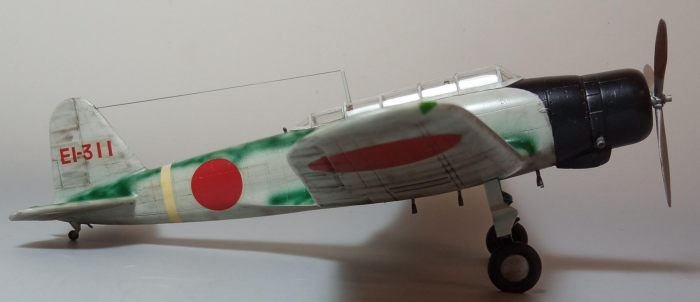
I wanted to depict #EI-311 as it stood in December
1941. This particular plane by that time seemingly carried the “usual” IJN gray
overall color, with ‘blotchy” stripes of IJN green hastily and heavily applied
at all topsides, including the aft canopy area of the fuselage but excluding the
cowling area, which retained the distinctively shaped black color. Quite
interesting!
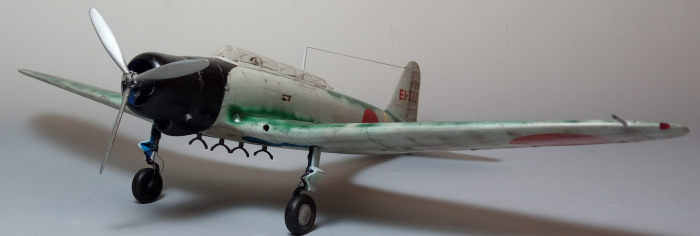 In order to
replicate it, I first gave the bird an overall coat of Hu196 light gray, then,
with my airbrush at its finest settings, I free handed the green topside
pattern, for which I used Model Master 2116 IJN Green, which sprayed really
nicely. I did not bother to tighten the camo lines too much, as the original
picture depicted a nevertheless rough application. The distinctive black front,
as well as the wing walk areas were hand painted after being masked with
flexible tape. Upon a coat of Future, I took the bird to the decal shop.
In order to
replicate it, I first gave the bird an overall coat of Hu196 light gray, then,
with my airbrush at its finest settings, I free handed the green topside
pattern, for which I used Model Master 2116 IJN Green, which sprayed really
nicely. I did not bother to tighten the camo lines too much, as the original
picture depicted a nevertheless rough application. The distinctive black front,
as well as the wing walk areas were hand painted after being masked with
flexible tape. Upon a coat of Future, I took the bird to the decal shop.
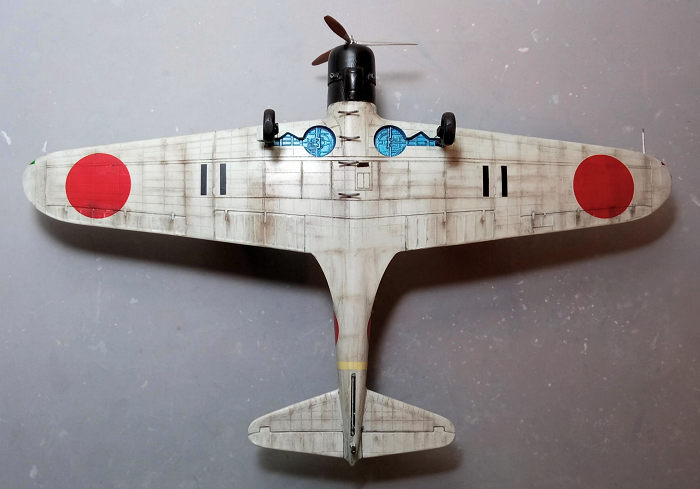
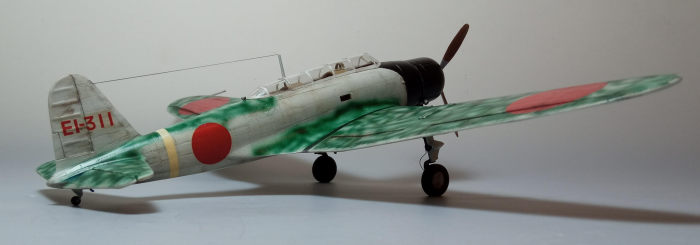
I used the kit decals which, to my pleasant surprise, behaved nicely, detached
easily from their backing paper and, with the help of Mr Mark Softer, succumbed
onto the surface details. By consulting the Hasegawa instructions for the same
bird, it looks like it had its two last serial digits painted in black
underneath the wings, for which I used some leftover decals from my dungeon. The
white band aft of the fuselage is represented as ivory, so a heads-up there for
the modelers who mind about it. A coat of Future sealed the decals.
As a note the Nichimo decals digit style, though not looking too wrong, is
different (simpler) than the one witnessed at the available pic, my only
assumption being that once the kit was issued in 1972 the available pic(s) would
have been of lower definition, not allowing precise evaluation of the digits
style.
| CONSTRUCTION CONTINUES |
I attached the gear legs, followed by the wheels and
the gear doors. The main legs received brake lines from stretched sprue and were
painted black, then silver dry-brushed and oleos were painted chrome using my
fine silver pen. Door innards and wheel bays were Aotake, the latter also silver
dry-brushed, in order to accentuate the nice molded-on details.The wheels had
IJN Gray outer rims, gunmetal inner drums and black tires. As a note, legs are
stated to be painted silver at Hasegawa instructions, however, in order to add
some interest (and by all means not claiming any credibility), I went for the
assumption that IJN personnel had applied corrosion resistant black paint onto
the legs by that time, still deeming the bays and door innards Aotake primer
sufficient.
The arresting hook was painted “steel” and attached (it was to have been
attached before fuselage closing, but it was not too difficult to attach at this
later stage, only needing some careful twisting around and positioning). Its
fuselage cutout was carefully painted Aotake with a fine brush. The good looking
and surprisingly sturdy molded-on rear wheel had its body and rim painted IJN
Gray with black tire. The kit provided exhausts looked uninspiring, so I cut two
suitable pieces from a cotton bud stem (the older, plastic, non
environmental-friendly…), painted them Testors Burned Metal and attached them to
the cowling recessions.
It was then time for some weathering, which consisted of a black wash (heftier
at the wheel bays) that brought out all engraved details nicely, followed by
dark brown and black dry pastels lavishly applied at places where soot, dirt and
grim would accumulate. Some silver dry brushing was also applied at the wing
walk lanes and the blade tip rears (where the “propeller color” had been
applied): this would be a well used naval bird for sure! A final satin coat (of
the wonderful and, sadly, discontinued MM lacquer line) gave the bird its final
finish.
 Per my
lifetime habit, it was only at this time I realized that the two rectangular
fuselage indentations at the navigator’s sides were in essence skylight windows.
Though I could have taken a non-quality shortcut and painted the recessions
silver or chrome, I decided to open them up (meaning risking ruining the paint
job, among others), something that could have easily been avoided should I have
opened them out nicely and easily before closing the fuselage halves. Anyway, by
micro drilling and careful use of my hobby knife and mini files the process was
uneventful, with these two and the underside bomber vision windows replicated by
Clearfix.
Per my
lifetime habit, it was only at this time I realized that the two rectangular
fuselage indentations at the navigator’s sides were in essence skylight windows.
Though I could have taken a non-quality shortcut and painted the recessions
silver or chrome, I decided to open them up (meaning risking ruining the paint
job, among others), something that could have easily been avoided should I have
opened them out nicely and easily before closing the fuselage halves. Anyway, by
micro drilling and careful use of my hobby knife and mini files the process was
uneventful, with these two and the underside bomber vision windows replicated by
Clearfix.
The transparencies had their frames hand painted and were attached in position,
fitting quite well (if you want to display the rear gun deployed, the rear
canopy must not be attached). The antenna mast has to be inserted through a hole
which has to be carefully drilled on top of the navigator’s canopy section.
Since the mast’s circumference increases downwards, you may drill out the hole
just enough for the mast to be able to be carefully press-fitted from the inside
at the correct height. Its part under the canopy was painted cockpit color,
whereas the external IJN Gray.
The prop was affixed in position: it was painted steel with its blade rears
“propeller color” (for which I used Hu113 Rust), roughly covering its two
outward thirds (again, an assumption). The pitot was attached, having its tip
painted gunmetal, with the same color used for the small rear gun support, which
was attached aft of the rear canopy.
Though tempted to finish the Kate in six-bomb configuration, I did not like the
racks looks, so,I chose an alternative configuration and went on adding the four
torpedo sway braces, which I painted gunmetal. For the aerial wire, I ran thin
stretched sprue from the mast to the fin top. Finally, the wingtip lights were
represented by mini blobs of red and green clear paint, before calling the Kate
done!
| CONCLUSIONS |
If you want a modern, detailed quarter scale Kate, the
Hasegawa offering, appearing in 2001 and lavishly reissued ever since, is
clearly the way to go, outperforming the classic Nichimo in every respect but
collectability.
While the elderly Nichimo cannot compete heads-on with the Hasegawa, this does
not mean that it is by any means obsolete, as it offers correct general shape,
superb engraved external detailing, detailed engine, good looking landing gear,
quite busy wheel bays and equally good looking ordnance, accounting for all
weapons loading configurations. Cockpit is not bad, and will look believably
busy under the closed canopy, the latter being a minus, since most modelers
(Yours Truly excluded) prefer separate canopies and will either have to cut the
kit provided one or go aftermarket and obtain a nice vac canopy.
Overall fit was relatively good, Instructions were followable and decals were
still usable.The low parts count deems the kit suitable even for beginners, who
will come up with a very nice result purely out of the box (OOB). On the other
hand, the super detailer will have a quality time improving or enhancing various
kit areas and he may do so with the aid of aftermarket stuff that address many
of the kit’s lesser areas.
The fact that this good kit is a 1972 mold is really noteworthy. If you have one
or find one (not that easy nowadays in 2023), go on and build it. A really nice
Kate will emerge.
Happy Modeling!
Spiros Pendedekas
14 February 2023
Copyright ModelingMadness.com. All rights reserved. No reproduction in part or in whole without express permission from the editor.
If you would like your product reviewed fairly and fairly quickly, please contact the editor or see other details in the Note to Contributors.