Airfix 1/72 D3A1 'Val'
| KIT #: | A02014 |
| PRICE: | AUD$15.00 |
| DECALS: | Two options |
| REVIEWER: | George Oh |
| NOTES: | A vintage, basic, kit |
| HISTORY |
 In 1936, the
Imperial Japanese Navy (IJN) sought a new dive-bomber to replace their Aichi
D1A/Susie biplane bomber, and in Dec 1939, they ordered the Aichi proposal that
had undergone several improvements to the prototype. Aichi’s D3A1 became the
IJN’s principal dive-bomber. Comparable in armament and capability to the other
dive-bombers of the time, it bettered them all in range and manoeuvrability. In
1943, it started being replaced in front-line service by the Yokosuka D4Y Suisei(Comet)/JUDY.
In 1936, the
Imperial Japanese Navy (IJN) sought a new dive-bomber to replace their Aichi
D1A/Susie biplane bomber, and in Dec 1939, they ordered the Aichi proposal that
had undergone several improvements to the prototype. Aichi’s D3A1 became the
IJN’s principal dive-bomber. Comparable in armament and capability to the other
dive-bombers of the time, it bettered them all in range and manoeuvrability. In
1943, it started being replaced in front-line service by the Yokosuka D4Y Suisei(Comet)/JUDY.
At the start of the Pacific War, Allied personnel began to name Japanese aircraft with code-words to identify them. In mid-1942, Captain Frank T. McCoy and his detachment, set out to devise a simpler method for identifying Japanese aircraft, by allocating them familiar western names (of people and items). This aircraft they named a ‘VAL’. By Dec ’42, the system became universal amongst the Allied countries & services, and histories of the war continue to use the naming system.
| THE KIT |
This kit has been around since 1965, being released periodically with the same boxart (of a VAL’s rear gunner delivering a parting shot while pulling-out after mortally bombing an American(? – the wooden deck) aircraft carrier. This is the 2011 iteration with a new boxart depicting the mount of LtCdr Takashinge Egusa, the lead aircraft of 1st Sqn, 21st Section, from the IJN carrier Soryu, over Pearl Harbour.
 A Skill
Level 1 kit, it comes in a standard lid-&-tray box that houses 1 bag that
contains 2 plastic and 1 clear sprue together. There are 31 parts to the
aircraft + 3 clear parts. The moulding is a child (or geriatric?) of its age,
showing knock-out pin marks but surprisingly little flash or mould-slip seams.
The inside is limited to 2 seat shapes and 2 poseless crewmen. Missing is a
floor, IP, rear gun, smaller bombs, pitot tube, and any representation of the
cooling gills around the base of the engine’s cowling (which I could have easily
scribed IF I had noticed this deficiency earlier. Rats!!!). The decal sheet is
rather extensive, colourful, in good register and (as I’d discover) dense in its
opacity. It provides the red and the stripes of the tail & rear fuselage, but no
IP or wing-walk stripes. Tut tut tut!!!
A Skill
Level 1 kit, it comes in a standard lid-&-tray box that houses 1 bag that
contains 2 plastic and 1 clear sprue together. There are 31 parts to the
aircraft + 3 clear parts. The moulding is a child (or geriatric?) of its age,
showing knock-out pin marks but surprisingly little flash or mould-slip seams.
The inside is limited to 2 seat shapes and 2 poseless crewmen. Missing is a
floor, IP, rear gun, smaller bombs, pitot tube, and any representation of the
cooling gills around the base of the engine’s cowling (which I could have easily
scribed IF I had noticed this deficiency earlier. Rats!!!). The decal sheet is
rather extensive, colourful, in good register and (as I’d discover) dense in its
opacity. It provides the red and the stripes of the tail & rear fuselage, but no
IP or wing-walk stripes. Tut tut tut!!!
I bought this kit because I was attracted by the new boxart, and expected that this was an Airfix new mould of one of their original kits. Boy - was I disappointed to discover that the contents was the original unchanged mould. Double Rats!!! I started it because I was still impressed by the boxart.
| CONSTRUCTION |
 I decided to
build the very-colourful aircraft of the boxart, and targeted only a couple of
things to do. I’ll do a bit in the cockpit, leave it open, and I’ll add a brass
MiniWorld Lewis gun.
I decided to
build the very-colourful aircraft of the boxart, and targeted only a couple of
things to do. I’ll do a bit in the cockpit, leave it open, and I’ll add a brass
MiniWorld Lewis gun.
I started this model when dipped the clear parts in Future, and then glued the upper wing halves to the fuselage halves. I often do this to bypass the need for filler. The trick is to position them correctly in relation to the tail fin-&-rudder. After painting inside the cockpit well, I detailed the seats a little. I attached the gunner’s cut-down seat to a plastic plate that I positioned between the two crew positions, so that he would be facing the rear (with his gun), then closed the fuselage. I didn’t pre-position the arrestor hook because it would impede the painting, and besides, it looked easily break-offable. The wing undersides and tail-planes went on next, to largely complete the airframe. At the same time, I assembled the undercarriage legs and their spats, without their wheels (to speed-up the painting). Lots of repeated filling and sanding came next (I SAID that this was an old mould).
| COLORS & MARKINGS |
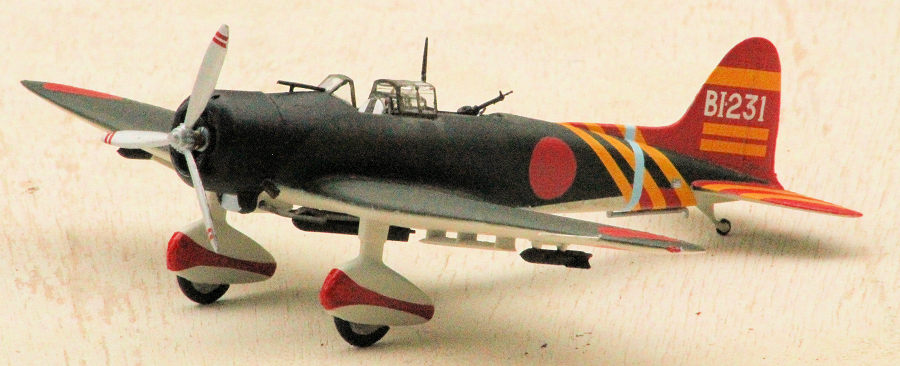
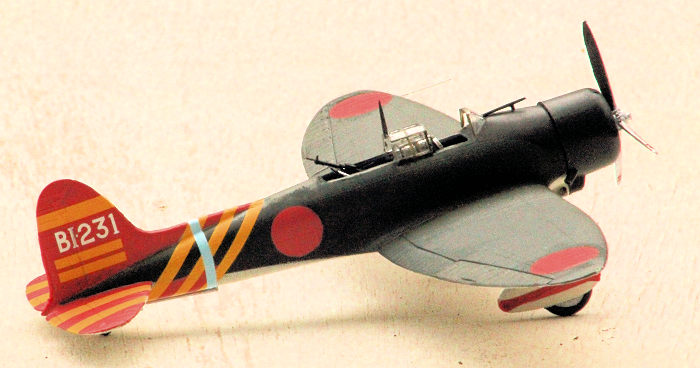
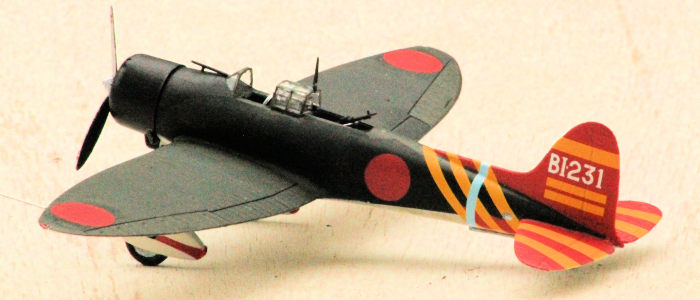
I used Citadel Wraith bone from a spraycan in-lieu of Humbrol’s 90/matt beige/green because I had it on-hand. I squirted the undersides, the whole fin-&-rudder and the both surfaces of the tailplanes. I even remembered the loose underside bits – Yay me!!! After lots of drying time, it was masked. One slight detour here. The kit provides decals for each side of the red and yellow stripes, and blue band, around the rear fuselage. But there are clear areas between the yellow stripes through-which the upper fuselage green shows, and the underside red-&-yellow decal is to stop at the base of the green. For my own sanity, I photocopied the decals, cut-out the stripes, and taped them together to cover the rear fuselage. This allowed me to see (and mark) where the green/beige border was to go.
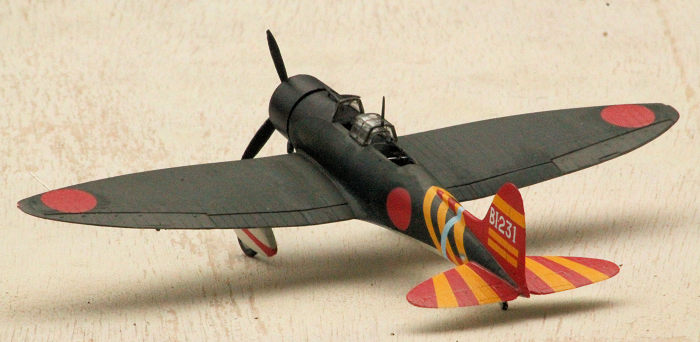 This kit
marks the first time I used Tamiya IJN green on an IJN aircraft (WHAT was I
thinking???) Previously, I had touched-up this paint with Citadel Castellan
green, with success because the colours matched. But this time, the (new bottle)
was a slightly-different shade. I’ll live with it and call it the patchiness of
the livery, as shown in the boxart. Citadel Abaddon black was brush-painted on
as the nose & cowling’s anti-dazzle pattern, and the bombs (instead of grey – to
make them more visible). This is when I highlighted the control surfaces – with
pencil on the underside and a thin black wash on the upper side.
This kit
marks the first time I used Tamiya IJN green on an IJN aircraft (WHAT was I
thinking???) Previously, I had touched-up this paint with Citadel Castellan
green, with success because the colours matched. But this time, the (new bottle)
was a slightly-different shade. I’ll live with it and call it the patchiness of
the livery, as shown in the boxart. Citadel Abaddon black was brush-painted on
as the nose & cowling’s anti-dazzle pattern, and the bombs (instead of grey – to
make them more visible). This is when I highlighted the control surfaces – with
pencil on the underside and a thin black wash on the upper side.
Now, there are 6 major (L&R fin-& rudder, tail planes and rear fuselage wrap-around) and 4 minor (each side of the wheel spats) form-fitting decals. Experience has taught me to beware of these, because the usually don’t fit perfectly, as intended. In anticipation, I brush-painted the forward edge of the tailfin Vallejo Bloody red. This proved unnecessary because 1) the decals were just a bit larger (so the thin hang-overs were easily trimmed) and 2) the decal’s opacity was quite dense. Using that paper cut-out worked, and the decals lined-up (almost) perfectly with the green/beige border. What was I worried about? The one kit omission is that the wing walks are to be painted by the modeller – no decals. I’ll ignore Airfix because many on-line references show that this aircraft didn’t have them. One my-fault stuff-up was that I painted over the tail decals to extend the fuselage green back to the tip of the tail – I shouldn’t have. Triple Rats!!! I will disagree with Airfix on one other point regarding the stripes on the wheel spats. Airfix provides each stripe in two Y-shaped halves. The modeller is to put the Y’s on sideways, and this leaves a bare patch on the front of each spat. Other models show this patch as solid red with the aircraft’s number(?) on the front. I’ll stick with the solid red, because it looks better and besides, the Airfix boxart says so. And the Y’s don’t meet at the back of the spats, so it is a minute’s work with some red paint and a tooth pick to fix that blooper.
| FINAL CONSTRUCTION |
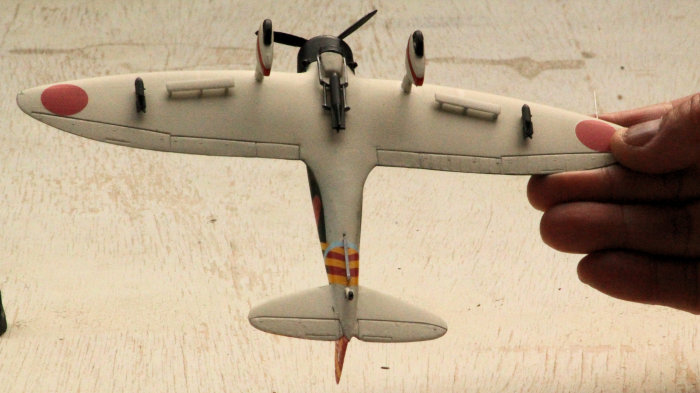
The under-bits were attached without difficulty (‘cept the little bombs – which had to be pinned and superglued onto their bomb racks). BZ to Airfix for having the legs fit into sockets (rather than onto little raised platforms). The propeller touched the cowling, so I cut a small ring from a brass tube to make it stand-off a little (but the rough edges prevent it from spinning freely).
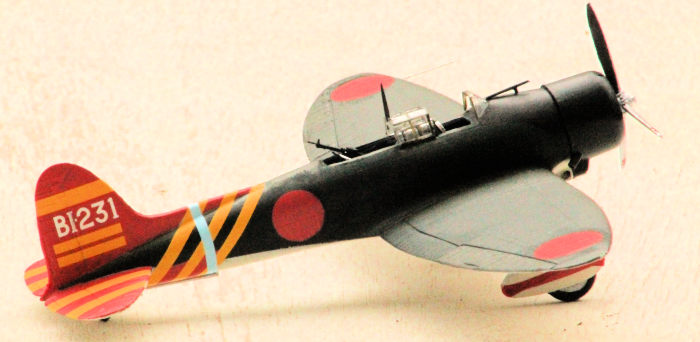 The single
main clear bit was divested of its lateral rails to make 3 separate pieces, and
all framing was brush-painted. I used only the windshield and centre section to
create open pilot’s and gunner’s positions, and I put the gunner’s separate (and
smaller) section under the centre section to give the appearance of both pilot’s
and gunner’s sections being slid back. To complete the gunner’s position, I
fashioned a U-shaped (with shoulders and arms) gun rail from wire, which I
superglued to the inside of the rear cockpit (via the arms), then the beautiful
brass gun’s convenient mounting post was bent into a hook, thus allowing me to
superglue it onto the gun rail.
The single
main clear bit was divested of its lateral rails to make 3 separate pieces, and
all framing was brush-painted. I used only the windshield and centre section to
create open pilot’s and gunner’s positions, and I put the gunner’s separate (and
smaller) section under the centre section to give the appearance of both pilot’s
and gunner’s sections being slid back. To complete the gunner’s position, I
fashioned a U-shaped (with shoulders and arms) gun rail from wire, which I
superglued to the inside of the rear cockpit (via the arms), then the beautiful
brass gun’s convenient mounting post was bent into a hook, thus allowing me to
superglue it onto the gun rail.
The solid dive brakes have knock-out pin scars on their upper sides, so while my reducing of them isn’t perfect, they are hidden. I added a straight pitot tube (from thin wire) to the port wingtip because the real aircraft had them, and the red-&-green formation lights just forward of the wingtips (as seen on other models of the VAL). Did these things have a landing light? I can’t find a reference to one. The last bits attached were the exhaust pipes, telescopic sight and antenna mast. The canopy frame had to have a vertical groove sawed into it to accommodate the mast, but is still fragile (aren’t they all?), so I won’t rig it.
| CONCLUSIONS |
The only real resistance this kit put-up was the extensive need for filler on the underside. Otherwise, it is a relatively painless build, so I’m happy to recommend it to all other modellers. It is a colourful scheme depicted in many scales, but not here in MM (so I’m obliging).
George Oh
1 September 2026 Copyright ModelingMadness.com. All rights reserved. No
reproduction in part or in whole without express permission from the editor. If you would like your product reviewed fairly and fairly quickly, please contact the editor or see other details in the
Note to
Contributors.