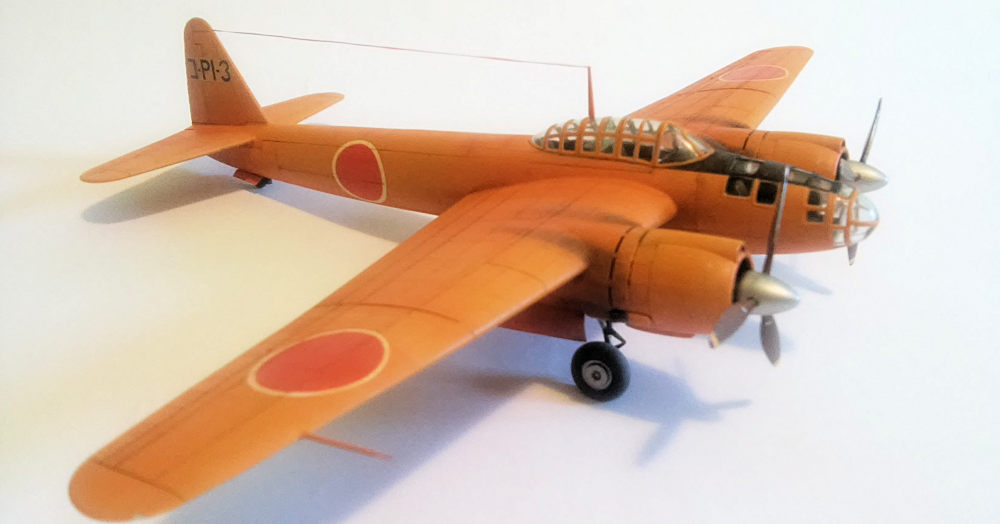
Revell 1/72 P1Y-1/2 'Ginga'
| KIT #: | H-103 |
| PRICE: | $ |
| DECALS: | Seven options |
| REVIEWER: | Andre Botto |
| NOTES: | Advantages: Simple kit, moderate parts count, good detail level, accurate in outline, alternative parts for 'Dash-1' or 'Dash-2' engine nacelles and windscreens. Disadvantages: 'Heavy' surface detailing; some fit issues; insufficient information on the versions involved; overlong landing gear parts (troublesome assembly process); 'bogus' interior; overly thick wing trailing edge and LG cover doors |
| HISTORY |
Unlike other WW2 belligerents, Japanese interest on
the fast, twin engine multi role attack bomber type came quite late. Early
Japanese Navy Air Force (IJNAF) operations were in the main the territory of the
'airline-like' G3M type 96 (Nell) and the ubiquitous G4M 'Hamaki' (Betty). It
was already 1944 when the concept did finally materialize in the form of the
Army's formidable Ki-67 (Peggy), while the IJNAF phased in its new P1Y-1 Model
11, poetically named 'Ginga' (Milky Way), but better known to the allies by the
TAIU reporting name 'Frances', this sometimes being shortened to 'Fran' in US
radio parlance (I'm using both designations interchangeably along this article).
A very sleek design, the Ginga is frequently compared to late model Ju-88s, but
its general arrangement and design philosophy may have been influenced by the
Douglas A-20, since some of them had been captured during the 1942 East Indies
campaign. The original 1940 specification called for a fast attack bomber,
capable of lifting the same bomb load as the Betty, while matching the
performance of a Zero fighter, with the help of two engines in the 2,000 HP
class, it being hoped the aircraft would surpass the 300-knot mark. A torpedo
carrying capability was also required.
In the face of the difficult international scenario, the traditional aircraft
manufacturers' teams were working almost to capacity, so the design was
entrusted to the Yokosuka Naval Air Arsenal, or 'Dai-Ichi Kaigun Koku Gijitsusho'
(shortened to Kugisho). Called design Y-20, it was the brainchild of a team led
by Engineers Masao Yamana and Tadanao Mitsuzi, resulting in an extremely sleek
design, sporting a narrow fuselage and a mid wing layout. The powerplant
selected was the new, 1820HP Nakajima 'Homare' (Honor), then still under
development. Unlike other types, crew complement (3 members) and defensive
armament were to be kept to a minimum: just a pair of guns, to be manned by a
bombardier/ navigator and an observer/gunner. Initially these were comprised of
a slow firing 20mm cannon in the nose and a dorsal rifle caliber machine gun,
but in practice there were several armament variations, according to the mission
profiles being flown. Later on, a pair of 13mm (.50), 'Type 2' MGs, whether on
single or twin mounts, were usually carried on bomber versions. Offensive
armament came in the form of a 800kg torpedo (carried with bomb doors partially
open), or two 500kg bombs (or various other combinations) in a ventral bomb bay.
The rest of the story is pretty well known... what happens when a new type,
however promising (He177, Typhoon, B-29, F-111... you name it!), is rushed
through production with a powerplant that's equally untried? Teething troubles!!
The prototype was flying by the summer of 1943 and test pilots (generally used
to fly more 'ho-hum' types) were at once full of praise for the plane's
nimbleness and speed (as high as 340 m.p.h.). And it even had pilot armour
plating! But the powerplant was another matter...
Although the test program was conducted with the help of the manufacturers'
experienced maintenance teams, the engines were a source of constant headaches,
with excessive wear and poor reliability; additionally, the overly complex
hydraulics was a source of numerous headaches. To compound the problem, the
production program was already in full swing. Initially, Nakajima's Koizumi
plant was selected due to the phasing out of Nell production, the production
lines being quickly dismantled to give way to Ginga production. The practical
result was that for practically one year, Air Force storage depots became full
of aircraft that had not yet been accepted for service use (such a sorry state
for a people so 'orderly-oriented' as the Japan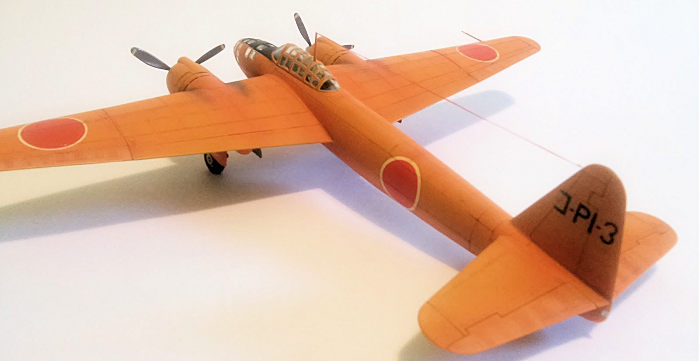 ese).
By the time all the bugs had been ironed out, it was already late 1944 and the
scenario had changed considerably, with the Japanese now on the defensive and
being pushed out of all territories it once conquered. A new fearsome tactic had
been inaugurated, in the form of the Kamikaze attacks; Ginga's debut came about
at just such a time.
ese).
By the time all the bugs had been ironed out, it was already late 1944 and the
scenario had changed considerably, with the Japanese now on the defensive and
being pushed out of all territories it once conquered. A new fearsome tactic had
been inaugurated, in the form of the Kamikaze attacks; Ginga's debut came about
at just such a time.
The time is February, 1945, and the Japanese garrison on Iwo Jima had been all
but annihilated after a bloody battle with U.S. Marine forces, backed by a
powerful fleet. By early March, this had retreated and steamed back to Ulithi
Atoll to regroup, being discovered by a fast recon C6N1 Sayun (Myrt). Naval
headquarters quickly decided to exploit this situation and mounted 'Operation
Tan' a raid on the anchored ships. For this purpose a dedicated unit had been
formed on P1Y1s, the 'Asusa Special Attack Unit', which was to fly the
1,500-plus mile distance in a 'one-way' suicide bombing attack. In order to help
the bombers with the difficult navigational issues, support would be provided by
the Emily flying boats of the 801st Air Corps. The operation took place on
March, 11th, with 24 bombers taking off from Kanoya Air Base with bombs and fuel
for a one-way trip, initially being led by a lightened H8K2 flown by an 801st
AC's senior pilot. Later on, the lead was to be taken by two other Emilys (that
had taken off in advance), which were also charged with assessing the raid's
bomb damage.
However, by the time the formation reached Okinotori Shima, severe rain squalls
were encountered, forcing a descent into low level, where headwinds were
encountered, reducing groundspeed and increasing engine wear. Thirteen of the
bombers experienced engine problems and left formation; while most of them
managed to land on Japanese held Islands, two did ditch and were lost. Finally
Yap Atoll came into view, from which the run in into Ulithi could be ascertained
and the bombers parted company with the H8K2s at 18:52h, attacking in pitch dark
conditions up to 19:30h. The H8K2s did not observe any fires at all in the gloom
and Operation 'Tan' (including Ginga's performace) was deemed a failure. U.S.
records show that only USS Randolph was damaged in Ulithi that day. It had been
a complete failure.
This inauspicious beginning was not being helped by events in the Home Islands.
Meanwhile, appreciating the design's speed potential (as well as a backup should
something foul Nakajima's production), Japanese Naval Headquarters had
instructed Kawanishi for Ginga production in its Konan plant. For fear of the as
yet untried Homare, Kawanishi selected installation of the powerful Mitsubishi
Kasei 25a of 1,850HP, giving rise to the P1Y-2S version, 'romantically' named
Kyokko (Aurora), of which just 96 examples were to be produced. Armament was
once again revised, with deletion of the nose gun and installation of two Type
99 Model 2 cannon firing obliquely upwards. Once again a Frances version was
beset by troubles, since Kyokkos could not reach the B-29s' operational
altitudes for an effective interception, and the scheme fell through. Surviving
airframes had their oblique armament removed and reconverted to bomber
configuration (P1Y-2 Model 16s).
In the face of the desperate war situation, the Kamikaze special attack doctrine
was expanded, calling for the utilization of every aircraft type (and boat)
available, and the projected P1Y4 version was selected as the carrier ship for
the Ohka Model 22 jet powered suicide bomb, superseding the combination Betty/
Ohka 11 then in use. Mercifully, the Japanese surrender intervened and an
invasion of the Home Islands was avoided, to the general relief. None of the
subsequent Ginga versions, P1Y3, 4, 5 or 6 were ever built.
However, a lot of testing had already been carried out on jet propulsion
concerning the Ohka 22's engine ・called 'Tsu-11' - which was not quite what we
know as a jet nowadays, but a type of 'Campini engine' (today known as a 'Ducted
Fan'), in which the compressor section is not moved by a gas turbine, but rather
by a conventional piston engine. Since it wouldn't be possible to test it on the
bomb itself, here again the Ginga enters the tale, for one of the Homare
prototypes was quickly adapted as a carrier (a modification we'll call the 'Jet
Frances' on this article), in the same fashion as would later happen with
several other surplus bombers, like B-17s, Lancasters, etc. Its aft bomb bay was
adapted with a ventral bulge in which a Tsu-11 was installed. With 'two turning
and one burning', this combination must have been quite fast...
The rest of the tale must forcefully remain untold, for here come the end of the
information available. Instead of a respected opponent, most Gingas quickly
became one more type of 'fighter fodder', due to factors such as lack of
experienced pilots, poor manufacturing and maintenance practices and incorrect
tactical doctrine. Of the 1000-plus examples built, (fortunately) one example
survives (i.e., above sea level), having been brought postwar from Japan by
carrier and now stored in the Smithsonian's NASM restoration facility. The
airframe is reportedly incomplete and, with the museum's current philosophy of
preservation-instead-of-restoration, a restoration is unlikely in the near
future... if so, what a pity for this beautiful aircraft!!
Remember Tadanao Mitsuzi? After VE-day, and after changing his surname to 'Miki'
(a common occurrence in the sensitive climate of postwar Japan), he found a new
job with 'Japan National Railway' Company and was instrumental in the design
process of the new 'Shinkansen' fast train, one of the most visible symbols of
the postwar restoration of Japan's pride and also one of the country's most
famous postcard scenes with Mount Fuji as a background...
| THE KIT |
Now a trip down memory lane: according to the
'legend', the great Revell concern once spurred the appearance of several
'local' licensed kit Manufacturers abroad, such as in Germany (by far the most
successful), Britain and also in Japan, where several WW2 IJNAF and IJAAF types
were kitted, most notably Sally, Helen, Nick, Irving... and Frances. In a
practice now common, the moulds were periodically 'swapped' or leased between
different manufacturers and Brazil's Kikoler Company (of Rio de Janeiro) was a
case in point, having kitted batches of these three last types. I can still
remember the time when these could be found at hobby shops and were quite
expensive to acquire...
Fast forward to modern times: My favorite hobby shop was [unfortunately] holding
a foreclosure sale and I couldn't believe my luck when I saw copies of both the
Frances and Irving kits on sale!! After snatching them, I proceeded to
thoroughly examine my prize: Frances!! To me, simply one of the most beautiful
WW2 aircraft, period! Its box was the most damaged one and showed signs of
moisture damage, while it had already been started, so Frances goes first...
For modern standards, the kit is quite simple, only 70 numbered parts moulded in
three grey sprues and a clear one. surface detailing is of both raised and
engraved type, with rivets, but these are quite petite and delicate in form and
(unlike a lot of other contemporary kits) do not detract from the general
appearance. The engraved lines are heavier, but even then are far from looking
like 溺atchbox's trenches・
 The kit's
greatest asset is that of alternate parts to represent both -1 and -2 versions;
these include full(!!!) engine parts (a lot of the expensive 1:48ths of today
just come with a flat 'look alike') and alternate cowlings for Homare and Kasei;
there are also alternate armoured and unarmoured windscreen parts.
The kit's
greatest asset is that of alternate parts to represent both -1 and -2 versions;
these include full(!!!) engine parts (a lot of the expensive 1:48ths of today
just come with a flat 'look alike') and alternate cowlings for Homare and Kasei;
there are also alternate armoured and unarmoured windscreen parts.
The instruction sheet is another beauty: yes, just ONE, single, 2-page sheet;
you haven't got to read a book in order to build this one...
There come decals and instructions for 7 versions, both -1 and -2, and one of
them is... Jet Frances!! Clearly drawn with the Tsu-11 engine fairing, however
there are no conversion parts or further comment on it...
In the ordnance dept., the bird is 'armed to the teeth' with a type 99 cannon in
the nose and an MG for the observer; this looks like a type 96 'Lewis look
alike'. There's also an open bomb bay to be 'decorated' with a 'Long Lance'
torpedo or 3 bombs... these look like one -500kg and two -250kg types. Two wing
drop tanks complete what comes as a respectable array for a vintage kit.
All doors and detail parts are overly thick and detract from the general
appearance; the antenna mast would be 'at home' in a square-rigger, while the
pitot probe looks like 40mm cannon barrel ・these have to be replaced!
An interesting note is that, as a result of the hydraulic system's teething
troubles, the tailwheel installation was revised and the originally retractable
tailwheel became fixed. The kit somewhat 'botches' things, since (overlong)
tailwheel doors are provided, to be glued around the 'fixed type' tailwheel
enclosure, which is just a circular hole from which the leg juts out.
A curious trait of old kits are the landing gear parts. Perhaps because
yesteryear examples were conceived to be put on 'display stands', LG legs were
moulded in the 'decompressed' (fully extended) oleo leg position, which only
happens in flight or when the bird is jacked up; a dry fit assembly will quickly
confirm that.
| CONSTRUCTION |
When reviewing the information available, I quickly
decided to go for the prototype... however, it was with much more reluctance
that I decided not to try scratchbuilding the Jet Frances. First, because if
you're building an IJNAF type other than Zeros and don't read Japanese, your
info sources are pretty limited.... in this case, just one (lousy), well known
photo of the contraption, which does not adequately convey the fairing's true
form. Furthermore, this seems to have some pretty complicated intake trunk
detailing. Second, because doing it would mean representing the aircraft in a
rather 'sorry state', with a lot of wear and tear (differently colored spinners,
etc.); so, I chose the 'backdating to an 'early version' option.
I'll skip the 'blow by blow' account in order not to get boring. Since we're
dealing with the prototype, the first step is to do away with all
armament/ordnance (and radar aerials), which is relegated to the 'spares
dungeon'.
The assembly process begins with... the engine nacelles!! Revell provides us
with four engines (eight rows of cylinders), to be mounted on a common back
plate incorporating the cooling gills and the production versions' ejector
exhausts. However, it is clear that the prototype, just like in the early Zeros,
had the 'manifold' type... so it's necessary to cut off and sand away all
exhaust stubs and rescribe the cooling gill engravings. I used the longer 'Homare'
cowlings, and these were intended to take the smaller engine parts. The
resulting test fit was not to my liking, since I found them quite anemic and
unlike the reference photos, so I chose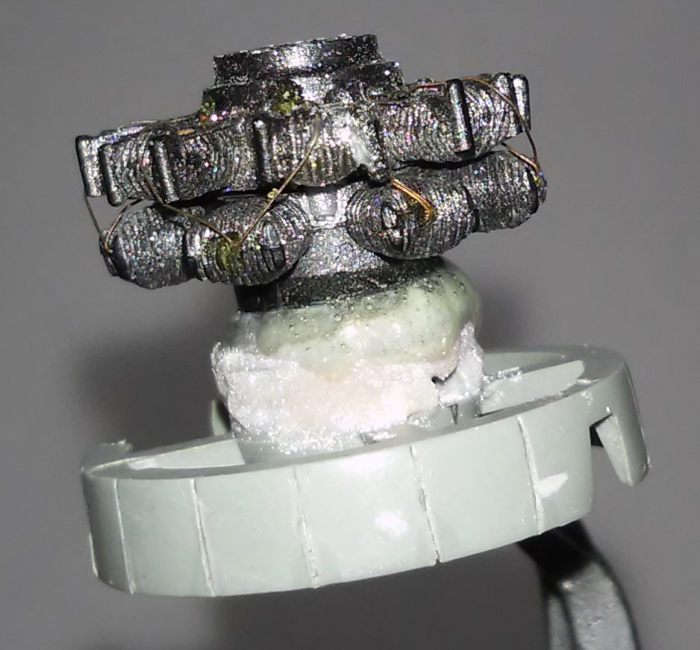 to modify those (larger) parts originally intended for the Dash-2. These present
two problems, namely they do not have enough 'chord' and would place the
crankcase too far inside the cowling; secondly, the rows are devoid of any
rocker arm or control rod detail. The first one was easy to correct; I just
glued on a pair of unused (and ugly) 1:72 wheels to the back plate to serve as
spacers; the whole was then reinforced with tiny amounts of dental resin. The
second was more elaborate: armed with photos of the real thing, a minor
scratchbuilding effort was begun. First I filed away the lateral top sides of
each cylinder (front row only) and installed sprue bits to mimic rocker arm
covers; the next step was to install individual bits of tiny styrene rods, which
were anchored to the crankcase on small holes drilled with my smaller drill
bits... easier said than done, but it all came up all right. The propeller
mounting holes were then carefully re-drilled in order to accept the axes in a
snug fit ・it worked, and in the end it made possible for me to install them
without any gluing ・as a precaution against the 'odd idiot' who's frequently
around at contests and tries to see whether the propellers really 'spin'...
to modify those (larger) parts originally intended for the Dash-2. These present
two problems, namely they do not have enough 'chord' and would place the
crankcase too far inside the cowling; secondly, the rows are devoid of any
rocker arm or control rod detail. The first one was easy to correct; I just
glued on a pair of unused (and ugly) 1:72 wheels to the back plate to serve as
spacers; the whole was then reinforced with tiny amounts of dental resin. The
second was more elaborate: armed with photos of the real thing, a minor
scratchbuilding effort was begun. First I filed away the lateral top sides of
each cylinder (front row only) and installed sprue bits to mimic rocker arm
covers; the next step was to install individual bits of tiny styrene rods, which
were anchored to the crankcase on small holes drilled with my smaller drill
bits... easier said than done, but it all came up all right. The propeller
mounting holes were then carefully re-drilled in order to accept the axes in a
snug fit ・it worked, and in the end it made possible for me to install them
without any gluing ・as a precaution against the 'odd idiot' who's frequently
around at contests and tries to see whether the propellers really 'spin'...
The whole was then painted; it was then and there that I made my first mistake,
by choosing to paint all my elaborate work's results in flat black and
drybrushing the highlights in silver... since that's a closely cowled engine, in
the end the whole assembly became practically invisible behind the propeller...
only appearing when shining a strong flashlight through the aperture. Aha!! But
at least I know it's all there!! [We'd better stop proclaiming that aloud, lest
they decide to put us into a sanatorium, hee, hee!]
Then I chose to turn my attention to the interior parts; in this was helped by
the many photos available of the sole example extant. Here once again there was
some parts shuffling.
Engineering of the cockpit parts is quite out of the ordinary. To begin with,
it's a 'two-storey' affair, with an upper part to represent pilot/ observer
accommodations and a lower one forming the bomb bay top and the floor of the
bombardier's compartment. In their center portion, the two parts interlock to
form an open compartment into which the wing alignment tabs can later slide.
Kikoler's version comes without any crew figures. As commented, interior parts
are quite 'bogus', possibly a reflection of insufficient type information at the
time of the mould's design (today we can count with excellent info on that
subject!).
The detail parts themselves are an 'interesting' collection of vague forms that
seem to have been more or less fashioned out of guesswork. The space between
cockpits is occupied by a 'reserve tank' that's not present in the preserved
example. The crew's seats are all basic; add miniature 'legs' and they readily
become excellent doll house stools. The bombsight looks very much like a coffee
table and there are two other 'strange blocks', to be tucked inside the
bombardier's enclosure and become virtually invisible in the end; one is
L-shaped, while the other clearly resembles an old jukebox. There is a sizable
gap between the pilot's panel and the side consoles, quite unlike the full size
airplane.
My first step was to carefully saw away the 'tank' format, in order to only
leave a sort of wall between the two cockpits. In order to fill the space up, I
chose to glue on in its place the 'jukebox' form, that's going to mimic the
radio gear that would be present there; plastic card bits filled the remaining
gaps. The other problem was posed by the removal of the dorsal MG; this left off
an ugly open void that I had to fill up in some way. I finally decided to take
advantage of the 'two-storey' assembly and chose to reposition the whole upper
part a few millimeters back (although this had its consequences later on...);
the long instrument panel upper coaming allowed for that to succeed. I then took
the steps to close down the gap between this panel and the side consoles; this
was done with some bits of plastic blocks an sheet stock. The instrument panel
itself does not have enough gluing surface to 'stick', so I had to reinforce it
with a stout bit of sprue (that comes up completely invisible in the end). The
gap between panel and consoles was also filled up with plastic blocks.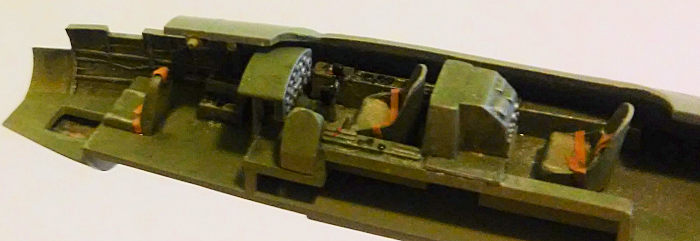
I wanted to do something about the bombardier's enclosure also. As moulded, it
looks like a hermetic coffin, totally devoid of accesses. Of course that's not
true, for the BN entered the plane through a ventral hatch and could also use a
couple of 'skylight' upper doors to peer out over the nose (an arrangement
practically identical to the Tupolev SB's); I chose to replicate the former. To
do this, I just hacked off a rectangular opening in front of the BN's feet (of
course, I left off the bombsight) I later painted the fuselage parts underneath
black; although a little overdone, this helps highlighting the aperture's
presence.
I was not happy with the seats either, but decided that I was only to modify the
upper ones, since the BN's was smaller, more hidden and had less headroom to
spare. In this I was again helped by the reference photos available on one of
seats extant, which shows a semicircular back section and space for a backpack
parachute. I took the original pilot and observer seats and clipped away some
two thirds of each seat back, then filed them to a square topped format; the
next step was to sand away each back's corners, resulting in a 'rounded'
appearance when viewed from above (see photos). I then stretch formed ('heat and
smash' method) a couple of new rounded back parts of the adequate shape. What
remained of the original, uncut part of the seat back now looked like a support
for a backpack parachute ・just simple scratchbuilding!
The ensemble was then painted ・now, I know about the considerable argument there
is on the subject of Japanese interior finishes: the famous 'Aotake', or 'Young
Bamboo' color. I admit: I'm not an expert on the subject and neither do I want
to be. In this way, I just chose a color that mostly resembled young bamboo and
I saw it used on many Zero restorations (I know the color well, living in a
tropical country, and it most definitely does not look like a semi transparent
blue green, so I ignored it). In Mikesh's book that color corresponds to hue
A/N-34, so I just sprayed all interior parts uniformly with a home brawn mix I
made myself. The finishing touch were to add the seat belts, which I took the
poetic license to paint them a mid beige to add some contrast. The only
exception was the instrument panel, painted a very dark green.
These interior parts go very well together and are easily enclosed inside the
fuselage halves. However, I wouldn't say the same about bomb bay doors. In
practice, the bomb bay was conceived to be posed open, with doors that slide
into the fuselage (this option really calls for leaving the doors completely
off), but the 'prototype option' calls for a closed compartment, so get your
putty tube and be prepared for some filling... Here I'll open a parentheses to
the benefit of those aiming at the 'open doors' option: both bomb bay doors come
as a single part to be cut off and longitudinally split... on their aft
extremity they show a sort o deep groove... the photos I have seen of wartime
aircraft show that this line marks the division between the forward and after
sections... you've got it right: These are actually FOUR doors and, while the
forward ones slide inside, the aft ones actually OPEN OUTWARDS!! Well, you've
been warned!
As has been told elsewhere, the bird is covered with rivets, but these are by no
means of the old 'golf ball' size, being quite subdued. Some purists may
disagree from it, but in my assembly I chose to keep them as intact as possible
(a difficult thing considering the volume of sanding work that would soon be
coming) for that additional touch of 'vintage modeling'. In order to restore the
many lost rivets, I would use my new 'secret weapon': a super-duper Chinese
riveting apparatus! It worked, but all the 'new rivets' were engraved and looked
even more subdued...
Now begins a more 'boring' phase, that of adjustments, filling and sanding...
I'll discuss it in general terms: summing it up, while the Ginga is not quite a
'putty queen', it's quite 'putty intensive'; that's were the true modelers are
taken apart from the boys! Practically every part and joint had to be dry fitted
and gently 'convinced' to form a smooth bond with the one it was glued into. The
wing parts have quite thick trailing edges and have to be sanded down to a
thinner outline; I had to be careful not to obliterate too many rivets in the
process.
In order to get the least possible trouble, I chose to split up the bomb bay
door part in two and carefully glue each half to its respective side, then work
with just the seam down the centerline; to my chagrin, this resulted in a large
gap down the centerline, that had to be carefully filled, puttied, sanded,
refilled, sanded again, rescribed and re-riveted... Uf!!
![]() Wing
joints in old kits are those notorious 'step-makers', and Ginga is no exception,
but this kit had a trait that actually helped me: the wing parts had only got
alignment tabs in the top halves! I quickly took advantage of it and subverted
the assembly sequence by first gluing the top ones on, taking special pains to
ensure good alignment and avoiding steps; if necessary, any differences were
dealt with by opening up the insertion grooves on the fuselage. I had also to be
careful not to interfere with the open space inside, since I had shuffled the
interior parts' position, remember? Once these had dried, I then glued the
bottom parts in the same fashion, thus achieving an almost perfect fit! The
resulting joints only needed minimum amounts of putty. Unfortunately this could
not be repeated with the single part stabilizer parts, and that joint gave me
more trouble and took more elbow grease to finish.
Wing
joints in old kits are those notorious 'step-makers', and Ginga is no exception,
but this kit had a trait that actually helped me: the wing parts had only got
alignment tabs in the top halves! I quickly took advantage of it and subverted
the assembly sequence by first gluing the top ones on, taking special pains to
ensure good alignment and avoiding steps; if necessary, any differences were
dealt with by opening up the insertion grooves on the fuselage. I had also to be
careful not to interfere with the open space inside, since I had shuffled the
interior parts' position, remember? Once these had dried, I then glued the
bottom parts in the same fashion, thus achieving an almost perfect fit! The
resulting joints only needed minimum amounts of putty. Unfortunately this could
not be repeated with the single part stabilizer parts, and that joint gave me
more trouble and took more elbow grease to finish.
I turned my attention back to the engine nacelles, this time to modify the
exhaust system to the manifold option. First I had to decide whether there would
be one or two exhaust outlets per engine; from the 2 photos there was simply no
way to know and (purely on guesswork) I finally chose to add two ('early Zero'
style), since it didn't seem to be enough exhaust area using just one manifold
exit. To do this meant blanking off two cooling gills per exit, these being
filled up and faired into
Here I used some left over parts from another kit, mainly a dreadful old 1:48th
P-51. To imitate the voluminous fairing in front of it, I sanded away one half
off the tip of a (badly moulded) 5・HVAR rocket and glued it in the front, while
the exhaust stub itself was replicated using a section of suitably sized
Contrail tube. The whole assembly was then puttied, sanded and finished.
A tale apart were the two overlong main landing gear legs. To complicate
matters, they have been engineered to be assembled together with the nacelles,
BEFORE the finishing process. This had to be so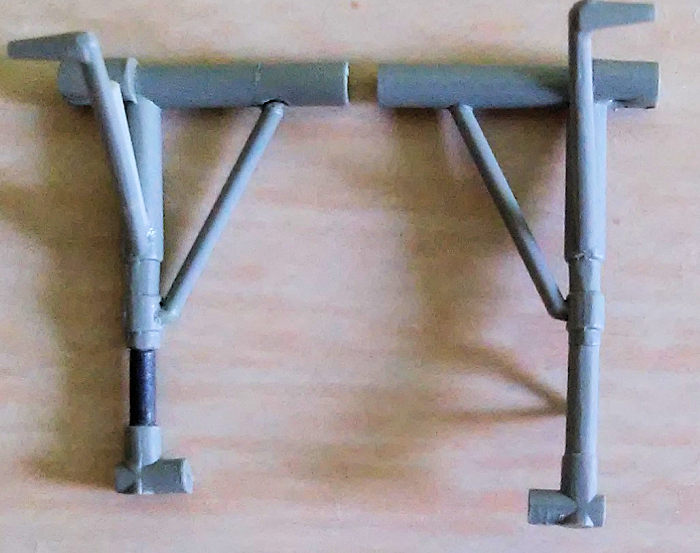 lved,
because I'd already broken the tailwheel off by trusting this system. The legs
were engineered to slide into oval- and round-shaped compartments. I simply cut
off the after part of the oval ones and this allowed me to install the legs
later (although that was quite a tense moment).
lved,
because I'd already broken the tailwheel off by trusting this system. The legs
were engineered to slide into oval- and round-shaped compartments. I simply cut
off the after part of the oval ones and this allowed me to install the legs
later (although that was quite a tense moment).
There are several ways to shorten the legs; I chose the more handsome and
accurate, but also the more difficult one, by severing the oleos themselves and
(carefully!!) also separating the sway braces. The parts were then drilled to
accept the new short oleos, made up of a stout copper rod inside another bit of
Contrail tube. The sway brace was then reglued in place. Golly, you've got to
take a lot of length out of it: practically 2 millimeters!! Wheels and tires
also called for attention; wheel hubs were drilled, detailed and glued to the
tires, which were then sanded down (no movable wheels on this one...)
Aileron and tail feather details came next; as moulded they are so deep, they
look like 'rice paddy dykes' full of the old - terrible - 'fabric effect'. It
was a bit of a chore, but I managed to fill them all with plastic sheet stock,
putty, sand and finish ・it looks much better now...
As told elsewhere, the prototypes sported a retractable tailwheel; to replicate
it, I carefully cut off the fuselage around the tailwheel mount, thus forming a
tailwheel well of suitable size (use your references); the overlong door parts
were then clipped in order to suit this size.
The wheel doors are also not good; besides looking like casemate hatches, fit
also suffers ・if the bomb bay doors seem to be made to be assembled open, these
are almost a perfect fit when closed! I simply did not want to stretch form a
new set of doors, so went about thinning them from the inside... some more elbow
grease!!
One of the model's finest points is the scribing showing the precise location of
all navigation lights; I took the opportunity and filed away these areas, then
glued bits of clear sprue that were then sanded and polished to shape to
represent the actual lights; the ones on the wings were small enough that I just
let them stay transparent, without color tinting.
With a lot of exposed framing, the clear parts are a little more challenging
than usual. I was a little worried at first but although not altogether good,
fit was quit decent, except for the pilot's windscreen (for the prototype
version, be sure to use the rounded one provided), which demands a little more
adjustment work, sanding and polishing. Also, go easy with the putty, in order
not to mar any parts.
![]() For an
added realism touch, I chose to scratchbuild the 'auxiliary windscreen', which
was installed between cockpits in order to allow the 'in flight' opening of the
pilot's enclosure without disturbing the gunner's. It was simply fashioned out
of a piece of flat clear styrene cut, sanded, drilled and painted... but when I
was going to install it, I had another surprise: here again, my internal parts
shuffling had had its effects, for the cockpits' new boundary did not coincide
with the place where the windscreen should be. In the end, it had to be glued
one full frame back from that point. However, I just said: 'what the heck?' and
proceeded with it, for it's a really cool detail!
For an
added realism touch, I chose to scratchbuild the 'auxiliary windscreen', which
was installed between cockpits in order to allow the 'in flight' opening of the
pilot's enclosure without disturbing the gunner's. It was simply fashioned out
of a piece of flat clear styrene cut, sanded, drilled and painted... but when I
was going to install it, I had another surprise: here again, my internal parts
shuffling had had its effects, for the cockpits' new boundary did not coincide
with the place where the windscreen should be. In the end, it had to be glued
one full frame back from that point. However, I just said: 'what the heck?' and
proceeded with it, for it's a really cool detail!
| COLORS & MARKINGS |
Since everything was OK, it's now on to the paint
shop. The first step was to install the kit on a 'painting jig' ・I usually plan
in advance the way I'm going to rig that up, usually using the landing gear
attachment points as supports; it is worth the extra time spent on it, since it
provides an additional support and allow me to avoid having to touch the kit or
use clumsy gloves (a potentially accident prone condition).
Considering the kit's irregularities (rivets, etc.), I chose to apply a really
consistent primer coat, using Gunze Mr. Mark 1000. It got extra heavy on some
points, perhaps (it got a little exaggerated in the end...); in this case, the
sanding and repainting process took a bit longer, quite normal for a model this
age. I also discovered that having rivets on a kit is a bit of a liability
during the painting process, for you've got to work more carefully, especially
avoiding marring the surfaces with dust particles.
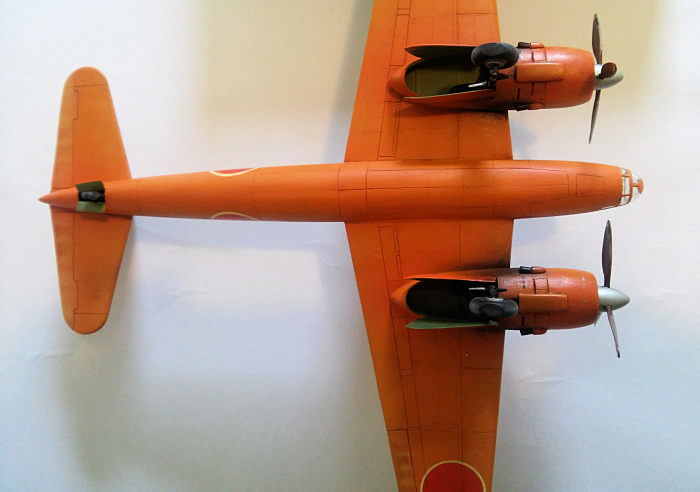
For the prototype version, the instruction plans called for a scheme of 'olive
green overall', but now we know differently, doesn't we, folks? Probably one of
the main reasons for my choice, many Japanese prototypes (look at Hasegawa's
'G8N Rita') were painted overall... trainer orange... and it must have looked
like a big orange!!
To paint the main coats, I elected to use 'AEROTECH PAINTS', a nitrocellulose
based line of paints originally conceived for automotive work; although of
excellent quality, drying fast to the touch and providing very thin coats, they
have quite a 'stink', so take care with the fumes...
Monochrome or (largely) single color finishes are a modeler's opportunity to
exercise 'multi-layer', or surface texturing painting, representing different
lighting conditions, weathered areas, wear & tear, etc., practically the same
reasoning used to paint model figures.
 I consider
this my 'time of trial': most of us seem to feel quite at home with one tool,
while having a difficult time with another, and while feeling quite at home with
a brush in my hands (perhaps because I've been brought up this way), I always
approach airbrush tasks with some anxiety, since a mess-up here is usually very
costly. On forums I keep hearing about messy paintwork, glazed or cracked
varnish coats, etc. Well, with chemical factors aside, the only cause I can
think about for this boils down to the old five-letter word: HASTE!! The only
antidote known for that is that old P-word: PATIENCE!! According to that
philosophy, I really took my time and things turned into 'slow motion'; I chose
to allow for a lot of time ・sometimes up to two weeks ・between coats.
I consider
this my 'time of trial': most of us seem to feel quite at home with one tool,
while having a difficult time with another, and while feeling quite at home with
a brush in my hands (perhaps because I've been brought up this way), I always
approach airbrush tasks with some anxiety, since a mess-up here is usually very
costly. On forums I keep hearing about messy paintwork, glazed or cracked
varnish coats, etc. Well, with chemical factors aside, the only cause I can
think about for this boils down to the old five-letter word: HASTE!! The only
antidote known for that is that old P-word: PATIENCE!! According to that
philosophy, I really took my time and things turned into 'slow motion'; I chose
to allow for a lot of time ・sometimes up to two weeks ・between coats.
It began with the base coat. The chip shows that what we've called 'Trainer
Orange' is more of a Red Orange. For this I chose to go for my own, home-brawn
hue, by mixing quantities of basic orange with a very dark red paint. I
proceeded slowly and smoothly covered all surfaces. After that had proved surely
dry, I started adding the several texturing layers; in a very brief description,
that was begun by masking and spraying all 'fabric' control surfaces with a
contrasting, lighter hue. Third step consisted in spraying all upper surfaces
with a much lighter, yellowish tone. I'll explain: according to my experience,
the red pigment in the orange is one of most sensitive ones to sun bleaching, so
I really 'let'er rip' with the yellow mix above.
Major painting was then achieved by spraying the underside darker tones, with
special attention given to the engine nacelles and exhaust areas. The final
touch was then to paint the pilot's antiglare paneling on the upper nose (the
photos only showed paint in this area, so I left the cowling tops painted
orange).
A lot more days elapsed in order to let the layers fully cure. The whole was
then uniformly sprayed with liquid wax as a preparation for decaling; in this
case I used 'Tacolac' wax, diluted 50/50 with isopropyl alcohol.
The decal set was actually one of the biggest surprises I had. It was the kit's
the original set of 'Serigraphs' and I estimated their age to be in the 40-year
range; however, they had clearly been well stored (in a dry place), looked good
with just mild yellowing and were integral. Imagine my joy when all application
tests showed near perfect results!! And you still mumble about the low quality
of the local products!!
However, in the 'decal design' department all was not so good. The kit's set had
been conceived to fit the combat versions and sported fuselage hinnomarus
(meatballs) considerably smaller than the prototype's. Besides, I'd need white
surrounds on all six positions, while the underside ones provided were also for
green & gray painted examples. Decal spares to the rescue!! There were four
'red-only' meatballs to be used at the night bomber versions, and I used those;
meanwhile, I had located a sheet for another nation's roundels that sported
(extremely thin!!) separate white surrounds, and it was just a matter of
combining four designs from each set... and we are done! I was thus free to
apply those originally intended for the upper wings to the fuselage. This time
these are a little larger than needed, but the difference is not so noticeable.
I generally got really cautious about that and decided to use mild setting
solutions, opting for a local brand called 'DEC SYSTEM', but the most difficult
spots were dealt with minute amounts of Gunze's Mr. Mark. Here again, I
discovered that rivets are quite an issue when applying decals over them.
It all went perfectly well, except for the 'KO-P-I-3' (denoting Kugisho) tail
code and it's carrier film is the only one that really got quite noticeable,
especially after the weathering layers applied. I was already wary of too much
tampering with such vintage decals, so let it be that way. The finishing touch
came by applying the data table under the empenage, a 'trifle' originally
overlooked by 'toy manufacturers'... this was a small table listing data like
type, model, manufacturing date, engine type, etc., and this one had been
stencile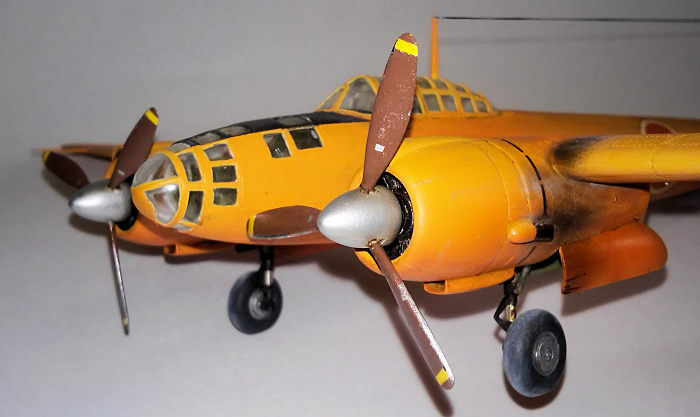 d
over a small natural metal patch on the lower tail area. Conclusion: the bird's
garish coat had been applied 'after' the stencil's addition... To emulate that
involved a duplication effort: I had already masked and sprayed Alclad over a
small rectangular patch and then just apllied a small stencil table I took from
a 'Western' aircraft type' that I found after a frantic search... I'm risking my
salt that most contest judges will not be able to read 'Nippon-go' on a 1:72nd
data table under the plane's stabilizer, hee, hee!! The final protective varnish
coat was then applied.
d
over a small natural metal patch on the lower tail area. Conclusion: the bird's
garish coat had been applied 'after' the stencil's addition... To emulate that
involved a duplication effort: I had already masked and sprayed Alclad over a
small rectangular patch and then just apllied a small stencil table I took from
a 'Western' aircraft type' that I found after a frantic search... I'm risking my
salt that most contest judges will not be able to read 'Nippon-go' on a 1:72nd
data table under the plane's stabilizer, hee, hee!! The final protective varnish
coat was then applied.
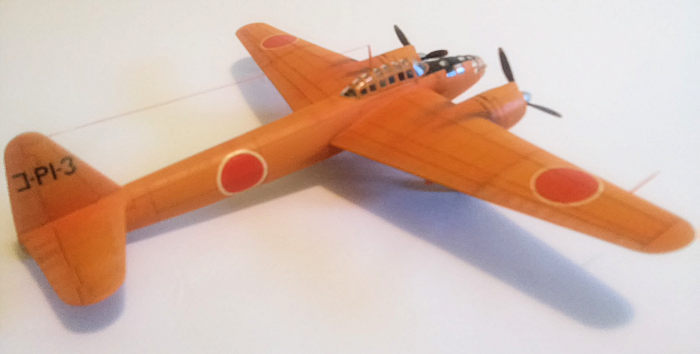
Weathering is one of the parts I really enjoy in a kit (that's brush work!) and
I really 'let'er rip' with a whole range of techniques, applying oil paints
(shade & highlight), airbrushing 'Tamyia smoke' and a final pastel application.
Pitting and scraping was simulated with aluminum powder and a fine (expended)
felt tip pen; I kept my application confined to leading edges, prop tips, engine
nacelles, upper center section and canopy rails. As a reflex of the engine
trouble, photos show heavily pitted paint about the cowling panels, so these
received special attention.
Also as per the photos, landing gear parts were treated to a coat of flat
aluminum and then some areas were masked and painted black (a scheme only seen
on the prototype). These were later finally installed into the wells (an
exhilarating moment!) and I just added the doors without further ado (I didn't
add any other detail to the wells).
The only tasks remaining involved adding the final details. The rear canopy was
re-bored in order to receive a replacement antenna (more P-51 stuff), while the
new pitot probe was fashioned from a bit of copper wire inside a section of
hypodermic tubing; then added the antenna wire and with this I think this old
kit had already suffered enough in my hands.
| CONCLUSIONS |
After so many years of modeling, I know my audience well... if you are all still with me, now probably half the guys may be asking themselves just why I have chosen to build such a complicated 'oldie', while the other half may be mumbling just why I may have chosen to expend such a 'rare box'... Heck, that's because it's a beautiful plane!! There's only one other injected 72nd kit on the market (Hasegawa) and from a distance, my prototype will surely pass for one of them. And although being 'vintage', the Revell Frances is by no means 'venerable'. With a good bit of determination and that 'P-word', it's going to transform itself into a startling replica of the Shinkansen's forerunner!
| REFERENCES |
- 'Japanese Aircraft of the Pacific War', by Dr.Ren
Francillon. Putnam
- 'Camoufrage [sic] and Markings of IJNAF Fighters'. Bunrin-do
- 'Japanese Cockpit Interiors, vol2' (booklet) and 'Japanese Cockpit Interiors'
(hardback edition), both by Robert C. Mikesh. Monogram Books
- Several websites of WW2 IJNAF aircraft photos
31 May 2018
Copyright ModelingMadness.com. If you would like your product reviewed fairly and fairly quickly, please
contact
the editor or see other details in the
Note to
Contributors. Back to the Main Page
Back to the Review
Index Page
Back to the Previews Index Page