
Hasegawa 1/48 D3A1 'Val'
| KIT #: | Jt55 |
| PRICE: | $18.00 |
| DECALS: | Three options |
| REVIEWER: | Fernando Rolandelli |
| NOTES: | Eduard FE1281 p.e. and masks Yellowhammer decals |
| HISTORY |
 Designed by Toshio Ozaki under the direction of Tokuichirou Gomei, the
-slightly- backwards-looking Aichi D3A1 flew in January, 1938, under the
programme AM-17. Though influenced by the Heinkel He-70 (Ozaki had
visited the Heinkel factory) it was deliberately kept simple and more
rugged than the German design. Among the several main modifications were
the shape and surface of the vertical fin and rudder, and a change of
engine, to the Mitsubishi Kinsei of 840 kph. It was easy to fly, very
maneuvrable (effective dogfighter when not encumbered by a bomb) and
easy to deck handling. The weapon load might look a bit puny to us, the
main missile being a 250 kg bomb (the same an SBD took for scouting!)
but the precision in the dive would make up for this
Designed by Toshio Ozaki under the direction of Tokuichirou Gomei, the
-slightly- backwards-looking Aichi D3A1 flew in January, 1938, under the
programme AM-17. Though influenced by the Heinkel He-70 (Ozaki had
visited the Heinkel factory) it was deliberately kept simple and more
rugged than the German design. Among the several main modifications were
the shape and surface of the vertical fin and rudder, and a change of
engine, to the Mitsubishi Kinsei of 840 kph. It was easy to fly, very
maneuvrable (effective dogfighter when not encumbered by a bomb) and
easy to deck handling. The weapon load might look a bit puny to us, the
main missile being a 250 kg bomb (the same an SBD took for scouting!)
but the precision in the dive would make up for this
Ozaki went on to design the B7A Ryusei and the M6A1 Seiran. He survived the war.
| THE KIT |
The Hasegawa kit is for now the best D3A1 in 1/48, with adequate interior and fine recessed panels. Clear parts are outstanding. Do Hasegawa put more -loving- care to WW2 Japanese subjects? That said, the kit is simple, engine is just one piece for the two rows of cylinders and none of the flying surfaces is detached. Decals are a bit thick as usual. I threw in an Eduard Zoom PE set plus Yellowhammer decals.
| CONSTRUCTION |
 The
cockpits are well furnished and were completed using the PE parts and
some scratchbuilding. Some of the rear cockpit instruments are mimicks;
I corrected this to an extent using the book by Mikesh as a guide,
especially in remaking the prominent compass (probably the most
disappointing part in the kit). The color I chose was US Interior Green.
I completed the rear cockpit as it would be on deck: the seat facing
forward and the MG stowed.
The
cockpits are well furnished and were completed using the PE parts and
some scratchbuilding. Some of the rear cockpit instruments are mimicks;
I corrected this to an extent using the book by Mikesh as a guide,
especially in remaking the prominent compass (probably the most
disappointing part in the kit). The color I chose was US Interior Green.
I completed the rear cockpit as it would be on deck: the seat facing
forward and the MG stowed.
The main parts fit is very good, though I am not a good assembler and had to use some putty in areas. The canopy is very complex, as the various segments go one over the other. I resorted to masking and painting the innermost ones and attach them to the still unpainted fuselage; then proceeded normally (a precut mask is heartily recommended). This was the only part of the assembly that worried me. The cowling requires some extra care, as it comes in two halves plus forward ring, and the seam line is very visible on the interior surfaces (it is not well faired as in, say, an A6M, it is more of an open pot!) I suggest puttying and sanding both sides.
| COLORS & MARKINGS |
 A one
colour overall paintjob looks easy, but it is not, at least if you do
not want it to look like a die-cast model. I made an extensive preshade
(almost a “marbling”) and then proceeded to paint in mottle fashion,
with some extra later care of flying surfaces and some structural
details post shaded in a lighter shade.
A one
colour overall paintjob looks easy, but it is not, at least if you do
not want it to look like a die-cast model. I made an extensive preshade
(almost a “marbling”) and then proceeded to paint in mottle fashion,
with some extra later care of flying surfaces and some structural
details post shaded in a lighter shade.
The colour I wanted to replicate was the Aichi version of Ame-Iro, supposedly more vivid than the Mitsubishi version (hence the reports of “yellow” or “orange” Aichis?) I chose Xtracolor FS34201, which is among the colours recommended by Nick Millman as an acceptable match. Hinomarus were painted, with a Red colour from Revell.
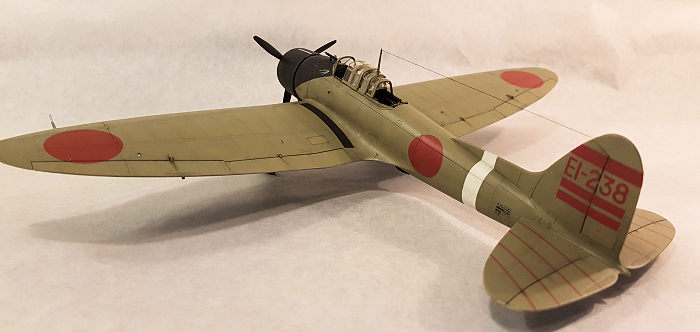 Decals
were rather nightmarish, but it might be they were a bit old. Instead of
making some trial, I went in for the tail code, which, to my horror,
started disintegrating in the water. Somehow I managed to take it out of
the water and on to the tail, with some gaps which were duly filled with
the Revell paint. The other side code I coated in Xtracrilixs Gloss, and
it worked, though still had some breakages which were duly filled with
the Revell paint. After some coats of Gloss varnish and polishing in
between, they look almost if nothing had happened. The fact that the
Revell paint was the exact hue the decals had (a rare occurrence)
undoubtedly helped. The stripes on the tailplane came from a Xtradecal
generic sheet.
Decals
were rather nightmarish, but it might be they were a bit old. Instead of
making some trial, I went in for the tail code, which, to my horror,
started disintegrating in the water. Somehow I managed to take it out of
the water and on to the tail, with some gaps which were duly filled with
the Revell paint. The other side code I coated in Xtracrilixs Gloss, and
it worked, though still had some breakages which were duly filled with
the Revell paint. After some coats of Gloss varnish and polishing in
between, they look almost if nothing had happened. The fact that the
Revell paint was the exact hue the decals had (a rare occurrence)
undoubtedly helped. The stripes on the tailplane came from a Xtradecal
generic sheet.
| CONCLUSIONS |
A good modelling experience. These models are not new, and comes as no surprise to anyone, but they are a delight to built, and quite recommended for people that has little time to dedicate to the hobby, such as myself.
| REFERENCES |
“Japanese Aircraft Interiors 1940-1945”, Robert C. Mikesh, Monogram (2000)
“A6M Colours”, Nick Millman
“Aichi D3A1/2 Val”, Peter C. Smith, Crowood Aviation Series
7 November 2023 Copyright ModelingMadness.com. All rights reserved. No
reproduction in part or in whole without express permission from the editor.
If you would like your product reviewed fairly and fairly quickly, please contact the editor or see other details in the Note to Contributors.