
Hasegawa 1/48 D3A1 'Val' - Midway
| KIT #: | Jt 56 |
| PRICE: | 21 Euros in 2006 |
| DECALS: | Two options |
| REVIEWER: | Spiros Pendedekas |
| NOTES: |
| HISTORY |
The Aichi D3A Type 99 Carrier Bomber (Allied reporting name “Val”) was a World War II carrier-borne dive bomber. It was the primary dive bomber of the Imperial Japanese Navy (IJN) and was involved in almost all IJN actions, including the attack on Pearl Harbor.
The Aichi D3A was the first Japanese aircraft to bomb American targets in the war, commencing with Pearl Harbor and U.S. bases in the Philippines, such as Clark Air Force Base. Vals sank more Allied warships than any other Axis aircraft.
 The
pilot position was equipped with a telescopic gunsight which was used for aiming
the bomb during the dive. The observer position was equipped with a drift sight,
which was a long vertical tube located in the front-left of the observer’s seat.
In addition, the observer position was equipped with a drift meter that was
mounted on the floor in the front-right of the observer’s seat. The observer
also operated a radio set that was mounted in front of the observer’s seat and
behind the pilot’s seat. On top of the radio set was a reflector compass for
precise navigation.
The
pilot position was equipped with a telescopic gunsight which was used for aiming
the bomb during the dive. The observer position was equipped with a drift sight,
which was a long vertical tube located in the front-left of the observer’s seat.
In addition, the observer position was equipped with a drift meter that was
mounted on the floor in the front-right of the observer’s seat. The observer
also operated a radio set that was mounted in front of the observer’s seat and
behind the pilot’s seat. On top of the radio set was a reflector compass for
precise navigation.
Armament was two fixed forward-firing 7.7 mm (0.303 in) machine guns, and one flexible 7.7 mm (.303 in) machine gun at the rear end of cockpit. Normal bomb load was a single 250 kg bomb carried under the fuselage, swung out under the propeller on release by a trapeze. Two additional 60 kg bombs could be carried on wing racks located under each wing outboard of the dive brakes.
The D3A1 commenced carrier qualification trials aboard the aircraft carriers Akagi and Kaga during 1940, while a small number of aircraft made their combat debut from land bases over China. Starting with the attack on Pearl Harbor, the D3A1 took part in all major Japanese carrier operations in the first 10 months of the war.
During 1942, dive bombing attacks by D3A bombers significantly contributed to sinking of three US fleet carriers: Lexington at the Battle of the Coral Sea, Yorktown at the Battle of Midway and Hornet at the Battle of the Santa Cruz Islands. In addition, they damaged carrier Enterprise both at the Battle of the Eastern Solomons and at the Battle of the Santa Cruz Islands.
 Discounting
the Pearl Harbor strike, which also used the B5N for level bombing and torpedo
attacks, Val dive bombers were credited with sinking the following Allied
warships:
Discounting
the Pearl Harbor strike, which also used the B5N for level bombing and torpedo
attacks, Val dive bombers were credited with sinking the following Allied
warships:
USS Peary, American destroyer, 19 February 1942 – Australia (Darwin)
USS Pope, American destroyer, 1 March 1942 – Pacific Ocean
USS Edsall, American destroyer, 1 March 1942- Pacific Ocean
USS Pecos, American oiler, 1 March 1942- Pacific Ocean
HMS Cornwall, British heavy cruiser, 5 April 1942 – Indian Ocean
HMS Dorsetshire, British heavy cruiser, 5 April 1942 – Indian Ocean
HMS Hector, British armed merchant cruiser, 5 April 1942 – Indian Ocean
HMS Tenedos, British destroyer, 5 April 1942 – Indian Ocean
HMS Hermes, British aircraft carrier, 9 April 1942 – Indian Ocean
HMAS Vampire, Australian destroyer, 9 April 1942 – Indian Ocean
USS Sims, American destroyer, 7 May 1942 – Pacific Ocean
USS De Haven, American destroyer, 1 February 1943 – Pacific Ocean
USS Aaron Ward, American destroyer, 7 April 1943 – Pacific Ocean
USS Brownson, American destroyer, 26 December 1943 – Pacific Ocean
USS Abner Read, American destroyer, sunk by kamikaze 1 November 1944 – Pacific
Ocean
USS William D. Porter, American destroyer, sunk by kamikaze 10 June 1945 – Japan
(Okinawa)
As the war progressed, there were instances when the Vals were pressed into duty as fighters in the interceptor role, their maneuverability being enough to allow them to survive in this role.
| THE KIT |
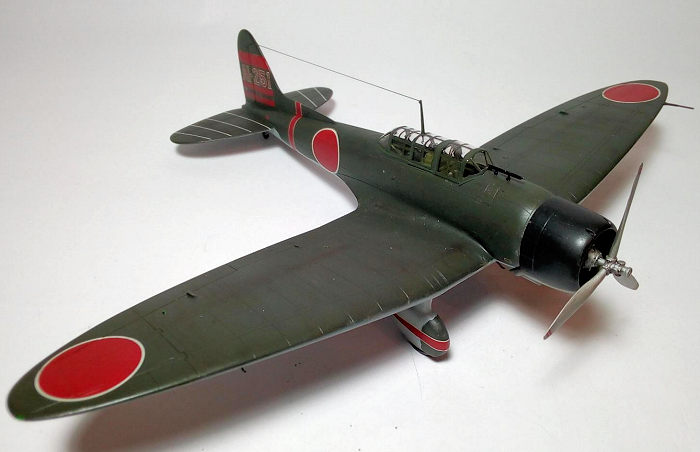
Introduced in 1998, this is one of the three initial release versions (them differing only in decals). Bought this kit in 2005, during the Golden Ages of my Shelf of Doom creation and augmentation. The box cover sports an astonishing Koike Shigeo painting of the Val AI-251, onboard carrier Akagi, green over grey, leading aircraft of the dive bombers that attacked Midway, piloted by Lieutenant Takehiko Chihaya with a group of 35 other Vals.
Upon opening the box you are treated by your typical Hasegawa amazingly looking sprues, very promising in the box. All sprues, sans the clear parts, are sealed together, being thus prominent to scratches, the clear parts sealed together with the decals.
You get quite a lot parts to make the cockpit, including a passable
clear representation of the gunner's gyro compass. In f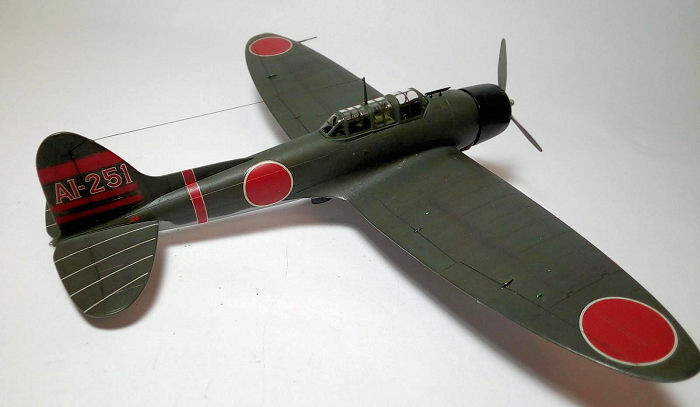 act,
the cockpit is superbly detailed with plenty of detail, and frankly few will ask
for PEresinish extras. The rest of the parts are typically laid out, with left
and right fuselage halves and a one piece lower wing, helping alignment.
act,
the cockpit is superbly detailed with plenty of detail, and frankly few will ask
for PEresinish extras. The rest of the parts are typically laid out, with left
and right fuselage halves and a one piece lower wing, helping alignment.
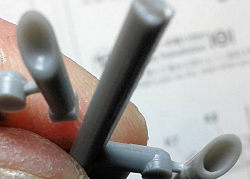
The double row engine is well represented, although I wouldn't mind having the back row cylinders fully (and not partly) represented, to satisfy The Penlight Police.The engine cowling is a three piece affair, something I am not very fond of, having to glue, fill and sand, inevitably resulting in some loss of detail. I have seen many one piece molded cowlings (I think from Hasegawa as well), looking great, and would love to see them in all their models.
The propeller is nicely detailed and is fitted to the crankcase with the typical Hasegawa polycap. The wheels are weighted and look good. Being it the bomber version, you get one central mounted (with a well executed release mechanism) 250kg and two wing mounted 60kg bombs. There is a choice of a a one piece or split parts canopy, which is nice. The rest of the detail parts are more or less nicely represented, leaving a very positive first impression and urging you to go and build this beauty.
Instructions are typical Hasegawa in 7-page pamphlet style, with a small history at the front page, detailed construction steps and appropriate colour callouts. The only criticism is some vague info concerning the placement of a few parts in the cockpit, which can be easily overcome by studying cockpit pics (from the internet or other sources you may have access to).
Decals provided are for two similarly painted Battle of Midway Vals, AI-251, onboard carrier Akagi and AI-201, onboard carrier Kaga. They were printed in 1998, the white being ivory, but otherwise nicely done and looked useable.
| CONSTRUCTION |
I started with the cockpit, which is comprised of not less than 38
parts! Detail is really sufficient for most of us. Having decided to finish my
Val with closed canopy, I assembled the gunner's seat and gun in stowed
position. Instructions call the modeler to make a mix for a yellow green
interior colour. After the usual internet r esearch
I came up using Humbrol 226, which looked close enough to what I researched.
Instrument panel, various panels, radios and other “boxes” were painted black. I
used the kit decals for the instrument panel and for three more panels. They
snuggled over the raised panel details beautifully with Mr Mark Softer. The rest
black stuff details were enhanced by silver drybrushing and various knobs picked
up in red and white. The gyro compass is a rough representation of the real
thing, but I painted its base black and used it anyway. Gun, ammo boxes and
spare magazines were painted Testors gun metal. I added scratch built seat belts
from painted masking tape, their buckles done with my PILOT silver pen.
esearch
I came up using Humbrol 226, which looked close enough to what I researched.
Instrument panel, various panels, radios and other “boxes” were painted black. I
used the kit decals for the instrument panel and for three more panels. They
snuggled over the raised panel details beautifully with Mr Mark Softer. The rest
black stuff details were enhanced by silver drybrushing and various knobs picked
up in red and white. The gyro compass is a rough representation of the real
thing, but I painted its base black and used it anyway. Gun, ammo boxes and
spare magazines were painted Testors gun metal. I added scratch built seat belts
from painted masking tape, their buckles done with my PILOT silver pen.
The painted and assembled cockpit (minus some delicate parts to be
fitted at ending
 stages)
was trapped between the fuselage halves. Fit was good. Then the lower part of
the wing was attached, followed by the two upper parts. I had some gaps at the
fuselage/wing joint; maybe it was my fault, maybe not. Filled the gaps with
liquid styrene. The horizontal stabilizers fitted like a dream. Realized that
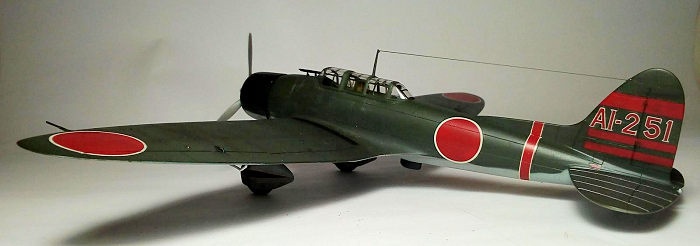
the Val is quite large for a single engine plane, with nice late 30's looks.
stages)
was trapped between the fuselage halves. Fit was good. Then the lower part of
the wing was attached, followed by the two upper parts. I had some gaps at the
fuselage/wing joint; maybe it was my fault, maybe not. Filled the gaps with
liquid styrene. The horizontal stabilizers fitted like a dream. Realized that
the Val is quite large for a single engine plane, with nice late 30's looks.
I then proceeded to the engine, which was painted black and heavilly drybrushed in silver. Looked busy enough with the molded-in ignition harnesses. The cabane, as well as the nicely depicted propeller, were painted Testors steel. Drilled the two exhausts to look more realistic, then painted burned metal. I assembled/filled/sanded the (unnecessarilly for me) three piece cowling, painted gloss black outside and interior green inside, and fitted the engine in.
The spats were also assembled and glued in position. It was then time for the (always neccessary for me) filling and sanding session (I used Squadron “green”). Afterwards, the dive brakes were glued underwing and it was time for the paint shop.
| COLORS & MARKINGS |
 Instructions
call for Nakajima dark green topsides, with IJN light grey undersides (I chose
Humbrol 75 and 127, which looked “close enough”). I used Tac to obtain a tight
yet not hard demarcation line. I then gave the model a coat of future and
proceeded to apply the decals.
Instructions
call for Nakajima dark green topsides, with IJN light grey undersides (I chose
Humbrol 75 and 127, which looked “close enough”). I used Tac to obtain a tight
yet not hard demarcation line. I then gave the model a coat of future and
proceeded to apply the decals.
I chose to depict AI-251, leading aircraft of the dive bombers that attacked Midway, piloted by Lieutenant Takehiko Chihaya with a group of 35 other Vals. The very old kit decals took centuries to detach from their backing sheet, but behaved well afterwards. Mr Mark Softer took care of them, as they snuggled nicely on their coverage area.
I then gave my Val a black wash to liven-up the monotonous underside gray. Chipping and weathering was applied, not too intensive, but I wanted to depict the harsh conditions’ impact at the Val aboard the Akagi, despite the maintenance personnel laborious efforts! An uneven allover matt coating was finally applied.
| FINAL CONSTRUCTION |
I assembled and fitted the centerline bomb rack and also the wing bomb racks,
that I had to modify their undersides to look realistic without bombs fitted (I
rarely fit ordnance to my models, just the external tanks, the missile pylons
and the bomb racks, Don’t know why I do this, guess I am used to planes with
this configuration. It also saves a lot of time nedded for assembling and
painting those bombs, rockets, A/A and so on!).
I also fitted underwing something that looks like a seecondary pitot tube and a radio antenna, painted black.
 Leftover
bits were installed in the cockpit; did some touchups to the upper green,
painted gunsight and tail wheel....well, this and that! I also painted flat
black the back of the engine, as there is some chink around the exhausts area.
Leftover
bits were installed in the cockpit; did some touchups to the upper green,
painted gunsight and tail wheel....well, this and that! I also painted flat
black the back of the engine, as there is some chink around the exhausts area.
Finalized and installed the handpainted canopy (I usually – not always –
finish my models with closed canopies, as I like their shape more – hint: can
hide my cockpit mess jobs too! – That said, I ADORE all those open canopy models
that one can admire, among others, the cockpit details). Faired the canopy edges
with white glue (thanks Tom Cleaver for the tip).
Fitted the gunsight with a piece of “wire” made of streched sprue under it that
ends up at the windscreen base, to look closer to the real thing (as master
Koike Shigeo depicted it at the boxart).
Fitted the antenna mast and run an antenna wire made of streched sprue
al the way to the fin top. “Made” a tail light (or whatever it is, judging from
the box art) with my PILOT silver pen, surrounded by a blop of future for a more
“glazed” look. Fitted the propeller (those polycaps work curiously
wonderfully)…..
…..and called it done!
| CONCLUSIONS |
This was a delightful kit to build, definitely up to the modern Hasegawa standards. I believe it is the best Val kit allaround. I enjoyed every step of the process. It is not a difficult kit to build and can be tackled even by a novice modeler with very good results. The end product sure looks like a Val.
Definitely recommended.
| REFERENCES |
https://en.wikipedia.org/wiki/
13 October 2020
Copyright ModelingMadness.com
If you would like your product reviewed fairly and fairly quickly, please contact the editor or see other details in the Note to Contributors.
Back to the Main Page Back to the Review Index Page Back to the Previews Index Page