Eduard 1/48 Ki-115 'Tsurugi'
| KIT #: | 8087 |
| PRICE: | $49.98 MSRP |
| DECALS: | Three options |
| REVIEWER: | Terry D Moore |
| NOTES: | Available in standard and 'profipak' versions. |
| HISTORY |
In 1944, the
Pacific war was not going well for the Empire of Japan. It was decided that
desperate measures were needed. The Special Attack Corps, the Divine Wind, or
Kamikaze, was created as a measure to delay the advance of the allies toward the
homeland. In January of 1945 Nakajima was ordered by the Imperial Japanese Army
to develop an aircraft that was simple to build
 and could be flown on its one
way mission by pilots with little training. The result was the Ki-115 Tsurugi (Sabre),
an aircraft that could be built using non strategic materials by semi skilled
workers. It was designed to be flown using a variety of engines, although the
production aircraft used the 1150 hp Nakajima Ha-35 radial engine.
and could be flown on its one
way mission by pilots with little training. The result was the Ki-115 Tsurugi (Sabre),
an aircraft that could be built using non strategic materials by semi skilled
workers. It was designed to be flown using a variety of engines, although the
production aircraft used the 1150 hp Nakajima Ha-35 radial engine.
The fuselage
was constructed of steel formers and steel skin, the cowling was made of tin,
the tail surfaces were of wood with fabric covering. The wings were aluminum.
The undercarriage (can't call it landing gear because the aircraft was not
designed to land!) was made of tube steel and had absolutely no shock absorbing
ability.
The first flight took place only a few months after it was ordered by the Army.
The aircraft did not handle at all well on the ground due to the lack of shock
absorbers (some aircraft were later fitted with a rudimentary shock absorbing
undercarriage). In the air it was difficult to fly and the inexperienced pilots
that would have been assigned to the aircraft would probably have not fared very
well. Nakajima completed 104 aircraft but none were used operationally before
the war ended. One aircraft survived and it's now in the possession of the
National Air & Space Museum, in an unrestored state. Editor's note:
somewhere in the bowels of MM are a set of photos of this particular aircraft.
| THE KIT |
 I've always had a fascination for this aircraft as it certainly was less well
known than most other types flown by Japan during the war. I even had a 72nd
scale master nearly complete when I was producing my own line of injection
molded kits back in the early 1980's (but that's another story for another
time).
I've always had a fascination for this aircraft as it certainly was less well
known than most other types flown by Japan during the war. I even had a 72nd
scale master nearly complete when I was producing my own line of injection
molded kits back in the early 1980's (but that's another story for another
time).
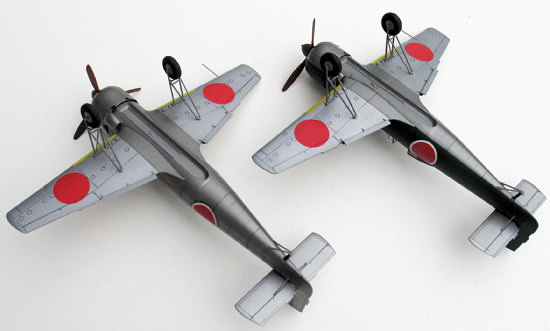
When the Eduard kit showed up out of the blue at the local hobby shop I just had to have one (or 2 in this case). Upon opening the nice stout box, you find 3 wrapped sprues molded in dark grey, a clear sprue with the canopy parts, separately wrapped, plus small photo etch fret with painted seat belts, and a set of Eduard masks. Panel line & rivet detail is finely engraved. On both my examples I found no sink marks and the ejector pin marks would not be a problem. There are some minor mold line issues especially with some of the finer parts, of which there are a lot, but nothing an average modeler can't handle.
In both my
examples the decal sheet was well printed and there were no registration
problems.
The instruction sheet is 8 pages in addition to a full color painting guide for
3 different aircraft. I found the instructions quite easy to follow from
beginning to end. There is a parts diagram and color callouts for a variety of
different paints (Gunze Aqueous, Mr Color, Tamiya, Testors, Revell, & Humbrol) .
The assembly drawings are of the exploded view type.
| CONSTRUCTION |
I followed the instruction sequence in order and had no problems at all except I
saved attaching the undercarriage and pitot tube as the last steps to finish
each model due to the fragility of those items. Parts fit was quite good all
around although I needed to do some trimming for nearly all of the individual
exhaust stacks because of the mold lines. The cockpit is well done and
considering 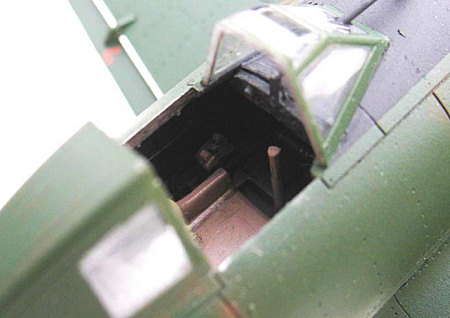 there's not much to it, doesn't require any additional detailing.
The side wall details are molded in fairly deep relief and with careful painting
really stand out. I painted the cockpit with Alclad steel as the interior was
left unpainted. I used a burnt umber wash to make the formers stand out. The
seat, control stick, throttle handles were all painted a light wood tone. I used
the PE seatbelts provided. The instrument panel was painted black and dry
brushed with white to bring out the details. A decal for the instrument panel is
provided but I did not use it. The headrest consists of 3 pieces which, for this
rather ham handed modeler, is probably a bit of overkill, but at least I did
not send the parts off to the carpet monster. I painted the headrest a dark
leather color and the headrest supports an interior green. The deck behind the
headrest I left in natural steel.
there's not much to it, doesn't require any additional detailing.
The side wall details are molded in fairly deep relief and with careful painting
really stand out. I painted the cockpit with Alclad steel as the interior was
left unpainted. I used a burnt umber wash to make the formers stand out. The
seat, control stick, throttle handles were all painted a light wood tone. I used
the PE seatbelts provided. The instrument panel was painted black and dry
brushed with white to bring out the details. A decal for the instrument panel is
provided but I did not use it. The headrest consists of 3 pieces which, for this
rather ham handed modeler, is probably a bit of overkill, but at least I did
not send the parts off to the carpet monster. I painted the headrest a dark
leather color and the headrest supports an interior green. The deck behind the
headrest I left in natural steel.
The fuselage
went together without any problems once I glued the cockpit to one half. The
engine assembly fit right on the front of the fuselage without any problems.
Care must be used when gluing the cowling halves together as there is not much
mating surface, even with the finest alignment pins I've ever seen on a model. I
ended up having to putty part of one cowling as when I set it down to dry, it
somehow misaligned itself (more ham handedness from me perhaps?). When it is dry
it was a perfect fit to the engine mo unt - no glue required. The fuselage
required only a minor amount of putty along the top seam.
unt - no glue required. The fuselage
required only a minor amount of putty along the top seam.
The wing halves went together without a problem and only required some minor sanding and filing to remove the seam. However, the biggest glitch with this kit is mating the fuselage to the wing. The fuselage is slightly wider than where it mates to the wing and it's also hard to align. I used CA to attach the fuselage to the wing whilst pinching together the fuselage halves. The fit wasn't perfect but it's not noticeable to the point where I needed to use putty to fill the gap. The lower wing/fuselage joint needed some heavy filing & filling, as did the join ahead of the wing. Fortunately I was able to restore some of the rivet details on the lower fuselage using my microsaw blade.
The tail surfaces fit without any problems although the stabilizer support struts broke when I tried to clip them from the sprue (some more of those really fine parts). I had to replace the struts with sprue and attached them after the model was painted.
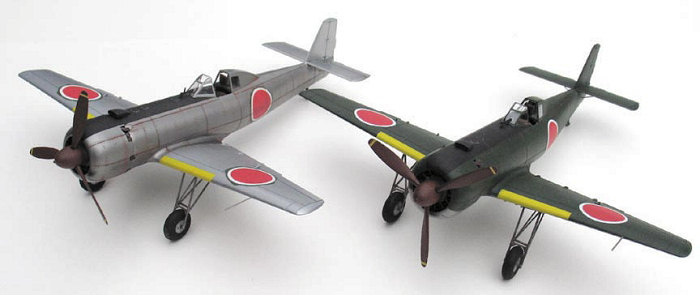
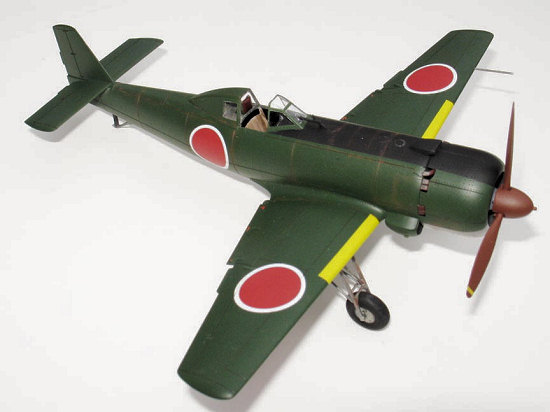
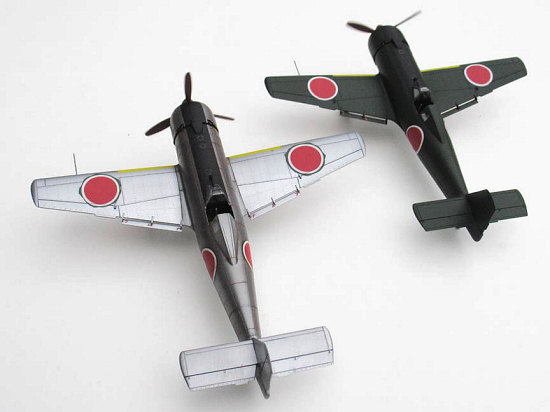
| COLORS & MARKINGS |
At this point
it was time to paint the model. After I primed the model with a grey lacquer, I
painted the fuselage of the natural metal
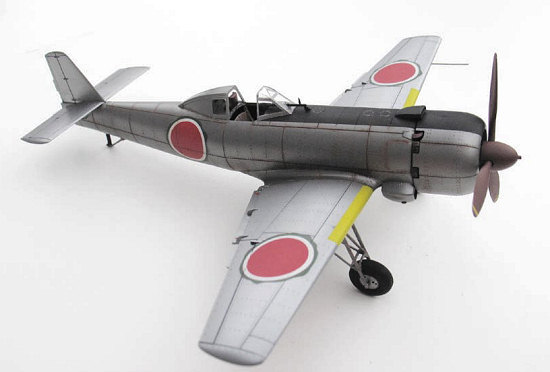 aircraft with Alclad steel, the wings
with Alclad Aluminum, and the tail surfaces with Alclad Duralumin (it was the
only other Alclad color I had left). I painted the lower surfaces of the
camouflaged aircraft the same colors. The green uppersurface I used Tamiya __?__
green. I don't know the real color as the label wasn't on the bottle. All I know
it looks like a Japanese Army green. I then masked the upper fuselage and
sprayed the black antiglare panel using Testors flat black.
aircraft with Alclad steel, the wings
with Alclad Aluminum, and the tail surfaces with Alclad Duralumin (it was the
only other Alclad color I had left). I painted the lower surfaces of the
camouflaged aircraft the same colors. The green uppersurface I used Tamiya __?__
green. I don't know the real color as the label wasn't on the bottle. All I know
it looks like a Japanese Army green. I then masked the upper fuselage and
sprayed the black antiglare panel using Testors flat black.
I decided to use the kit decals and they worked OK with Solvaset. They didn't quite snuggle down over every rivet and I had to use my Xacto to cut the decals at the panel lines but they turned out OK. I think the red is probably a bit too bright but when I oversprayed them with Dullcoat it seemed to tone them down somewhat. I hand painted the "do not step" characters on the flaps by hand as it was quicker than using the decals
Only then did I
attach the undercarriage. It is also quite fine and amazingly I didn't break any
of the parts removing them from the sprue or trying to remove the mold line.
They really are quite fragile until they are attached to the wing. I also
replaced the pitot tube with sprue as well.
As a final touch I used a bit of rust colored pastel chalk to the fuselage seams
and panels as most of the aircraft were exposed to the atmosphere, whether they
were flown or not. I did no other paint chipping or aging. And since the planes
were never operational I chose not to add either bomb to either aircraft.
| CONCLUSIONS |
These are the first Eduard kits I've built and I have to say Ki-115 really a
nice kit. There are a lot of parts, perhaps more than I'm used to in a small
kit, and some of them really finely molded (I had to replace a few). The model
compares very favorably to my references and drawings and I would recommend this
kit highly, especially since it's such an obscure subject. It'll certainly stand
out at the next model meeting or display.
| REFERENCES |
 JAPANESE ARMY AIRCRAFT COLORS & MARKINGS OF WORLD WAR II, Don Thorpe
JAPANESE AIRCRAFT OF THE PACIFIC WAR, RJ Francillon
BROKEN WINGS OF THE SAMURAI, Robert Mikesh
JAPANESE AIRCRAFT CODE NAMES, Robert Mikesh
AIREVIEW JAPANESE AIRCRAFT OF THE PACIFIC WAR
Terry D Moore
November 2007
Copyright ModelingMadness.com. All rights reserved. No reproduction in part or in whole without express permission from the editor.
If you would like your product reviewed fairly and fairly quickly, please contact the editor or see other details in the Note to Contributors.