Eduard 1/48 Ki-115 Tsurugi
| KIT #: | 8088 |
| PRICE: | $15.00 on sale |
| DECALS: | Three options |
| REVIEWER: | Randy Lutz |
| NOTES: | Profipack version |
| HISTORY |
Nakajima's one-shot wonder
By early 1945, Japan had amassed a considerable quantity of aircraft, which were to be used in the kamikaze role. However it was recognized that even this large number of obsolete and front line aircraft would not be of sufficient numbers to stem the anticipated Allied invasion and as such, the Army Air Staff instructed Nakajima to build a disposable (read that as suicide) aircraft out of non-strategic materials. The proposal specified that the aircraft should be easy to build and easy to fly, as well as maintain. It should be capable of carrying a bomb load of up to 800kg and powered by any number of radial engines available.
 The
basic airframe was made from a mixture of materials, as the fuselage was
constructed from light gauge steel, the wings were fashioned from aluminum
alloys, while the vertical fin was of a fabric covered wood construction.
The landing gear was a non-retractable, re-usable design, which was
jettisoned after take-off. The single bomb was semi-recessed in the bottom
of the fuselage and once hoisted into position could not be released from
inside the cockpit.
The
basic airframe was made from a mixture of materials, as the fuselage was
constructed from light gauge steel, the wings were fashioned from aluminum
alloys, while the vertical fin was of a fabric covered wood construction.
The landing gear was a non-retractable, re-usable design, which was
jettisoned after take-off. The single bomb was semi-recessed in the bottom
of the fuselage and once hoisted into position could not be released from
inside the cockpit.
Design features such as this pretty much assured the pilot that he would not be returning from any missions and once airborne, the aircraft would need the protection of a fighter escort, as it was totally helpless to defend itself, owing to a lack of defensive armament. This was at a time when the Japanese fighters were being overwhelmed by the Allied interceptors, so there existed a high probability that many of the pilots would never have seen their missions come to fruition.
Of the 104 production examples of the Tsurugi, not one was ever used in combat and the aircraft remains as an interesting testimonial to the desperate measures instituted out of necessity.
| THE KIT |
Due to the Ki.115's rather esoteric nature and very limited production, I think the Tsurugi is one of those aircraft that you either really like, or really dislike. I fall into the really like side of things, only because I am drawn to the more obscure aircraft of the Second World War. I came very close to buying a resin Ki.115 that if I recall correctly, was made by Racoon Models. This was an exorbitantly priced kit that more closely resembled an Aero chocolate bar, as it was so polluted with bubbles. Fortunately for me, I was advised that Eduard had one in the works and I would be better served if I waited another year.
So it was with great excitement the day I finally
got a ProfiPACK Eduard Ki.115. When I delved into the package to see what
the fine folks at Eduard had come up with. It proved to be a bittersweet
experience as I was presented with a state-of-the-art model of a subject
long desired, but was dismayed at some of the faults I found in the kit. I
have long been disenchanted with the too shallow relief moulded into some of
the cockpit parts of earlier Ed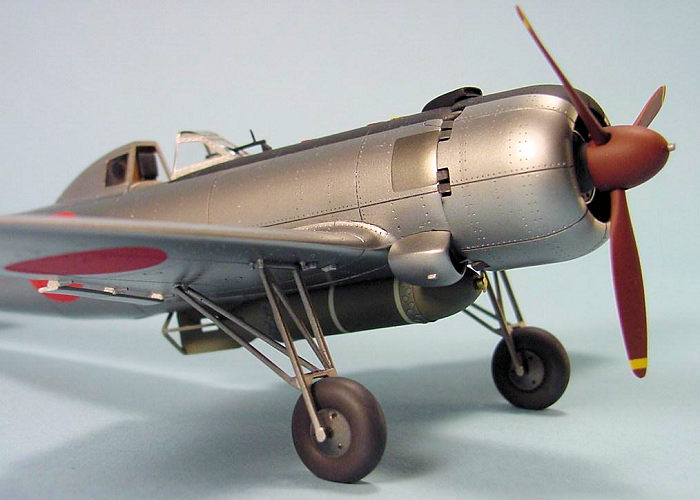 uard
and Gavia releases such as the Tempest, P-39, Lysander and La-7. In this
regard the Ki.115 was a step forward, as Eduard has done a commendable job
of providing sufficient depth on the parts to facilitate the washes and
dry-brushings required to bring out the details. Bless you Eduard! However,
my model suffered from severe mould shift, which rendered some parts, such
as the twelve exhaust pipes almost unusable. Curse you Eduard! I have since
spoken to others who have assembled this kit and they did not have the mould
shift problems that I had, so maybe mine was a one-off.
uard
and Gavia releases such as the Tempest, P-39, Lysander and La-7. In this
regard the Ki.115 was a step forward, as Eduard has done a commendable job
of providing sufficient depth on the parts to facilitate the washes and
dry-brushings required to bring out the details. Bless you Eduard! However,
my model suffered from severe mould shift, which rendered some parts, such
as the twelve exhaust pipes almost unusable. Curse you Eduard! I have since
spoken to others who have assembled this kit and they did not have the mould
shift problems that I had, so maybe mine was a one-off.
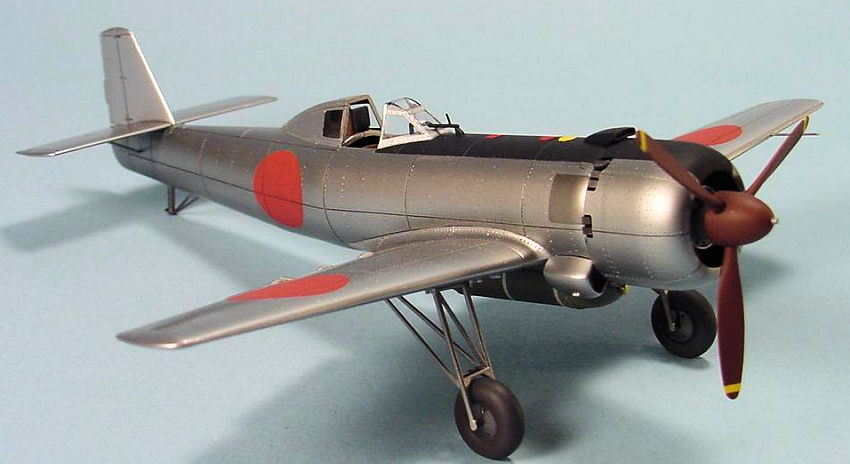
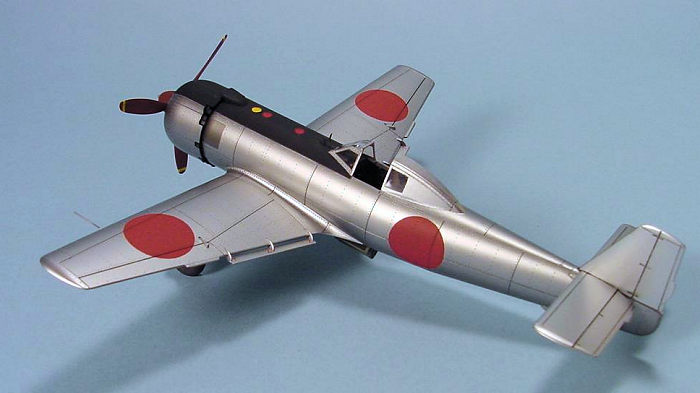
For a rather simple airframe, the model has a relatively high part count, numbering 80 pieces moulded in tan and two clear parts. Also included were the ancient style of canopy mask, which offered less than optimal performance and the decal sheet featuring marking choices for three aircraft. While at first blush the hinomarus look to be the correct colour, take it from me they are far too orange and nowhere near the generally accepted FS 31136 red.
There are also two etched frets that accompany the kit. The larger set of etch is unique to the ProfiPACK version while the smaller pre-painted set of etch seat belts is common to both releases of the Tsurugi. Rounding out the kit contents are a nice set of instructions featuring full colour renderings of the marking choices, but interestingly, no short history on the aircraft is included.
| CONSTRUCTION |
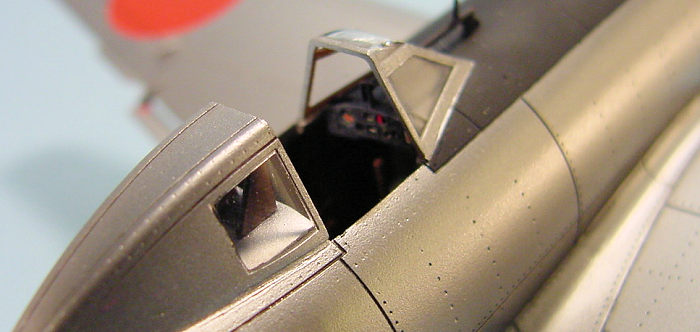
Construction commenced by removing and bending to
shape, the few etched parts that found there way into the cockpit. These
consisted of the rudder pedal toe straps, throttle linkages, instrument
panel and seat belts. The painting of this cockpit was a welcome departure
from most other models as the majority of the components are a wood finish.
I first airbrushed the floor with Xtracolor X102 Tan FS 10219, then
 airbrushed
X209 RLM79 Sandgelb over the raised areas on the floor as well as the seat,
control column and throttle quadrant. After a dark brown wash, all these
interior parts were streaked with Winsor & Newton Raw Umber and/or Burnt
Sienna oil paints, to produce the wood grain and various hues to represent
different woods. While it was a rather involved process, I feel the results
paid off. Further details were picked out using X28 Royal Navy Helicopter
Olive Drab and black. While Eduard supplies pre-painted seat belts, I do not
feel they look right and opted to airbrush the belts with Testors Leather,
followed by a lighter dry-brushing to add depth. So far so good, as
everything fits as it is supposed to.
airbrushed
X209 RLM79 Sandgelb over the raised areas on the floor as well as the seat,
control column and throttle quadrant. After a dark brown wash, all these
interior parts were streaked with Winsor & Newton Raw Umber and/or Burnt
Sienna oil paints, to produce the wood grain and various hues to represent
different woods. While it was a rather involved process, I feel the results
paid off. Further details were picked out using X28 Royal Navy Helicopter
Olive Drab and black. While Eduard supplies pre-painted seat belts, I do not
feel they look right and opted to airbrush the belts with Testors Leather,
followed by a lighter dry-brushing to add depth. So far so good, as
everything fits as it is supposed to.
Eduard suggests that the sidewalls of the cockpit are Nakajima Green, but I felt this was incorrect. To start with, at this juncture of the war, I don't think painting the interiors of expendable aircraft was a priority and secondly, according to photos in the Robert Mikesh book on Japanese interiors, they look like natural metal. So, the sidewalls were sprayed Testors Metalizer Steel, given a dark wash and then dry-brushed with Metalizer Aluminum. Part A4, which is the instrument panel, was sanded smooth and airbrushed with Testors Black Chrome in preparation for the decal to be applied. Then the etched overlay was glued in place after painting and dry-brushing.
The completed cockpit was trapped between the fuselage halves and it was here that I found the first fit problem. The instrument panel would not install properly as the etched overlay is a marginally bigger than plastic panel and interferes with the joining of the fuselage in the area of the cockpit coaming. So, be prepared to trim the etch part prior to installation.
 The
wings are a simple affair consisting of just an upper and lower half.
Initial dry-fitting had shown that the fit would be good, with no gaps or
trimming required. However, with the cockpit in place, this all changed for
the worse, as I had to grind out large areas in the upper wing, immediately
below the cockpit floor, to allow the floor to recess a little into the
wing. Otherwise, there would have been a sizeable gap running the length of
the fuselage, wing fillet joint. While this allowed me to arrive at a
perfect wing root seam, I needed to add small strips of styrene to fill gaps
just in front of the wing. I next installed the rear stabilizer and vertical
fin and encountered another fit problem. There is a rectangular hole in the
stabilizer, which is to accommodate the tab on the bottom of the vertical
fin. But, and there always is a but, the hole is not perfectly in line with
the centreline of the aircraft and if left unmodified, the vertical fin will
be skewed to one side. Perhaps the fin is supposed to be offset to
compensate for engine torque, but I was unable to verify.
The
wings are a simple affair consisting of just an upper and lower half.
Initial dry-fitting had shown that the fit would be good, with no gaps or
trimming required. However, with the cockpit in place, this all changed for
the worse, as I had to grind out large areas in the upper wing, immediately
below the cockpit floor, to allow the floor to recess a little into the
wing. Otherwise, there would have been a sizeable gap running the length of
the fuselage, wing fillet joint. While this allowed me to arrive at a
perfect wing root seam, I needed to add small strips of styrene to fill gaps
just in front of the wing. I next installed the rear stabilizer and vertical
fin and encountered another fit problem. There is a rectangular hole in the
stabilizer, which is to accommodate the tab on the bottom of the vertical
fin. But, and there always is a but, the hole is not perfectly in line with
the centreline of the aircraft and if left unmodified, the vertical fin will
be skewed to one side. Perhaps the fin is supposed to be offset to
compensate for engine torque, but I was unable to verify.
The engine assembly is composed of front and rear banks of cylinders, a separate crankcase with moulded on pushrods and a separate set of pushrods for the rear cylinders, along with the twelve poorly moulded exhaust pipes. In addition Eduard provides a photo-etched ignition harness. The cylinders were airbrushed Metalizer Steel and given Black India Ink wash to pick out the cooling fin detail. The crankcase was finished in a generic dark grey while all the pushrods were painted semi-gloss black. To add a little contrast, I painted the ignition harness with RLM 66 Black Grey. All the exhaust pipes were first airbrushed with Metalizer Burnt Iron and then just the ends of the pipes were airbrushed with Metalizer Burnt Metal. The completed engine was set aside for installation later as the Metalizer finishes are quite fragile and will rub off if handled too much.
| COLORS & MARKINGS |
With all the basic airframe body work completed the canopies were installed
and I painted the wood grain on the canopy frames. The totally unusable kit
pitot tube was replaced with a hypodermic needle and replacement tail plane
support struts were fashioned from plastic rod. I found it necessary to
replace the pitot and struts, as the mould shift was so severe on those
parts that there would have been nothing left of them if I had attempted to
r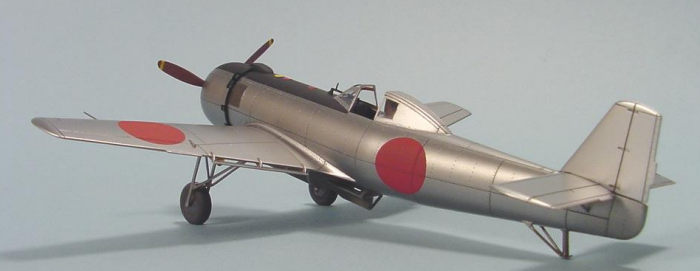 emove
the mould seams. Tamiya TS-14 Black Lacquer was airbrushed over the entire
model as a base coat for the Alclad metal finish. The black paint serves two
purposes; 1) it provides the proper base finish for the Alclad so that it
does not crack and 2) it highlights any defects in my body work. Remember,
the smoother the black paint, the smoother will be the resultant metal
finish.
emove
the mould seams. Tamiya TS-14 Black Lacquer was airbrushed over the entire
model as a base coat for the Alclad metal finish. The black paint serves two
purposes; 1) it provides the proper base finish for the Alclad so that it
does not crack and 2) it highlights any defects in my body work. Remember,
the smoother the black paint, the smoother will be the resultant metal
finish.
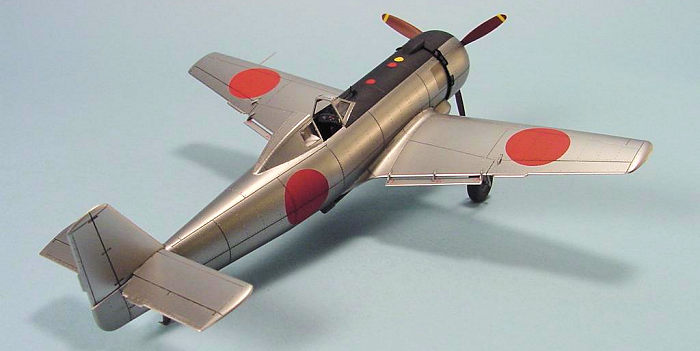
The wings were painted with Alclad Duraluminum; the fuselage is a mix of Duraluminum and Steel, while the vertical fin is White Aluminum and the small square panel on the nose is Alclad Steel. Initially, I attempted to use the kit decals, even though the colour is incorrect, but I found that the decals did not go on as well as decals from the Eduard P-39 or BF-108, nor did they respond as well to Solvaset, which is my setting solution of choice. I therefore elected to remove the decals and paint the hinomarus using Xtracolor X103 Insignia Red FS 11136.
The model was given a medium grey wash in all the panel lines and then the undercarriage was installed. I painted the gear legs with Alclad Steel, the wheel hubs a darkened version of Steel and the tires were airbrushed with flat black, Testors Rubber and then dry-brushed in various shades of grey.
 Eduard
provides a choice of either a 500kg, or 800kg bomb load. They also suggest
two possible colour choices: black or Khaki green. I opted for Khaki green
for no reason other than the fact I thought it would look better than black.
As part of the photo-etched set with the kit, there are metal bands that go
around the bombs. When installing the bands, keep the joint to the part of
the bomb that will be hidden in the recess on the bottom of the fuselage.
The same holds true for the three pale green decal stripes which go around
the bombs.
Eduard
provides a choice of either a 500kg, or 800kg bomb load. They also suggest
two possible colour choices: black or Khaki green. I opted for Khaki green
for no reason other than the fact I thought it would look better than black.
As part of the photo-etched set with the kit, there are metal bands that go
around the bombs. When installing the bands, keep the joint to the part of
the bomb that will be hidden in the recess on the bottom of the fuselage.
The same holds true for the three pale green decal stripes which go around
the bombs.
You will notice that there is no weathering of any kind on the model. This aircraft was not one that was designed to be flown more than once as a rule. The landing gear was jettionsable and the bomb could not be released, so landings would be somewhat problematic. With those factors taken into consideration, models depicting weathering from use would not be realistic. The most weathering one could expect to see on this type of airframe would be oxidation from exposure to the elements.
| CONCLUSIONS |
In summary, while not an overly difficult kit to build, I did find it to be a mixed blessing. It sports nice surface detail and well defined interior components, but is marred by poor fit and substandard decals. The finished model is actually quite nice and I am happy to finally have one in my display case, but it was a retrograde step on the part of Eduard. Would I recommend the kit to others? The answer is yes, but with the caveat that one should be prepared for some extra work.
| REFERENCES |
My principal reference for this build was Monogram’s Japanese Aircraft Interiors 1940-1945, by Robert Mikesh.
Back to the Main Page Back to the Previews Index Page
Back to the Previews Index Page