Hasegawa 1/48 Ki-45 'Toryu'
| KIT #: | 09781 |
| PRICE: | $ |
| DECALS: | Two options |
| REVIEWER: | Bill Koppos |
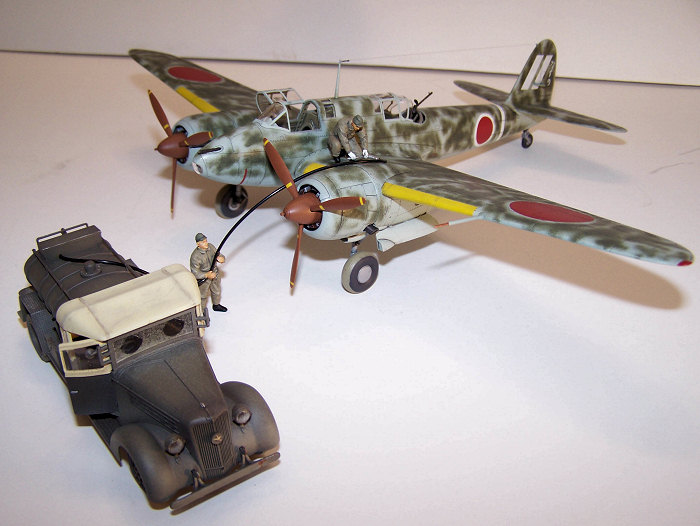
| NOTES: | Includes Isuzu fuel truck |
| HISTORY |
The Ki45 had it's origins in the 1930's "Strategic Fighter" fad. The
development of the all-metal monoplane fighter led to the thought that a twin
engine larger machine could be used for more roles, foremost being long-range
bomber escort, but included bomber interception and ground attack. This larger
machine could carry more fuel, a second crewman with a defensive gun, and
heavy armament, concentrated in the front fuselage. Several Countries were
enamored (love that English spelling) of this concept and developed aircraft for
it. Germany, of course did the Bf110, France had it's Potez series, the
Netherlands it's Fokker G1. Japan,
 planning a long-range Pacific war, was
watching with interest. The Kawasaki firm answered the specification with the
Ki45. Chief designer on this project was Takeo Doi, who later also was
responsible far the Ki61 Hien. The airframe that emerged was a shapely twin
engine two seater that showed some Heinkel influence, with elliptical wings and
rounded rudder. Underpowered by two 820 HP radials, initial tests were
disappointing. Speed was way under that hoped for, and maneuverability poor. The
future of the project was in doubt, but re-engined with more powerful engines,
and some aerodynamic redesign saved the fighter. Now with 1000 HP engines, the
machine reached 323 MPH, and all aspects of it's performance improved. With
armament settled at two 12.7mm machine guns in the nose, and one 20mm cannon in
a fuselage "tunnel", production was approved in November 1941, and given the
name "Toryu", the Dragon Slayer.
planning a long-range Pacific war, was
watching with interest. The Kawasaki firm answered the specification with the
Ki45. Chief designer on this project was Takeo Doi, who later also was
responsible far the Ki61 Hien. The airframe that emerged was a shapely twin
engine two seater that showed some Heinkel influence, with elliptical wings and
rounded rudder. Underpowered by two 820 HP radials, initial tests were
disappointing. Speed was way under that hoped for, and maneuverability poor. The
future of the project was in doubt, but re-engined with more powerful engines,
and some aerodynamic redesign saved the fighter. Now with 1000 HP engines, the
machine reached 323 MPH, and all aspects of it's performance improved. With
armament settled at two 12.7mm machine guns in the nose, and one 20mm cannon in
a fuselage "tunnel", production was approved in November 1941, and given the
name "Toryu", the Dragon Slayer.
The improved machine was now a very maneuverable two seater, the first examples entering service with the 5th Sentai in August, 1942. The 21st Sentai operated a mix of Ki43 Hayabusas and Ki45's initially, one chutai (squadron) being sent to captured Rangoon, Burma, to provide more firepower to engage in what would be the machine's primary role, bomber interceptor. Here the Toryu scored some successes against raiding B-24's. The new twin was also soon encountered over China, New Guinea, the East Indies, and Rabaul, and assigned the name "Nick" under the allied code system. Upon entering combat it's career began to parallel it's other strategic fighter cousins. Efficient against unescorted B-17's and B-24's, and effective at ground and shipping attack, when the Toryu met single-engine fighters or it's twin-engine, single seat competition, the Lockheed P-38, the outcome was seldom good., the 7.7mm defensive rear-gun being rendered useless during any kind of maneuvering.
As the J.A.A.F. forces were forced back to the homeland, the Ki45
Sentais more and more became bomber interceptors, first over Manchuria, then
Japan proper as the country came under B-29 attack. A new version appeared, the
Ki45 Kai-Hei.Taking from previous night-fighting experience, this model was
armed to the teeth. Two 20mm cannon were mounted behind the front cockpit, at an
oblique angle, much like the Bf110's "Schrage Musik" installation. The Tunnel
20mm was replaced by an automatic 37mm cannon. The blunt nose of the first
version was made more pointed and sometimes the rear-gun position plated over.
Perhaps the most effective use of the "Toryu" was in horrifying ramming attacks,
which resulted in many downed and damaged B-29's. When P-51 Mustangs began to
accompany the B-29's in April, 1945, the ballgame was over.
| THE KIT |
Well
at last the venerable Nichimo kit has a rival. Hasegawa's latest J.A.A.F.
release is a worthy replacement. The older kit's Trumpeter-style overall rivet
look has been replaced with the now standard engraved panel lines, with rivet
representations along only these lines. This new model
 has real wheel wells,
with molded in hydraulic tanks and ribbing. The cockpit has more and crisper
detail. Best of all this release is the early model Kai-koh, with later versions
on the way. The decal and etch gang is going to have a ball with this one. The
fact that you get a built-in diorama, with fuel truck, crew and accessories is
one helluva bonus.
has real wheel wells,
with molded in hydraulic tanks and ribbing. The cockpit has more and crisper
detail. Best of all this release is the early model Kai-koh, with later versions
on the way. The decal and etch gang is going to have a ball with this one. The
fact that you get a built-in diorama, with fuel truck, crew and accessories is
one helluva bonus.
The box is a big 'un, with the usual fine Koike Shigeo artwork. The aircraft parts come on 11 sprues, 2 are clear. A couple of these are version-specific small sprues, which will be replaced in later boxings. The fuel truck comes in 9 sprues, of which 2 are figures and one clear. .No sink marks are visible, ejector marks invisible or hidden. The decal sheet includes two aircraft, one of the 21st Sentai (a Sentai being the equivalent of our Fighter Groups), and the 5th Sentai on home defense 1943. Included are four of the ever- present 55 gal (?) drums and a wheeled fire extinguisher.
| CONSTRUCTION |
Front
offices are first, of course. The interior is well detailed, typical Hasegawa
with levers, boxes and stuff, and separate
 sidewalls. Decals are given for the
instrument panels and "Tobi" radio, but I painted these, drybrushing with a drop
of Future floor polish for the instrument faces. The rear gunner is provided
with plenty of ammo drums, and the cannon breech can be seen in it's "tunnel"
from above. This was drum loaded, too, reloading this being another job for the
gunner. There is still controversy over Japanese interior colors but these
plans call for two choices, base being Khaki with a mix of either red brown or
green. Previous research led me to go for the green mix, resulting in something
like a faded olive drab. This was sprayed on all interior surfaces and the wheel
wells. If you go with the Red Brown you will get something like "Sandy brown',
which would be the commonly used interior color of the Kawasaki Ki61 Hien. Your
choice.
sidewalls. Decals are given for the
instrument panels and "Tobi" radio, but I painted these, drybrushing with a drop
of Future floor polish for the instrument faces. The rear gunner is provided
with plenty of ammo drums, and the cannon breech can be seen in it's "tunnel"
from above. This was drum loaded, too, reloading this being another job for the
gunner. There is still controversy over Japanese interior colors but these
plans call for two choices, base being Khaki with a mix of either red brown or
green. Previous research led me to go for the green mix, resulting in something
like a faded olive drab. This was sprayed on all interior surfaces and the wheel
wells. If you go with the Red Brown you will get something like "Sandy brown',
which would be the commonly used interior color of the Kawasaki Ki61 Hien. Your
choice.
Some
trimming was needed to get the fuselage halves together, mainly along the bottom
of the cockpit sidewalls. The "tunnel" part required some trimming too, along
the pin posts that stick out. Test fit a lot here before committing glue. It was
much the same with the nacelles, before they would meet up with the wing bottom
they needed some scraping. Attaching the wings was more problematical, needing
considerable trimming and dry fitting to get a clean join. Take time here or
there will be gaps. Another minor pain in the patoo is that this version
apparently had no landing light in the wing leading edge, requiring you use the
provided filler piece to plug the hole, which results in filling and sanding the
area. The nose parts fit close, but not perfect, but as
 they are on a panel line
it's good enough. The upper fuselage area between the cockpits is a clear part,
so the windows here can be masked during painting. The fit of this to the
fuselage is good. The engines are nicely done, but like all closely cowled
radials, with the cowlings on you won't see squat. The circular oil coolers also
block them. So I just slapped some aluminum on the engines, doing the coolers
copper, and attached the cowlings and 3 part carb scoops. Stabilizer fit is
good. At this stage, all seams are cleaned up with various grades of sanding
stick, and away to the painting area. (The great outdoors.)
they are on a panel line
it's good enough. The upper fuselage area between the cockpits is a clear part,
so the windows here can be masked during painting. The fit of this to the
fuselage is good. The engines are nicely done, but like all closely cowled
radials, with the cowlings on you won't see squat. The circular oil coolers also
block them. So I just slapped some aluminum on the engines, doing the coolers
copper, and attached the cowlings and 3 part carb scoops. Stabilizer fit is
good. At this stage, all seams are cleaned up with various grades of sanding
stick, and away to the painting area. (The great outdoors.)
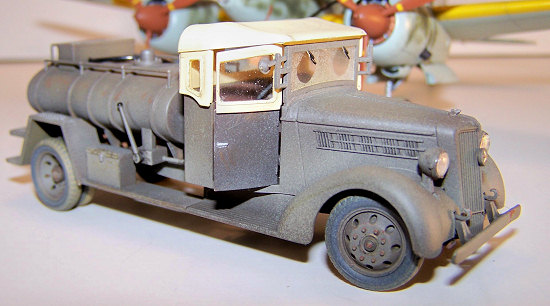
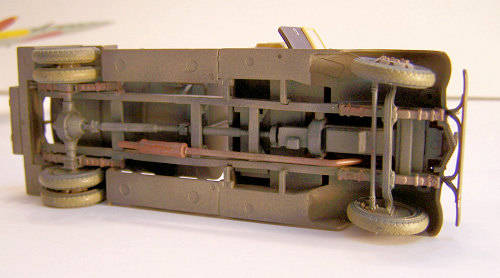
Building De truck
This is a pretty straightforward assembly job, just follow the instructions and you be OK. There is an option to have the driver door open or shut, I chose open. Don't go too nuts on the interior, because you can't hardly see it with the canvas hood on. This hood is a clear part also, allowing a molded-in window. The tires all have pretty good mold seams on them that need sanding off, and the wheels were left off the truck for painting. So leave the canvas hood off, mask all your windows, (always the best part-NOT) and we can paint this too.
| COLORS & MARKINGS |
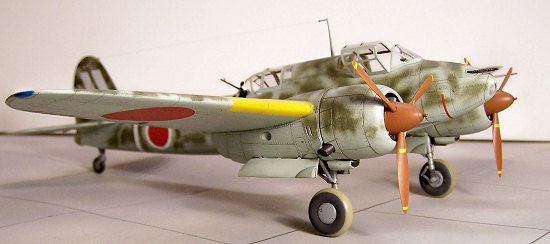
The
wing leading edge yellow I.D. panels are provided as decals. Use these if you
choose later on, but I prefer to paint these. After the cockpits and wheel wells
were masked off, the yellow for these panels was sprayed first. This area was
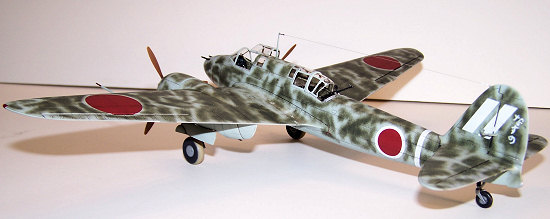
then masked off as per the 3 view in the plans. Factory paint applied to "Nicks"
appears to be the light grey-green Japanese Army
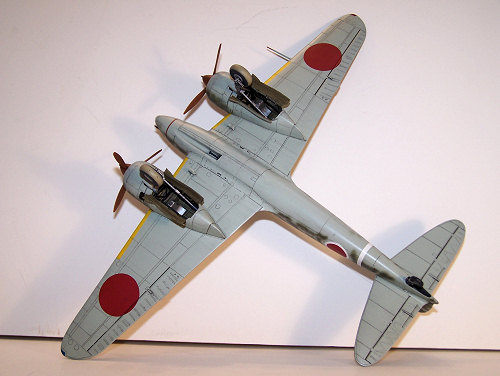 shade. I used Model master
Enamels number 2115 Japan Army light grey. At this point it was shot with my glosscoat of choice, Testor's Metallizer sealer, as the Hinomarus now must be
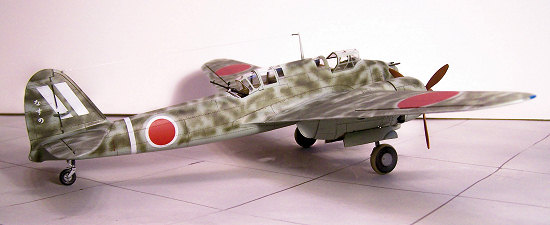
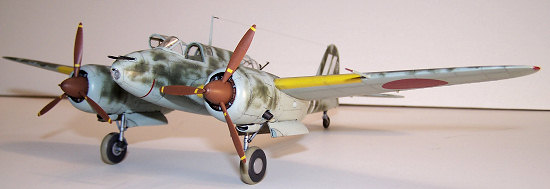
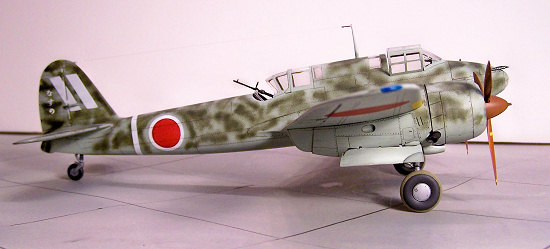
applied. Now to the good part. Most Ki45's carried green mottling of different
patterns over the light grey. The majority had a fairly even pattern of
hard-edged splotches over all upper surfaces. This might have been
factory-applied as the red "Hinomaru" national insignia seems to have been
applied over this. The aircraft I wanted to do had the sloppier, apparently
field-applied sprayed mottle, sprayed around the Hinomarus. I found a blurry
photo of my plane on Rod's Warbirds website, and tried to duplicate this pattern
based on this photo and the kit box art. Setting my trusty Paasche "H" as fine
as she'd go, I scribbled an uneven blotching of Model Master 2114 J.A. green as
if it were put on with a cheap spraygun at a jungle airbase, making sure to go
around the previously applied Hinomaru decals. I was fairly satisfied with the
results.
shade. I used Model master
Enamels number 2115 Japan Army light grey. At this point it was shot with my glosscoat of choice, Testor's Metallizer sealer, as the Hinomarus now must be
applied. Now to the good part. Most Ki45's carried green mottling of different
patterns over the light grey. The majority had a fairly even pattern of
hard-edged splotches over all upper surfaces. This might have been
factory-applied as the red "Hinomaru" national insignia seems to have been
applied over this. The aircraft I wanted to do had the sloppier, apparently
field-applied sprayed mottle, sprayed around the Hinomarus. I found a blurry
photo of my plane on Rod's Warbirds website, and tried to duplicate this pattern
based on this photo and the kit box art. Setting my trusty Paasche "H" as fine
as she'd go, I scribbled an uneven blotching of Model Master 2114 J.A. green as
if it were put on with a cheap spraygun at a jungle airbase, making sure to go
around the previously applied Hinomaru decals. I was fairly satisfied with the
results.
Now, the Sentai marking decals can be put on the tail, and the white I.D. band. As previously mentioned, the Hinomarus were already on. The kit decals are typical Hasegawa stuff, pretty thin, and settling down under a (very light) coat of Solvaset setting solution. Their white decals seem better here, being less translucent than previously. I put the nifty 21st Sentai tail flashes and the band on after the mottling, as this seems to be the way it was done according to photos I' ve seen. Normally I would paint these, but wanted to use the kit decals for this review. All worked out quite well, and another glosscoat was sprayed to seal the decals.
 The
truck was next. I almost felt like I was building a Tamiya kit here, because
again the instructions called for a mix of colors. This time it was 55% Khaki
and 20% Red Brown, for a Japanese Army vehicle. The option is also present for
an Imperial Navy truck). A test mix of this looked nothing like the pic on the
box side, so I played with some mixes till I found one that matched the way I
wanted. This turned out to be about a 50-50 mix of Khaki and Burnt Umber. The
whole thing sprayed this overall, I highlighted middle panels and doors with a
lightened mix. Turning it over, I used Floquil weathered black to do the engine,
axle and driveshafts. I brushed the exhaust system with rust, drybrushed some
wear and tear on the treadplate around the fuel tank with aluminum, and did the
seats in brown. I did the canvas hood in Humbrol Cream.
The
truck was next. I almost felt like I was building a Tamiya kit here, because
again the instructions called for a mix of colors. This time it was 55% Khaki
and 20% Red Brown, for a Japanese Army vehicle. The option is also present for
an Imperial Navy truck). A test mix of this looked nothing like the pic on the
box side, so I played with some mixes till I found one that matched the way I
wanted. This turned out to be about a 50-50 mix of Khaki and Burnt Umber. The
whole thing sprayed this overall, I highlighted middle panels and doors with a
lightened mix. Turning it over, I used Floquil weathered black to do the engine,
axle and driveshafts. I brushed the exhaust system with rust, drybrushed some
wear and tear on the treadplate around the fuel tank with aluminum, and did the
seats in brown. I did the canvas hood in Humbrol Cream.
Time to re-tire. The hubs sprayed with the truck color, I masked the hubs with circles cut with a Staples (the office superstore) circle template. The tires were shot with Floquil Weathered Black, which I have found to be a very good tire color. At this time the tires were mounted (no jacks necessary in this scale) and the whole caboodle weathered with a dusty coat of Floquil's "Foundation". Both models now return to the bench.
| FINAL CONSTRUCTION |
On the aircraft, landing gear was next. The various parts were painted and put in, all a nice fit. The wheel hubs and tires are separate parts which makes for easy painting. Warning! When cutting the landing gear doors off the sprue, DO NOT do what yours truly the dumpkopf did, and nip off all the mounting tabs. Look at what you're doing first, then cut. Each door has three tabs which run to the sprue, a second's thought will show you where to cut. This cost me a good hour as I made and glued 12 tiny tabs onto the doors! Reference pics will help here as to the angle to mount the gear doors.
 It was now time to cut out and mask all the clear parts, so-I put it off and
worked on the truck. The parts of the canvas cover were assembled, but the
windshield must go in first, as this installs from the inside. I got ambitious
and decided to do an old trick from my panzer days. I masked two windshield
wiper patterns on the windshield, to spray a LIGHT coat of dust on it then peel
the tape to get a dusty windshield that someone used the wipers on. Now as then,
I overdid the dust, but too late now. A little more drybrushing, and some rust
spots, and I called the Isuzu road ready.
It was now time to cut out and mask all the clear parts, so-I put it off and
worked on the truck. The parts of the canvas cover were assembled, but the
windshield must go in first, as this installs from the inside. I got ambitious
and decided to do an old trick from my panzer days. I masked two windshield
wiper patterns on the windshield, to spray a LIGHT coat of dust on it then peel
the tape to get a dusty windshield that someone used the wipers on. Now as then,
I overdid the dust, but too late now. A little more drybrushing, and some rust
spots, and I called the Isuzu road ready.
Well, can't put off the damnable canopy masking any more. Hasegawa clear parts are very nicely done, but the frame lines are very fine and can be hard to see through the Tamiya tape I use for masking. Hours of cutting and applying tiny tape squares later, I could spray them first with the interior color, followed by the Army grey, then a flatcoat to match the final finish then peel all the tape off. Such fun. Oh well, it's part of the game. I think my next aircraft model should be a WW1 job, with just a windcreen! At last, final assembly time. A choice is given of open or closed canopy parts both front and back. I left the front open and closed the back, as I like the look of the rear gunner's turtleback as is. The front cover is in two parts, which need careful placement. Again, refer to any pics you may have here.It opens like a 1930's car hood, with a hinged middle. I wouldn't want to have to bail out of this plane in a hurry! The homestretch consists of putting on the pointy bits-front and rear machine guns, pitot tube, antenna mast. Antenna wire is invisible mending thread. Paint these plus the landing lights, and we can fuel her up with Ethel.
| CONCLUSIONS |
 I painted the two delicately molded crew figures with
Vallejo paints, (to the best of my limited figure ability) and set up for the
foto session. I am very happy with this whole setup, and glad to see more
airfield and crew stuff coming out in 1/48th scale. I know I'm greedy, but
hopefully there's a Toyota (Isuzu?) starter truck in the near future, as these
are ubiquitous on Japanese wartime airfields. I like this trend of planes and
vehicles together. Gotta find time for the Priller Focke-Wulf and BMW car.
I painted the two delicately molded crew figures with
Vallejo paints, (to the best of my limited figure ability) and set up for the
foto session. I am very happy with this whole setup, and glad to see more
airfield and crew stuff coming out in 1/48th scale. I know I'm greedy, but
hopefully there's a Toyota (Isuzu?) starter truck in the near future, as these
are ubiquitous on Japanese wartime airfields. I like this trend of planes and
vehicles together. Gotta find time for the Priller Focke-Wulf and BMW car.
This is another fine job from Hasegawa, aside from minor
fit issues on the wings, highly recommended to anybody with a kit or two under
their belts. I'm looking forward to the next versions already. "Tis the golden
age of modeling were living in!
| REFERENCES |
Japanese Army Fighters Part 1 William Green and Gordon Swanborough Arco
Publishing 1977 ISBN 0-668-04119-6
B-29 Hunters of the J.A.A.F. Takaki and Sakaida Osprey Pub. Elite # 5 ISBN
1-84176-161-3
J.A.A.F. Camouflage and Markings Donald Thorpe Aero Pub. 1968
Bill Koppos
January 2008
If you would like your product reviewed fairly and quickly, please contact me or see other details in the Note to Contributors.