Hasegawa 1/48
Ki-44-II Hei Shoki (Tojo)
|
|
9136 (Jt36) |
|
PRICE: |
$26.95 |
|
DECALS: |
Two options |
|
REVIEWER: |
|
|
NOTES: |
Eduard Zoom FE163 |
|
HISTORY |
The Ki-44
Shoki “Tojo” was the design platform for a home defense fighter. In 1938,
Nakajima Aircraft of 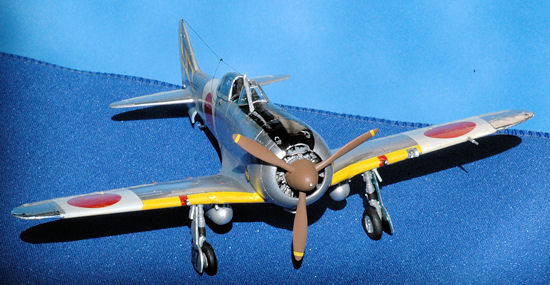 as the Type
2 Single Seat Fighter. During a comparison with the IJN Zero-sen the Tojo was
found to climb to interception altitudes better than the Zero but despite a
larger engine was not significantly faster.
as the Type
2 Single Seat Fighter. During a comparison with the IJN Zero-sen the Tojo was
found to climb to interception altitudes better than the Zero but despite a
larger engine was not significantly faster.
It was
nicknamed Shoki (Demon) and code named "Tojo" by the Allies.The type 2 Model II
carried a more powerful engine, the HA-109, with its two-stage supercharger.
There were three versions, the Koh,
Ki-44-I has
a telescopic gunsight which protrudes through the front windscreen. It also has
the oil cooler in a copper ring inside the front of the engine cowl similar to
the Ki-27. The second version, Ki-44 II, which is the version provided with this
kit (#9136), has a reflector gunsight and an external oil cooler (this change
started with KI-44 serial # 1054) on the lower engine cowling. Initial armament
was comprised of two 7.7mm (.30 cal) cowl guns and two 12.7mm (.50 cal) wing
mounted guns. A few were armed with a pair of 40MM wing guns, and the cowl guns
used the 12.7mm guns with the 12.7mm guns in the wings late in the war in the
Ki-44-IIb variant. This bomber buster was made in the units with serial numbers
1356 to 1749. The 40mm guns, utilizing a novel caseless rocket propulsion for
the bullet was a disappointment due to low muzzle velocity. Thus, the armament
was changed to four 12.7mm guns starting with airframe number # 1750 with two
12.7mm (.50 cal) cowl guns and two 12.7mm (.50 cal) wing mounted guns. This
model, the Ki-44-IIc was built from March 1944 through January 1945 with 427
units produced. Some early Ki-44-IIc units were equipped with the telescopic
gunsight so as always it is best to model your kit using photo reference. I was
about to use a beautiful Eagle Strike decal on this build and determined the
color profile in the instructions did not match a photo reference due to
differing gun sights.
 The 40mm
equipped Shoki’s never really proved of value during the
The 40mm
equipped Shoki’s never really proved of value during the
Nakajima
only assembled two major models of the Ki-44, the Ki-44-I and the Ki-44-II.
Errors were made in categorizing the Ki-44-II in many publications because the
time honored tradition of later models having the large or heavier weapons did
not hold truth with Shoki production. A final prototype, the Ki-44-
For a very
nice graphic catalog of the airframe differences the reference text,
Nakajima Ki-44 Shoki by
Martin Ferkl, Revi books # II-4005, published in 2009 has profiles on pages
14-15 that visually depict the changes. This is a highly recommended book since
it is in English and very complete as a reference.
|
THE |
Hasegawa’s
announcement of a new mold 1/48 Ki-44-II Hei Shoki in June of 1995 was eagerly
anticipated by Hasegawa WWII Japanese aircraft subject fans like me.
Many folks wondered if it would improve
much over the nice Otaki/Arii kit. In my opinion, yes, it did improve on the
Arii/Otaki kit, especially in the cockpit area.
I did not
find any areas that I needed to fix errors which is a good thing. It is a well
moulded kit with fine details. There is a minimal parts count and it goes
together rather quickly unless you want to take some time to detail the cockpit
interior.
It is a
small kit and quite attractive when completed even if you make some errors in
building it. What I really enjoyed is placing it next to other contemporary
aircraft to visually see the diminutive size of this aircraft.
|
CONSTRUCTION |
I used my
Panavise PVJr. (Combo Model 201) with the rubber Cake and Pastry Decorators Matt
glued to its jaws as the most helpful tool in this and most of my projects. I
use it on small parts such as when wiring radial engines and to hold entire
completed aircraft once assemblies are complete. This tool holds them at the
needed angle and frees up one hand which comes in handy all the time. Also, when
applying decals for example, you can rotate the aircraft into any position you
feel you need in order to provide the perfect position for placing that tricky
decal. I have to profusely thank Steven Budd from
Because I
intend to build several examples of the Ki-44 Shoki a few early building
problems, self induced, led me to decide on building this kit as a reference
model. That is, I wanted to build an almost OOB kit to see what construction
snags there were and where I might be able to improve on the final kit in future
builds. This freed me from “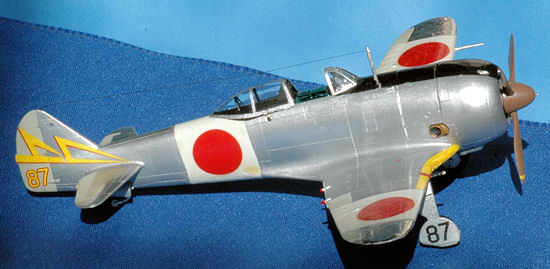 problems,
without sweating the loss of a contest quality model. In summary – it was a for
fun build and it was a fun kit to build that does not look bad once finished
despite some problems I contributed during construction.
problems,
without sweating the loss of a contest quality model. In summary – it was a for
fun build and it was a fun kit to build that does not look bad once finished
despite some problems I contributed during construction.
I was in a
quandary regarding the correct color to use for the cockpit interior. I used a
mixture of Tamiya X-13 Metallic Blue with some Tamiya X-25 Clear Green added. I
use this for the cockpit interior, landing gear wells and inside the cowl. While
reading up on this subject and looking at some web based builds it looks like
some modelers have opened up the emergency side hatch as if this door was like
the exit door on a Spitfire which can be seen open with its distinctive pry bar
on the inside. Apparently the door was dropped only during ground maintenance to
get access to some hard to reach areas and only in the event of an emergency
exit, never for the normal in and out movement of the pilot. So, I kept it
closed despite the obvious improvement in looking inside the small cockpit with
the enhanced open area of having this portion opened.
For a
faster build I relied on the Hasegawa instrument panel decal. It looks fine but
the next build I will use the even better Eduard Zoom set for this aircraft.
I placed
two small silver dots to represent the two buttons on the top of the control
column. I have also seen an illustration in a Japanese book where the buttons
are painted yellow and red. The Ki-44 had the guns buttons over on the engine
controls similar to today’s F-16 HOTSA stick. The two buttons are #1 Fowler
Flaps on, and #2 Fowler flaps retract.
The tires
have noticeable ejector pin marks so that needed to be fixed before painting.
The rest of the construction was based on just following Hasegawa’s instruction
sheet.
|
COLORS & MARKINGS |
I used the
kit decals, subject number 2. When I started the build I was going to use a very
colorful scheme from an Eagle Strike # 48172 decal sheet. Once some mistakes
were made during the build I chose to use the kit decal – all of them including
the 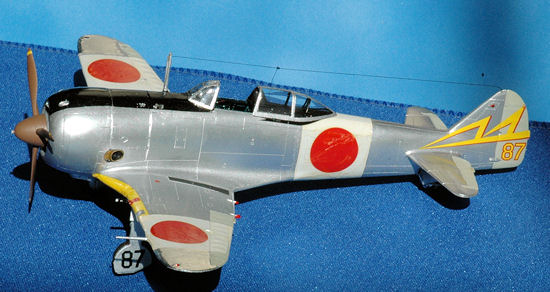 that I did
not care for since this was a “reference build”.
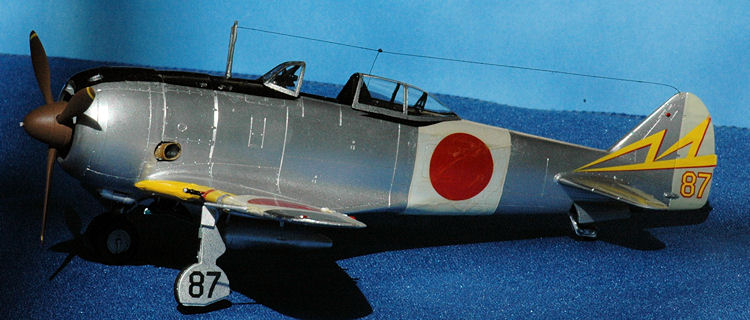
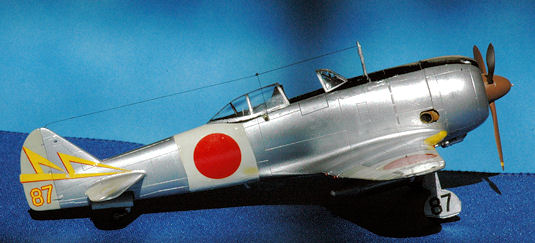
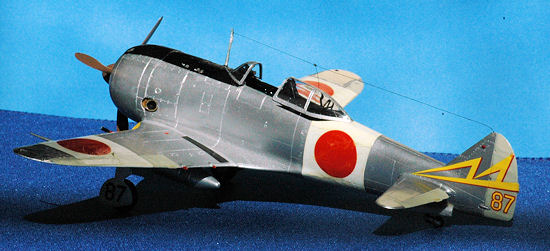
I used one that I thought looked plain and simple on the build. Now that
it is finished I like it. The decal represents a Ki-44-II Hei from the 3rd
Chutai, 47th Hiko Sentai based at Narimasu airfield in 1944. I hope
you, by seeing it on the kit, appreciate it as well.
that I did
not care for since this was a “reference build”.
I used one that I thought looked plain and simple on the build. Now that
it is finished I like it. The decal represents a Ki-44-II Hei from the 3rd
Chutai, 47th Hiko Sentai based at Narimasu airfield in 1944. I hope
you, by seeing it on the kit, appreciate it as well.
Due to some
mistakes in the construction phase I opted to use a 15 year old bottle of SNJ
which had a white wax like plug form above the aluminum pigment powder and below
the thinner instead of my new Alclad paints. I stirred it thoroughly with a
stick but should have run it through a mesh material before trying to apply it.
This resulted in more problems such as a clogged up airbrush. I also used Xylene
as an additional solvent thinner hoping to dissolve the waxy residue.
Unfortunately this had a harsh effect on the plastic leaving a less than smooth
finish. Lesson learned – never use old paint that looks unusable because it is.
Why I had such an old bottle of original SNJ laying around is because I build
very few NMF aircraft. I need to build more of these NMF aircraft in the future
using Alclad or newer stocks of SNJ.
Weathering
and Final Coat
Aside from
the engine exhaust area, I did no weathering of plane and I did not spray on a
gloss coat to seal in all the decals. I was tempted to use a flat coat on the
decals but the gloss finish looked OK.
|
FINAL CONSTRUCTION |
I put a black wash on the
intake screen of the oil cooler and on the engine cylinders. I also used flat
black on the inside of the air intake at the top of the engine cowl as one of
the final steps..
The Ki-44 has landing gear
indicator pins that pop up when the gear is down based on using the reference
photos from FAOW #
 16 #5-1989
page 30. I omitted adding these on this build to keep it simple. I will add them
to the next build. I also added brake
lines using the reference photos from FAOW # 16 #5-1989 pages 4-5 and pages
32-33. If you want to detail the fuel tank a fine photo of this is found on page
53 FAOW # 16.
16 #5-1989
page 30. I omitted adding these on this build to keep it simple. I will add them
to the next build. I also added brake
lines using the reference photos from FAOW # 16 #5-1989 pages 4-5 and pages
32-33. If you want to detail the fuel tank a fine photo of this is found on page
53 FAOW # 16.
The Ki-44 has a retractable
boarding step based on using the reference photos from FAOW # 16 #5-1989 pages
40-41, page 68 and on the two page color foldout which is essentially page 1. I
omitted adding these on this build to keep it simple. It is not a component that
comes with the kit. I was surprised Hasegawa omitted this since they do provide
it on their FW-190 kits.
I had a problem with the SNJ
not adhering to areas affected by handling. The paint essentially wore off. I
replaced these areas with some candy bar aluminum foil glued on using Microscale
foil glue.
|
CONCLUSIONS |
I am very
pleased with this kit. It is a very easy build and I am surprised how much I now
enjoy and appreciate its lines since I understand the design philosophy of form
and function that were applied to this aircraft. I also now see the genealogy
from the K-43 to Ki-44 through to the Ki-84 much better having built this kit.
Hasegawa has done a fine job with their plastic moulding and you will have an
enjoyable time building this model. There are lots of color schemes and
aftermarket decals for the Ki-44 Shoki
 from
Aeromaster, Eagle Strike, etc. Now there is a superb multi decal set released by
Lifelike decals (48-36, 37, 38) for the Ki-44. The Lifelike decal features many
unique and attractive color schemes for your Tojo. I must admit years ago I
disliked the Tojo thinking it was a terrible looking design. I did not like the
almost forward swept wings, stubby body, for example, thinking any aircraft that
was not a P-51, Bf-109, FW-190 or a Spitfire had poor looks. I am past that
thinking and now appreciate the Ki-44 in all its variants as an attractive and
interesting little fighter. Since the kit, 09136, is once again available on a
limited run from Hasegawa, I encourage you to grab one for the stash because you
will enjoy building it. It can be found frequently on eBay as well which
indicates most folks do not get around to building this kit. This won’t be my
last Shoki from Hasegawa. I have a few other versions already in the initial
pre-painting stage as a result of my great enjoyment building and learning all
about the Hasegawa 1/48th scale Ki-44 during this build. I even
bought a 1/32nd scale Hasegawa Shoki just by looking at the kit in
the box. I have resisted going the 1/32nd scale route (it takes up
too much space) but I am making an exception for the Tamiya P-51 and Hasegawa
Ki-44.
from
Aeromaster, Eagle Strike, etc. Now there is a superb multi decal set released by
Lifelike decals (48-36, 37, 38) for the Ki-44. The Lifelike decal features many
unique and attractive color schemes for your Tojo. I must admit years ago I
disliked the Tojo thinking it was a terrible looking design. I did not like the
almost forward swept wings, stubby body, for example, thinking any aircraft that
was not a P-51, Bf-109, FW-190 or a Spitfire had poor looks. I am past that
thinking and now appreciate the Ki-44 in all its variants as an attractive and
interesting little fighter. Since the kit, 09136, is once again available on a
limited run from Hasegawa, I encourage you to grab one for the stash because you
will enjoy building it. It can be found frequently on eBay as well which
indicates most folks do not get around to building this kit. This won’t be my
last Shoki from Hasegawa. I have a few other versions already in the initial
pre-painting stage as a result of my great enjoyment building and learning all
about the Hasegawa 1/48th scale Ki-44 during this build. I even
bought a 1/32nd scale Hasegawa Shoki just by looking at the kit in
the box. I have resisted going the 1/32nd scale route (it takes up
too much space) but I am making an exception for the Tamiya P-51 and Hasegawa
Ki-44.
Finally, if
you need a good reference, I highly recommend you get the
Nakajima Ki-44 Shoki by
Martin Ferkl from Revi books for your library to enhance your build.
|
REFERENCES |
Nakajima Ki-44 Shoki by
Martin Ferkl, Revi books # II-4005, published in 2009
Nakajima Ki-44 Shoki in
Japanese Army air Force Service by Richard Bueschel – Shiffer Books 1996,
original release by Osprey Publications in 1970.
November 2012
If you would like your product reviewed fairly and fairly quickly, please contact the editor or see other details in the Note to Contributors.