Nichimo 1/48 Ki-45 'Toryu'
|
KIT #: |
S-4819 |
|
PRICE: |
15 euros when new
|
|
DECALS: |
options |
|
REVIEWER: |
Spiros
Pendedekas |
|
NOTES: |
Some scratch building performed |
The Kawasaki Ki-45 Toryu (屠龍, "Dragonslayer") was a two-seat, twin-engine
fighter used by the Imperial Japanese Army in World War II. The army gave it
the designation "Type 2 Two-Seat Fighter"; the Allied reporting name was
"Nick".
 Soon after entering service, the Ki-45 was assigned to home defense, and
several were dispatched against the Doolittle raid, though they did not see
action. The craft's heavy armament proved to be effective against the B-29
Superfortress raids which started in June 1944. However, its performance was
insufficient to counter B-29s flying at 10,000 m (32,800 ft). Modifications
such as reduction of fuel and ordnance were attempted to raise performance,
to little avail. In the end aircraft were used effectively in aerial ramming
attacks. Those aircraft belonged to suicide attack units known as Shinten
Seikutai (“the ones who shake the sky”), which in late 1944 were created on
orders from Shosho Kihachiro Yoshida (the CO of 10th Hikoshidan) and were
tasked with ramming B-29s.The Toryus were also used in kamikaze attacks.
Soon after entering service, the Ki-45 was assigned to home defense, and
several were dispatched against the Doolittle raid, though they did not see
action. The craft's heavy armament proved to be effective against the B-29
Superfortress raids which started in June 1944. However, its performance was
insufficient to counter B-29s flying at 10,000 m (32,800 ft). Modifications
such as reduction of fuel and ordnance were attempted to raise performance,
to little avail. In the end aircraft were used effectively in aerial ramming
attacks. Those aircraft belonged to suicide attack units known as Shinten
Seikutai (“the ones who shake the sky”), which in late 1944 were created on
orders from Shosho Kihachiro Yoshida (the CO of 10th Hikoshidan) and were
tasked with ramming B-29s.The Toryus were also used in kamikaze attacks.
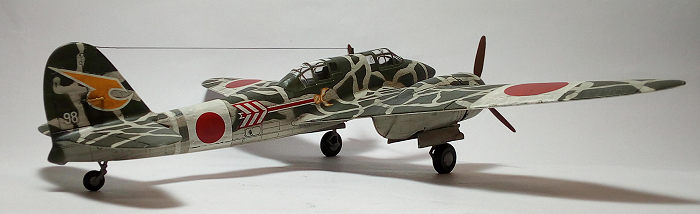
The Shinten Seikutai Toryus carried no rear gunner, had the gunner’s
compartment totally stripped of everything and the rear open part of the
canopy covered by a custom made thin metal plate. All guns and their
mechanisms were removed, with the “schragemusik” armament top holes covered
as well. The gunsight was deleted and the antenna mast was greatly
shortened. All above weight reduction and aerodynamic sleekening
modifications were obviously aiming to improve the Toryu’s performance, in
order to have a better chance ramming those fast’n’high flying
Superfortresses!
This kit, despite its 80’s origins and Nichimo “toy-like” reputation comes
as a surprise, with its nice engraved (mostly rivet looking) details. The
specific kit was bought in 2002, together with the 1/48 Nichimos Kate and
Jake, sealed and forgotten at shelf of a toy/hobby shop in my hometown. I
paid 35 euros for all of them, a bargain, I believe. The molds looked nice
and crisp, the decals looked useable. After building the Jake (build review
here), I just couldn’t stop myself pulling this out and start it.
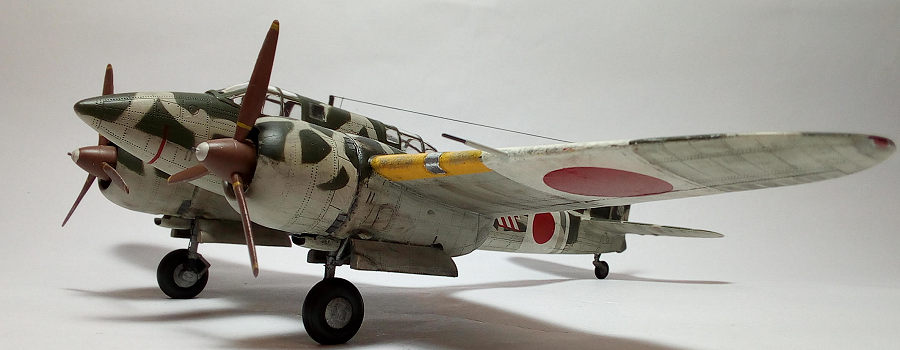
 I decided from the start to do No 98 aircraft, belonging to 53rd Sentai, 3rd
Shinten Seikutai, Matsudo Air Base, 1945. This scheme is covered by the kit
supplied decals, but is not referred to the instructions or at least
depicted in the boxart. So, was I more or less on my own? Not at all, as the
net is here to save the day! I found quite a few nice Ki-45 pics, including
“Shinten Seikutai” Toryus, and including the specific machine I was to
build! Additionally, since Hasegawa have issued their Toryu with these
markings as well, I consulted their instructions, which proved very helpful,
not only in painting and marking, but also in performing key scratchbuilt
improvements. Isn’t life a miracle?
I decided from the start to do No 98 aircraft, belonging to 53rd Sentai, 3rd
Shinten Seikutai, Matsudo Air Base, 1945. This scheme is covered by the kit
supplied decals, but is not referred to the instructions or at least
depicted in the boxart. So, was I more or less on my own? Not at all, as the
net is here to save the day! I found quite a few nice Ki-45 pics, including
“Shinten Seikutai” Toryus, and including the specific machine I was to
build! Additionally, since Hasegawa have issued their Toryu with these
markings as well, I consulted their instructions, which proved very helpful,
not only in painting and marking, but also in performing key scratchbuilt
improvements. Isn’t life a miracle?
I started by attaching the cockpit parts on the cockpit floor and walls.
There was some kind of (not represented_ stepped construction behind pilot’s
seat, where the “schragemusik” guns were housed. An appropriately cut
styrene sheet represented this. Similarly, no rear bulkhead aft of the
gunner’s compartment was provided, so I fabricated a rear wall from styrene
sheet, scribing some crossed lines to add interest.
Nichimo’s cockpit color suggestion was “bamboo” (???). Studying Hasegawa’s
instructions, cockpit pics and, mostly receiving helpful suggestions from a
friend in iModeler, I used Humbrol 72 Khaki Drill as a base color, “washed”
with a light mixture of Humbrol 116 Dark Green. The result resembled the
cockpit pics shade. Instrument panel and “consoles” were painted black,
silver-drybrushed, with red, yellow and white knobs done with a 10/0
paintbrush. The good looking seat was had its back drilled, for more
interesting looks and was painted Testors steel. Seat belts were added from
khaki doped masking tape, the silver “buckles” made with my PILOT fine
silver pen. The control stick was painted “bamboo” with black top and a
“fire” button depicted in red.
 I then attached the fuselage halves, after having trapped the cockpit floor
between them. Fit was very good.
I glued the wheel well floors at the inside of the top wing parts, then
glued the halfwings together, followed by attaching the cowling air intakes
and a pair of side bulges bilaterally, immediately aft. I also assembled the
rear wings. Fit was good. Then the front and rear wings were attached to the
fuselage. Fit was so so here.
I then attached the fuselage halves, after having trapped the cockpit floor
between them. Fit was very good.
I glued the wheel well floors at the inside of the top wing parts, then
glued the halfwings together, followed by attaching the cowling air intakes
and a pair of side bulges bilaterally, immediately aft. I also assembled the
rear wings. Fit was good. Then the front and rear wings were attached to the
fuselage. Fit was so so here.
As a note, instructions state to attach the landing gear at the well floors
and then attach the floors to the wings. I prefer to add landing gear at the
final stages, so I left it off, hoping to be able to attach the gear legs at
those final stages (with some fiddle around, maybe).
No front and rear walls for the main wheel wells are provided. For the front
walls, I cut suitable pieces from my sons’ party plates and attached them
with my home made brew of liquefied styrene, which double acted as filler.
For the rears, I used leftover styrene sheet, also attached with liquefied
styrene. Parallel stretched sprue pieces were attached on the wheel well
floors and rear walls, to add some “ribbing” interest.
The nicely molded engines, cowlings, props and main wheels, were also
assembled at that time. The MLG doors had their inner part lightly drilled
at a few symmetrical places, to add interest. Wheel wells, MLG doors and
cowling innards were painted with the same cockpit “bamboo” shade. Props
were painted Humbrol 113 Rust (which to my eye, comes close to “propeller
color”),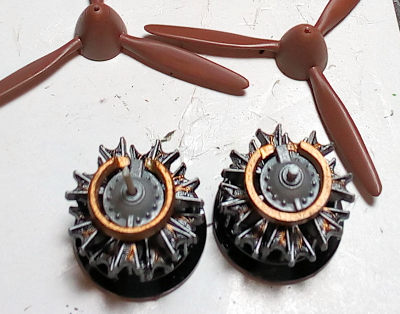 with satin white cowling fronts, gun metal cowling tips (where, I
believe, the starting device was mounted) and yellow blade warning stripes.
The main wheels were filed down to look weighted. They were painted Testors
steel with black tires.
with satin white cowling fronts, gun metal cowling tips (where, I
believe, the starting device was mounted) and yellow blade warning stripes.
The main wheels were filed down to look weighted. They were painted Testors
steel with black tires.
It was then engines detailing time: after the cylinder blocks (and the rear
firewall) were painted black, they were heavily drybrushed with silver. This
brought out the cooling fins and pushrods nicely, I painted the molded in
wire harness “copper’ and the cabane a medium gray (also silver drybrushed
afterwards).
I then had a look at the Hasegawa instructions and found out that the
engines sport very prominent circular oil coolers. Those are not provided in
my Nichimo kit…What to do? Oh, of course, modify leftover F-104 styrene main
tires from a Hasegawa 1/48 kit I built wheels up 15 years ago, what else?
(!)
Since those “tires” had the correct outer diameter, I increased their inner
diameter by filing, thinned them allover, and finally cut a part of them, to
the point that they started top resemble the Hasegawa ones. They were
painted copper, with “silver” bracing straps and attached in front of each
engine. They looked quite good, but, sadly, with cowlings attached, they
hide those beautiful engine details, as is the case in the real plane…
Then I turned my attention to the assembled plane and gave it an initial
coarse sanding, followed by two rounds of filling/sanding with my beloved
Squadron Green Stuff at quite a few places (I just love seeing it covering
all those nooks after sanding…). I deemed the end result acceptable,
attached the nice but fragile fuel coolers underneath the wings (having
deepened them beforehand with my microdrills, and painted their innards
black, for realistic looks), covered the crew compartments and wheel wells
with wet tissue, temporarily secured the cowlings at their respective
positions, and headed to the paint shop.
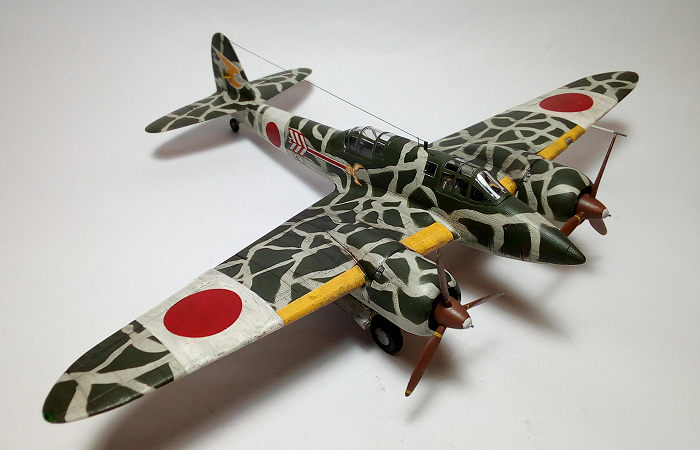
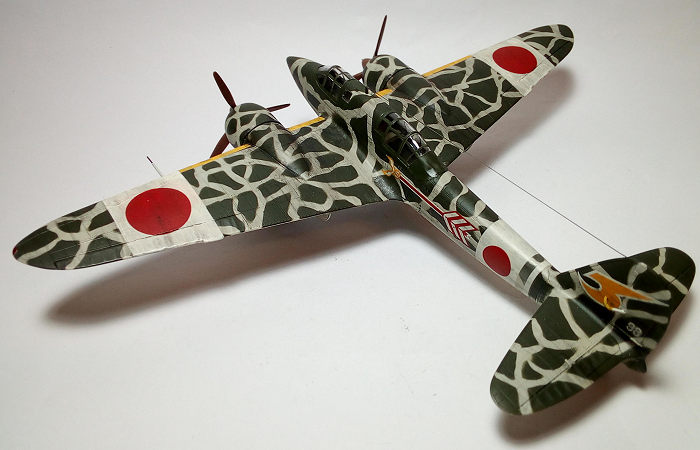
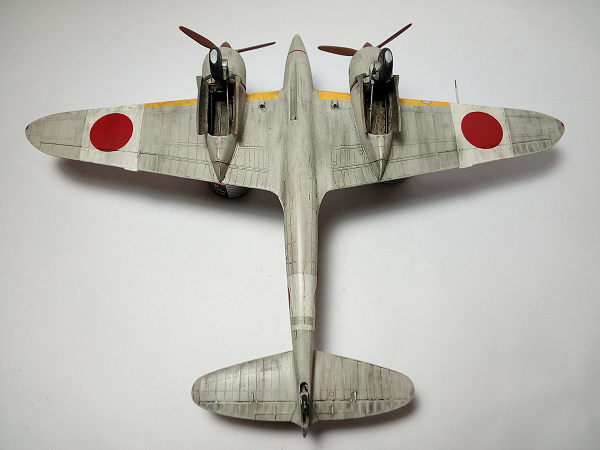
With my Revell Vario, I applied my usual Humbrol 196 allover (including the
MLG doors) for the “IJN Gray”, followed by a protective coat of Future. My
chosen scheme seemed to sport a quite extensive top green coverage, unevenly
“disrupted” by IJN gray lines. To achieve this effect, I applied unevenly
thin  strips of Patafix tac all over the top area, including the front sides
of the cowlings, trying to replicate the camo patterns I saw at both Nichimo
and Hasegawa instructions. Feeling confident about it, I applied a dark
green (Humbrol 116) all over the top and side areas. Upon Patafix removal,
after some overspray cleanup, a nice disrupted green emerged, with the
borders looking good, neither too hard, nor too soft (let’s call them “hardsoft”!).
A coat of Future sealed that nice camo and gloss-prepared the model for
decaling.
strips of Patafix tac all over the top area, including the front sides
of the cowlings, trying to replicate the camo patterns I saw at both Nichimo
and Hasegawa instructions. Feeling confident about it, I applied a dark
green (Humbrol 116) all over the top and side areas. Upon Patafix removal,
after some overspray cleanup, a nice disrupted green emerged, with the
borders looking good, neither too hard, nor too soft (let’s call them “hardsoft”!).
A coat of Future sealed that nice camo and gloss-prepared the model for
decaling.
Since Nichimo provided the decals for the Shinten Seikutai bird, but no
instructions for placement, I consulted the Hasegawa instructions. I was
expecting tranluscency with the decals, especially through the white and
yellow. Sadly, I was not disappointed, as the camo lines can be seen
underneath, especially under strong light….
Also, the yellow ID bands were stiff and started to tear apart upon
applying. This was the time that I understood (and appreciated) the fact
that many modelers paint all these markings.
Anyways, I decided to leave everything “as is”, supposing that the applied
markings on the field were translucent anyway (!!!!). For the yellow bands,
I used leftover decal pieces. Mr Mark Softer did his best in order those
stiff decals to conform, with Future sealing them after the inevitable
touchups (mainly at the white and yellow areas).
The unassembled main landing gear had brake lines added (from stretched
sprue) to the main struts. They were painted Testors Steel, with black brake
lines, oleo rubber covers and upper retraction struts. I n order to make them
fit in the well, I first attached the upper retraction struts, followed by
the main strut and wheels. After some fiddling I managed to glue them
altogether, align them and left them to dry. The rear wheel (painted steel,
with black oleo cover and tire) and the rudder mass balances were also added
at that time. The engine exhausts were painted Testors Burned metal. The
pitot was also attached at the port side, its body painted IJN gray and its
tip burned metal.
n order to make them
fit in the well, I first attached the upper retraction struts, followed by
the main strut and wheels. After some fiddling I managed to glue them
altogether, align them and left them to dry. The rear wheel (painted steel,
with black oleo cover and tire) and the rudder mass balances were also added
at that time. The engine exhausts were painted Testors Burned metal. The
pitot was also attached at the port side, its body painted IJN gray and its
tip burned metal.
I then gave the model a thin black wash, which brought up the (mostly
riveted) engraved detail really nicely. I continued weathering with a bit
heavier blackwash in the wheel wells and engines area, followed by dark
brown and black dry pastels application to represent engine stains, mud and
dirt. Light chipping was applied at wing, cowling and prop blade edges and
at personnel frequent walk/step areas. The result was an adequately
weathered Toryu, attuned to those intensive desperate last days of the war…
The propellers were attached and final satin coat sealed everything.
Approaching the finish line, it was transparencies time. First, the two aft
cockpit windows were attached from inside. Then the already hand painted
canopies (with really nice molded in frames) were attached. They proved to
be narrower than the fuselage, which was odd (might have possibly been
removed from their molds still “hot”).
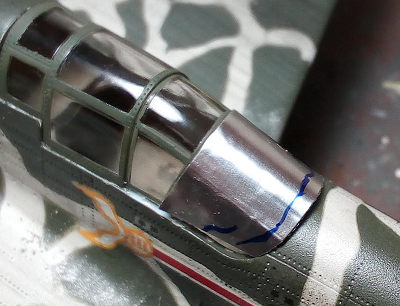 In order to represent the rear canopy thin metal cover, I used wine bottle
lead foil, cut it in shape (with some trial and error), and affixed it with
cyano. Upon glue drying, I lightly and unevenly pressed it, in order to make
it look wrinkled as depicted in reference pics. After achieving adequate
looks, I painted it the same shade as the plane’s top green. All
transparencies joints, as well as the two “schragemusik” guns top fuselage
holes were then feathered with white glue and touched up. To my (partial)
satisfaction, the above noted width difference was not that pronounced as
initially feared.
In order to represent the rear canopy thin metal cover, I used wine bottle
lead foil, cut it in shape (with some trial and error), and affixed it with
cyano. Upon glue drying, I lightly and unevenly pressed it, in order to make
it look wrinkled as depicted in reference pics. After achieving adequate
looks, I painted it the same shade as the plane’s top green. All
transparencies joints, as well as the two “schragemusik” guns top fuselage
holes were then feathered with white glue and touched up. To my (partial)
satisfaction, the above noted width difference was not that pronounced as
initially feared.
The Nichimo provided antenna mast was shortened to 3mm and attached. My
specific plane’s reference pic shows a two piece aerial wire attached (a
long wire and a small one, just aft of the mast), so I replicated them at my
model, with two-piece stretched sprue, tightened with my wife’s hairdryer
and carefully painted gun metal. My Shinten Seikutai Toryu was then called
done!
The Nichimo kit is an old but good kit of this important plane, with
accurate overall shape, adequate fit, average cockpit, wheel wells and
landing gear details and surprisingly good looking external engraved
riveting.
 Definitely a classic, it can be built quite easily OOB and produce a fine
result to the hands of the average modeler, especially if some effort is put
to quality painting. Since the decals proved quite stiff, I would
wholeheartedly recommend painting those white/red Hinomarus, as well as the
yellow ID stripes. An experienced modeler can superdetail the simplistic
areas and produce a very good model..
Definitely a classic, it can be built quite easily OOB and produce a fine
result to the hands of the average modeler, especially if some effort is put
to quality painting. Since the decals proved quite stiff, I would
wholeheartedly recommend painting those white/red Hinomarus, as well as the
yellow ID stripes. An experienced modeler can superdetail the simplistic
areas and produce a very good model..
It looks like this kit has been reissued a couple of times in the far past
and a few examples appear on ebay from time to time at quite low prices. It
is unknown if (and by whom) it will ever be reissued.
Of course, since 2007, the Nichimo kit has been superseded by the amazing
Hasegawa offering, which is excellent by any standard, let alone the fact
that it is frequently reissued, having covered most (if not all) of Ki45
variants and schemes, with many of them really exciting! Marketed at very
reasonable prices, it is definitely the way to go, if you want an excellent
quarter scale Toryu.
Still, the Nichimo is a sweet kit and can definitely hold its own. If you
own or come across one, grab it and build it. With a little effort, you will
have a nice Toryu in your shelves!
Happy modeling!
Spiros
Pendedekas
19 July 2021
Copyright ModelingMadness.com. All rights reserved. No
reproduction in part or in whole without express permission.
If you would like your product reviewed fairly and fairly quickly, please
contact the editor or see other details in the
Note to
Contributors.
Back to the Main Page
Back to the Review Index Page
Back to the Previews Index Page