| KIT #: | 00132 |
| PRICE: | ~$5-11.00 |
| DECALS: | Two options |
| REVIEWER: | Chris Mikesh |
| NOTES: | Out of the box |
| HISTORY |
A Tale of Two Tojos (with apologies to Charles Dickens)
The Shoki (Tojo) Army Type 2 fighter was realized by the Japanese to meet the new idea of a fast hit-and-run fighter style prevalent in the world at that time. The introduction of large-bodied high power engines, a main body trimmed to the maximum, main wings with little area gave it an uncanny appearance. Its ability too, superior to the similar Messerschmitt 109E, made it a factor to its high production. It was mainly used to fight off the B-29s during the air defense of the mainland.
| THE KIT |
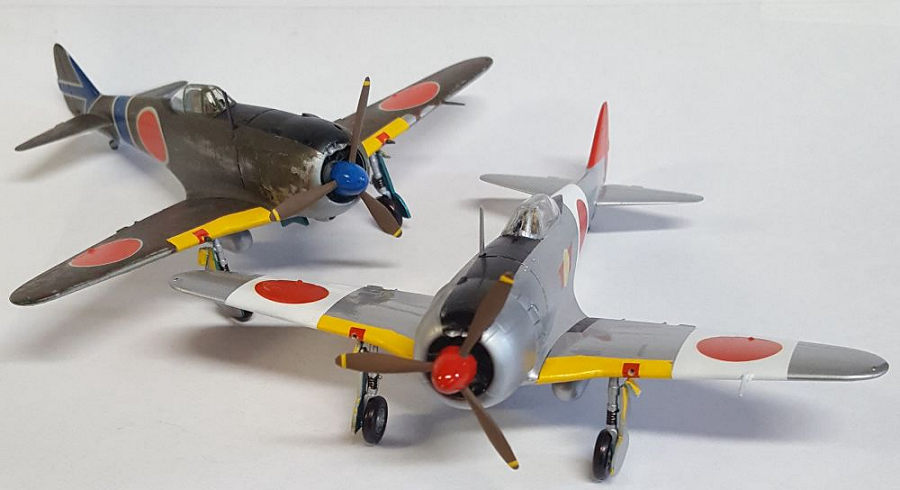
I picked up the box at a Model Contest from a vendor. It seemed heavy and understandably so. There was a complete kit and a partly started kit in the box. But, I’m not afraid of a partly started kit, and ‘2 for 1’ was a good deal.
 My
examples were molded in gray color and come with two different types of
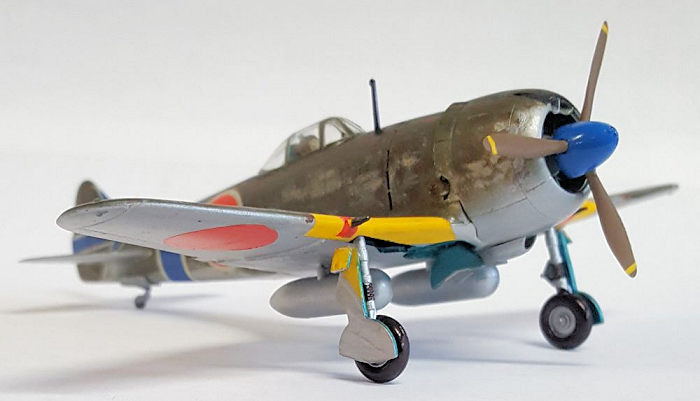
canopies. You will need to choose one of two options. 47th Sentai
(Silver/unpainted aircraft). The canopy/windshield is notched for a scope
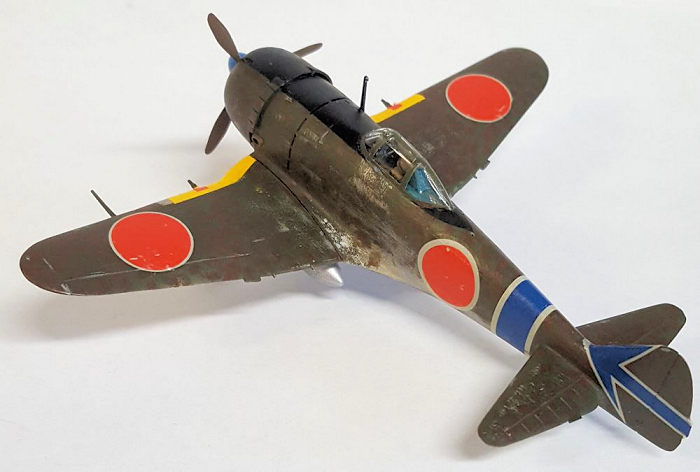
gunsight and has recessed wing guns (removed and drilled out). The Camouflaged
version from the 85th Sentai, has a solid windshield and exposed wing guns. You
will want to choose before you get going on the model.
My
examples were molded in gray color and come with two different types of
canopies. You will need to choose one of two options. 47th Sentai
(Silver/unpainted aircraft). The canopy/windshield is notched for a scope
gunsight and has recessed wing guns (removed and drilled out). The Camouflaged
version from the 85th Sentai, has a solid windshield and exposed wing guns. You
will want to choose before you get going on the model.
The kit itself was molded well with recessed panel lines on two major sprues. Both of my examples – as with most Hasegawa products, did not have noticeable flash or flaws. But keep in mind, the kit has been in production since 1972. My kit issue year was 1987. So, it is not up to modern standards for Hasegawa.
| CONSTRUCTION |
Cockpit and Canopy: Construction of the model is typical. It starts with
the cockpit area. There is not much to view, but there is an instrument panel
provided. The cockpit tub has no detail to it. But you can't see it anyway. The
cockpit tub is not as simple as the instructions imply - but not difficult
either. The builder will discover the tub barely makes contact with the mounting
pins and barely makes contact on the other side. Use Super Glue to mount the tub
so that everything centers on the fuselage seam line. When p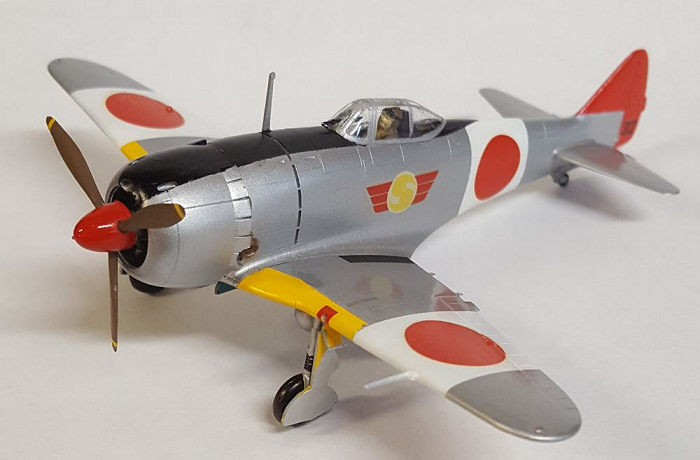 utting
the other half in place there will be minimal fuss.
utting
the other half in place there will be minimal fuss.
Modelers should be aware that the pilot is a little oversized for the cockpit. In the Pilot's native form, when glued to the pilot seat, his head is too high. All pun intended, you will have to shave the Pilot's butt by about a half a millimeter in order to get him correctly in the cockpit. I recommend attaching the canopy with white glue. That way the canopy can be removed if needed. Or, you can skip the pilot, but will need to detail some interior. There is a separate arm for the pilot that can be changed in position if you like. The pilot should be installed in the cockpit tub before mounting it in the fuselage. The pilot will not fit through the hole once the fuselage halves are glued together. You will need to amputate his arm if you make the same mistake I did. (Now where did I put that extra arm?)
Once the canopy is painted and unmasked, you may want to dip it into future and let dry for a day. It will become very clear and look thinner.
Wings: Disappointingly, Hasegawa left some very large pour gates on the wings. These will have to be removed and smoothed. Don’t over-correct or you will need to fill the gaps later. The remainder of the assembly is quite normal and the fit is generally good, but watch out for surprises.
Engine Mount: A word of caution, the hole for engine on the firewall is not centered to the cowling. Simply enlarge the hole up, and to the right. It is not a glaring problem – but annoying. Keep dry fitting the engine with the cowling and you can correct it.
| COLORS & MARKINGS |
 Let’s
get the easy part out of the way first. All paints were Tamiya except as noted.
The Pilots were painted with XF-59 Dessert Yellow for the tan uniforms (not
yellow at all). XF-64 Red Brown added details like helmets, gloves and shoes. It
was also used for the propellers and exhausts. Leading edges were Yellow XF-3.
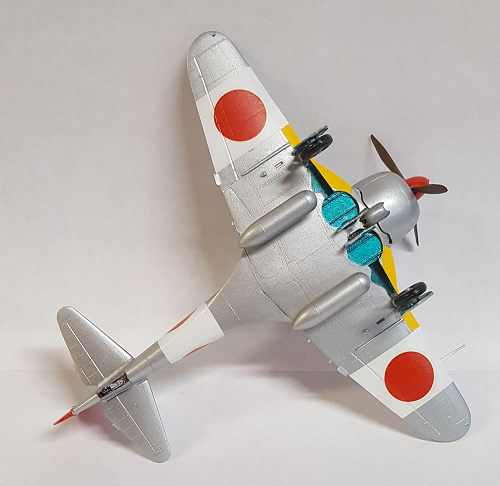
White is X-2 (47th Sentai) and was airbrushed. XF-1 is the Flat Black areas such
as the anti-glare panels and tires. The engines were painted with XF-56 Metallic
Grey (really superb stuff – looks like metal). Interiors and wheel wells were
painted with Gunze Sangyo Metallic Blue Green. Touch ups included a Sharpie Fine
Point Silver or Black as needed.
Let’s
get the easy part out of the way first. All paints were Tamiya except as noted.
The Pilots were painted with XF-59 Dessert Yellow for the tan uniforms (not
yellow at all). XF-64 Red Brown added details like helmets, gloves and shoes. It
was also used for the propellers and exhausts. Leading edges were Yellow XF-3.
White is X-2 (47th Sentai) and was airbrushed. XF-1 is the Flat Black areas such
as the anti-glare panels and tires. The engines were painted with XF-56 Metallic
Grey (really superb stuff – looks like metal). Interiors and wheel wells were
painted with Gunze Sangyo Metallic Blue Green. Touch ups included a Sharpie Fine
Point Silver or Black as needed.
The ‘Silver’ 47th Sentai Tojo was not difficult. Once the canopy was masked, I hosed the plane in TS-17 Gloss Aluminum (both planes). This is a wonderful aerosol paint and very forgiving even for a novice. It dries quickly and can be handled inside an hour. The paint cures hard in 24 hours and is great to mask on.
I masked off the areas on the fuselage and wings to be painted white. It may seem easy to just grab a spray can of white and paint those areas, but DON’T! Aerosol white paint is too thin and even after several coats will look terrible. Airbrush the white areas AND include the rudder and nose cone where you will paint it red next. The white undercoat will brighten the red rudder and really make it ‘pop’. The silver paint will dull that red and mis-match the Japanese Hinomaru decal (Red circle national markings) on the wings and fuselage. Also mask off the area around the leading edge and airbrush the yellow. The same principles apply to yellow as the white. (Hang in there – you’re almost done!)
 Tamiya
5mm Plastic Masking Tape for curves is glorious stuff! Outline the anti-glare
panels on the nose and around the canopy. This stuff is best used when stretched
and applied. It has a good seal to reduce paint attraction under the tape.
Again, I recommend airbrushing the black if you can. I hand-painted the black
with no issues.
Tamiya
5mm Plastic Masking Tape for curves is glorious stuff! Outline the anti-glare
panels on the nose and around the canopy. This stuff is best used when stretched
and applied. It has a good seal to reduce paint attraction under the tape.
Again, I recommend airbrushing the black if you can. I hand-painted the black
with no issues.
Now let’s look at the ‘Camo’ 85th Sentai plane. It was already pre-painted silver just as the 47th Sentai Tojo. The underside remains silver, so mask it off so there is no ‘oops!’ However as you mask off the sides, peel the mask away from the fuselage a bit, and keep it away as best you can. You will want a very soft and sloppy edge when applying the XF-13 J.A.Green over the top surfaces. Keep this paint thin so you can see traces of silver all over. One coat is more than needed. Consider that the ground crew was trying to dull the shiny silver down, but had minimal resources. (Hasegawa also released this plane – same markings – in 1/48 #09711)
Now the fun begins! The instructions differ from other models and painting examples I have seen. After all, Japanese Camo is not an exact science – so who knows, you may be wrong (or right) in your camo – but few will be able to prove it. Japanese paint at the time was garbage and didn’t stick well to aluminum. It chipped and faded badly. So have some fun! Here is what I did:
 After
the Green (XF-13) was applied, I waited a couple of days as I wanted it to
really set up. Next, I settled on Tamiya XF-68 Nato Brown as part of the camo. A
note about Tamiya paints: they dry darker than the bottom of the bottle looks.
Don’t go by the bottle cap. So test the paint on something and let it dry to
make sure that is what you are looking for.
After
the Green (XF-13) was applied, I waited a couple of days as I wanted it to
really set up. Next, I settled on Tamiya XF-68 Nato Brown as part of the camo. A
note about Tamiya paints: they dry darker than the bottom of the bottle looks.
Don’t go by the bottle cap. So test the paint on something and let it dry to
make sure that is what you are looking for.
Again, the instructions imply occasional blotches of the brown. I used a cut down Testors plastic bristle paint brush to dry brush with. There is hardly any paint in the brush, but as it is dry more or less, just smash it onto the surface a couple of times to get a blotch of paint. Do a couple of test blotches and let it set to make sure of the result you want. Once you get the hang of it, continue all over the model. Keep turning the plane around to prevent yourself from forming a pattern of blotches. I discovered as the paint dried, it faded some or blended into the green. I went back over the model and doubled the blotches so it looked like a 50/50 mix of green and brown with no pattern.
The kit decals are excellent with the exception of the white under the Hinomaru. As you will see, it is actually grey. Being a thin decal, it is also translucent when applied to a camouflaged surface. I recommend finding alternate Hinomarus if applied to the 85th Sentai. All other decals such as the fuselage band and tail markings are excellent. However, when using the same decals on the silver/white surfaces of the 47th Sentai, it is superb. I used MicroSol, and MicroSet occasionally (rudders and fuselage band) to soften the decals and conform more easily to the model.
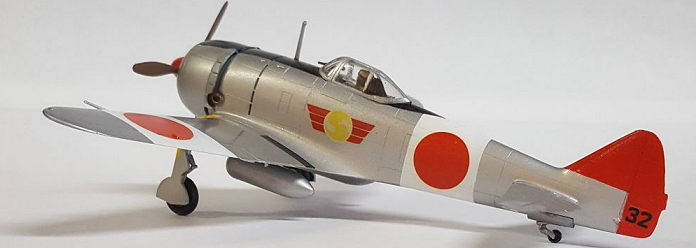 I
coated the silver 47th Sentai with Future floor finish as it levels everything
off, like brush strokes or rough surfaces, and protects the decals. That glossed
it up nicely for that ‘factory fresh’ look. The Camo 85th Sentai was also coated
with a much lighter coat of Future because I only wanted to give the plane
‘sheen’ and protect the decals. It also provides a scale effect for the
weathering. Landing gear, antennas, and all “break-off” details were added.
I
coated the silver 47th Sentai with Future floor finish as it levels everything
off, like brush strokes or rough surfaces, and protects the decals. That glossed
it up nicely for that ‘factory fresh’ look. The Camo 85th Sentai was also coated
with a much lighter coat of Future because I only wanted to give the plane
‘sheen’ and protect the decals. It also provides a scale effect for the
weathering. Landing gear, antennas, and all “break-off” details were added.
Included also in the kit, is a saluting pilot. I put the pilot on a piece of acetate instead of the pylon because the acetate is clear, and it is easier to place in a diorama if needed. (There is always a Wise Guy in every formation, including the Japanese Army.)
| CONCLUSIONS |
The kit is straight up and simple with only a few surprises. If you have the proper tools, you will produce a very respectable model. Yes, I’d build another one if I needed to, but I think 2 is enough for me. I’m certain you will enjoy the simplicity of the model and the detail provided. On a scale of 1 to 10, this is an 8+.
| REFERENCES |
http://modelingmadness.com/kitindex/kitindexjkl.htm
http://www.warbirdphotographs.com/ArmyJB&W2/
and many resources on the internet.
30 October 2020
Copyright ModelingMadness.com
Please feel free to contact if questions or
constructive ideas.
ChrisMikesh@Gmail.Com All sanding sticks survived the
ordeal and no damage to my airbrush.
If you would like your product reviewed fairly and fairly quickly, please
contact
the editor or see other details in the
Note to
Contributors.
Back to the Main Page
Back to the Review
Index Page
Back to the Previews Index Page