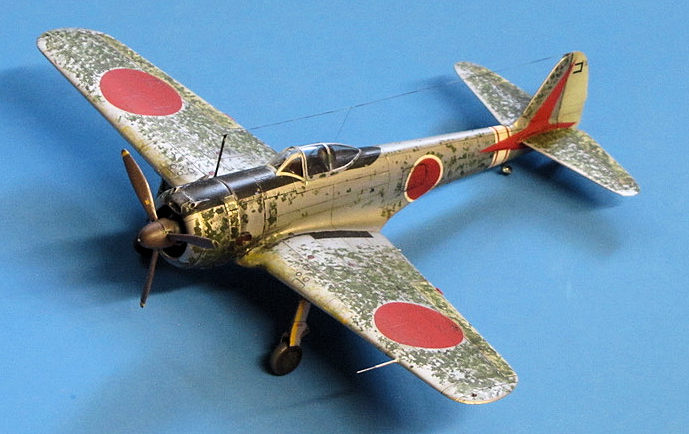
Arma Hobby Ki-43-II Hayabusa
| KIT #: | 70078 |
| PRICE: | $31.00 |
| DECALS: | Three options |
| REVIEWER: | Ryan Grosswiler |
| NOTES: | Kit masking set and Arma 3D parts. |
| HISTORY |
The 'Other Zero': the Ki-43 might possibly reign supreme as history's Most Consistently Misidentified Aircraft, with the possible exception of the Sopwith Triplane, or any modern fighter with two vertical stabilizers. As the most numerous Japanese aircraft other than the aforementioned Zero, the Ki-43 was encountered in combat everywhere the Japanese Imperial Army was present from 1941 to 1945. However, with the more famous Zero sparking fear and imagination in the Western Allies as much as it did, the Ki-43 actually encountered was very often in after-action reports identified as a Zero, even in regions where there was no Japanese Navy presence. Less hysterical reporting correctly identified the aircraft, where it entered Allied identification manuals under the code name "Oscar". As was the case everywhere else, the Ki-43 absolutely tore up Allied opposition on all fronts in the first half of 1942 and was Japan's main ace-maker.
 Unlike the Zero, the
early Ki-43-I (easily identified by its cylindrical engine cowl and two-blade
prop) which was reaching the front line just as the Pacific war exploded in
December 1941, had real developmental problems. Nakajima's quest was to make the
lightest and most maneuverable fighter possible for an elite IJAAF cadre,
accustomed to the company's earlier Ki-27 fighter and very skeptical of its
retractable landing gear and enclosed cockpit. This design-performance effort
went a shade too far, and the first production series suffered from serious
structural weakness, particularly in the wing center section. Buckled wing skins
and popped rivets were common, and some pilots even lost their lives to
catastrophic wing failure in extreme maneuvering. These airframes were recalled
quickly to the factory for strengthening kits to be added while the production
tooling was revised. Worse, the Ho-103 fired an explosive shell which would
detonate prematurely as the projectile left the gun muzzle once the barrel
heated up, destroying the engine's accessory section.
Unlike the Zero, the
early Ki-43-I (easily identified by its cylindrical engine cowl and two-blade
prop) which was reaching the front line just as the Pacific war exploded in
December 1941, had real developmental problems. Nakajima's quest was to make the
lightest and most maneuverable fighter possible for an elite IJAAF cadre,
accustomed to the company's earlier Ki-27 fighter and very skeptical of its
retractable landing gear and enclosed cockpit. This design-performance effort
went a shade too far, and the first production series suffered from serious
structural weakness, particularly in the wing center section. Buckled wing skins
and popped rivets were common, and some pilots even lost their lives to
catastrophic wing failure in extreme maneuvering. These airframes were recalled
quickly to the factory for strengthening kits to be added while the production
tooling was revised. Worse, the Ho-103 fired an explosive shell which would
detonate prematurely as the projectile left the gun muzzle once the barrel
heated up, destroying the engine's accessory section.
So, we come to the main production version kitted here, the Ki-43-II. With the beginning of 1942 corrections to these deficiencies were incorporated to five -I airframes pulled off the production line. The engine was changed to a 15% uprated Ha-25, the Ha-115, under a more bulbous cowl. This drove a three-blade propeller, and the new two-stage supercharger intake was moved to the upper cowl lip while the oil cooler repositioned externally beneath the cowl. The wing span was reduced by two feet. A reflector gunsight replaced the telescopic one under a new more rounded canopy. All this resulted in a much better-looking airplane, which entered service late in the year as the Ki-43-II. The new fighter, thought by the Allies to be a derivative of the Ki-27, remained shrouded in mystery well into the war and it wasn't for quite a while before it was recognized to be an all-new design and garnered the code name "Oscar".
However, to a greater extent than the Zero, the Ki-43 began to suffer from limitations in speed and armament as Allied pilots gradually began to discover its weaknesses. The Ki-43—all versions—only ever carried a pair of machine guns, and was found to be terribly vulnerable to damage once hit. The maneuverability advantages of the Ki-43 and the climb and armament/vertical speed attributes of the specialist interceptor Ki-44, developed in parallel, were finally merged into the single design of the superb Ki-84, too late to have much impact on the course of things.
Designer Hideo Itokawa would go on after the war to be one of the pioneers of Japanese rocketry. About a dozen Ki-43s exist today around the world; a few of them being airworthy. No matter whether or not you like the airplane, the Ki-43 makes a fun modelling subject not only for its place in history but also for the sheer profusion of different paint schemes and unit markings it wore.
| THE KIT |
 Being
a principal WWII aircraft type, the Ki-43 has always been well-covered in 1/72.
The problem is that it has not been covered well. LS and Revell had a couple
kits in the mid-'60s, products of their time. We do of course have the classic
Hasegawa kit, constantly available since the early '70s and still accurate and a
nice build (and an ideal first kit for the new modeler), but unfortunately one
of the last molds the company cut with raised panel lines and bearing the
heavy-handed approach to detail characteristic of a kit from the era. Special
Hobby and AML offered a couple short-run kits in the 'aughts, both of which by
all accounts are beastly build experiences. In the meantime, Fujimi and Fine
Molds issued nice kits in the 1990s, but--puzzlingly--never released either in
anything further than the early -I version.
Being
a principal WWII aircraft type, the Ki-43 has always been well-covered in 1/72.
The problem is that it has not been covered well. LS and Revell had a couple
kits in the mid-'60s, products of their time. We do of course have the classic
Hasegawa kit, constantly available since the early '70s and still accurate and a
nice build (and an ideal first kit for the new modeler), but unfortunately one
of the last molds the company cut with raised panel lines and bearing the
heavy-handed approach to detail characteristic of a kit from the era. Special
Hobby and AML offered a couple short-run kits in the 'aughts, both of which by
all accounts are beastly build experiences. In the meantime, Fujimi and Fine
Molds issued nice kits in the 1990s, but--puzzlingly--never released either in
anything further than the early -I version.
Arma Hobby of Poland stepped in to resolve this situation in 2024. The end-opening box with some very crisp artwork opens to spill out two compact light-grey sprues and one clear bearing 77 parts total. Options include different styles of exhaust with associated fuselage panel, different headrests, and early or late drop tanks, plus various stores-rack arrangements. All is in recessed detail per the current industry standard, plus decals, canopy/wheel masks, and Arma's now-standard QR path to 3D-printed detail parts. There are no parts to represent the individual exhaust stacks associated with the Ki-43-III, so perhaps Arma will depict these in a separate sprue in the future. Some flash is present here and there, a side-effect of Arma's quest to achieve very sharp trailing edges. This flash was the cause for some very dramatic lamentations within the online modelling community as this kit was released--I detail below how to fix this.
Three attractive and highly contrasting finishing options are provided, one in overall IJA green upper surfaces, another in natural metal with the white Home Defense bandages, and the third in a mottled scheme. There are two sets of stencil decals on the sheet; this is to cover a potential second build with the 'sprues only' releases that Arma sometimes offers from its online store.
| CONSTRUCTION |
 Before the build, this
Gen-X'er enlisted the help of Millennial and Zoomer coworkers to get a set of 3D
parts printed. The oil cooler and exhausts in
particular offer a stunning improvement over the injection-molded options. Also,
select the finish scheme from among the included options as the instructions
will guide you through options specific to your chosen airframe. I mentioned the
underwing store arrangements: early -IIs had drop tanks which were mounted
directly to the wing inboard of the landing gear. The later installation
involved a proper stores rack for either fuel or bombs and was positioned
further outboard. If you choose one, drill the holes at this time—you will have
a hard time finding them later!
Before the build, this
Gen-X'er enlisted the help of Millennial and Zoomer coworkers to get a set of 3D
parts printed. The oil cooler and exhausts in
particular offer a stunning improvement over the injection-molded options. Also,
select the finish scheme from among the included options as the instructions
will guide you through options specific to your chosen airframe. I mentioned the
underwing store arrangements: early -IIs had drop tanks which were mounted
directly to the wing inboard of the landing gear. The later installation
involved a proper stores rack for either fuel or bombs and was positioned
further outboard. If you choose one, drill the holes at this time—you will have
a hard time finding them later!
I started by mating the wing parts (A27 and A12) and leaving this to cure fully. The assembly included the clear landing light part which for my chosen scheme is simply sanded flush and painted over. Next, cockpit and engine parts were assembled, Steps 1-8, 11, and 15. The kit's engineering (the cockpit floor is the top of the wing center section, like the real thing) means that the cockpit remains very accessible until the wing is joined to the fuselage, so all these 'nether regions' could be painted and weathered all at once. In fact, I had the engine, fuselage, and wing complete as subassemblies, seams sanded, and scribing restored before any paint touched the model.
This is how you deal with the mold 'flash' I mentioned above: 1) hold the affected part in front of strong light to see where to border to the part itself lies, then 2) sand the flash away. Done! Nothing to get upset about, people.
 My approach to Arma's
assembly sequence meant that interior painting and special effects could all be
done at once. The engine and cockpit were sprayed black, then the cockpit was
sprayed with IJA interior green from above, (i.e., the natural direction of
light), followed by a highly lightened shade of the same. This created natural
shadows and highlighting with about ten minutes' work. Even though aftermarket
accessories have been released to enhance this area, Arma's stock plastic
cockpit with its comprehensive decals is really quite sufficient even for an
open-canopy model. Take the time to segment Arma's instrument panel decals down
further to better settle into the raised detail, particularly C1 and C6. The
main landing gear legs were built up alongside and given a set of brake lines
from fine solder. Once the cockpit and engine received weathering and special
effects, general assembly followed.
My approach to Arma's
assembly sequence meant that interior painting and special effects could all be
done at once. The engine and cockpit were sprayed black, then the cockpit was
sprayed with IJA interior green from above, (i.e., the natural direction of
light), followed by a highly lightened shade of the same. This created natural
shadows and highlighting with about ten minutes' work. Even though aftermarket
accessories have been released to enhance this area, Arma's stock plastic
cockpit with its comprehensive decals is really quite sufficient even for an
open-canopy model. Take the time to segment Arma's instrument panel decals down
further to better settle into the raised detail, particularly C1 and C6. The
main landing gear legs were built up alongside and given a set of brake lines
from fine solder. Once the cockpit and engine received weathering and special
effects, general assembly followed.
Other reviewers have given warning about the kit's five-piece engine cowling, engineered like this to achieve the real cowl's subtle bulged shape. I didn't have a problem with it (and the instructions helpfully detail a specific assembly sequence), but I would recommend completing it in two sessions, taking the first to get the first three parts (A8, A7, and A1) in place, letting this cure, then assembling the top panel and cowl ring to finish. I did find it helpful to open up the gun troughs in the cowl ring to achieve a better fit. When the cowl was fully cured, I wet-sanded it with 1500 grit to smooth things out. For the time being, the stabilizers were left unattached as directed by the instructions to accommodate the unit decals over the rudder and vertical fin during finishing.
| COLORS & MARKINGS |
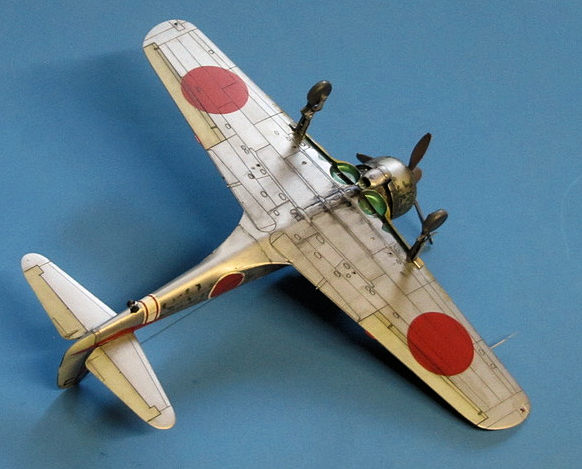
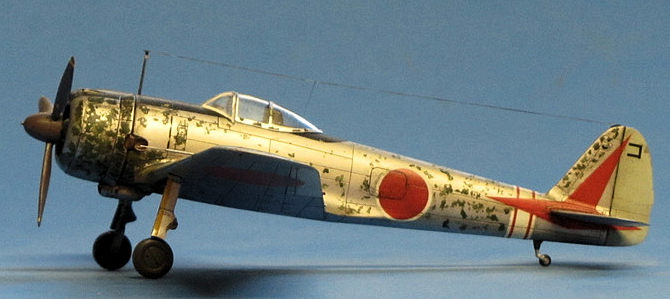
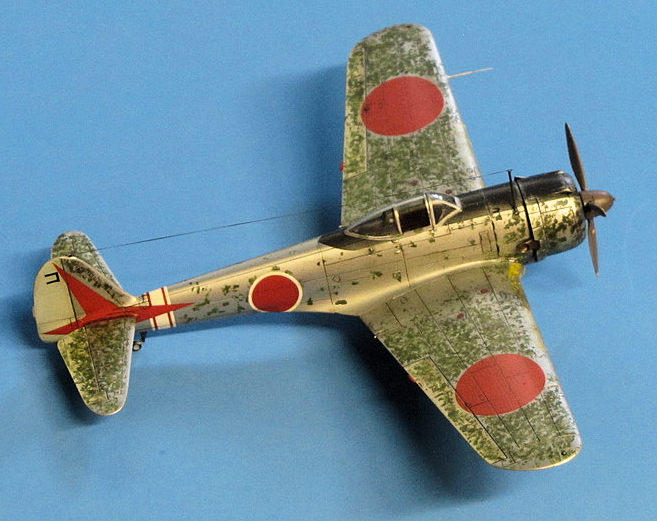
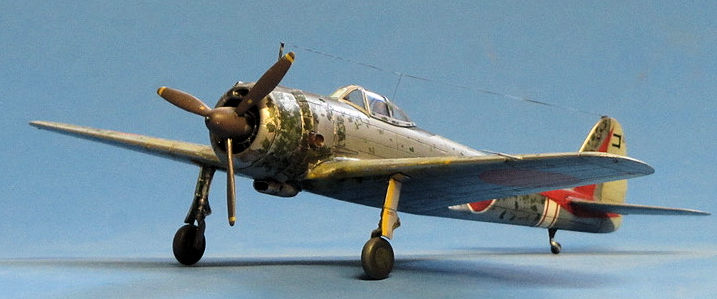
As is common for IJAAF aircraft, there's a profusion of fascinating finishing options for the Ki-43 and in this case lots of aftermarket decals available. For this review build, I stuck with the kit's decals and selected the option with the mottled finish. After masking the canopy with Arma's included set, I started by spraying the whole exterior with Tamiya AS-12 lacquer. This was left to cure for an hour, then a light coat of AK White Aluminum followed. A few contrasting darker aluminum panels were masked and sprayed, mostly on the bottom, along with the linen-colored control surfaces and the black anti-glare panels.
I have always loved the "Paper Crane"
markings of the 54th Sentai
so that second decal option had been a foregone conclusion. The decal went on as
directed over the still stab-less tail with Micro Set and Sol. Over the next
hour, I monitored the drying/conforming process with an occasional brush poke.
In keeping with my previous experiences, Arma's decals do conform impressively
over seemingly impossible compound surfaces, but I think this application over
the protruding stabilizer root fairing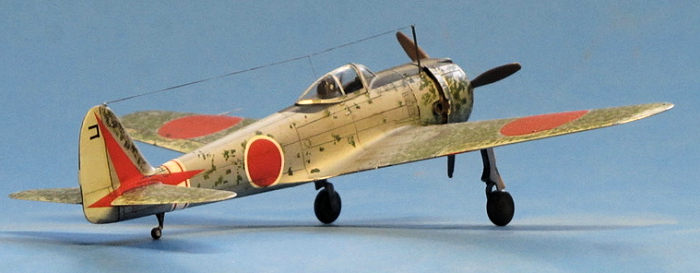 is a bridge too far. I recommend making some cuts in both this decal and the
wing leading edge ID stripes. Really, both should probably be masked and
painted.
is a bridge too far. I recommend making some cuts in both this decal and the
wing leading edge ID stripes. Really, both should probably be masked and
painted.
Stabs, finished separately, were then attached. Setting myself up outside under an umbrella on a hot summer day, I then cut ICM's acrylic green paint about 50% with ordinary tap water and depicted the mottling by dotting it in place with a 00 brush and about an hour's work. This was locked in with a coat of Mr. Color Clear, and a light weathering of oils and washes followed. These were finished in Tamiya Semi-gloss clear.
Wait, you haven't tried ICM's acrylics? They're every bit as good as Tamiya's and in this era of the shrinking modeler budget a fantastic value, even on this side of the Atlantic. Years ago, ICM sent me a set as part of their Thank You package with a sample of the Ki-21s I had assisted them with, and I've been using this set off and on since. I'll be covering these fine paints in a separate review.
I had ordered some items from Arma directly a year ago, so was able at the time to acquire their inexpensive yellow nylon landing gear jig for this kit. The main landing gear was glued to the model, and the model strapped into this contraption. Huge relief of tedious work there, and I highly recommend this purchase if you plan on building multiples of this kit. An EZ Line antenna went on and that was it.
I don't think drop tanks in either offered configuration do anything for the looks of this airplane, but for the sake of the review I made up the earlier version to test them and took a photograph. They fit without problems and look correct in place, though their mountings are quite delicate. Be careful!
| CONCLUSIONS |
Yay! A modern-mold Ki-43 that's a great build! For those of us busy with the load of 21st-century adulting, this is a refreshing two-weekend project. If you're ordering directly from Arma in Poland, spend the few Euros on the alignment jig. It's worth it, especially if you'll be building more than one copy of this kit. As much as I dislike the thought of Arma Hobby expending its substantial talents anywhere but The One True Scale, the company would be wise to pantograph this kit into 1/48.
My next one is going to be soon: the totally sick all-blue scheme of the 20th Sentai!
| REFERENCES |
Various Japanese monographs collected in the '80s and '90s. Also that old standby...
Francillon, Rene J. Japanese Aircraft of the Pacific War. Naval Institute Press, USA. 1970. ISBN# 0-87021-313-X
A fantastic bit of original English-language research
Ichimura, Hiroshi. Ki-43 'Oscar' Aces of World War 2 (Aircraft of the Aces 85) Osprey Publishing, UK. 2009. ISBN# 978-1-84603-408-4
17 September 2026
Copyright ModelingMadness.com. All rights reserved. No reproduction in part or in whole without express permission.
If you would like your product reviewed fairly and fairly quickly, please contact the editor or see other details in the Note to Contributors.