Eduard 1/48 Ki-115 'Tsurugi'
|
KIT #: |
8088 |
|
PRICE: |
30.00 Euros in 2004 |
|
DECALS: |
one option |
|
REVIEWER: |
Spirios
Pendedekas |
|
NOTES: |
|
The Nakajima Ki-115 Tsurugi (剣, "Sabre") was a one-man kamikaze aircraft
developed by the Imperial Japanese Army Air Force in the closing stages of
World War II in 1945. The Imperial Japanese Navy called this aircraft Tōka
(藤花, "Wisteria Blossom").
The aircraft's intended purpose was to be used in kamikaze attacks on Allied
shipping and the invasion fleet expected to be involved in the invasion of
Japan, Operation Downfall, which in the end did not take place.
Because the Japanese High Command thought that Japan did not have enough
obsolete aircraft to use for kamikaze attacks, it was decided that huge
numbers of cheap, simple suicide planes should be constructed quickly in
anticipation of the invasion of Japan.
The aircraft was very simple, being made from "non-strategic" materials
(mainly wood and steel). To save weight, it was to use a jettisonable
undercarriage (there was to be no landing), so a simple welded steel tube
undercarriage was attached to the aircraft. This, however, was found to give
unmanageable ground-handling characteristics, so a simple shock absorber was
then incorporated. The cross section of the fuselage was circular and not
elliptical as were most planes of this size and type; such a fuselage was
easier to make.
 Tsurugi
had an instrument panel with some flight instruments; rudder pedals in
addition to joystick type control column, and also a place for a radio.
Flight controls included both ailerons and elevators and (in production
versions) flaps.
Tsurugi
had an instrument panel with some flight instruments; rudder pedals in
addition to joystick type control column, and also a place for a radio.
Flight controls included both ailerons and elevators and (in production
versions) flaps.
The Ki-115 was designed to be able to use any engine that was in storage for
ease of construction and supply, and to absorb Japan's stocks of obsolete
engines from the 1920s and 1930s. The initial aircraft (Ki-115a) were
powered by 858-kilowatt (1,151 hp) Nakajima Ha-35 radial engines. It is not
known if any other engine was ever actually fitted.
After testing the first production aircraft were fitted with the improved
undercarriage and two rocket units. These may have assisted with take-off or
may have been designed for the final acceleration towards the target.
The aircraft had a top speed of 550 kilometres per hour (340 mph) and could
carry a bomb weighing as much as 800 kilograms (1,800 lb), large enough to
split a warship in two. However, it was otherwise unarmed, and heavily laden
with its bomb, would have been an easy target for enemy fighter aircraft.
The controls were crude, the visibility terrible, and the performance
abysmal. Tsurugi had very poor take-off and landing performance and could
not be safely flown by anyone other than experienced pilots. There were
fatal crashes during testing and training. However new, better versions with
improved controls and better visibility were under intensive development.
The Japanese High Command had plans to construct some 8,000 per month in
workshops all across Japan.
The war ended before any flew in combat. Individually, they would have been
rather inefficient weapons, but used in waves of hundreds or thousands they
could have been quite destructive.
Of the 105 examples produced, two airframes are known to exist. One example
of the Ki-115 on loan to the Pima Air & Space Museum in Tucson, Arizona from
the National Air and Space Museum. Another, once displayed as a gate
guardian at Yokota Air Base, since 1952 turned over to Japanese authorities
and is reportedly at a Japanese museum.
Variants:
Ki-115 Tsurugi: Single-seat suicide attack aircraft. production version.
Ki-230: Single-seat suicide attack aircraft. projected version, none built.
This kit hit the shelves in 2004. It was one of Eduard’s great releases back
then, creating quite an impact to the modeling world. It was issued in
“standard” and “profipack” versions, the profipack differing in the
provision of an extra nice PE fret that provides instrument panel, engine
lead cables, oil cooler intake mesh, fuel caps and many other goodies. I
grabbed mine profipack one at the “normal” price of around 30 euros.
 The
attractive boxart depicts a non-loaded Tsurugi, attempting to takeoff from
(supposedly) Nakajima factory, it being bombed by Allied planes. Its purpose
of flight might well have been to ram a bomber (?).
The
attractive boxart depicts a non-loaded Tsurugi, attempting to takeoff from
(supposedly) Nakajima factory, it being bombed by Allied planes. Its purpose
of flight might well have been to ram a bomber (?).
Upon opening the box, one is greeted by three well cast (if not slightly
mold-swifted) sprues in beige colour, appearing to incorporate the then new
CAD sprue design, with no sink or visible ejector pin marks whatsoever.
Since it is a small and very simple plane, there are not a ton of parts,
with many of them used for the construction of the well detailed engine and
cockpit.
The Tsurugi hd a primitive cockpit and is well represented, with seat (PE
belts provided), stick, throttle box with PE cables, foot pedals with PE
straps, instrument panel with PE face and extra decal.
Engine is a very well detailed, comprised of 21 pieces, with the PE harness
being a nice touch.
The fuselage is typically split in half and, with the cockpit fitted in,
sits on top of the two piece wing affair. The horizontal stabilizer is one
piece, as is the fin too.
The propeller is nicely done in one piece with extra hub, but the cowling is
split in two, inevitably resulting in a seam that needs to be filled and
sanded.
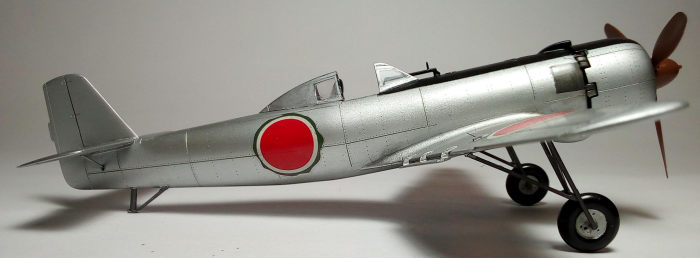
The distinctive crude landing gear and extra flaps are satisfactorily
executed.
Transparencies look convincing.
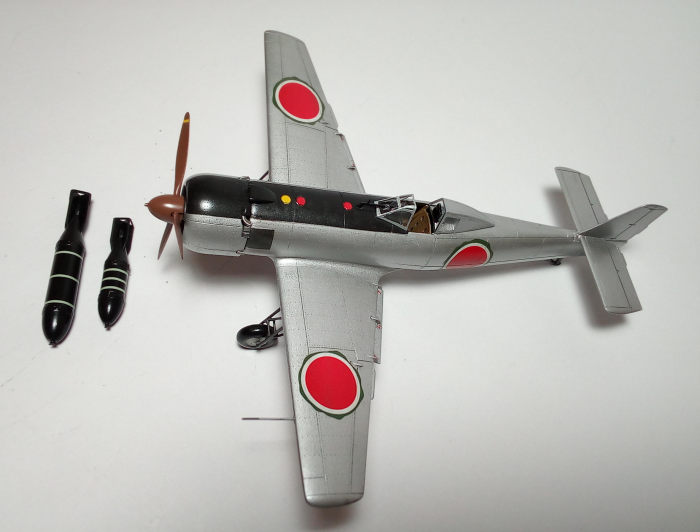
Two well done 500kg and 800kg bombs are provided, beefed up by PE rings.
There's a set of masks for the canopy and wheels painting too.
All in all, a very positive first impression of this little strange plane's
kit.
I started with the cockpit. Eduard instructions state a Nakajima green for
the cockpit allaround and also for the inner cowling. From what I’ve read
and from actual Pima Museum Tsurugi cockpit photos viewed, I sense it is not
correct. Floor, stick, throttle box, seat and instrument panel base were
made of wood, with minimum treatment (except maybe for the stick looking
well varnished…). The pedals' base seems to be made of steel. The cockpit
walls look as to have a reminiscent dark greenish tint, which makes me think
it was some cockpit green paint lightly applied to the untreated steel
cockpit wall, while some other cockpit frames seem to be bare steel.
This makes VERY sense (remember, this was a desperate measure one-off
machine). So that is the setup I depicted. I concluded u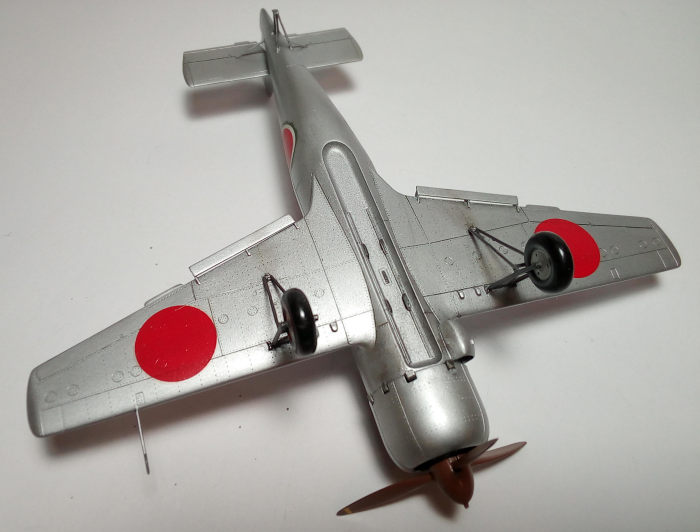 sing
Humbrol 226 for the green, 110 with minimal clear orange streaks for the
“wood” and Testors steel for the rest. Finally, I strongly believe the inner
cowling was left bare steel, so on with it too.
sing
Humbrol 226 for the green, 110 with minimal clear orange streaks for the
“wood” and Testors steel for the rest. Finally, I strongly believe the inner
cowling was left bare steel, so on with it too.
So, cockpit was assembled and painted as above. Drilled 6 oval holes to the
seat to look like the real one and applied the beautiful PE belts, as well
as the tiny photoetched dual cable exiting the throttle box and going
forward “towards the engine”.
Fitted the instrument panel. It's detail was raised and OK, but went a bit
further on and glued the PE face on top, followed by the decal provided,
finally snuggling down to the PE instrument holes nicely (with the aid of my
true friend, Mr Mark Softer).
Finished cockpit was trapped between the fuselage parts, them glued to the
top of the already assembled wing. Fit was generally good, with only a
slight fuselage/wing misalignment, my fault definitely, which was treated
with some sanding, with the inevitable loss of some detail. The oil cooler
(with nice PE mesh) was also glued in place.
The tailplane was next glued. Fit was excellent. The two supporting rods
looked poor, so I replaced them with needle pieces.
The engine was assembled next. It is nicely depicted with front and rear row
cylinders and pushrods, augmented by the PE harness. It was painted black
and then heavily drybrushed silver. The cowling was assembled/filled/sanded,
painted steel inside and received the engine, sans the delicate multi
exhausts that were painted Testors burned metal and left apart to be fitted
at the final stages.
Other “subassemblies” done were the two flaps, the intricate landing gear
legs (interestingly painted in a gun metal-ish colour, as shown in pics,
including the tail bar), the two wheels, the propeller (“propeller” brown)
and the two bombs (black).
Then it was the filling and sanding session. Filler was used here and there
(Squadron green-discontinued- now grey....- green is grey, as my local hobby
shop owner points out to me!) only at a minimum, as fit was good (apart from
my self induced fuselage/wing slight misalignment).
 Painted
the antiglare panel black and masked it. Then painted the two side engine
panels burned metal and masked them too.
Painted
the antiglare panel black and masked it. Then painted the two side engine
panels burned metal and masked them too.
Instructions call for the whole underfuselage bomb open half bay to be
painted gun metal. I think this is incorrect, deciding to paint it fuselage
color, only the bomb brackets depicted in gunmetal.
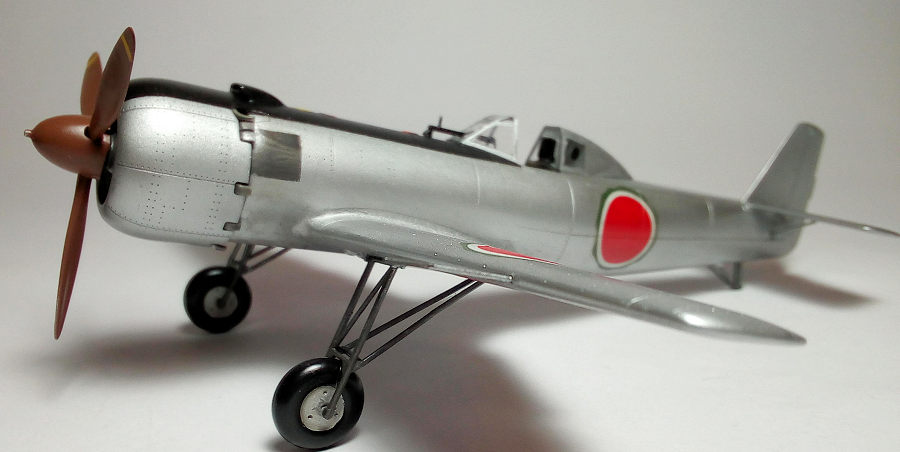
The Tsurugi sported steel fuselage, aluminum wings, wooden fin and
(possibly) elevators, aiming towards using less and less “strategic”
materials, as production line was moving on.
Apart from a small number painted green on top (could only find one pic with
one plane), the rest of the planes looked “silver” upon exiting the Nakajima
factory, meaning that the wooden parts were painted silver. As for the
aluminum and steel parts, due to the desperate circumstances, I believe that
they were left untreated.
I wanted to depict a plane that had exited the production line and finished
the (say three) test flights, parked inside the Nakajima factory and awaited
deployment. So I sprayed Humbrol 11 allover, aiming to tone it down with a
black wash (and bring the details up!) later on. Looked acceptable, so I
proceeded with the decals.
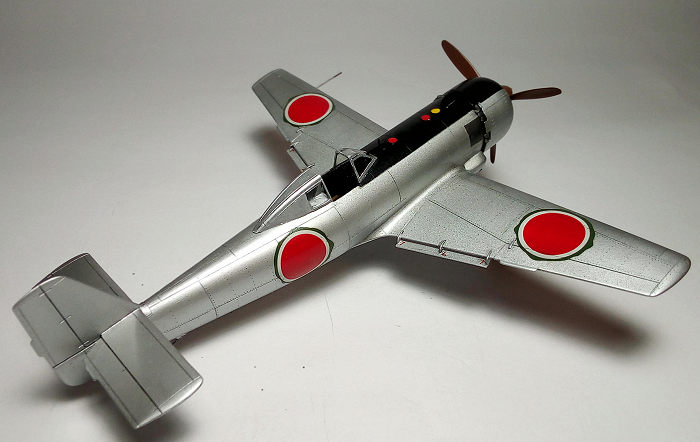
By studying existing photos, which are rare, the planes seem to wore three
“progressing level” camos. Of the 104 or 105 build, most exited the Nakajima
factory in NMF with solid red Hinomarus (let’s call it “first” level camo),
a few were NMF with green bordered wing top and fuselage Hinomarus (“second”
level camo), obviously to assist the green over grey camo to be applied at
the field, and a few seem to have their top (at least) with green colour
already applied (‘third” level).
I had not seen a lot of Tsurugis modeled with the green bordered Hinomarus
and, since Eduard surprisingly provided those, I chose to decal mine like
this.
After removing the masking tape and applying a coat of Future (yes, I do it
even in NMF, as it protects the “metal” layer from my not so gentle
actions...), I started decalling.
Decals went on like a dream, reacting slowly but positively to Mr Mark
Softer (kudos to Eduard). I then gave the model a black wash to tone down
the shine and bring up the beautiful engraved details (kudos again,
Eduard!).
 At this
time I painted the transparencies. Didn't use the nice masks provided, just
hand painted them (why changing the habits of a lifetime??!!).
At this
time I painted the transparencies. Didn't use the nice masks provided, just
hand painted them (why changing the habits of a lifetime??!!).
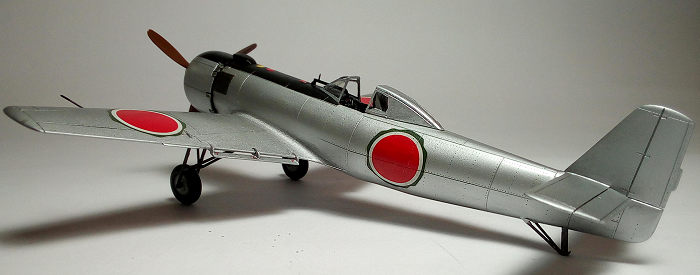
I did very slight weathering, limited to tyre, “underwing tyre induced” grim
and minimal engine exhaust stain, all done with pastels. My scenario of a
recently built plane suited me fine, as I am not very fond of weathering.
A final uneven mattish clear coat was finally applied, in order to seal
everything.
I installed the landing gear and glued the wheels. Some care must be taken
here, as the gluing surface between wheel and hub is minimal and
misalignment can easilly occur. Cyanoacrylate is strongly recommended.
The propeller was next fitted, together with a pitot tube at the port wing,
fabricated from a needle, as the styrene one was looking less sporty.
Finally the windscreen and canopy were fitted and called this mad beauty
done!
This was a relatively easy and simple kit to build, easily tackled by a
novice modeller, who can come with a nice looking OOB Tsurugi.
Of course the advanced (not yours truly) modeler will excel in the NMF and
general detailing areas and will produce a masterpiece.
Eduard has to be congratulated for producing this obscure less known plane
at this scale and at this quality. Never during the built I had the feeling
of dealing with a short run kit. Minor remarks were a slight mold
misalignment and the brittleness of some small parts.
The end result looks like a Tsurugi, bringing interesting thoughts in mind
about its suicide purpose and how it was implemented at its design and
manufacture with scarce suitable materials in the all-pervading desperation
climate.
Happy modelling!
https://en.wikipedia.org/wiki/Nakajima_Ki-115
Various internet sites (photos and info)
Spirios Pendedekas
27 October 2020Copyright ModelingMadness.com
If you would like your product reviewed fairly and
fairly quickly, please
contact
the editor or see other details in the
Note to
Contributors.
Back to the Main Page
Back to the Review
Index Page
Back to the Previews Index Page