
Brengun 1/72 Ta-Go
| KIT #: | BRP720-45 |
| PRICE: | $AUD$23.00 |
| DECALS: | One option |
| REVIEWER: | George Oh |
| NOTES: |
| HISTORY |
Twice, in 1274 and again in 1281, Japan faced the large Mongol fleet of Kublai Khan, who was coming to invade their islands. Each time, the sky generated a typhoon that destroyed many of the ships and scattered the rest, leaving the shipwrecked survivors to be slaughtered by Samurai. Japan was saved. They attributed the arrival of the winds to their gods, and named the wind, the Kamikaze/the Devine Wind.
Towards the
end of WWII, the Japanese Empire was facing the approach of another fleet - the
Allied fleet consisting of many assault, combat and support ships (of many
different types). Faced with that threat, coupled with dwindling resources and
manpower, their war-machine came-up with a simple, logical (but morally
unsupportable) conclusion. If a precise bomb-hit would sink or disable a ship,
then the best way to deliver it (as long as the Enemy don’t interfere with your
plans) was by a human hand (rather than a mechanical or gravitational means) –
one man and one bomb to kill one ship. Thus was born the concept of a new
Kamikaze in-which a pilot wou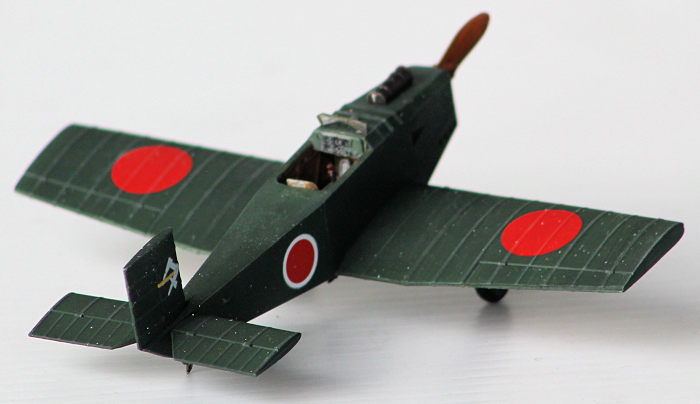 ld
dive his bombed-up plane onto a ship. Volunteers came forward because, who of
you wouldn’t put your life on the line, even while knowing that you probably
won’t come back, to protect your family, your home, your country, or freedom (as
you know it). Remember what ‘WNGCOMD Guy Gibson’ told ‘Barnes Wallis’ (after he
lamented to loss of 56 fine young men) in the heroic film 'The Dam Busters' –
“If all these fellow has known from the beginning they wouldn’t be coming back;
they’d have gone for it just the same. There isn’t a single one of them would’ve
dropped-out. I knew them all. I know that’s true.” The Kamikazes weren’t the
first cases of deliberate ramming in WWII. I first heard of it during the
Invasion of Poland.
ld
dive his bombed-up plane onto a ship. Volunteers came forward because, who of
you wouldn’t put your life on the line, even while knowing that you probably
won’t come back, to protect your family, your home, your country, or freedom (as
you know it). Remember what ‘WNGCOMD Guy Gibson’ told ‘Barnes Wallis’ (after he
lamented to loss of 56 fine young men) in the heroic film 'The Dam Busters' –
“If all these fellow has known from the beginning they wouldn’t be coming back;
they’d have gone for it just the same. There isn’t a single one of them would’ve
dropped-out. I knew them all. I know that’s true.” The Kamikazes weren’t the
first cases of deliberate ramming in WWII. I first heard of it during the
Invasion of Poland.
Any plane that could fly with a bomb, was pressed into service. Additionally, purpose-designed aircraft was also conceived. The most well-known was the Yokosuka MXY-70 Ohka/Cherry Blossom (or Baka/Fool, to the Allies) – a rocket-boosted glide-bomb with a pilot guiding it. Less well-known are the Nakajima Ki-115 (see here)and the Tachikawa-Kokusai Ta-Gō.
In 1944, CAPT Yoshiyuka Mizuyama of the IJA designed the Tachikawa-Kokusai Ta-Gō as a simple, easily-produced, cheap plane. Rejected, Mizuyama built it himself in a bombed-out factory, but the prototype was bombed. He simplified his design, resubmitted it, and was requested to simplify it even further before it was accepted. It was made from wood and fabric and had a fixed bomb & landing gear. The pilot sat in an open cockpit on a simple seat with no seatbelt/s. It had no fuel pump relying instead on a simple gravity-feed system. (I wouldn’t have flown one of these. They’re a bloody death trap). Its only extravagance was a simple wing- folding mechanism that would allowed it to be stored in small buildings or caves, till needed. Its small size and engine (non?)availability dictated a smaller-than-planned Hitachi Ha-47/11 110hp engine, which kept it slow, allowing it to carry only one (smaller than planned) 100kg bomb. So the Ta-Gō would have been flown against landing craft or tanks - if the war had continued.
| THE KIT |
 The kit
comes as a single sprue in an end-opening box. This is a limited-run kit of 1 x
clear bit and only 38 parts that show some mould-slip seams. There are no
alignment pins and only a few locating recesses/bumps. The basic cockpit tub
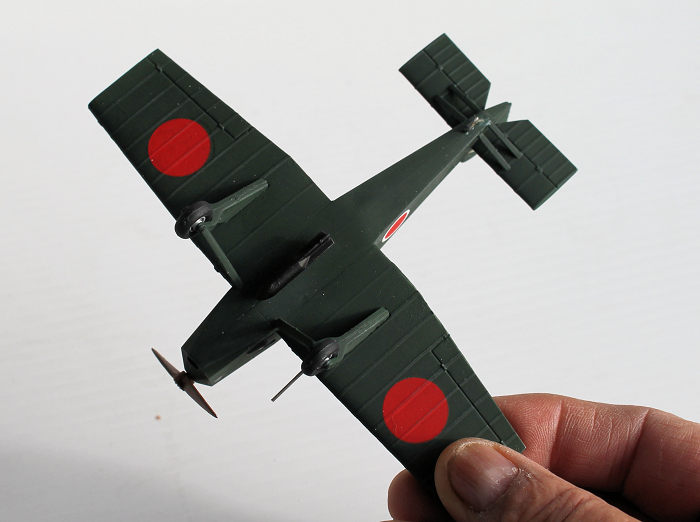
assembles from only 7 parts and no pilot is supplied. Each 2-piece wing has a
thick trailing edge that requires sanding-down, and the 6 support struts
(undercarriage and tail planes) are way too thick (but that’s plastic moulding
for you). The wheels could be made to turn, but the propeller can’t (unless a
little scratch-building is done). I would have liked the cowling straps to be
separate parts (to make sanding easier) and the 4 separate exhaust pipes moulded
as one piece (to make assembly easier).
The kit
comes as a single sprue in an end-opening box. This is a limited-run kit of 1 x
clear bit and only 38 parts that show some mould-slip seams. There are no
alignment pins and only a few locating recesses/bumps. The basic cockpit tub
assembles from only 7 parts and no pilot is supplied. Each 2-piece wing has a
thick trailing edge that requires sanding-down, and the 6 support struts
(undercarriage and tail planes) are way too thick (but that’s plastic moulding
for you). The wheels could be made to turn, but the propeller can’t (unless a
little scratch-building is done). I would have liked the cowling straps to be
separate parts (to make sanding easier) and the 4 separate exhaust pipes moulded
as one piece (to make assembly easier).
Instructions are on a double-sided A4-sheet and quite adequate. The decals consist of 6 hinomarus (with only the fuselage ones having a white border), a crest(?) for either side of the fin and an IP decal.
I bought it because I routinely support my LHS and because it is a different subject. I started building it because there is a local competition in 2 weeks, and I’d like to add another model to my entries. The only thing I planned to do was to replace the delicate pitot tube with a piece of bent wire.
| CONSTRUCTION |
In one afternoon, I painted all of the inside parts and sanded the insides of the wing trailing edges (hindered a little by the upward sweep of the wing tips). Dry-fitting showed me that the two cockpit bulkheads are waaaaay too wide, so I sanded them down, too. Before going to bed, I glued (and clamped) the wing trailing edges together and assembled the cockpit tub (to dry inside of the fuselage, to ensure the bulkheads were vertical, and that everything would fit). Next morning, I glued the rest of the wings together.
 To defeat
the fragility of the butt-joins, I resolved to pin as many of them as I could.
From the outside, I drilled onto the recesses for the wings and tailplanes,
right through into the fuselage, with a drill-bit suitable for the wires I’d be
using. After gluing the parts in-place, I drilled from inside the fuselage and
deep into the target item, before supergluing-in the pins. I should have started
with the wheel pants before attaching them under the wings – Rats!!!
Fortunately, they were all correctly aligned with each other. Filler was needed
along the fuselage seams. The wheel pants were next. I was careful to trim the
lower halves of the moulded-on rings that were to locate the axles of the
wheels. This would let me join the halves of the pants, and to fit-in the wheels
after painting. Finally, all of the struts were securely attached into their
positions (with plenty of glue). The large connecting surfaces and the sturdy
struts make the undercarriage very rigid.
To defeat
the fragility of the butt-joins, I resolved to pin as many of them as I could.
From the outside, I drilled onto the recesses for the wings and tailplanes,
right through into the fuselage, with a drill-bit suitable for the wires I’d be
using. After gluing the parts in-place, I drilled from inside the fuselage and
deep into the target item, before supergluing-in the pins. I should have started
with the wheel pants before attaching them under the wings – Rats!!!
Fortunately, they were all correctly aligned with each other. Filler was needed
along the fuselage seams. The wheel pants were next. I was careful to trim the
lower halves of the moulded-on rings that were to locate the axles of the
wheels. This would let me join the halves of the pants, and to fit-in the wheels
after painting. Finally, all of the struts were securely attached into their
positions (with plenty of glue). The large connecting surfaces and the sturdy
struts make the undercarriage very rigid.
| COLORS & MARKINGS |
This was easy. After plugging the open cockpit, I sprayed-on an all-over coat of Tamiya XF-11/IJN green. All details were brush-painted with Citadel miniatures paints. Thanks to the rim between the tire and the rim, painting the wheels was easy, thanks to a technique suggested by a modelling college (Hi D). After painting the hubs silver, I touched the tires with a black wash, which stopped at the rim. Later, I completed the blackening of the tires by enhancing the wash with straight paint.
 Each of the
minimalist decals went-on without fuss, on too of a small puddle of Future, and
under a light pressing with a damp sponge. And they conformed nicely to the ribs
of the fin and wings, but they are very glossy (so a coat of clear flat is
called-for). The white rim of the side decals reveals that they are a touch
out-of-register. A little white paint may help to explain why.
Each of the
minimalist decals went-on without fuss, on too of a small puddle of Future, and
under a light pressing with a damp sponge. And they conformed nicely to the ribs
of the fin and wings, but they are very glossy (so a coat of clear flat is
called-for). The white rim of the side decals reveals that they are a touch
out-of-register. A little white paint may help to explain why.
I hit the whole model with a coat of clear flat to tone-down the very-bright hinomarus (translation – Sun’s red disc), then lightly dry-brushed a bit of light grey over the raised ribs to make them visible. No weathering was done because I doubt that this class of aircraft was flight-tested before an operation.
There were only a few more bits to attach – those 4 separate exhaust pipes, the fuel tank, the pitot tube (a short length of small unbent tubing), tail skid, wind screen and the wheels. All went on without a fuss, though I elected to hold a piece of wood against the cowling to get the exhaust pipes to the same level. The last piece to be glued-on was the bomb’s pylon with its moulded-on. The bomb was painted in an unblemished black coat because it is as yet, unused. The prop was just pushed into place, because it is a VERY tight fit.
| CONCLUSIONS |
With a (large) bit of post-war R&D, and a (much) larger engine (with a fuel pump), this little plane could have become the progenitor of the microlight aircraft that proliferated in the 90s. Its folding wings would have made it attractive because it would have fitted better onto a box-trailer or a standard car garage.
This build was hindered by its limited-run nature, but was enhanced by the simplicity of the subject and the (usually) good fit of the parts. Apparently, there IS an after-market PE fret for this aircraft (but I ‘aint got one). I recommend it to modellers of all levels. Now I should build a 72-scale Ohka to sit beside it.
8 October 2024
Copyright ModelingMadness.com. All rights reserved. No reproduction in part or in whole without express permission.
If you would like your product reviewed fairly and fairly quickly, please contact the editor or see other details in the Note to Contributors.