| KIT #: | 72203 |
| PRICE: | $60.00 SRP |
| DECALS: | Four options |
| REVIEWER: | Ryan Grosswiler |
| NOTES: | 2022 New tool |
| HISTORY |
You cannot tell the story of Japanese military air operations 1937-45 without bringing up the Mitsubishi Ki-21. The bomber was initially conceived and specified during 1936 as a means of dealing with the vast distances posed by Japan's newly-seized territories in Manchuria, and a potential war against that other military power who shared these borders, the Soviet Union. The intent was to provide the Army with an aircraft which could carry large tactical bomb loads over these largely uninhabited distances and attack targets at the front line, the frontier between the nations' spheres of influence. This limitation in its military applicability would haunt the design later, when it was called to conduct more demanding tasks.
Prototypes for Mitsubishi's entry and Nakajima's competing design, the Ki-19, appeared in the first months of 1937. Several months of arm-wrestling over the production contract ended when the two manufacturers were instructed to switch to each other's engines, and Mitsubishi to adopt certain fuselage features from the Nakajima aircraft. The resulting modified Ki-21 pre-production aircraft won the competition when paired with Nakajima's Ha-5 engines. In spite of being subcontracted to produce the Mitsubishi aircraft as a consolation prize, Nakajima was deeply stung by this loss. For another dimension to the story that would follow, see my review of Hasegawa's Ki-49 elsewhere on this site.
The aircraft the new bomber replaced was the corrugated, open cockpit, and decidedly gothic Ki-1. Even as production was just getting underway the prototypes and preproduction Ki-21s were deployed to China, the comparatively sci-fi-looking aircraft were blended into front line units alongside the Italian bomber ordered as a stop-gap while production gained tempo, the Fiat BR.20.
 As the
new Ki-21-Ia was incorporated into the BR.20 formations in onsies and twosies,
it was embroiled in heavy combat action almost immediately. After the ghastly
fall of Nanking, the Japanese sought to keep their southeast momentum going with
attacks against the various sub-cities of the Wuhan area; the strategy being to
destroy the remaining Kuomintang military and governmental structure in the area
and at the same time neutralize this important railway hub for foreign aid.
Ki-21 operations began in the late summer and early fall of 1938 (sometimes in
cooperation with the contemporary IJNAF G3M 'Nells') with attacks against the
airfields, governmental seats, and limited industry of this area. Japanese crews
developed an immediate preference for the superior qualities of the domestic
aircraft, the BR.20 having only the edge in bombload.
As the
new Ki-21-Ia was incorporated into the BR.20 formations in onsies and twosies,
it was embroiled in heavy combat action almost immediately. After the ghastly
fall of Nanking, the Japanese sought to keep their southeast momentum going with
attacks against the various sub-cities of the Wuhan area; the strategy being to
destroy the remaining Kuomintang military and governmental structure in the area
and at the same time neutralize this important railway hub for foreign aid.
Ki-21 operations began in the late summer and early fall of 1938 (sometimes in
cooperation with the contemporary IJNAF G3M 'Nells') with attacks against the
airfields, governmental seats, and limited industry of this area. Japanese crews
developed an immediate preference for the superior qualities of the domestic
aircraft, the BR.20 having only the edge in bombload.
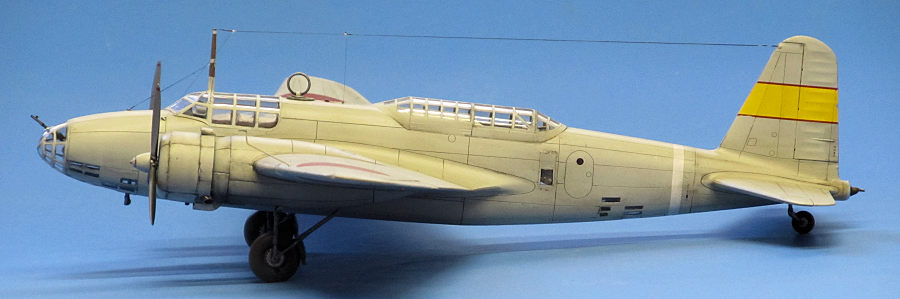
Despite retaliatory raids by the Chinese Air Force, the Japanese remained effective and by the end of the year Chinese air power (such as it was) had been temporarily muted, and the Ki-21 had acquitted itself well. There were concerns, however: the oxygen bottles had a tendency to explode at cruise altitude, killing/maiming crewmembers and damaging aircraft, and the IJAAF crews soon developed the alarming habit of conducting their missions while fighting the effects of hypoxia, having deactivated the system. Also, while combat losses remained sustainable, the Chinese fighter opposition's growing more numerous and aggressive had been felt, and a defensive blind spot was noted directly aft of the aircraft. This was addressed with a defensive 'stinger' in the reshaped tail cone in the succeeding -Ib version, as depicted in this kit.
Action in China proper was interrupted by the confrontation with the Soviets for which the Ki-21 had been designed in the first place, as a skirmish along the northern border of Manchuko and Mongolia developed into a brief but intense war late spring of 1939. This time the aircraft was operated in a mostly tactical role, attacking Soviet positions and supporting advancing Japanese troops, the flat terrain on more than one occasion allowing aircraft to rescue downed crews by simply landing next to them. But the Japanese were defeated, in part owing to the low state of readiness of their forces committed to that front, and the prewar borders reaffirmed.
By the end of September 1941, IJAAF units were only called into combat sporadically and Japanese ambitions shifted to the greater Pacific. The Ki-21 units mostly stood down to train, recuperate, and receive the new version of their aircraft, the -II with the more familiar bulged nacelles for the larger Ha-101 engine. But that's an entirely different story.
The old -I nonetheless lingered in small numbers in frontline IJAAF units alongside its succeeding model into the first half of 1942, and the Western Allies would encounter it briefly over the Philippines and Malay Peninsula as they suffered their legendary defeats during the Japanese advances there. This is also when the bomber would gain a name: "Sally". Afterward it was passed entirely to training and transport units, alongside its dedicated Ki-57 transport derivative, or service as a unit hack.
| THE KIT |
There's a bit of a story behind this kit, and I will tell you a shortened version so that you, Dear Modeler, get an inkling of all that went into this product release. Let's frame this with a little background: despite this aircraft type being the single most common twin in wartime Japan, the Ki-21 family has ruled for the past several decades as WWII's Single Most Underserved Modelling Subject.
There was, of course, the old Revell/Takara offering dating from 1975. This was a beautiful kit incorporating what was at the time truly cutting-edge injection molding technology...but unfortunately based on a bad set of drawings. Really bad. The model's bloated fuselage was topped with a cockpit canopy that looked like it had been stepped on. The engine cowls had too little taper. Its pot belly made it appear to sit too low. The list went on and on, and about all that could be said in the end about the kit's fidelity to the real Ki-21 is that its researchers did manage to get the wing planform correct. No matter ultimately, as the molds were lost at sea sometime in the early '80s.
 Twenty
years passed. Then, to the excitement of meatball buffs everywhere, Hasegawa and
Fujimi both announced and released a comprehensive series of Japanese
multiengine subjects in a steady flow spanning about five years, about '95-'00.
But, puzzlingly, the highly-marketable Sally was not among them. MPM then seemed
to come to the rescue in the early '00s with a Ki-21-II in both greenhouse and
turreted versions, but this depressingly only turned out to be a knock-off of
the old Revell kit with all its faults, plus the innovation of awful fit. By all
accounts it was a miserable build.
Twenty
years passed. Then, to the excitement of meatball buffs everywhere, Hasegawa and
Fujimi both announced and released a comprehensive series of Japanese
multiengine subjects in a steady flow spanning about five years, about '95-'00.
But, puzzlingly, the highly-marketable Sally was not among them. MPM then seemed
to come to the rescue in the early '00s with a Ki-21-II in both greenhouse and
turreted versions, but this depressingly only turned out to be a knock-off of
the old Revell kit with all its faults, plus the innovation of awful fit. By all
accounts it was a miserable build.
Another twenty years passed. While kit manufacturers the world over had meanwhile scraped the bottom of the barrel for new WWII subjects both obscure and fictional, still no Ki-21. The Revell and MPM kits reached a 3-digit demanding price in online auction sites.
Perennially annoyed, I finally went the proactive route and in the summer of 2021 began messaging every model kit manufacturer I could think of 1) advising them of the situation, 2) illustrating the sales opportunity, and 3) offering my research support and guidance, as I had been all along gathering and studying documentation for the aircraft in anticipation of a possible scratch-build. This was along with a definite signal of 4) steering clear of ANY thought of copying that old Revell kit, further warning of its extensive problems.
In response mostly there was silence, naturally. From Airfix I received a polite decline. From Sergey at Clear Prop! I got an enthusiastic email along with the oblivious declaration, "I have located a Revell kit and am ready to scan it—can you tell me what's wrong with it?" I duly sent a list and never heard from him again.
Then, that December, while sitting in the Lake Isabella Department of Motor Vehicles (chosen to avoid the hellish urban offices nearer where I live) waiting area to renew my driver's license, in came another email, this time from ICM of Ukraine. "Good morning, Ryan. We are interested in all versions of the Ki-21, including transport options...could you begin by describing version changes and sending drawings?" I was elated, and for the first and probably only time in my life sat in a DMV office in a state of positive euphoria. This is reflected in my driver's license photo: Ryan Grosswiler CA#A2541372 is visibly glowing, my normally stern facial expression split by a big 'ol joyful grin.
What followed over the next two months was a flurry of emails and "research papers" spelling out the differences of each sub-type. ICM especially needed clarification on the different window arrangements on the fuselage over the aircraft's production life. Chris Mikesh sent me some of his father's surviving collected works, which I duly forwarded. I got George E. from the Arawasi website involved for further embellishment and verification. An accurate kit was in work, and all seemed set for a kit production date that summer later that spring.
Then, the following February, a certain Mr. Putin sent his green-clad hordes blundering their way into ICM's home nation for the purpose of seizing and subjugating it. The conversation continued for a moment, but a week later, Putin's rabble appeared at the outskirts of Kiev, ICM's base of operations, and my friends there understandably but chillingly dropped offline.
 Unexpectedly, they reappeared as the overextended and professionally-challenged
Russians melted away from Kiev a month later. The project continued. Finally,
exactly one year after my memorable moment in the DMV, a delivery (totally
encased in ICM-printed packing tape) arrived on my doorstep. For the first time
ever in my modeling life I had received a 'Thank You' package from a plastic kit
manufacturer. Inside were two copies of their new Ki-21 and the matching paint
set.
Unexpectedly, they reappeared as the overextended and professionally-challenged
Russians melted away from Kiev a month later. The project continued. Finally,
exactly one year after my memorable moment in the DMV, a delivery (totally
encased in ICM-printed packing tape) arrived on my doorstep. For the first time
ever in my modeling life I had received a 'Thank You' package from a plastic kit
manufacturer. Inside were two copies of their new Ki-21 and the matching paint
set.
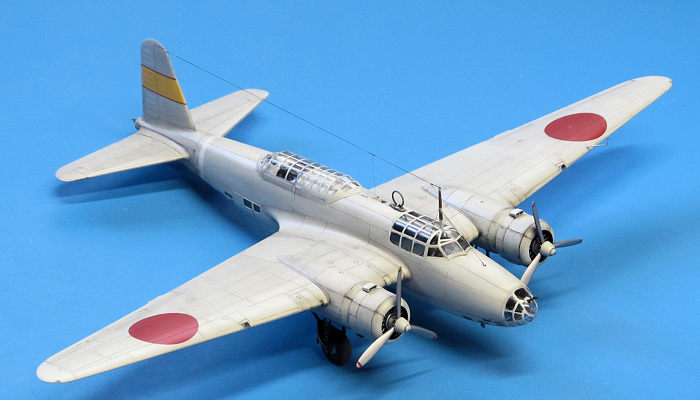
Scott wrote a good preview of this kit, so I'll only add a few things: Upon opening the box (featuring some slightly cartoonish but eye-catching artwork) I went straight for the canopy and dorsal greenhouse, the type's defining feature. These parts proved to be nicely shaped, sparklingly clear, thin, and quite free of optical distortion, almost to vacuform standards. The best the industry has to offer, in short. In the instruction booklet, ICM supplies a detailed masking template for these, nicely annotated, but without explaining its use in any other way. More on this later.
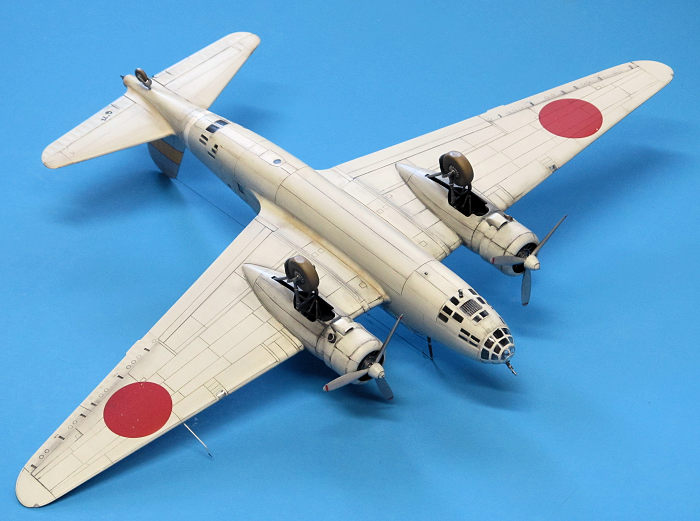
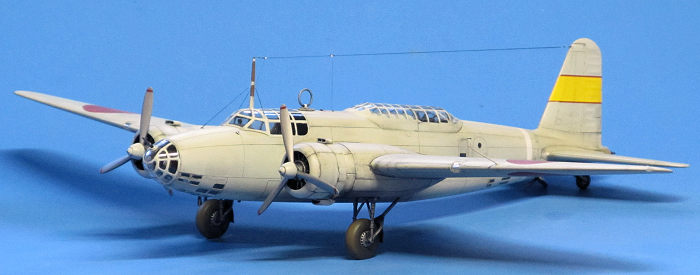
As molded, the kit represents a Ki-21-I Otsu, the second production subtype, still with the small Ha-5 cowls/nacelles and early wing sweep, but incorporating other changes after the preproduction aircraft and -I Ko examples ran into increasingly determined fighter opposition over China and more defensive firepower was added—including the distinctive tail 'stinger' that would feature in all remaining Ki-21 military production. Options are provided for some minor differences in window arrangement and gun stations, with lots of extra guns! The kit parts are broken down to provide for as many future versions as possible (at this writing a -Ia with the 'plain' tail cone is set for imminent release), but if ICM decides later on to do the more familiar -II with the bigger, bulbous engine installation I suspect the only common parts will be the fuselage halves and transparencies.
| CONSTRUCTION |
For the sake of this review, I built the kit in a casual manner, with little dry-fitting or other preparation. Throwing all caution to the winds, I followed the instructions. Except as noted.
The transparent canopy parts fit to their corresponding fuselage components (always best to find and correct any problems with these here and now) almost perfectly, BUT NOTE THIS: like their Fw-189 which I reviewed years ago, ICM has molded these parts with a very fine (about .3mm) flange around their perimeters to assist alignment during assembly. The sprue gates run straight into some of these, and it is absolutely essential that you take a few minutes to clear these out with a fresh blade and fine rattail file, or these parts will not seat correctly. This 'feature' is also present where the main gear support forks (Part D33) meet the mudguards.
Weirdly, I began with Step 1, which is bringing the forward fuselage and tail parts together with some internal bits. After allowing the cement to set up for about ten minutes, I skipped ahead to Step 20 and did likewise to the left fuselage half. This was done so I could then temporarily tape the two completed fuselage halves together and ensure they were aligned properly with each other. Set up this way, they were then allowed to cure thoroughly overnight.
Interior assembly and detail followed, Steps 2 through 25. I found it helped to trim away the flanging around the rear fuselage windows so they'd sit more flush with the fuselage exterior. I also added some lead foil seatbelts. There is scope to add a little detail here and there, but what ICM provides is more than adequate on the completed model with some careful shadowing and highlighting.
I then paused at Step 27 to mask, paint, and wash/highlight that interior before closing it up. Those gorgeous clear parts reveal quite a bit in the cockpit and dorsal gunner's areas, but the rest is mostly just shadowy shapes if it can be seen at all.
 Fuselage
halves were then joined and the joint scraped and sanded. Hardly any filler was
required here, just my usual line of grey primer applied by brush and
sanded/feathered around the entire joint to ensure that no seams appear later. I
think I could have skipped this step completely had I been more attentive in
monitoring the clamping and curing process. In fact, fit in general of this kit
is superior to the Hasegawa Ki-49 I built a few years back and approaches that
of the recent Tamiya products I have put together.
Fuselage
halves were then joined and the joint scraped and sanded. Hardly any filler was
required here, just my usual line of grey primer applied by brush and
sanded/feathered around the entire joint to ensure that no seams appear later. I
think I could have skipped this step completely had I been more attentive in
monitoring the clamping and curing process. In fact, fit in general of this kit
is superior to the Hasegawa Ki-49 I built a few years back and approaches that
of the recent Tamiya products I have put together.
The locating pins for the main wheel halves do not line up the parts correctly, so I simply sliced them off and joined the halves, temporarily slipping them on to the main landing gear to make sure the assembled wheel was straight as the cement cured. The wingtip position lights (E16 & 17) are too small, so two lengths of the kit's clear sprue were glued in and sanded/polished to contour. These were the only actual fit issues I ran into over the entire course of construction.
I applied the decal (#21) for the signal flag slots as a template to scribe them on the fuselage top properly. Also, ICM as molded the top and bottom formation lights ahead of the bomb bay and aft of the pilots' canopy integrally and offset; these were shaved off and replaced after the seams had been cleaned up.
Main gear construction is really complex, because the real airplane's gear was complex, and it should be done where called out in the instructions because it'll be difficult to access the attachment points later. The fit is a little inexact here, so check for/correct any alignment issues on all three axes after the cement sets up and leave the model suspended with the gear hanging straight down letting gravity do the work for you as the joints cure fully overnight. Your reward is a nicely represented and strong finished product. The support rods in Step 53 are in reality (to my eye) identical and interchangeable. I normally don't like attaching/painting the landing gear this early in construction but it didn't end up being a problem.
 On the
other hand, when assembling the engine nacelles, pay close attention to their
specific part numbers in the instructions: they are paired deceptively on the
sprues and there's nothing otherwise stopping you from joining the wrong parts
into incorrect subassemblies, dooming the model.
On the
other hand, when assembling the engine nacelles, pay close attention to their
specific part numbers in the instructions: they are paired deceptively on the
sprues and there's nothing otherwise stopping you from joining the wrong parts
into incorrect subassemblies, dooming the model.
Engines were painted and all remaining assembly was completed, no issues. There is a little exhaust collector-ring detail, and with some bold painting and dry-brushing work is visible on the completed model. I also took a moment to further drill out both exhaust pipes with the tip of my knife.
Per my usual practice, I augmented or replaced all the little antennas/guns other such sticky-outies with bits of brass rod along the way, as I build all my models to survive handling by the uninitiated. I strongly recommend that you do likewise at least to the tail wheel strut (on Part C2): it's molded very petitely and will break with anything more than the model's static weight on it. The frail little prop shafts could also stand replacement with sleeved brass.
| COLORS & MARKINGS |
As I believe most western modelers will do, I puzzled over how to use the supplied masking templates for a few days. "Thanks, ICM...but, uh...what exactly do I do with this?"
After
some experimentation, I came up with the following procedure: 1) made several
photocopies of said masking templates, 2) applied to the backs of each a little
spray adhesive, such as Elmer's or Loctite (3M Super 77 is too strong). Just a
little bit here—only enough to get the templates to lay flat on 3) strips of
Tamiya tape on a cutting
 mat. I then 4) cut the mask for each pane out one at a
time. Done right, the paper template then falls away or is easily peeled off,
and the mask beneath applied like any other.
mat. I then 4) cut the mask for each pane out one at a
time. Done right, the paper template then falls away or is easily peeled off,
and the mask beneath applied like any other.
I was dubious at first, and it took a little practice to get the technique down, but once I got the hang of it ICM's supplied templates really sped things along, and working on it for about 45 minutes after work over a week, I was done. Aftermarket manufacturers are already falling all over themselves to supply masks, but I suspect these will sell out quickly, so the templates remain a good option: they probably cut the time required for this task in half.
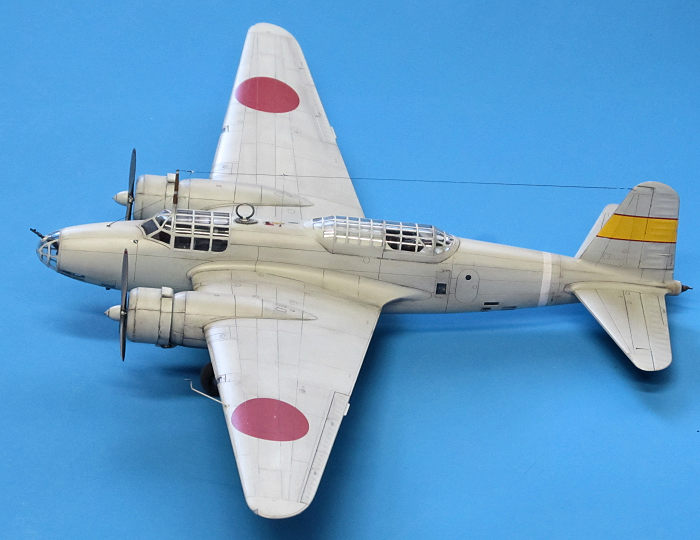
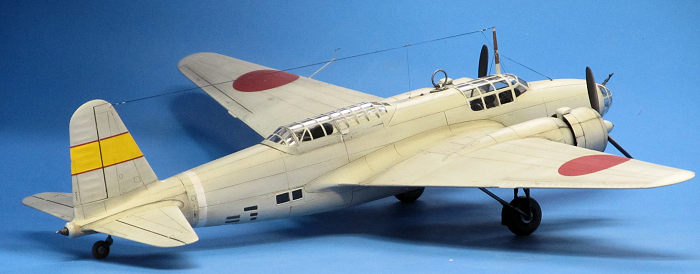
For finishing I chose one of the four overall IJA green-gray schemes offered, as I didn't have such colors in my lineup. To avoid a boring finish, I used the dissimilar-greys technique. Five or six panels were picked out from each upper wing surface and another two or three on the horizontal stabilizers; these were masked and airbrushed a slightly lighter shade of the base green-grey. It doesn't show up in my photographs very well but is nonetheless effective in breaking up the monochromatic color and making things rather lively.
A gloss coat was applied. Decals were excellent: glossy, dead-accurate register, solid color density, no visible carrier film. They slid right into place—no issues of fragility—and sucked right down enthusiastically into the model's surface detail with Micro-Set and Micro-Sol. My standard weathering process of oil wash, pastels, and metallic highlighting followed.
If you don't like decaling, you can skip this step entirely as the -I was photographed in China several times with no markings whatsoever, just that overall green-gray. Also, as a sidebar note, if you don't like the gray schemes there are camouflaged options possible with the included decals. Or—for something really offbeat—a Royal Thai Air Force example! ICM has already announced these as future releases.
The Ki-21 had a fairly complex spiderweb of radio aerials around the pilots' canopy. This was carefully replicated with EZ Line and Uschi van der Rosten products.
| CONCLUSIONS |
Finally! A superb kit of this important aircraft. ICM has filled an egregious gap...and it's a sweet build, to boot! Simply mind the minor points of concern above and in short order you as well will have that elusive Ki-21 in your lineup.
I know, I know: I'm not exactly an impartial reviewer in writing this glowing product review, but it's the specific sensation of RELIEF that is the giveaway here: when you're so closely involved with a project's development, you bear some responsibility for the result. As I indicated above, the general feel during the build itself was superior to Hasegawa kits of similar subjects and much of the time felt very much like the recent Tamiya offerings I've put together. Whatever problems ICM had in the past with engineering a well-fitting kit have been resolved.
A lot of you are probably waiting for ICM to release the more common -II version of this aircraft, as encountered by the Western Allies after 1941. You needn't. This is one of those rare kits that wants to be built, an enjoyable process that it has the power to whet one's appetite for more of its subject matter; early war, pre-war, aviation of Japan, whatever 'special interest' you consider the subject to be. Recommended for anyone with a dozen or so injected kits under their belt and those who don't fear all the masking.
A reminder is due here about the conditions under which this kit was produced—under enemy bombardment. The people who made this product are lacking heat and electricity from time to time, not to mention the persistent threat of violent death. Give that little 'factoid' some thought.
Thank you, ICM, for responding to my email in the most generous way possible.
| REFERENCES |
Sources are surprisingly thin for this aircraft even in the Japanese market. For those of us in the Western world there's really only one viable title: the Arawasi "Eagle Eye" book. While expensive, especially for a softcover, you do get what you pay for with type development, detailed unit histories, personal accounts, lots of gorgeous side view and some top color profiles, plus an extensive section of technical description with two complete five-view 1/72 drawing sets, one each depicting a -I and -II, and lots of interior/detail photographs and scrap views. All this is original research drawn from Japanese sources, not warmed-over derivation of the work of aviation historians from 50 years ago!
The other titles (all out of print and expensive) are really only worthwhile if you're planning a full-blown Ki-21 family in your lineup and need absolutely every last published photo and scrap of data on the type.
Eleftheriou, George, et al. Eagle Eye Series #3. arawasi-wildeagles.blogspot.jp 2021
Author Unknown. Mitsubishi Army Type 97 Bomber. Maru Mechanic #29. 1981.
Yuzawa, Yutaka, Chief Editor. Army Type 97 Heavy Bomber. Bunrin-Do Publications, Tokyo, Japan. 2013
Francillon, Rene J. Mitsubishi Ki-21. Profile Publications, Surrey, UK. 1967
2 January 2023
Copyright ModelingMadness.com. All rights reserved. No reproduction in part or in whole without express permission.
If you would like your product reviewed fairly and quickly, please contact the editor or see other details in the Note to Contributors.