Hasegawa 1/48 Ki-44-II Hei
|
KIT # |
JT 134 |
|
PRICE: |
$25.00 |
|
DECALS: |
See Review |
|
REVIEW & |
Mark Gran |
|
NOTES: |
Jaguar/Eduard interior set used |
|
HISTORY |
In 1938 the Imperial Japanese Army approached the Nakajima Aircraft Company on the potential development of a high-speed interceptor. Speed was stressed in the aircraft’s design over maneuverability which is obvious with the initial incorporation of the HA-41engine (and later the Ha-109 engine), the largest available at the time of the design and originally intended for bomber type aircraft). The aircraft became known as the Ki-44 Shoki and was adopted in 1942. Towards the end of the war, most Ki-44’s were used primarily for Home Defense over Japan against the onslaught of the B-29’s.
|
THE KIT |
 Upon opening the box the modeler is subjected to the
standard Hasegawa offering. All parts trees are bagged together with the clear
parts placed in a separate bag along with the decals. There are two different
windscreens offered with the kit so the modeler can either build a Ki-44 with a
telescopic sight or not. There are two different decal options, one for the 1st
Flight Training Squadron/Hitachi Flight Training Division. This aircraft has a
nice bright red lightning bolt outlined in white (as depicted in the box art)
with the hinomarus outlined with a white surround. This aircraft is IJA Green
uppers with Aluminum undersurfaces. The second aircraft depicted is from the
Akeno Flight Training Division with standard home defense markings. The decals
are typical Hasegawa offering, the wing leading edge yellow ID band is offered
in multiple pieces (which I didn’t like, more on that later). The white for the
surround on the hinomaru is offered as a single circle that is used as backing
for the red portion. The white home defense bands are offered as decals as well.
Hasegawa also provides decals for the antiglare panel for those folks who don’t
want to paint this. All other markings are pretty straightforward.
Upon opening the box the modeler is subjected to the
standard Hasegawa offering. All parts trees are bagged together with the clear
parts placed in a separate bag along with the decals. There are two different
windscreens offered with the kit so the modeler can either build a Ki-44 with a
telescopic sight or not. There are two different decal options, one for the 1st
Flight Training Squadron/Hitachi Flight Training Division. This aircraft has a
nice bright red lightning bolt outlined in white (as depicted in the box art)
with the hinomarus outlined with a white surround. This aircraft is IJA Green
uppers with Aluminum undersurfaces. The second aircraft depicted is from the
Akeno Flight Training Division with standard home defense markings. The decals
are typical Hasegawa offering, the wing leading edge yellow ID band is offered
in multiple pieces (which I didn’t like, more on that later). The white for the
surround on the hinomaru is offered as a single circle that is used as backing
for the red portion. The white home defense bands are offered as decals as well.
Hasegawa also provides decals for the antiglare panel for those folks who don’t
want to paint this. All other markings are pretty straightforward.
|
CONSTRUCTION |
In talking with my good friend Steve Mesner, we have both
been talking about building a Ki-44 as part of our ‘Nice and Easy’ train of
thought (I build ‘em nice and Steve builds them easy). Well, since those
discussions of multiple projects, this is the first one that I have finished. A
P-40N and A-20G were left to the dust due to some unforeseen set backs (this
takes to long to explain, both kits did survive their frustrated builder and are
patiently waiting for me to get back to them).
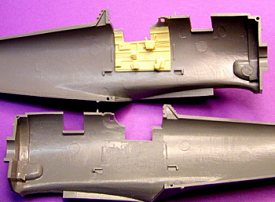
I had intended to install the Jaguar cockpit detail set so
I was ready to perform some surgery. I started off with the cockpit and cut out
the side emergency/access doors so that I could show these items lowered on the
finished kit. I also ground down the sidewall detail so that I could install the
new sidewalls from the Jaguar offering. Out came the Dremel and “POOF” that was
done. The new sidewalls were installed with no major fuss and were an
improvement over the detail in the kit. When it came to the seat and aft bulked,
I wasn’t impressed with the Jaguar bits since they seemed only to be copies of
the kit parts with only the belts added to the seat, this is when I went and
purchased the Eduard interior set. I folded the seat to shape and added the lap
belts leaving off the shoulder harness. I haven’t been able to find anything
definitive one way or another 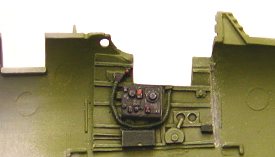 whether this aircraft carried the shoulder harness
so I left it off. The kit instrument panel was painted and detailed since I
thought the resin part from the Jaguar set was not any improvement over the kit part(s). Originally I was going to use the Eduard aft bulkhead but when I glued
it in, it did not give me the support I wanted for the aft portion of the
cockpit floor so I used it as a template for the lightning holes and modified
the kit part.
whether this aircraft carried the shoulder harness
so I left it off. The kit instrument panel was painted and detailed since I
thought the resin part from the Jaguar set was not any improvement over the kit part(s). Originally I was going to use the Eduard aft bulkhead but when I glued
it in, it did not give me the support I wanted for the aft portion of the
cockpit floor so I used it as a template for the lightning holes and modified
the kit part.
Once all of this was done, I painted up the floor, seat,
sidewalls and front bulkhead Nakajima Interior Green. The color I use is a
custom mix based on the color chip (N33) provided in the Monogram Japanese
Aircraft Interiors. Interesting enough, there is nothing definitive on what the
actual color of the cockpit is from the Monogram offering. Until solid
information comes forth, I think it’s safe to say that a modeler
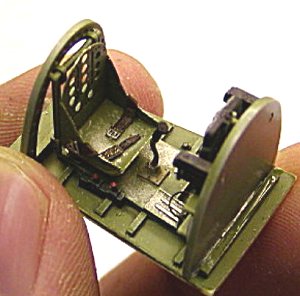 can either
painting the cockpit Aotake (since the aircraft was built almost at the same
time as the Ki-43), Nakajima Interior Green or left natural metal. The one
picture that is provided in the Monogram book shows the cockpit painted so this
is what I did (call it artistic license). After the usual detail painting of all
of the little goodies, the cockpit floor assembly was glued to the right
fuselage half. I also thinned out some vents from the inside of the kit so I
could attach the photoetch grills provided in the Eduard set. Once this was
done, the left fuselage half was glued to the right side. Fit was GREAT, no
filler was needed at all on any of the seams, so far I was a happy camper. I cut
off the rudder since I was going to use the replacement rudder offered in the
Jaguar set.
can either
painting the cockpit Aotake (since the aircraft was built almost at the same
time as the Ki-43), Nakajima Interior Green or left natural metal. The one
picture that is provided in the Monogram book shows the cockpit painted so this
is what I did (call it artistic license). After the usual detail painting of all
of the little goodies, the cockpit floor assembly was glued to the right
fuselage half. I also thinned out some vents from the inside of the kit so I
could attach the photoetch grills provided in the Eduard set. Once this was
done, the left fuselage half was glued to the right side. Fit was GREAT, no
filler was needed at all on any of the seams, so far I was a happy camper. I cut
off the rudder since I was going to use the replacement rudder offered in the
Jaguar set.
The wings went together with nothing major to report here. When I joined the wings to the fuselage here is where I ran into my first hiccup, the left wing met the fuselage side with no gap or step, the right upper wing section gave me 1/32 inch gap which was filled with some sheet styrene. This was sanded, mudded, sanded and then all panel lines rescribed. All in all it wasn’t anything major and more than likely could have been solved with a spreader on the inside of the forward fuselage. The horizontal stabs were glued on with only Mr. Surfacer 1000 dabbed in the seam (minor as it was) and then sanded down.
Next came the cowl. What can I say about the cowl other than it didn’t fit. The upper cowl on my kit sat about 1/64 above the forward deck and the lower portion of the cowl sat about 1/64 below the lower section of the forward wing assembly. I broke out the heavy file and solved the upper cowl issue smoothing out the surface with various grades of sandpaper. The lower cowl was somewhat dealt with by slightly sanding down the forward wing assembly to match as close as possible the cowl. The side of the cowl is a tad fiddly but can be centered with nothing major here. The cowl would be glued on after the aircraft was painted.
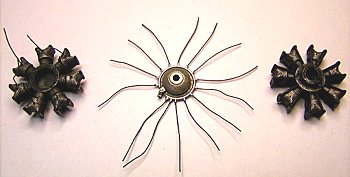 The engine I decided I was going to go to town on since
you could see it with that nice open cowl. I started off drilling holes with a
#79 drill in all of the cylinders where the plug wires would be entering. Next
came the “interesting” part. I wanted to used the kit ignition harness so I
ended up strapping on the magnifying glasses and drilling out each individual
nub with a #79 drill, this took awhile since I didn’t want to screw up the kit
part and, well, get myself into a pickle. Once this was done, .005 lead fishing
wire was added to the ignition harness and the front of the back cylinders. I
love using this stuff since it is more forgiving that brass wire in my opinion
(for what that’s worth). The engine was painted up, washed, dry-brushed and
glued together.
The engine I decided I was going to go to town on since
you could see it with that nice open cowl. I started off drilling holes with a
#79 drill in all of the cylinders where the plug wires would be entering. Next
came the “interesting” part. I wanted to used the kit ignition harness so I
ended up strapping on the magnifying glasses and drilling out each individual
nub with a #79 drill, this took awhile since I didn’t want to screw up the kit
part and, well, get myself into a pickle. Once this was done, .005 lead fishing
wire was added to the ignition harness and the front of the back cylinders. I
love using this stuff since it is more forgiving that brass wire in my opinion
(for what that’s worth). The engine was painted up, washed, dry-brushed and
glued together.
There is nothing really outstanding to talk about when it comes to the landing gear, pretty straight forward even though the main tires suffered from some pretty deep injector pin marks that took a while to fill with CA and sand down. All that was added to the gear were brake lines from the same .005 lead fishing wire.
The rudder was painted separate from the aircraft and once dry, I added the hinge points and a small control cable to the left side of the rudder since it was going to be kicked over to the right and yes, the rudder pedals in the cockpit are deflected accordingly : )
|
PAINT & MARKINGS |
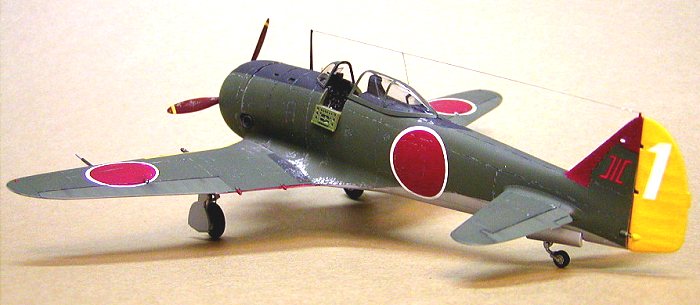
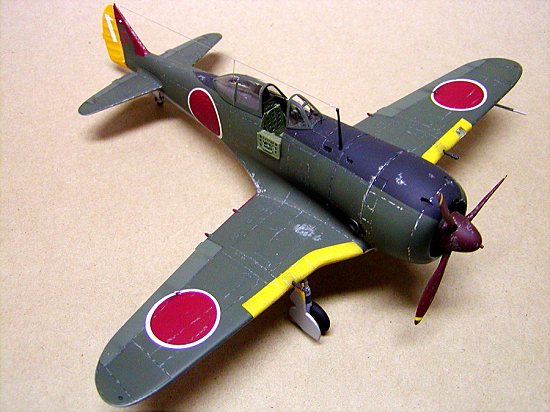
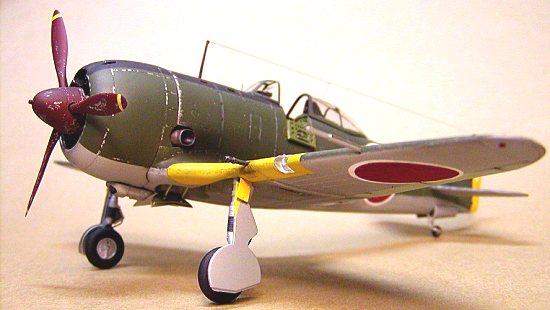
I wanted to do a bird that was pretty beat up so once again
Steve Mesner came to my rescue. He had some spare Ki-44 decals for an aircraft
that was reported to be IJA green “severely chipped.” So with that being said,
off to the model den I went to start painting. I applied Floquil Old Silver to
the entire aircraft and let this dry overnight. The next day this was masked off
and Model Master IJA Green was painted over this. I had intended to use some
tape to “chip” the IJA Green off of the silver, this was not to be. The IJA
green had bonded VERY well to the silver and was not about to chip. Oh well, in
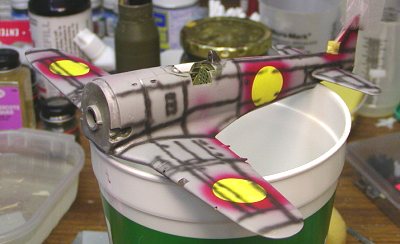 hindsight I should have used an acrylic over the Floquil, next time I guess. The
control surfaces were masked off on the lower portion of the wing and horizontal
stab and painted IJA Gray-Green, the upper portion of the control surfaces were
painted in a lightened IJA Green for that weathered fabric control surface
effect. The anti-glare panel was masked off and painted MM Cockpit Black since I
thought that straight Flat Black looked too dark for scale.
hindsight I should have used an acrylic over the Floquil, next time I guess. The
control surfaces were masked off on the lower portion of the wing and horizontal
stab and painted IJA Gray-Green, the upper portion of the control surfaces were
painted in a lightened IJA Green for that weathered fabric control surface
effect. The anti-glare panel was masked off and painted MM Cockpit Black since I
thought that straight Flat Black looked too dark for scale.
 At this point, the model was left to dry overnight. The
next day can only be summed up as “The Disaster.” It all started with a gloss
coat of Testors Gloss Coat which I let dry, no worries so far. I applied the
lower hinomarus with some Solvaset and left her to do its thing. Came back,
decals were sucked down and looked great. Went and applied the upper hinomarus,
they crinkled (no worries), they wrinkled and warped (no worries) and I left
them to dry. When I came back the next day, well, let’s just say they looked
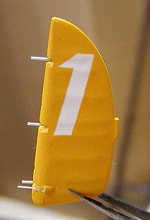
like prunes AHHHHH. At this point I decided to strip the aircraft back down to
bare plastic, start over and paint the markings on. I won’t bore you with all of
the details but let’s just say that after much masking; the ONLY decals on this
entire model are the markings on the face of the vertical stabilizer. The
Hinomarus, leading edge ID stripes, rudder and leading edge of the vertical stab
are painted.
At this point, the model was left to dry overnight. The
next day can only be summed up as “The Disaster.” It all started with a gloss
coat of Testors Gloss Coat which I let dry, no worries so far. I applied the
lower hinomarus with some Solvaset and left her to do its thing. Came back,
decals were sucked down and looked great. Went and applied the upper hinomarus,
they crinkled (no worries), they wrinkled and warped (no worries) and I left
them to dry. When I came back the next day, well, let’s just say they looked
like prunes AHHHHH. At this point I decided to strip the aircraft back down to
bare plastic, start over and paint the markings on. I won’t bore you with all of
the details but let’s just say that after much masking; the ONLY decals on this
entire model are the markings on the face of the vertical stabilizer. The
Hinomarus, leading edge ID stripes, rudder and leading edge of the vertical stab
are painted.
|
FINAL CONSTRUCTION |
Once all of the markings were painted on, the entire model was sprayed with Testors Dullcote to even out the paint. All paint chipping was done with a silver pencil and a 00000-paint brush. Even though not as chipped as the Aeromaster decal instructions show, I figured at one point in her life, this aircraft didn’t look like she has sat out in the middle of a sandstorm for 3 weeks, again call it artistic license. Exhaust staining was done with Tamiya Clear Smoke covered with Testors Dull Coat. The canopy and gear were attached and stretch sprue added for the antenna wire.
|
CONCLUSIONS |
 This little kit despite a few very minor fit issues was a
joy to build, in fact, the only place I used any filler was the right wing root
and the horizontal stabs (wasn’t really needed). The majority of the time was
spent on painting only due to the fact of “The Disaster.” If you intended to
build her straight out of the box, you can still build a very nice looking
aircraft, she doesn’t need much. I’m still perplexed why one set of the lower
decals went on absolutely wonderfully when the upper set decided to imitate some
dried fruit? Oh well, not going to worry about it now. Would I build another,
YOU BET. But before that happens I need to build my Ki-27, Ki-43, Ki-61, A5M4,
A6M2, A6M5…well, you get the drift :) I’m just glad I have a Ki-44 sitting on
the shelf. Now, where that Monogram 48th B-29?
This little kit despite a few very minor fit issues was a
joy to build, in fact, the only place I used any filler was the right wing root
and the horizontal stabs (wasn’t really needed). The majority of the time was
spent on painting only due to the fact of “The Disaster.” If you intended to
build her straight out of the box, you can still build a very nice looking
aircraft, she doesn’t need much. I’m still perplexed why one set of the lower
decals went on absolutely wonderfully when the upper set decided to imitate some
dried fruit? Oh well, not going to worry about it now. Would I build another,
YOU BET. But before that happens I need to build my Ki-27, Ki-43, Ki-61, A5M4,
A6M2, A6M5…well, you get the drift :) I’m just glad I have a Ki-44 sitting on
the shelf. Now, where that Monogram 48th B-29?
|
REFERENCES |
Monogram Japanese Aircraft Interiors by Robert C. Mikesh
If you would like your product reviewed fairly and quickly, please contact me or see other details in the Note to Contributors.