|
KIT: |
Starfix 1/72 A6M Zero |
|
KIT # |
? |
|
PRICE: |
If you paid for it, it was too much |
|
DECALS: |
1 option, tattoo style |
|
REVIEWER: |
Mark Fordham |
|
NOTES: |
Really, really accurate |
|
HISTORY |
No
other aircraft surpasses the Mitsubishi A6M Reisen ("ree-sin," Japanese
for Zero Fighter) as the symbol of Japanese air power during World War
II. Mitsubishi designed the Zero fighter but co-produced the airplane
with Nakajima. The two
 companies
built more than 10,000 Zeros between March 1939 and August 1945. Design
work began in 1937 when the Japanese Navy staff directed Mitsubishi and
Nakajima to submit proposals for a new aircraft to replace the Mitsubishi
A5M carrier fighter (Allied codename CLAUDE). Combat trials began in
China during July 1940 and by fall, Zero pilot's felled nearly 100
Chinese aircraft for the loss of only two Zeros to friendly fire.
companies
built more than 10,000 Zeros between March 1939 and August 1945. Design
work began in 1937 when the Japanese Navy staff directed Mitsubishi and
Nakajima to submit proposals for a new aircraft to replace the Mitsubishi
A5M carrier fighter (Allied codename CLAUDE). Combat trials began in
China during July 1940 and by fall, Zero pilot's felled nearly 100
Chinese aircraft for the loss of only two Zeros to friendly fire.
Japanese naval aviators flew 328 combat-ready A6M2 Reisens against American forces at Pearl Harbor and in the Philippines. The Reisen totally outclassed all Allied fighter aircraft for the first six months of the war until American carrier forces stopped the Japanese in the Coral Sea and at Midway in May and June 1942. The loss of four Japanese aircraft carriers at Midway underscored a deadly trend. The Japanese were losing experienced pilots and aircraft faster than they could replace them. Yet for almost two more years the ZEKE, as the Allies code-named it, remained an ominous threat.
History “borrowed” from NASM as I’m generally too lazy to do history.
|
CONSTRUCTION |
Starfix …there I said it now and I just feel dirty. Mention Starfix to any modeller and watch their reaction! Most will snort or make the same sort of noise only possible by a 4 year old boy, then say “whatcha wastin ya time with dem fur?” (said in a broad Kiwi accent after three or four Lion Reds) BECAUSE! I reply, then stoped to think why did I really spend three weeks of my modelling time working on a toy? Why indeed? After a few more moments though and another bottle of Red I had the answer, BECAUSE So there!
Step 1 “Ma where the chainsaw?” or Construction starts after you stop giggling at the contents of the box and remove the fuselage pieces from the sprues using a diamond tipped cutting wheel, boy this plastics hard. The floor, highly detailed seat and Mr Melt man Pilot were extracted from the sprues glued together and set aside, only to fall apart as the plastic was immune to MEK. Reglue Mk II with super glue. Sit, staaaay good seat! With the interior held together with 5 grams of CA it was time to paint the details and do the usual drybrushing to bring out the incredible detailing on the cockpit side walls and instrument panel, NOT.
 Step 2 consists of
opening a draw and quickly hiding all evidence of the Starfix kit off my
desk because two of my modelling buddies decide to drop in unannounced
due in part to the fact that they knew that the beer fridge had just been
restocked.
Step 2 consists of
opening a draw and quickly hiding all evidence of the Starfix kit off my
desk because two of my modelling buddies decide to drop in unannounced
due in part to the fact that they knew that the beer fridge had just been
restocked.
Step 3 or “It’s not that small ….its just cold” With the fuselage glued together and the fist prototype flight across the room Mr melt man test pilot informed me that there wasn’t a lot of room in there and had I been drying the planes in the cloths drier again, sure ‘nuf on consultation with highly detailed plans and mountains of reference material, well not really I held it up against the Acadamy Zero and found to my surprise that the Starfix Zero is about 10% smaller in length and wingspan, now there’s a surprise. Starfix got it wrong Stop Press!
Step 4 “Slot A into Tab B” The one piece lower wing was prised from the sprue using my new Pro Mac 335 and mated to the two top wings, pay
careful attention to the instructions while doing this step, also pay particular attention to preserving the fine scale detail on the wings. With the Main wing on fill the small resulting gaps with Mr 2004 grinding paste and set the major assemblies aside to dry over a rack of braised lamb.
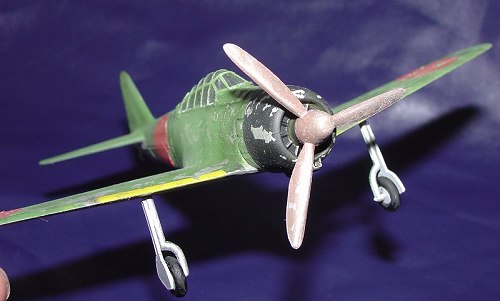
Step 5 “get yer gear off” With the “Z” almost ready for the paint shop the only thing need to be added at this stage was the undercarriage, now Starfix have made a common mistake, they have moulded the oleo struts uncompressed so they are slightly too long, by cutting 9mm out of the length of the leg I got the correct height for a zero under operational weight with a full load of fuel, ammo, pilot and three packets of two minute noodles, with the sit of the Zeke right it was off to the paint shop.
|
COLORS AND MARKINGS |
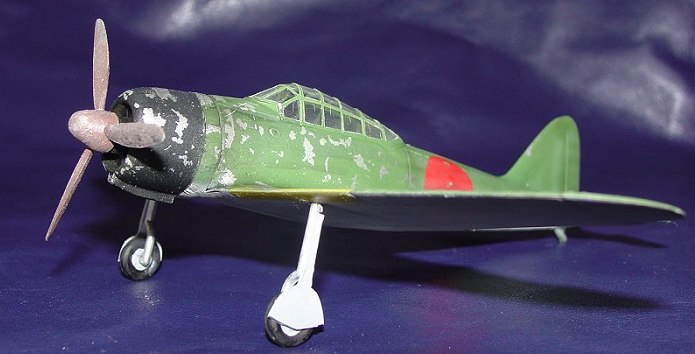
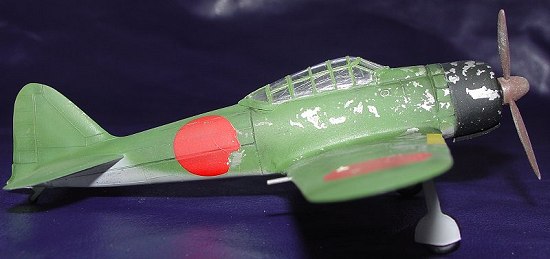
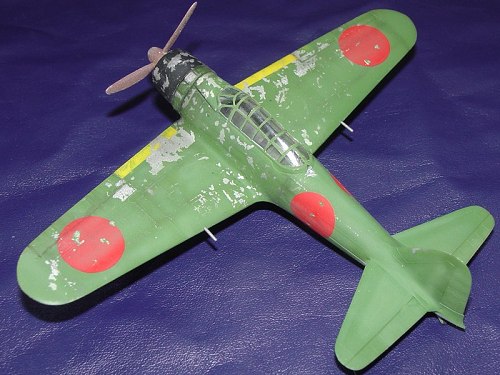
Step 6 “Paint me Mama” Ignoring my wifes suggestion of painting the Zero purple with lime green meatballs I first painted the airframe with Alcad III more commonly known as Tamiya Chrome silver and set it aside to harden for 3 minutes, With the silver nice and hard I gunned a coat of Citadels green acrylic over the upper surfaces of the “Z” and left to dry. Tamiya gray was used for the underside and on this particular aircraft the camouflage edge was soft so no masking was needed. The Yellow ID bands were masked up and sprayed using Humbrol enamel and the finally the nose was painted using Tamiya flat black.
 Then came the fun
part, using masking tape I dabbed the sticky tape over the paint and
pulled off chunks of paint to depict the paint flake so common on
Japanese equipment (like my Suzuki Swift) once I was satisfied with the
results the paint was sealed with a heavy coat of gloss varnish from a
spray bomb in preparation for the decals.
Then came the fun
part, using masking tape I dabbed the sticky tape over the paint and
pulled off chunks of paint to depict the paint flake so common on
Japanese equipment (like my Suzuki Swift) once I was satisfied with the
results the paint was sealed with a heavy coat of gloss varnish from a
spray bomb in preparation for the decals.
Step 7 “Want Pasta with them Meatballs Mister?” the decals that come with the Starfix Zero are perfectly in register, comprehensive and some of the best decals ever released with a commercial kitset. And my name is Pinocchio. You know those fake Tattoo’s that the kids of today like (well I hope there fake) Starfix’s decals consist of 6 meatballs that you offer up to the surface and sponge water onto the back of the decal sheet until such time as the decal departs company from paper …err no it doesn’t. Time to raid the decal stash. Now I don’t do a lot of Jap aircraft and I could only lay my hands on 4 meatballs of the correct size but what the Hay, this kits so accurate and detailed people are going to overlook the generic markings anyway.
With the decals on it was time for the final weathering, now normally I like to weather my planes the traditional way, by leaving them out in the sun for 4 or 5 years until the paintwork gets that nice patchy, oxided look but as this was on a strict deadline so I had to fake it with paint. By adding a couple of drops of gray paint into the left over green and lightening it by about 10% I went back and filled in the panels on the wings and fuselage with the faded paint, once happy with the results a very thin coat of tamiya smoke was misted over the whole plane to tone down the fading and cut back the brightness of the bare metal.
Step 8 A couple of thin coats of matt Kote were sprayed over the Zero to kill the gloss varnish and with the addition of the superbly detailed wheels my most accurate and detailed Zero was complete.
|
CONCLUSIONS |
Accurate, superbly detailed, excellent decals, fantastic fit, frameable
box art, these are words not normally heard when describing a Starfix
kit. Crude, under scale, crappy details and with laughable decals, the
Starfix Zero has got to be one of the worst renditions of the Zero that
is available. (Obviously, Mark has not built the Airfix version, which
comes in a close second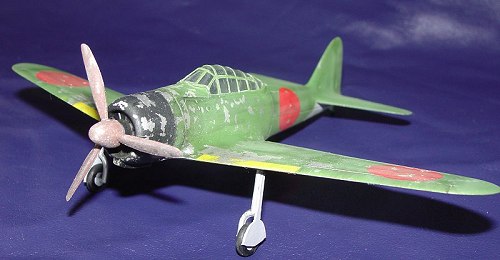 ....
Ed) Now regulars here on MM know that I love crude crappy kits like
Merlin, Airfix etc but Starfix just takes the biscuit, I doubt that many
if any of these have ever been built other than as BB gun targets. Even I
have to admit that I’m very unlikely to bother doing another one after
wading my way through the Bf 109 and the Zero.
....
Ed) Now regulars here on MM know that I love crude crappy kits like
Merlin, Airfix etc but Starfix just takes the biscuit, I doubt that many
if any of these have ever been built other than as BB gun targets. Even I
have to admit that I’m very unlikely to bother doing another one after
wading my way through the Bf 109 and the Zero.
My thanks to Bruno for the review sample and hands up how many of you noticed that I glued the wings on backwards …for shame on you and you call yourselves aircraft experts J. To do that particular modification I had to cut around 6 mm out of the trailing edge and build up the leading edge with plastic card and superglue. The wheel well which are now at the back of the wing were filled with the original doors and sanded smooth, due to time constraints I simply tacked the undercarriage legs to the trailing edge with superglue. Happy April Fools day readers of MM.
April 2004
|
REFERENCES |
Japanese
Aircraft of the Pacific War
by Rene J Francillon, Putnam, 1979
Mitsubishi A6M Zero,
by Artur Juszczak, Mushroom Models Publications, 2001
Japanese Aircraft Interiors; 1940-45, Robert Mikesh,
Monogram Publications, 2000
A6M type 11-21, Famous Aircraft of the World #5, July 1987
And special mention to the guys and gals at Academy.
If you would like your product reviewed fairly and quickly by a site that has nearly 250,000 visitors a month, please contact me or see other details in the Note to Contributors.