Hasegawa 1/48 C6N1 'Saiun'
|
KIT # |
09084 (JT 84) |
|
PRICE: |
US$32.95 |
|
DECALS: |
Two aircraft |
|
REVIEWER: |
|
|
NOTES: |
|
HISTORY |
"Ham" McWhorter Kills A Myrt:
The crew of the Mitsubishi C6N "Saiun" (Myrt) probably didn't know they'd been spotted. The speedy reconnaissance plane - fast enough to outrun almost all Allied interceptors - was at 24,000 feet and flying at high speed as it headed toward the American fleet off Okinawa. Death - in the form of four dark blue F6F-5 Hellcats - stalked them several thousand feet below and closing quickly.
 Leading the Hellcats
was LT Hamilton W. "Mac" McWhorter III, now on his second combat tour in the
Pacific after becoming the first Hellcat ace of World War II and the Navy's
first double-ace of the war during his first Western Pacific tour a year
earlier. "We were orbiting at 12,000 feet on combat air patrol, when we were
given a vector to intercept four bogies at twenty-thousand-plus. We applied
full power and started climbing. By the time we got to 20,000, I spotted a
single airplane ahead at 24,000, just making a bit of a contrail. I was
climbing faster than the others in the division, and hit the water injection to
catch up to him. I was right up on him at six o-clock and about one hundred
feet below when I opened fire. He never made a move, but the engine went up and
then his fuel tank caught. I was so close when he blew up that I had his engine
oil all over the canopy. He went straight in as a fireball all the way down."
The date was May 12, 1945 - the Myrt was McWhorter's twelfth and final victory
of the war.
Leading the Hellcats
was LT Hamilton W. "Mac" McWhorter III, now on his second combat tour in the
Pacific after becoming the first Hellcat ace of World War II and the Navy's
first double-ace of the war during his first Western Pacific tour a year
earlier. "We were orbiting at 12,000 feet on combat air patrol, when we were
given a vector to intercept four bogies at twenty-thousand-plus. We applied
full power and started climbing. By the time we got to 20,000, I spotted a
single airplane ahead at 24,000, just making a bit of a contrail. I was
climbing faster than the others in the division, and hit the water injection to
catch up to him. I was right up on him at six o-clock and about one hundred
feet below when I opened fire. He never made a move, but the engine went up and
then his fuel tank caught. I was so close when he blew up that I had his engine
oil all over the canopy. He went straight in as a fireball all the way down."
The date was May 12, 1945 - the Myrt was McWhorter's twelfth and final victory
of the war.
The great carrier air battles of 1942 demonstrated to the Imperial Japanese Navy that they needed a dedicated fleet reconnaissance aircraft that could outperform enemy interceptors, if they were to spot the enemy task force and return to tell the tale. The Nakajima B5N2 "Kate," which had the range to shadow the enemy, did not have the performance to escape the interceptors when discovered.
In the spring of 1942, Nakajima Hikoki K. K. received a new specification from the Naval Staff for a 3-seat aircraft with a maximum speed of 648 kph (403 mph), a normal range of 2,780 km (1,727 mi), and a maximum range of 4,956 km (3,078 mi), with a landing speed not to exceed 130 kph (81 mph).
 Engineers Yasuo
Fukuda and Yoshizo Yamamoto originally envisioned a pair of 1000 horsepower
engines buried in the fuselage of the new design, driving propellers mounted on
the leading edge of the wings via extension shafts. The introduction of the
1,860 h.p. Homare engine, which had a relatively small diameter coupled with a
high power rating, allowed Fukuda and Yamamoto to meet the specified speed and
range goals using a single engine. With a relatively small, laminar flow wing to
provide the necessary speed, both area-increasing Fowler flaps and Handley-Page
slots were used to keep the landing speed low.
Engineers Yasuo
Fukuda and Yoshizo Yamamoto originally envisioned a pair of 1000 horsepower
engines buried in the fuselage of the new design, driving propellers mounted on
the leading edge of the wings via extension shafts. The introduction of the
1,860 h.p. Homare engine, which had a relatively small diameter coupled with a
high power rating, allowed Fukuda and Yamamoto to meet the specified speed and
range goals using a single engine. With a relatively small, laminar flow wing to
provide the necessary speed, both area-increasing Fowler flaps and Handley-Page
slots were used to keep the landing speed low.
Nakajima completed the first prototype in March 1943 and flew it on May 15. From the start, the Homare engine failed to generate the specified power at altitude and suffered other problems associated with most new engines. While the aircraft handled well, the power loss meant that the speed requirements could not be met. However, the speed that was achieved - 639 kph (397 mph) - was still better than that of the airplane's expected opponent, the Grumman Hellcat. The Navy ordered the Saiun into production in the spring of 1944, taking first delivery in September. By war's end, Nakajima had built 463 C6N aircraft.
Prototype C6N1 aircraft first saw combat during the battles for the Marianas. Carrying a torpedo-shaped gas tank of 730 liters (193 gal), the C6N1 "Saiun" (Japanese for "Heavenly Cloud" - the Allied code name was "Myrt") could fly more than 4,830 km (3,000 mi). Combined with their high speed, they were safe from intercepting Grumman Hellcats and could shadow the U.S. fleet with impunity. Unfortunately, with the loss of the Japanese carrier fleet off Cape Engano during the Second Battle of the Philippine Sea in October, 1944, they were restricted to land bases from then on. A C6N1 was the last aircraft shot down in World War II, at 0540 August 15, 1945, five minutes before hostilities ended.
|
THE KIT |
So far as I am aware, the only other injection-molded kits of the C6N1 were a 1/50 scale kit released by Tamiya in the late 1960s that was notable for having an electric motor to turn the prop, which I once built in the early 1970s. It also had a clear fuselage half, Ed Like other releases by this company then, the requirement of being able to insert the electric motor led to distortion in the fuselage size and shape, though one could install an "accurate interior" in its place.
 As is usual when
Hasegawa goes out to do a model of a Japanese airplane, they do it as right as
they can. The molds are crisp. I have heard they took measurements from the
only C6N1 still in existence, the night fighter version at the U.S. National Air
& Space Museum, so presumably they "got it right" as regards dimensional
accuracy.
As is usual when
Hasegawa goes out to do a model of a Japanese airplane, they do it as right as
they can. The molds are crisp. I have heard they took measurements from the
only C6N1 still in existence, the night fighter version at the U.S. National Air
& Space Museum, so presumably they "got it right" as regards dimensional
accuracy.
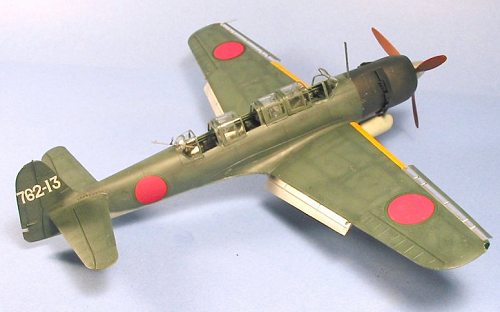
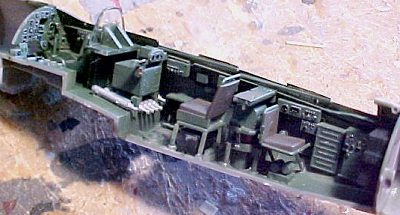
From photos of the cockpit, I can definitely say the kit supplied cockpit is accurate; like that of the B5N2 "Kate", Ki.43 "Oscar", and Ki.84 Frank, you will not need a resin replacement here.
Also, as is usual with their more recent releases, the kit comes with separate flaps and slats. The modeler additionally has the choice of assembling the cockpit canopy closed or open, and these parts are very clear.
Decals are provided for two different aircraft. There are enough number decals that a modeler could presumably do any C6N1 they had a photo of, since the individual numbers are about the only thing that visually distinguishes these airplanes.
|
CONSTRUCTION |
 Construction began with
some research up at j-aircraft.com, the premier internet site for Japanese
aircraft information. One of their contributors had just posted the results of
a visit to the C6N1 Myrt night fighter at Silver Hill, and provided a very good
description of the cockpit interior, which is painted a dark green overall.
Before any assembly began, I painted all the cockpit parts with Gunze-Sangyo
U.S. Medium Green (FS34092) which seems close enough to the description of the
original color. I then painted various details in black, and added some color by
picking out the instrument faces and various switches and buttons in various
colors. I did not use the kit instrument panel decals, as these were for black
instrument panels.
Construction began with
some research up at j-aircraft.com, the premier internet site for Japanese
aircraft information. One of their contributors had just posted the results of
a visit to the C6N1 Myrt night fighter at Silver Hill, and provided a very good
description of the cockpit interior, which is painted a dark green overall.
Before any assembly began, I painted all the cockpit parts with Gunze-Sangyo
U.S. Medium Green (FS34092) which seems close enough to the description of the
original color. I then painted various details in black, and added some color by
picking out the instrument faces and various switches and buttons in various
colors. I did not use the kit instrument panel decals, as these were for black
instrument panels.
Since I was doing all
this pre-painting, I took the time to also paint the engine. The walk-around
report at j-aircraft.com stated that the engine was entirely in natural metal,
unpainted. I used various shades of
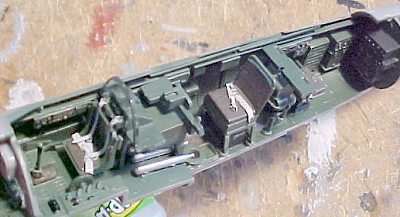 Testors Modelmaster
Metalizer colors to paint the different parts, then airbrushed them with sealer
so I could handle them during construction. I also painted the landing gear,
gear wells, interior of the engine cowling, and interiors of the gear doors with
non-buffing Aluminum, since these were not painted with Ameiro. (I think Tom
means Aotake, Ed)
Testors Modelmaster
Metalizer colors to paint the different parts, then airbrushed them with sealer
so I could handle them during construction. I also painted the landing gear,
gear wells, interior of the engine cowling, and interiors of the gear doors with
non-buffing Aluminum, since these were not painted with Ameiro. (I think Tom
means Aotake, Ed)
Once everything was
painted, construction was straightforward. The cockpit is highly detailed and
assembles into a tub that fits inside the fuselage with no trouble. The
fuselage fit with no gaps. I assembled the engine, placed it inside the
cowling, and attached this sub-assembly to the fuselage. I finished off by
attaching the horizontal stabilizers, which also fit perfectly.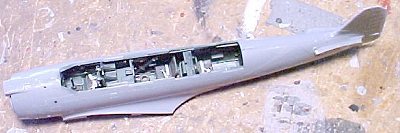
The three-part wing was easily assembled, with the wheel well inserted prior to gluing the wing halves together. There were no gaps when I attached the wing to the fuselage.
The only place where I used any Mr. Surfacer was along the centerline seam of the fuselage. This seam quickly disappeared with a light sanding once the Mr. Surfacer had dried.
Note that, if you wish to assemble the canopy in the open position, you should mask off the various parts, and paint them, and then attach the canopy as part of the final assembly once the model is painted and decaled, since the sliding canopies over the navigator's and radioman's cockpits slide under the fixed sections of canopy, and the open part must then be attached first.
|
CAMOUFLAGE & MARKINGS |
 Painting:
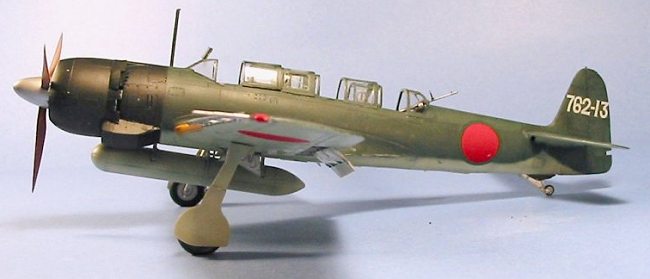
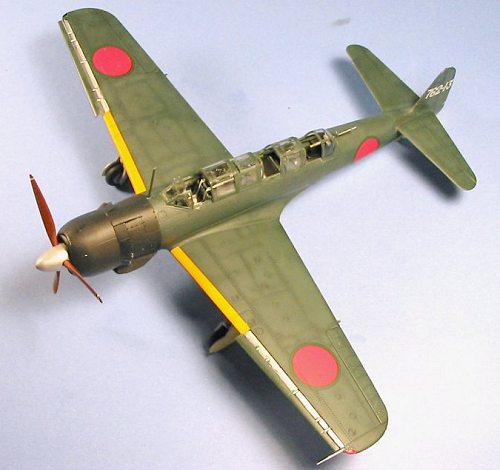
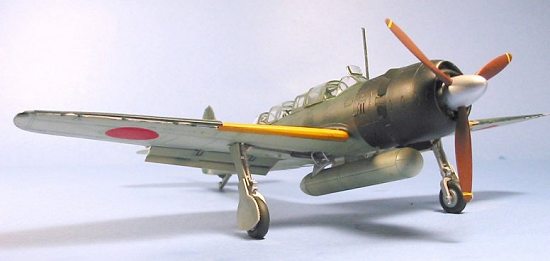
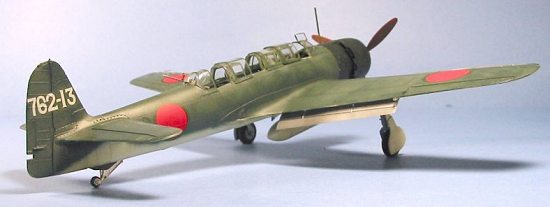
As with most Japanese Naval aircraft of the Pacific War, one has the choice of doing it in green uppers and grey lowers, or grey lowers and green uppers. Of the two possible aircraft to model with the kit decals, one was overall green and grey, while the other had the black cowling associated with most Japanese naval aircraft; this airplane is the more "colorful" since it was earlier production and had the white surrounds of the Hinomarus painted over in dark green.
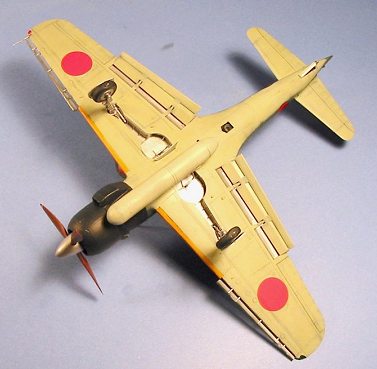 As a Nakajima
product, the Saiun was painted with Nakajima colors. I have found that Tamiya
IJN Green and IJN Grey are closest to the Nakajima colors (a bit more blue in
the blue-green, a bit more green in the grey-green), while the Gunze-Sangyo
colors by the same name more closely approximate the Mitsubishi colors. After
painting and masking off the yellow leading edge ID stripe, I painted and masked
off the black cowling, using Tamiya "NATO Black" with a bit of Tamiya "Flat
Blue" mixed in, then freehanded the upper and lower camouflage after pre-shading
the whole model with the color used for the cowling, which was masked off before
applying the camouflage colors. I also went back over each camouflage color
after putting in a bit of white paint in the airbrush cup, to "fade" the paint.
There are very few pictures I have found of the Saiun, and the three I have
access to show an airplane that was relatively clean, and not subject to loss of
paint as were most Japanese airplanes; this may be due to better maintenance
since a clean surface was needed to maintain the high speeds that were this
reconnaissance aircraft's main defense.
As a Nakajima
product, the Saiun was painted with Nakajima colors. I have found that Tamiya
IJN Green and IJN Grey are closest to the Nakajima colors (a bit more blue in
the blue-green, a bit more green in the grey-green), while the Gunze-Sangyo
colors by the same name more closely approximate the Mitsubishi colors. After
painting and masking off the yellow leading edge ID stripe, I painted and masked
off the black cowling, using Tamiya "NATO Black" with a bit of Tamiya "Flat
Blue" mixed in, then freehanded the upper and lower camouflage after pre-shading
the whole model with the color used for the cowling, which was masked off before
applying the camouflage colors. I also went back over each camouflage color
after putting in a bit of white paint in the airbrush cup, to "fade" the paint.
There are very few pictures I have found of the Saiun, and the three I have
access to show an airplane that was relatively clean, and not subject to loss of
paint as were most Japanese airplanes; this may be due to better maintenance
since a clean surface was needed to maintain the high speeds that were this
reconnaissance aircraft's main defense.
When everything was dry, I gave the model a coat of Future.
Decals:
The kit decals were thinner than I have found with many Hasegawa decals, and went down under a coat of Micro-Sol with no problems. When finished, I washed the model to get rid of solvent residue and shot another coat of Future. When dry, this was followed by two coats of thinned Dullcote.
|
FINAL CONSTRUCTION |
As noted above, I
attached the open canopy after everything was painted. The parts are
well-engineered and fit well, presenting no assembly problems. I then attached
the landing gear and the drop tank, as well as the leading edge slats and Fowler
flaps. Most likely, the Saiun sat on the ground with the leading edge slats
open since t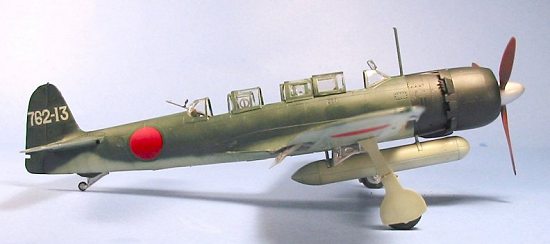 hey were held in
position aerodynamically, while the flaps would have been raised; as with most
of the Hasegawa kits with lowered flaps, it is relatively difficult to position
the flaps in the closed position, so I left them in the "incorrect" down
condition.
hey were held in
position aerodynamically, while the flaps would have been raised; as with most
of the Hasegawa kits with lowered flaps, it is relatively difficult to position
the flaps in the closed position, so I left them in the "incorrect" down
condition.
|
CONCLUSIONS |
The Saiun looks very
"classically Japanese", with its clean lines of a long thin fuselage and low
wings. You can tell the airplane was built primarily for speed, inasmuch as the
wings are relatively "small" for a carrier-based aircraft. It looks quite
distinctive among the models of other Japanese aircraft Hasegawa have produced.
The model is as well-designed and easy to build as it looks lying disassembled
in the box, and has the best overall fit of any Hasegawa kit I have recently
built.
Copyright ModelingMadness.com
If you would like your product reviewed fairly and quickly, please contact the editor or see other details in the Note to Contributors.