Classic Airframes 1/48 A5M4 'Claude'
|
KIT # |
427 |
|
PRICE: |
$24.95 |
|
DECALS: |
2 aircraft. See writeup |
|
REVIEW & PHOTOS BY: |
|
|
NOTES: |
|
HISTORY |
One wonders why it is that fighter pilots, who operate some of the most advanced aerial technology available, can often be so conservative. Rather than leap into the new, they are generally dragged kicking and screaming into every advance made in the art of fighter aircraft design. Nowhere was this more true than in the transition from the biplane to the monoplane. As early as 1916, Bristol had produced the M.1C "Bullet," 20 mph faster than the new German fighter designs that would destroy in less than six weeks of operations over the Somme the RFC's hard-won air supremacy on the Western Front, and put the service through such meat-grinders as "Bloody April," due to the overwhelming supremacy of the German Albatros over its opponents. RFC reluctance to operate a monoplane due to pre-war accidents that seemed to stress lack of structural strength in the monoplane design led directly to these near-catastrophic losses.
 By the 1930s it was clear that if the fighter was to retain its supremacy over its enemy, the bomber, that new technology would have to be embraced; the fighting biplane of the First World War style and simply run out of further opportunity for development and improvement. Fighter pilots, used to the high-g maneuvering of a biplane, believed they would be at a disadvantage flying a monoplane. Thus, many of the early specifications for monoplane fighters required the airplane to exhibit a performance more akin to that achievable with a biplane, rather than stress the strengths of the monoplane and modify fighting tactics accordingly.
Jiro Horikoshi of Mitsubishi was given the task of meeting the Imperial Japanese Navy's imaginative 9-Shi requirements, which had been created by LCDR Sawai Hideo. What was revolutionary about this development was that it did not call for a "carrier fighter" - which all agreed would never meet the performance of its land-based opponents - but a fighter per se, with maximum performance; LCDR Sawai believed that carrier compatibility could be created once the fighter existed.
Horikoshi met the requirements through the most-rigid weight consciousness ever applied to a Mitsubishi design, and by use of the most advanced aerodynamic principles and construction methods. The airplane actually came out weighing less than planned, and was the lightest fighter of its type anywhere in the world. Horikoshi had achieved an airplane with the performance of a monoplane, and the maneuverability of a biplane, albeit by limiting future growth of the design due to the weight-consciousness in its development.
 When the airplane was pitted against the Nakajima A4N biplane fighter, Genda Minoru declared the biplane the better fighter. However, when the rules were changed to allow climb-and-dive tactics as well as traditional dogfighting maneuvers, which allowed the monoplane to completely outperform the biplane which could not match it in the vertical plane; even the diehard Genda became a supporter.
The quality of the A5M2 was clearly demonstrated on its first mission, September 19, 1937, in an attack against Chinese airfields around Shanghai. 18 A5Ms led by Lt. Yamashita Shichiro met over 50 Curtiss Hawk IIIs and Boeing 281s (export versions of the P-26) in the course of two missions that day. The IJN pilots claimed 26 of the defending fighters without loss! For the first time, a Japanese airplane that was superior to its Western contemporaries was in service. This would be clearly demonstrated in the battles over Nanking in November and December, 1937, when the A5Ms met the Russian I-152 and I-16 in combat.
The definitive version of the A5M series was the A5M4, which offered increased power with a different engine and increased range with the adoption of a drop tank as standard equipment. The airplane began replacing earlier versions in late 1938. By that time, however, Chinese aerial opposition was vastly reduced from what it had been a year previously. Nevertheless, in early 1939, the A5M4 fought some of the last Soviet units over Hankow, and emerged the winner in these battles, too. By late 1939, the Japanese Navy had largely withdrawn from the Chinese war, and was involved in preparation for the coming Pacific War. The limitations of the A5M were such that a new design was called for, the 14-Shi fighter. Basing the design on the proven characteristics of stringent weight control and maximum usage of modern design technique learned with the A5M, Horikoshi created his masterpiece, the Zero fighter.
|
THE KIT |
 For an airplane as
important to Japanese aviation history as the A5M, modelers have been badly
served in getting it on their shelves. There was a very old kit in the 1960s
which was in 1/50 scale and had moveable control surfaces. There was nothing
else in 1/48 injection-molded kit form until Fine Molds came out with their very
expensive models in the early 1990s. US$70 for a kit was a bit much, and the
models never sold well. There was also a Japanese cast resin "garage kit" by
T.C. Berg, which had nice surface detail but required a modeler to drill out the
interior to create a cockpit. Additionally, Eagles Talon did a vacuform in
1/48, but it was not one of their better creations.
For an airplane as
important to Japanese aviation history as the A5M, modelers have been badly
served in getting it on their shelves. There was a very old kit in the 1960s
which was in 1/50 scale and had moveable control surfaces. There was nothing
else in 1/48 injection-molded kit form until Fine Molds came out with their very
expensive models in the early 1990s. US$70 for a kit was a bit much, and the
models never sold well. There was also a Japanese cast resin "garage kit" by
T.C. Berg, which had nice surface detail but required a modeler to drill out the
interior to create a cockpit. Additionally, Eagles Talon did a vacuform in
1/48, but it was not one of their better creations.
Classic Airframes' A5M4 - now sadly out of production - comes on two sprues of light grey plastic, with a bag of resin for the engine and cockpit interior, with decals for two A5M4s aboard IJN "Soryu" in 1939. Surface detailing is inscribed and petite, with good fabric representation.
|
CONSTRUCTION |
With a Classic Airframes kit - even the new ones - there is always at least one "catch" to getting the model right in construction, and this is almost never anything that is mentioned in the instructions - the modeler is left to trip over it on their own. Inasmuch as - outside of the "catches" - this kit assembles well, I will primarily discuss dealing with those.
 "Catch No. 1" is
mating the vertical fin to the fuselage. The design here is very strange, with
a separate vertical fin and rudder. The problem is the fin is narrower than
that portion of the fuselage it is to mate to, requiring a lot of putty and
re-scribing, unless you do the following:
"Catch No. 1" is
mating the vertical fin to the fuselage. The design here is very strange, with
a separate vertical fin and rudder. The problem is the fin is narrower than
that portion of the fuselage it is to mate to, requiring a lot of putty and
re-scribing, unless you do the following:
Before gluing the fuselage halves together, test-fit the fin-to-fuselage fit. Narrow the fuselage at that point by sanding along the centerline of each fuselage half, a bit at a time and checking, until you have the same thickness as the fin. Whether the fin is too thin or the fuselage too thick based on the original drawings is irrelevant - if you want it to fit right, doing it this way means you will only need some Mr. Surfacer on the join line.
"Catch No. 2" isn't so much of a surprise. When you test-fit the horizontal stabilizers to the fuselage, you will see that the fuselage fairing is thicker in section than the stabilizer. A short session with a rat-tail file solves this one easily.
"Catch No. 3" is that - as designed - the resin sidewalls of the cockpit will position the instrument panel too far forward. I cut these back to the first vertical rib, and the instrument panel then fit about 1/16" in under the upper decking, which to me looks more correct.
 "Catch No. 4" is one of
those that can bite you if you aren't aware of it. The problem is that, when
the assembled wing is attached to the assembled fuselage, there is no real
"joining surface" along the area where the trailing edge of the lower half of
the wing meets the lower fuselage. The resulting joint is thin enough that just
a bit of pressure with a thumb while handling the model to work on other things
will break it. The solution is to glue in a piece of evergreen sheet styrene
inside the fuselage before mating fuselage and wing subassemblies. That way,
the joint is solid.
"Catch No. 4" is one of
those that can bite you if you aren't aware of it. The problem is that, when
the assembled wing is attached to the assembled fuselage, there is no real
"joining surface" along the area where the trailing edge of the lower half of
the wing meets the lower fuselage. The resulting joint is thin enough that just
a bit of pressure with a thumb while handling the model to work on other things
will break it. The solution is to glue in a piece of evergreen sheet styrene
inside the fuselage before mating fuselage and wing subassemblies. That way,
the joint is solid.
Once you've gotten to this stage, if you test-fitted everything (de rigeur in a limited-run kit), you should only need Mr. Surfacer to fill the various seams of the joints.
Beyond these glitches, the model assembles well. There are no locating pins or tabs, so be sure of where you position things like landing gear, etc.
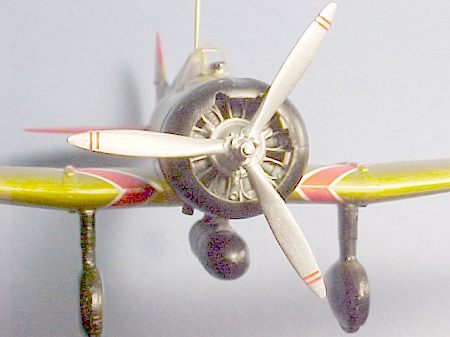
I built up the resin engine and it was very nice. However, before proceeding, I rediscovered the white metal engine and prop from the old Fine Molds kit I once had that "met its fate" in "The Big One" out here in 1994. However, the resin parts would have been more than acceptable had I not been so fortunate. The resin propeller as assembled will be delicate and subject to breakage with anything other than gentle handling.
|
PAINTING |
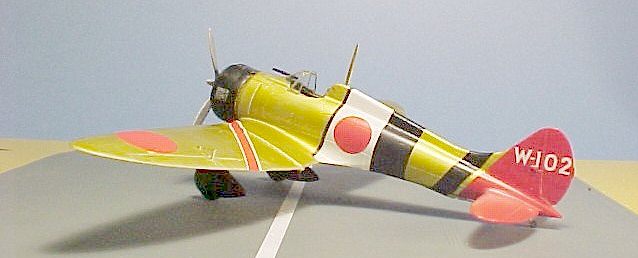
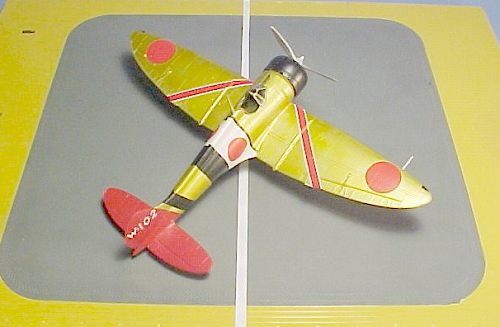
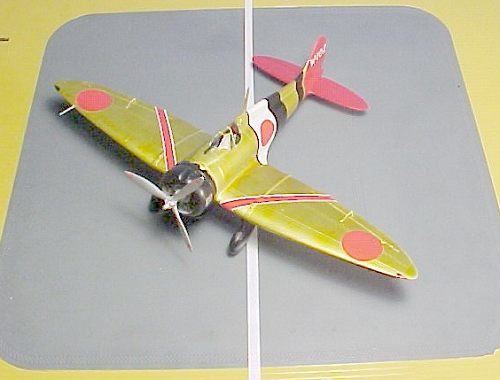
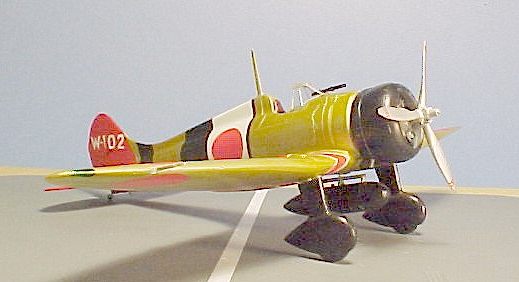
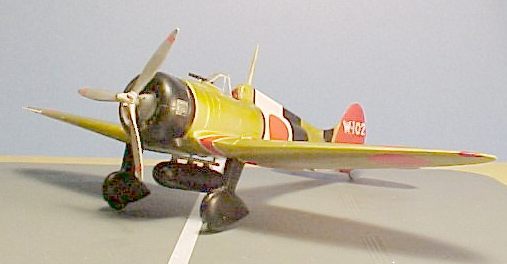
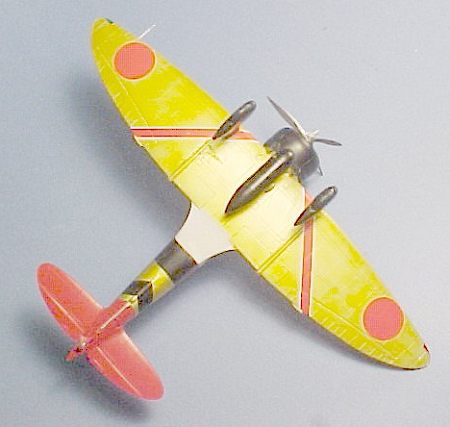
It turns out the A5M4 is one of those Japanese airplanes that looks much different that we had been led to believe over the years. The airplane was the first all-metal airplane the Imperial Navy took to sea, and they quickly learned what happens to unprotected aluminum in a saltwater environment. The solution was to paint the airplanes with a protective coat called "Ame Iro," one of those clear Japanese colors like the interior blues and greens. In this case, the paint is a clear lacquer with a yellowish tinge. (I will note here that several years after this "discovery" there is still considerable discussion among the colour sensei at places like j-aircraft.com, and one can find backing for doing the model in a silver finish.)
I painted the red tail first, then masked it off. I then painted the rest of the airplane with SnJ aluminum .
For the "Ame Iro," I used Gunze-Sanyo "Clear Yellow" in a mixture of 10 percent Gunze, 40 percent Future, and 50 percent alcohol. It's supposed to be a very thin paint, and the airplane should look "gold" from some angles and "silver" from others, depending on the light.
|
DECALS |
 The kit provides three
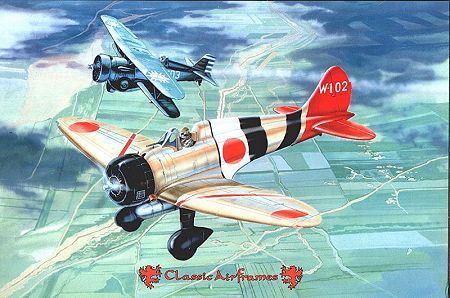
different markings options. I decided to do the airplane in the boxart, which
was aboard IJN "Soryu" operating off southern China in 1938-39. Since Classic
Airframes uses Micro-Scale decals, there were no problems. I did the white
stripe using a white decal sheet, after cutting out the outline having traced it
from the model onto typing paper. The black stripes were decals provided in the
kit.
The kit provides three
different markings options. I decided to do the airplane in the boxart, which
was aboard IJN "Soryu" operating off southern China in 1938-39. Since Classic
Airframes uses Micro-Scale decals, there were no problems. I did the white
stripe using a white decal sheet, after cutting out the outline having traced it
from the model onto typing paper. The black stripes were decals provided in the
kit.
|
FINAL BITS |
I shot the engine cowling glass black with a bit of midnight blue in it for the very dark blue-tinge (which doesn't turn up in the photos), and gave the rest of the airframe another coat of Future. I also Futured the white metal prop, then before it was fully dry covered it with SnJ polishing powder and polished it out. A final very thin coat of "flat Future" to dull things down due to saltwater exposure gave me my final result.
|
CONCLUSIONS |
Classic Airframes kits are difficult for the average modeler. There isn't one that doesn't have an inadvertent glitch or two designed into the construction process, but - hey! - dealing with that kind of thing is what's supposed to separate the modelers from the assemblers.
The end result is nice, and unlikely to show up as a Tamigawa kit in the foreseeable future. If you want a model of this important Japanese fighter - the first domestic Japanese design to outperform its foreign contemporaries - this is the kit for you if you should be fortunate enough to run across it. Follow my recommendations on how to deal with the "catches" and you will have a successful build.
November 2002
If you would like your product reviewed fairly and fairly quickly, please contact the editor or see other details in the Note to Contributors.