| KIT #: | ? |
| PRICE: | $ |
| DECALS: | One option |
| REVIEWER: | Carmel J. Attard |
| NOTES: | Short run kit |
| HISTORY |
Modelers who are keen on the early development of twin engine jet powered aircraft will consider assembling scale model aircraft such as the Me.262, Aircomet, Arado 234, early meteor, Heinkel first jet, Su-9, and last but not least, the Japanese version which closely resembled the Me-262, ie the Nakajima Kikka. All of these aircraft have several features in common, namely being twin engine, single seaters, having a tricycle undercarriage and best of all these will make a fine selection of the early jets which were the forerunners of today’s multi role combat aircraft.
Brief History
 The whole essence of the Kikka belies in
the extensive resemblance to the German Messerchmitt Me-262 with the two
heavy wing mounted engine pods but confronted with a need for information.
Two Ne-20 axial flow turbojets powered the Kikka. The maiden flight goes
back to the 7th of August 1945 and the type only survived until
the 11th of the same month when it crashed during the second
flight while utilizing rocket assisted power during a takeoff. This
incident happened only a few days before the war ended and the aircraft was
damaged beyond repair.
The whole essence of the Kikka belies in
the extensive resemblance to the German Messerchmitt Me-262 with the two
heavy wing mounted engine pods but confronted with a need for information.
Two Ne-20 axial flow turbojets powered the Kikka. The maiden flight goes
back to the 7th of August 1945 and the type only survived until
the 11th of the same month when it crashed during the second
flight while utilizing rocket assisted power during a takeoff. This
incident happened only a few days before the war ended and the aircraft was
damaged beyond repair.
Way beck in 1944 the Kikka was destined for the role of a close air support bomber and the wings were designed as a foldable type in order to be accommodated on aircraft carriers. However, considering the pressure that Japan was subjected to during the later years of the war, this has brought about the situation where the Japanese Navy Air Force planned to use it as a suicide attack plane. At the end of hostilities
24 Kikkas were under construction, which also included two seat conversion trainers. The finished aircraft were intended to be delivered to Kokutai 724 as (suicide planes). In the end one of these almost completed examples found it’s way to the United States and was due to be restored by the National Air and Space Museum.
| THE KIT |
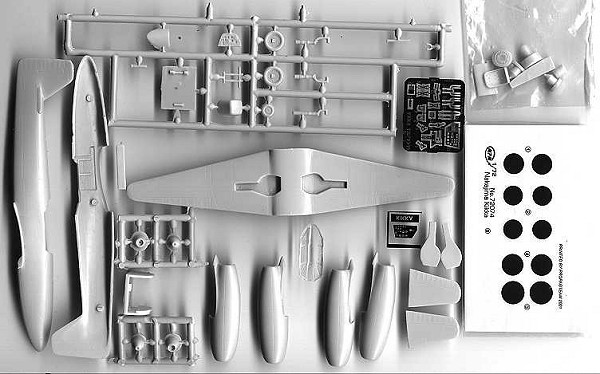 The 1/72 scale model of the Kikka is
released by MPM of the Czech Republic. This is in fact an upgraded reissued
kit. The earlier version has already been described in great detail in PKC
59, Autumn 99 issue on P.122 by David Elliott. Like the original, the kit
is injection moulded in light grey plastic with very finely grooved panel
lines on all parts. The kit contains a substantial number of detail parts
made of resin both for the cockpit and the undercarriage. Also included in
the kit is a clear injection moulded canopy which is a way forward to the
previously vacform canopy.
The 1/72 scale model of the Kikka is
released by MPM of the Czech Republic. This is in fact an upgraded reissued
kit. The earlier version has already been described in great detail in PKC
59, Autumn 99 issue on P.122 by David Elliott. Like the original, the kit
is injection moulded in light grey plastic with very finely grooved panel
lines on all parts. The kit contains a substantial number of detail parts
made of resin both for the cockpit and the undercarriage. Also included in
the kit is a clear injection moulded canopy which is a way forward to the
previously vacform canopy.
The resin parts for the interior are intended to replace the rather heavy internal ribbing integrally moulded on the original kit. There is also a pack with tiny brass etch parts and a detail assembly drawing depicts the exact location of each of these parts to go inside the cockpit and /or attached to the undercarriage area. Unlike the earlier release of the Kikka, which apparently had no forward undercarriage location mounting, there is now a finely moulded resin box like component , part PP7, which has a print inside to receive the nose wheel oleo. The whole assembly fits exactly inside the nose compartment. Upon fitting these together, the empty space around the box is filled with short cut strips of lead weight to achieve balance on the nose wheel. The nose wheel also needed to be extended by 3mm in overall length in order to obtain the correct sit, which is level with ground. References are scarce and do not dwell upon the Kikka’s interior, so as far as this goes I had to contend with the extra set of interior walls, seat parts which are supplied in resin. For the instrument panel, I preferred to use the narrower plastic version in preference to the brass etch part substitute. The sidebars of the seat back were also trimmed.
| CONSTRUCTION |
Assembly of the cleaned up components was
straight forward as each item fits together very well. Kit parts such as
parts 10, 11, 12, 17 and 18are replaced with new ones made of resin. These
comprise of a pilot seat, cockpit floor, and engine
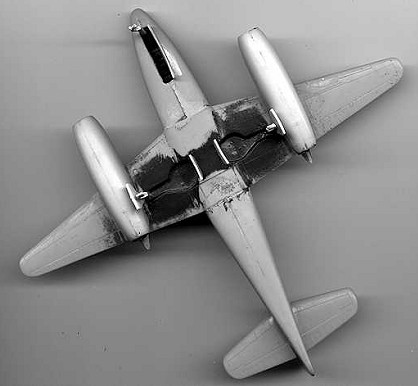 nacelle inlet and
outlet components. Part PP6 that is a bullet shaped component to fit inside
the engine intake has two small thin webs, one on each side. These were
very flimsy and broke off. These I had to replace with new ones made of
thin plastic card.
nacelle inlet and
outlet components. Part PP6 that is a bullet shaped component to fit inside
the engine intake has two small thin webs, one on each side. These were
very flimsy and broke off. These I had to replace with new ones made of
thin plastic card.
Like other MPM kits that I know of, there are no locating pins at the joint, which align the exact match of the two parts when put together. But with a little bit of extra care the two parts match exactly and produces an almost perfect joint. Only a small amount of filler to wing joint, around engine parts, and to rear fuselage was needed. The small plastic insert to rear of cockpit area also fitted well.
Undercarriage detail include brass etch torque link that is added to the oleo as well as retraction struts for the wheel well doors. Reference to the side view indicates the position of a strut that needs to be added to nose wheel oleo. This is visible even with the nose wheel door in the open position. The small upper doors to the wings were replaced with similar ones made of plastic card in view of the thickness of the kit ones. Although I would have desired to add a radio mast as indicated in drawing and artwork issued with the kit, I preferred to leave this out as the few photos of the Kikka that I had did not indicate that there was one fitted. Bearing in mind that I was doing the prototype version, I had to add a venturi tube on the starboard of the fuselage adjacent to the cockpit, and a thin steel pitot tube to port wing, which was not provided.
| COLORS & MARKINGS |
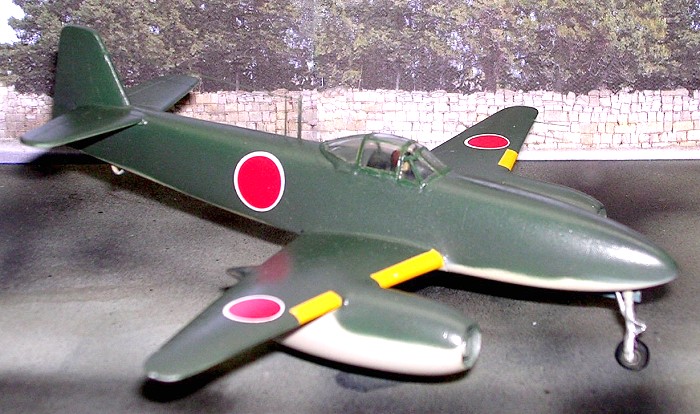
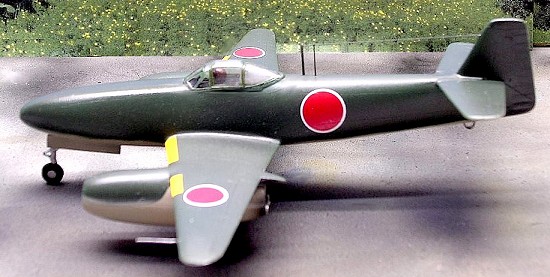
 A clear 4-view drawing indicates the areas
and details of paintwork. The kit is finished in standard Japanese Naval
scheme of dark green upper surfaces and light grey undersurfaces with
yellow leading edges. The wheel wells were metallic blue/green as seem to
be the standard at the time and the wheel hubs were grey. Decals provided
for 10 red Hinomarus. All of them with the exception of two carry white
outline, which are an extra option for the underside ones. There is also a
decal with serial 724-17 in white which sticks to each side of the tail
unit as indicated on the box art, possibly an imagined production machine.
A clear 4-view drawing indicates the areas
and details of paintwork. The kit is finished in standard Japanese Naval
scheme of dark green upper surfaces and light grey undersurfaces with
yellow leading edges. The wheel wells were metallic blue/green as seem to
be the standard at the time and the wheel hubs were grey. Decals provided
for 10 red Hinomarus. All of them with the exception of two carry white
outline, which are an extra option for the underside ones. There is also a
decal with serial 724-17 in white which sticks to each side of the tail
unit as indicated on the box art, possibly an imagined production machine.
| CONCLUSIONS |
This was a little aircraft with fine details, and the end result looked quite convincing. Until this occasion I always overlooked this type of aircraft and could never think of ever making a model of it. I have changed my mind and am very pleased with the final result.
October 2005
Copyright ModelingMadness.com. All rights reserved. No reproduction in part or in whole without express permission from the editor.
If you would like your product reviewed fairly and fairly quickly, please contact the editoror see other details in the Note to Contributors.