Special Hobby 1/48 Fiat G.55
Centauro “Sottoserie 0”
| KIT #: | 48066 |
| PRICE: | $52.00 MSRP |
| DECALS: | Three Options |
| REVIEWER: | Kevin Thompson |
| NOTES: | Includes photo-etch and clear film details |

| HISTORY |
In 1942, the Italian
Regia
Aeronautica accepted three
prototype fighter aircraft entries, all to be powered by the Daimler-Benz DB
605 liquid-cooled, inverted V-12 inline engine, and its license-built
Italian twin, the Alfa Romeo RA 1050
Tifone (Typhoon). This new generation of fighters was known as the
“Series 5”, denoting the DB 605 engine.
The first G.55s flew briefly with the Regia
Aeronautica before the Armistice, and enjoyed limited success in combat,
particularly against the P-38 Lightning. Once the Armistice was signed (and
| THE KIT |
Over the years, the Fiat G.55 has been kitted in a few scales, with mixed
results. The first plastic model of the G.55 was a 1/50th scale
kit by the Italian manufacturer Aliplast. Done in the mid-60s, this kit is
pretty crude, and does not properly represent the plane. Aliplastmade
several other Italian fighters in 1/50th,
including the CR. 42, MC.202, and
the MC.72 racing seaplane. These are the same molds that were later sold as
SMER kits.
Classic Airframes did a 1/48 G.55 kit about
fifteen years back. Without having ever built the kit, I understand that it
has some serious shape issues, particularly the nose profile. The most
recent G.55 kit is in 1/32 scale by Pacific Coast Hobbies. You can see Tom
Cleaver’s review in the Archives.
In 2007, MPM’s owner Jiri Silhanek, along
with one of his employees, was in
| CONSTRUCTION |
I then fitted the wing assembly to the
fuselage, and this had some slight gaps in the wing root-to-fuselage area,
as well as the inboard leading edge of the wing to the lower cowl
intersection. This will require some sanding and filler, but is not a big
deal.
The horizontal stabilizers were next, and
here is where I ran into the only “flaw” (albeit minor) in this kit. When
dry fitted to the fuselage, the inboard edge of the elevators (where they
contact the fuselage), are a bit too narrow compared to the stabilizers
themselves. This results in a
slightly swept hinge-line
when the stabilizers are in place. On the actual aircraft, the hinge (or
pivot) line is supposed to be straight. But the fix is easy and simple.
Using some Plastruct sheet (either 1/32” or 1/16”, I don’t remember), add a
small tab of plastic sheet to the inboard edges of each elevator only (at
the root). Once dry, sand the add-on tabs to the correct airfoil shape of
the elevators, then cement to the fuselage using CA glue. You will now have
a slight gap at the stab-to-fuselage junction, but this can be sanded and
filled once dried. The elevator pivot line is now straight and square.
After allowing ample drying time, sand all
the seams paying close attention to the cowling/ fuselage joint, wing
leading edge to lower cowling joint, and the gaps at the corrected
horizontal stabilizers. The latter two are the key areas where filler is
needed. Be careful not to lose too much detail at the cowling and forward
fuselage joint, as this is where the most aggressive sanding is
 needed.
With sanding and filling now completed, I then wet-sanded the model up to
about 1600-grit (whatever the orange/brown Flexi-Grit is).
Once sanding was completed, I then installed the “fiddly bits” that would have broken off during sanding. These included the oil cooler scoop with PE screens (pay attention to correct directional installation here), inboard main gear doors (I put them on before painting whenever possible for strength and neatness), radiator with PE screens (a good fit below the wing here) with rear door in opened position, air intake snorkel on left side of engine, tail wheel doors, and various other “bumps, bulges and scoops” that go on the forward fuselage. I then re-scribed panel lines where necessary. With cockpit and wheel wells plugged with tissue paper, the assembled airframe is ready for the paint shop.
| COLORS & MARKINGS |
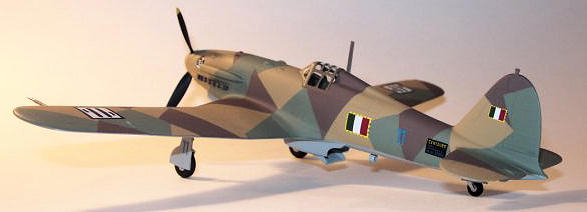
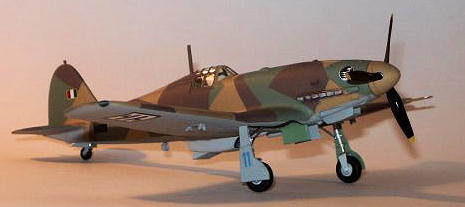
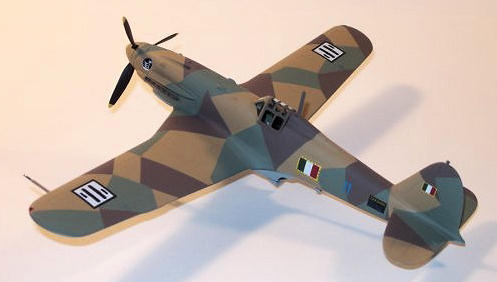
As previously stated, the kit has markings
for three aircraft. The first is an early Regia Aeronautica machine in dark
green topsides over grey undersides. The next is an ANR machine (briefly
used by the Luftwaffe, then returned to ANR service), with the same scheme.
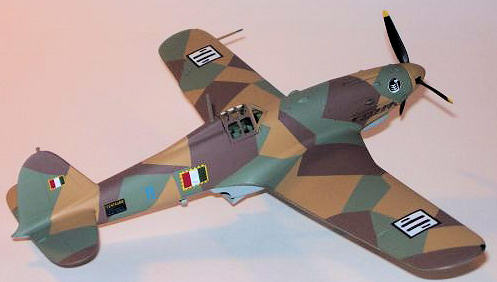
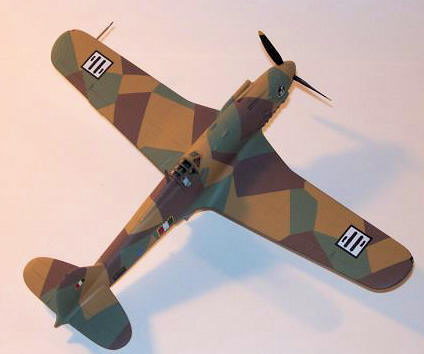
The last choice is by far the most interesting. It is MM91064 (the last
“Series 0” of the batch of twelve), an ANR machine of the 1st
Squadriglia “Gigi Tre Osei”, 2nd Gruppo, and carries an
experimental cammo scheme of sand, medium green and brown in an angular
“splinter” pattern on the topsides with the bottom in light gray. This
experimental scheme is almost certainly from the Luftwaffe’s influence and
collaboration with the ANR, and was used sporadically on a few G. 55s. The
attractive, colorful, and challenging scheme became my choice, and has not
yet been done on a G.55 by anyone else on a Modeling Madness kit review!
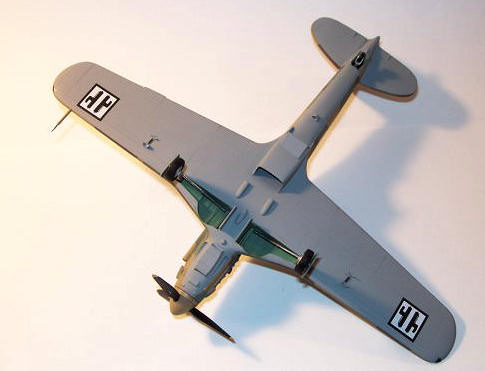
I started by painting the underside in
Model Master 2113 “Italian Blue Gray” (grigio
azurro
chiarro 1). After the underside
color was dry, I masked off the undersides at the sharp demarcation line to
the upper surface colors. The next step was to paint the tan color (giallo
mimetico 3) on the upper surface.
Instead of Model Master’s “Italian Sand”, which looks a bit too pink, I used
Model Master 2088 “RLM 79 Sandgelb”, and sprayed the entire upper surface.
Because this is a semi-gloss color when dried, I allowed more time for the
paint to cure, perhaps two days or so. Once the Sandgelb was thoroughly dry,
it was time to mask the upper surface splinter scheme.
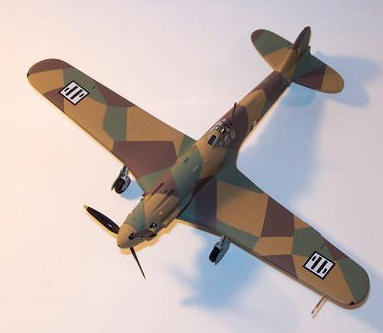
I made photocopies of the painting guide,
enlarging the plan drawings by 219%. This gave me an almost exact size
duplication in 1/48 scale. After the full size copies were made, I cut out
the tan parts of the paint scheme from the copies for the wings and
fuselage, and traced each one to 3M Scotch low-tack painter’s tape (the blue
stuff), then cut the tape to the correct shapes and applied them to the
upper surface. This took some time and patience to get right
 Now the
green (verde
mimetico 1) was applied. The
painting guide recommended FS 34258, but this appeared a bit too bright. The
best match I found (to my eyes, anyway) is Model Master 1793 “SAC Bomber
Green” FS 34159. I then sprayed the green over the masked upper surface and
allowed to dry. Once the green had dried, it was time to mask over where the
green meets the brown. With the tan isolated from the green, it was now time
to isolate the green from the brown, and the same masking technique was
used, but while still leaving the tan covered. The third color (marrone
mimetico 1) is well-represented
by Model Master 2111 “Italian Dark Brown” with just a touch of light grey to
lighten it slightly. Once the brown was sprayed and dried thoroughly, I then
removed all of the masking tape from the airframe. The result was pretty
close to the painting guide, with hard demarcation throughout, and I was
surprised how just a little extra care and effort in masking resulted in
minimal required touch-up after the fact. I gently rubbed the surface to
eliminate any masking “ridge” between colors. I then applied a light coat of
Testors Glosscote to the entire airframe and allowed it to dry.
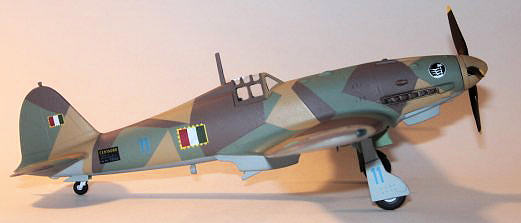
The Cartograph decals are well-printed, and
went on with no drama. The markings for this plane are fairly simple: ANR
square fasces on the upper and
lower wings, the Italian national flag on fuselage and fin positions, the
Gigi Tre Osei squadron insignia on both sides of the upper cowl, blue 11 on
fuselage sides and main gear doors, the build plate on the fuselage sides
just ahead of the horizontal stabs, and three propeller logos, one on each
blade. Note that on all ANR aircraft, the Italian flag should always have
the green field facing forward, and on the wing insignia, the outboard
fasces blade faces forward (or “up” in plan view). With all the decals dried
and the setting solution washed off, two light coats of Testors Dullcote
were then applied, for a uniform finish overall.
| FINAL CONSTRUCTION |
Prop spinner is tan, blades black with
yellow tips, gear doors grey outside with the green “Italian chromate” color
inside, gear legs and wheel hubs aluminum with black tires, gear actuating
rods steel gray with chrome oleo pistons, pitot tube is tan with silver tip,
and radio antenna mast dark brown. The gear and gear doors fit well with no
fuss.
The canopy was then masked and sprayed first with the interior green color, and then in the brown. On this aircraft, the windshield framing is tan as per the color demarcation, so the canopy section was masked from the windshield section and this was the last color sprayed. The one-piece canopy is a good fit with minimal gap and was white-glued to the airframe. The model is now completed.
| CONCLUSIONS |
 I am
really happy with this build in so many ways. First of all, I have always
been a fan of Italian WWII fighters. This probably rubbed off from my
father, Jonathan Thompson, who authored “Italian Civil and Military Aircraft
1930-1945” by Aero Publishers way back in 1963. At the time it was really
the only authoritative book on Italian planes in existence, and I learned a
lot about them from him and his book. Secondly, I appreciate Jiri Silhanek
for doing this kit. It is by far the best 1/48 example of what was a
significant airplane. The kit has no real problems to speak of; just a
little sanding and fitting in the areas mentioned. His kits are just getting
better and better all the time, and even the most detail-oriented builders
will have all they need. With the complex paint scheme working out as
planned, that was the icing on the cake. I would definitely recommend this
kit to anyone who is a fan of Italian WWII aircraft, or WWII aircraft in
general. Very gratifying build, and looks good next to Macchis, Reggianes,
Ki-61s, Bf 109s and Heinkel 100s or any other DB-powered fighters!
| REFERENCES |
“Italian Civil and Military Aircraft 1930-1945”
by Jonathan Thompson, Aero Publishers,
1963.
If you would like your product reviewed fairly and quickly, please contact me or see other details in the Note to Contributors.