 THE MACCHI C.202 FOLGORE
THE MACCHI C.202 FOLGORE
Manufacturer: Hasegawa
Scale: 1/48
Suggested Retail Price: $31.98
Review by: Drew Nix
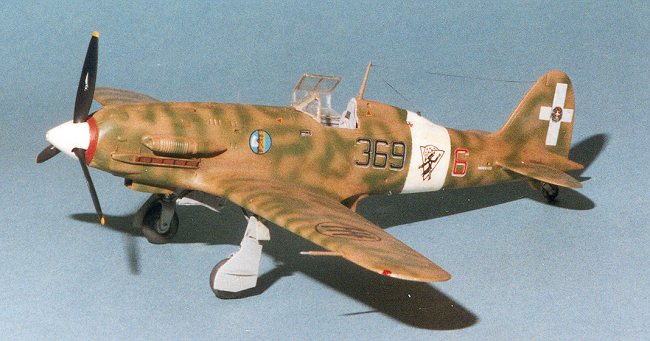
The Macchi C.202 Folgore (Lightning) was the result of the mating of the German Daimler-Benz DB601A in-line engine with a restructured airframe of the radial-engined C.200 Saetta (Thunderbolt). The resulting fighter exceeded even the most sanguine expectations of the Regia Aeronautica, finally putting an Italian fighter in service that achieved parity with then current Allied fighters. The Folgore itself was later re-engined with the Daimler-Benz DB605A resulting in perhaps the best Italian fighter to see action in any numbers in World War II, the C.205V Veltro (Greyhound).
Hasegawa's recent release of the Macchi C.202 is just another in a dizzying array of high-quality, injection-molded plastic kits to hit the market in the last few years. By any stretch of the imagination it beats the old Tauro kit of the same subject by a country mile. Many felt, as I did, that the Tauro kit was "overengineered", although it did have beautiful decals.
For your money you get an excellent product, molded in high-quality, light gray styrene. It is accurate right down to the wings being of unequal span. On the real aircraft this was to counteract the torque of the powerful Daimler-Benz engine. Finely engraved panel lines add to the overall appeal of the kit. The assembly sequence is logical and the instruction sheet is easy to read and follow, except in a couple of places discussed later.
 Construction begins with the cockpit, which has more than adequate detail
for this scale. However, I substituted the excellent resin cockpit set from
True Details. The only kit parts that are used with this set are the control
stick and the petite rudder bar. With the addition of paint, a wash, and
some drybrushing, the detail pops out at you, showing a beautifully rendered
"main office". With a little dry-fitting (I found I had to sand one of the
rear corners of my set just a bit), the True Details cockpit snuggles into
the Hasegawa kit and adds to it tremendously. I highly recommend True Details,
a lot of detail for a little cash. Hasegawa allows you to show off your work
by thoughtfully including a two-piece canopy.
Construction begins with the cockpit, which has more than adequate detail
for this scale. However, I substituted the excellent resin cockpit set from
True Details. The only kit parts that are used with this set are the control
stick and the petite rudder bar. With the addition of paint, a wash, and
some drybrushing, the detail pops out at you, showing a beautifully rendered
"main office". With a little dry-fitting (I found I had to sand one of the
rear corners of my set just a bit), the True Details cockpit snuggles into
the Hasegawa kit and adds to it tremendously. I highly recommend True Details,
a lot of detail for a little cash. Hasegawa allows you to show off your work
by thoughtfully including a two-piece canopy.
Every review I've read of this kit invariably says, "best fitting kit I ever built, no putty needed on this one," or something similar. Probably it's just me, but I had to use a little filler here and there on the kit. Two areas that require special attention were the top cowl of the nose and the wing/fuselage juncture. The cowl is one of two, top and bottom, that are needed so that Hasegawa could differentiate between the C.202 and the C.205V (another Hasegawa kit) without having to redo the whole fuselage for each kit, thereby saving tooling costs. On my kit, the top cowl piece was decidedly undersized, requiring gap-filling super glue to make up the difference. Not to worry, it doesn't require a lot of filling. The wing to fuselage joint is the same way: not a lot of filler needed, but some filler needed. The bottom cowl piece was a nice, snug fit, requiring no filling.
The propeller assembly is well done, but make sure that each of the three blades is attached to the spinner rear plate so that they are all going in the same direction and are at the same angle. A little care here will pay off later. The aggravation of fiddling with individual prop blades was offset, for me, by allowing me to paint the rear plate red for the version I was doing without having to do a lot of tricky masking.
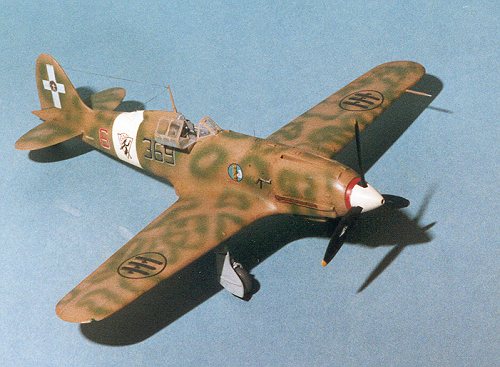
 Check your references carefully before painting. Most Folgores had the upper
wing camouflage pattern wrap around the leading edges onto the bottom of
the wings for a few inches, but not all had this feature. The same pattern
was usually repeated on the horizontal tails. Also, some Folgores had the
BOTTOM wingtips painted white. If you have the Tauro decal set, the instruction
sheet will give you help in determining which camouflage pattern to use with
your chosen decals.
Check your references carefully before painting. Most Folgores had the upper
wing camouflage pattern wrap around the leading edges onto the bottom of
the wings for a few inches, but not all had this feature. The same pattern
was usually repeated on the horizontal tails. Also, some Folgores had the
BOTTOM wingtips painted white. If you have the Tauro decal set, the instruction
sheet will give you help in determining which camouflage pattern to use with
your chosen decals.
The two places where the instruction sheet is not quite clear concerns the main gear. In the wheel well area, you will have an "N"-shaped crossframe to fit between the front and back walls. Where it fits into the front wall is obvious. However, in the rear wall are two possible sets of locator holes you can use. Use the BOTTOM (furthest away from the roof of the wheel well) two holes because the inner gear door retraction struts fit into the top two holes. The other place of confusion concerns the inner gear doors themselves. The instruction sheet shows them reversed from how they should be placed. This will become obvious when you begin working in this area.
There is some question as to the correct color of the main gear and wheel wells. I painted mine the same light ghost gray I used as the cockpit color of my late-production C.202. I think you could probably use this color, or the underside blue-gray, or perhaps even aluminum and very few could dispute your choice.
 I used the new Floquil Military Colors for the Italian Air Force on my Folgore.
If you use these colors, be aware that the underside Italian Blue-Gray goes
on from your airbrush with a decidedly tannish hue! Don't be alarmed. When
dry, the correct blue-gray color will appear. Careful masking will be required
in the wheel wells and in the radiator and oil cooler scoops before applying
the three-tone camouflage.
I used the new Floquil Military Colors for the Italian Air Force on my Folgore.
If you use these colors, be aware that the underside Italian Blue-Gray goes
on from your airbrush with a decidedly tannish hue! Don't be alarmed. When
dry, the correct blue-gray color will appear. Careful masking will be required
in the wheel wells and in the radiator and oil cooler scoops before applying
the three-tone camouflage.
I used the Tauro decals to get the particular markings I desired. There is an error on the Hasegawa sheet that can't be corrected. The crest for the House of Savoy on the white tail cross is much too big. Aeromaster makes a nice aftermarket decal sheet to the C.202 if you don't have the Tauro sheet handy. Even though they were over 6 years old, the Tauro decals went down without too many problems. They responded well to Solvaset. Caution: Tauro decals go on VERY matte, particularly noticeable in the carrier film connecting numbers, etc. Don't despair, a coat of gloss, followed by you favorite flat coat solves the problem.
After attaching the "fiddly" parts, I had a fine representation of this Italian thoroughbred. I can highly recommend this kit. There is probably a C.205V in my future and I for sure want to do Hasegawa's 1/48 Fiat G.50.