Italeri 1/48 Fiat CR.42AS
| KIT #: | 2653 |
| PRICE: | $51.50 SRP |
| DECALS: | Four options |
| REVIEWER: |
Andrew Garcia |
| NOTES: |
Eduard etched used for seat restraint system, kit decals for
instruments. |
| HISTORY |
The Fiat CR.42 was a result of Celestino Rosatelli’s innovative aeronautical
designs evolution. Starting with the CR.1 in 1924 the CR.42 first flew May 23,
1938. At a time when low wing, high powered monoplane fighters were flying or in
thier prototype stages this bi-plane aircraft seemed to be an anachronism.
Rather than launch into a discussion on the state of the art at that time let’s
focus on how good this was as the apex of development of the CR series of
fighters. Its test pilot after the first flight stated it was “the ultimate
pilot’s airplane”. The CR.42 was powered by the FIAT A.74 RC.38 radial engine
which produced
 828 h.p. at
12, 465 feet. Even an in line
DB601E engine was fitted and tested in this airframe (CR.42DB) during 1942 but
by the end of initial flight testing the air ministry recognized the day of the
bi-plane was over and that ended the CR.42.
Its initial armament consisted of two fuselage mounted Breda-SAFAT .50
caliber (12.7mm) guns synchronized to fire through the propeller arc. A field
conversion was available and used to replace the weapons with Breda-SAFAT .30
caliber (7.7mm) guns – as a weight saving gambit.
828 h.p. at
12, 465 feet. Even an in line
DB601E engine was fitted and tested in this airframe (CR.42DB) during 1942 but
by the end of initial flight testing the air ministry recognized the day of the
bi-plane was over and that ended the CR.42.
Its initial armament consisted of two fuselage mounted Breda-SAFAT .50
caliber (12.7mm) guns synchronized to fire through the propeller arc. A field
conversion was available and used to replace the weapons with Breda-SAFAT .30
caliber (7.7mm) guns – as a weight saving gambit.
The CR.42 was produced from February 1939 through June 1943 for a total of 1700
airframes. It evolved from the initial day fighter design into a night fighter,
fighter bomber and two seat training airframes. It was well liked by its pilots
and served in Italy, Western Europe (Belgium/France), Mediterranean, Russian and
North African fronts. It was even used by the Luftwaffe, designated CR.42LW, in
Italy during 1944 and in France during late 1943 for anti-partisan missions.
When the war ended it was still in service stationed in Austria and Croatia. It
was an ace maker logging air-to-air combat success for pilots from Italy,
Hungary, and Belgium.
| THE KIT |
Italeri have released three versions of their CR.42 Falco kit. The first
release, a CR.42 LW (# 2640), in late 2004 was for the CR.42LW Luftwaffe Night
Attack version with an extended exhaust muffler and partial landing gear spats.
That kit had no bombs which is an omission. It was followed by this release, #
2653, a CR.42AS Fighter-Bomber, which added a no spats landing gear (it also has
the full spats plastic parts as well) and some bombs the following year. Parts
tree “A” was changed adding the partial spats landing gear and bombs. Parts tree
“B” was changed deleting the Luftwaffe specific parts for the night operations
extended exhaust and partial spats parts. The Italeri # 2653 release has a
wonderful color printed walk-around booklet that is of great modeling value and
tremendous help in building this aircraft. There are many details on the CR.42
to be found and understood. The booklet positively helps with and adds a lot to
your building satisfaction. In 2007 the # 2702 Falco Aces release came out
featuring the most produced version of the CR.42 with colors and markings of
aces from Italy, Hungary and Belgium. Italeri’s # 2702 Falco Aces features the
required full spat landing gear and simple (non-dust filter) carburetor air
intake along the bottom centerline. The first two releases by Italeri, # 2640
and # 2653, only have the dust filter
 air intake
limiting how many CR.42 versions you can produce from those kits.
air intake
limiting how many CR.42 versions you can produce from those kits.
The Italeri CR.42 was well received when it was released and several in-box
reviews appeared giving it positive marks but always indicating that the value
of this kit would be determined after it was built. It was hoped that a new tool
injection plastic kit of the CR.42 from a major manufacturer would reward
modelers with a kit they have been waiting for. Classic Airframes released a
series of CR.42 kits, starting in 1995 with # 402, followed a few years later
with an improved tooling for kits #474, 475, 496, 497, 498, and 499 spanning all
the possible CR.42 variants
including a two seat trainer and seaplane! The Classic Airframes kits are still
available from many hobby shops, eBay and some internet retailers as well. I
mention the CA kit here because it set the standard against which the Italeri
kit would be compared.
The main differences in the three Italeri CR.42 kit releases are in the landing
gear, bomb racks/shackles and carburetor intake parts.
Sadly, very few Italeri CR.42’s have
appeared at modeling contests that I have been to. I have not seen many in
on-line web builds either despite the many versions and years of sales
availability. In general it could be because bi-planes are more difficult to
build. It could also be because the specific kit releases proved to be difficult
to build into nice replicas due to construction impediments.
Scott reviewed the kit stating “For decades we had no 1/48 CR.42 until Classic
Airframes released their short run kit several years ago (about 1996). While
nice, it had some issues in terms of dimensions. This kit was retooled last year
(i.e. about 2007) and produced in a
much nicer version. So it was with much surprise that we find Italeri producing
the same aircraft as a 1/48 kit. Now one might think that I'd compare the two,
but really, it is an apples and oranges thing. The CA kit is a short run
multimedia kit with lots of resin bits and pieces. This is a mainstream
injection molded kit and so does not have the usual resin and photo etched bits
that one finds in short run kits. Not the same animals at all.”
That helped me with answering the question of do I want to buy and build some of
the newly released Italeri models or get down to building the Classic Airframes
kits in the stash. So I bought the Italeri kit and cut into the two large sprues
that fill a pretty good sized box. The clear windscreen was the only part found
on the small clear tree. It has an indentation on the forward portion, probably
to represent the glass screen of the gunsight, though one is not indicated nor
is this feature explained in the box instructions. At first I did not know why
Italeri had this strangely shaped diagram on the front windscreen. Most kit
reviewers overlooked or failed to comment on this windscreen anomaly. I still
don’t really “know” but
 here’s what
I think after reviewing the Italeri kit # 2653 booklets color photos found on
page 30. Many web reviewers made no mention of it or noted it looked like an
opening for a telescopic sight. Some were unsure as to its meaning or purpose.
So I will go out on a limb and note the gunsight is just behind the front
windscreen and probably represents the gunsight glass superimposed on the
windscreen as a design simplification. It, the gunsight, is there at the top of
part A2. Once the cockpit is in the fuselage, the San Giorgio Type B reflector
gunsight in the middle of the panel pokes up behind and below the windscreen –
almost touching it. Thus, by placing it as part of the front windscreen’s “panel
lines” it looks like the gun sight glass is there, sitting on the gunsight, when
looked at from certain angles. It is an interesting alternative but I would have
preferred a separate gunsight with glass on the clear parts tree.
here’s what
I think after reviewing the Italeri kit # 2653 booklets color photos found on
page 30. Many web reviewers made no mention of it or noted it looked like an
opening for a telescopic sight. Some were unsure as to its meaning or purpose.
So I will go out on a limb and note the gunsight is just behind the front
windscreen and probably represents the gunsight glass superimposed on the
windscreen as a design simplification. It, the gunsight, is there at the top of
part A2. Once the cockpit is in the fuselage, the San Giorgio Type B reflector
gunsight in the middle of the panel pokes up behind and below the windscreen –
almost touching it. Thus, by placing it as part of the front windscreen’s “panel
lines” it looks like the gun sight glass is there, sitting on the gunsight, when
looked at from certain angles. It is an interesting alternative but I would have
preferred a separate gunsight with glass on the clear parts tree.
The kit cockpit seemed designed for a novice modeler and had rough details. It
greatly benefited from adding some Eduard etched details.
I had much higher expectations of Italeri for this kit after my recent
build of their Macchi MC.200 kit which I found to be quite nice. I even found
the fit of the completed cockpit tub into the fuselage to be a problem on one of
my two initial builds for this kit. This was unexpected since the kit looks like
it is very simple to assemble due to the few parts involved in its construction.
The only saving grace is you cannot see
much of the cockpit once the kit is built due to the small cockpit opening.
However, the bi-plane wings do not obstruct peering into the cockpit and that
 means you
should think about improving this area, especially the seat and main panels with
some color etched metal.
means you
should think about improving this area, especially the seat and main panels with
some color etched metal.
Since resin aftermarket details for the Italeri CR.42 are hard to find and you
can peer into the cockpit, I was concerned about the lack of detail. Folks at
contests surely will peer into the cockpit. Although it is a very simple cockpit
comparing pictures to the kit plastic with an actual airframe left me wondering
why the opportunity to make a definitive CR.42 was missed by Italeri. The oxygen
tank and compressed air tanks are missing from the cockpit area. The San Giorgio
gunsight is poorly done and the magnetic compass that sits under it is missing
from the cockpit. The finished cockpit has a brown or natural leather color trim
pad running from the headrest to the front edges of the cockpit. This is clearly
seen in the photos on pages 30 and 31 of the Italeri booklet. The padding even
encompasses the rear edges of the windscreen. Only the rear headrest padding is
provided, the rest of the cockpit opening padding is not represented in the kit
plastic.
As our Editor Scott noted, and I too was
perplexed that the general color of the interior was given as light grey and not
the Italian Interior Green found on most Italian aircraft. However, this is the
color used in the aircraft FIAT built after the war. A beautiful restoration
CR.42 was created from parts for an Italian Aviation Museum. It is documented in
color photographs in the booklet that comes with kit # 2653. There are two
options for the instrument sections. Both decals and raised detail panels are
offered for the main instruments and side panel. Also, a seatbelt decal is
provided but is fictitious since the real restraint system looks nothing like
the decal.
I built my CR.42’s using several variations of cockpit additions.
I think the combination of instrument
decals with some decal solvent on the raised detail panels looked best if you
want to avoid any aftermarket additions. I tried this on a build of the Italeri
CR.42LW version and turned out to be the best almost OOB route. However, the kit
seat belt decals were incorrect so the build was accompanied by Eduard "EU49017
Seatbelts Italy" pre-painted etched metal seatbelts. I did not use the flat
plastic instrument side panel and main console part 48A and used 6A with
49A/50A. I used the raised detail panels applying the decal with some Microsol.
The solvent worked perfectly to adapt the decal to the raised surface and gave a
better end result. The instructions would have you apply the decal to the flat
plastic parts. By using the raised detail part you can easily paint it flat
black after the decal snuggles down since the decals are raised above the
plastic panel (see photo comparison) for an improved appearance.
 but
incorrectly done on the kit decal. This is one example of the lack of subject
research reflected by poor detail or a decision on the part of Italeri to accept
mediocrity in its cockpit parts. This lack of finesse in moulding detail was a
big concern I found with this kit. Ideally
these parts could have been part of the kit plastic.
but
incorrectly done on the kit decal. This is one example of the lack of subject
research reflected by poor detail or a decision on the part of Italeri to accept
mediocrity in its cockpit parts. This lack of finesse in moulding detail was a
big concern I found with this kit. Ideally
these parts could have been part of the kit plastic.
There is no mention that two steel support rigging cables are part of the end
portions of the struts. They are in an “X” configuration and nowhere to be seen
as a suggested addition in the assembly instructions. They do appear in the
instruction booklets painting guide, decal colors and markings placement
profiles for the aircraft if you look closely. The kit decals should have the
prominent FIAT A.74 engine information plate (see page 24 & 25 of the kit # 2653
booklet). The FIAT “eliche” or propeller logo which is similar to the Hamilton
Standard prop logo (its picture is on pg. 27 kit # 2653 booklet) is close enough
so I will give them an OK on that item.
These are examples of the small details that could have made the kit a
standout and worth its asking price.
Italeri would have you glue all the struts in step 4 and simply flip the upper
wing upside down. Because of its superior engineering all the struts would line
up and drop into the slots on the small lower wing and fuselage. This didn’t
happen as you can expect. The struts require perfect, and I mean perfect
alignment partly because they have raked angles. They are not positioned
vertically upright, that is at a 90 degree angle, so gluing those at the
required angle, per the diagram, did not work for me. Although the end points
have accurate angles as part of their design they did not click into place. The
tips have rounded attach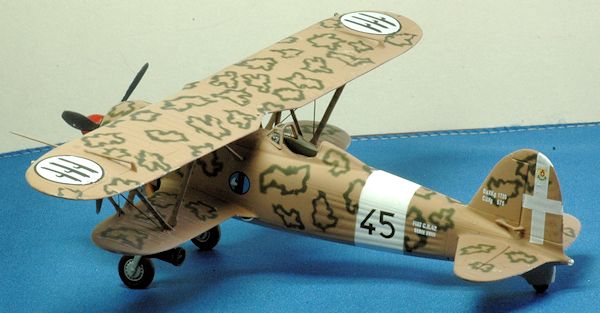 ment
points which make it easy if you are sliding it into the holes using some liquid
glue. My experience building four of these kits, working them two at a time
(simultaneously) was the struts tend to wander and fall over while you attempt
to glue them in place. They also come loose while drying because some are
apparently slightly short and stressed to fit. The small rounded knobs on the
ends tend to slip out of their attachment points (holes) very frequently. This
was most frustrating even when using a special tool like the SRAM to hold the
wings in place while attempting to align and attach the struts.
ment
points which make it easy if you are sliding it into the holes using some liquid
glue. My experience building four of these kits, working them two at a time
(simultaneously) was the struts tend to wander and fall over while you attempt
to glue them in place. They also come loose while drying because some are
apparently slightly short and stressed to fit. The small rounded knobs on the
ends tend to slip out of their attachment points (holes) very frequently. This
was most frustrating even when using a special tool like the SRAM to hold the
wings in place while attempting to align and attach the struts.
The engine is complete and nicely done. It is a nice reproduction of the FIAT
A.74 RC.38 radial engine and is similar to the Italeri Macchi MC.200 engine with
two rows of cylinders and separate push rod detailing. However, the pushrods did
not reach the top portion of the cylinder heads which was a shock and
disappointment because they were fine on my Italeri MC.200 build. The CR.42, all
three Italeri produced versions that I built, suffered from short push rods
(part # 23a & 19a). Also, the prominent engine manufacturers data plate on the
engine’s port side is missing from the kits decals. It is quite large and
visible on the actual engine. A tiny decal is all that was required to improve
this area.
 So I would
deduct a few detail points for the multi-sectioned cowl. This is a case where
simpler equals better and is a missed opportunity by Italeri to reduce the mould
cost and improve quality. A one piece cowl would have been much better – but
there could be a problem getting the engine inside the cowl so a minimum two
part cowl could be required but it is better than a “dodgy” four part
combination cowl construction process that Italeri provided. The exhaust
collector ring(s), part 18, includes hollowed out exhaust outlet tips which is a
nice touch. It comes as one part on the tree and you must cut it into two parts
for proper fit and alignment.
So I would
deduct a few detail points for the multi-sectioned cowl. This is a case where
simpler equals better and is a missed opportunity by Italeri to reduce the mould
cost and improve quality. A one piece cowl would have been much better – but
there could be a problem getting the engine inside the cowl so a minimum two
part cowl could be required but it is better than a “dodgy” four part
combination cowl construction process that Italeri provided. The exhaust
collector ring(s), part 18, includes hollowed out exhaust outlet tips which is a
nice touch. It comes as one part on the tree and you must cut it into two parts
for proper fit and alignment.
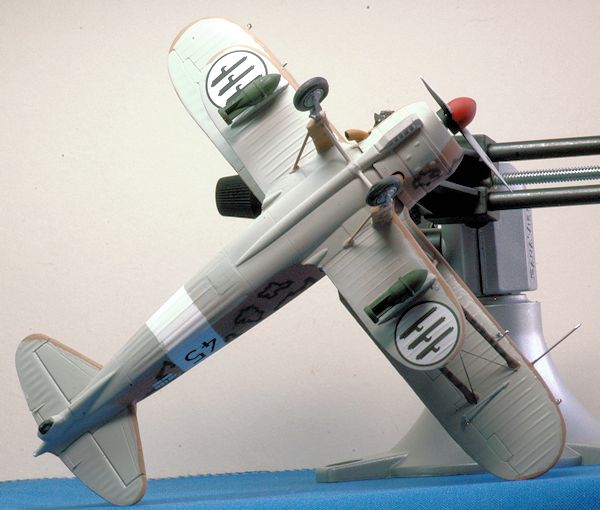
The landing gear has separate tires and is well moulded on the sprue. The tires
are easy to attach and look the part once on the kit. Separate gun barrels,
aileron and rudder actuating rods are provided.
Instructions are quite good, providing clear construction sections with color
information given as needed. These are all given as Model Master paint numbers
(Vallejo became the OEM maker for Italeri paints after this kit was released)
references as well as a generic name. The initial Italeri CR.42 kits used Model
Master paint numbers so this is a change for Italeri. My only concern is the
Model Master MM2110 Italian Sand color is very different from the Tamiya Desert
Sand (XF-59) that I usually use on Italian desert camouflaged aircraft. The
Tamiya XF-59 has a yellow tint compared to the Model Master’s brown tint. The
Tamiya shade is closer to color profile drawings. I did not have the newly
released Italeri or Vallejo paints on hand to round out the color comparisons.
This move by Italeri to expand their predict line with paints reminded me of the
Monogram Models paint line released many years ago.
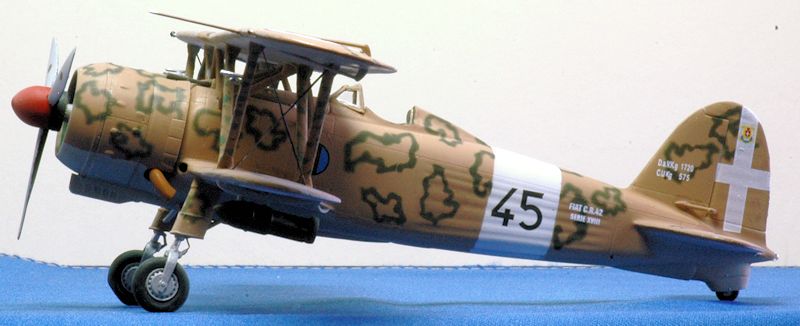
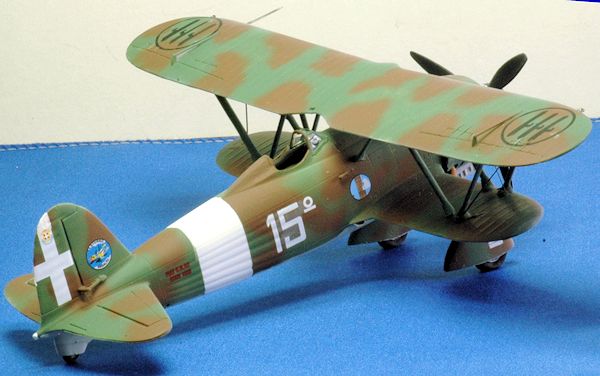
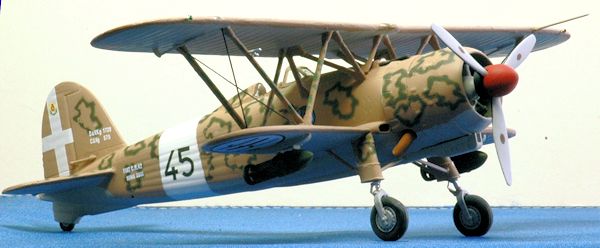
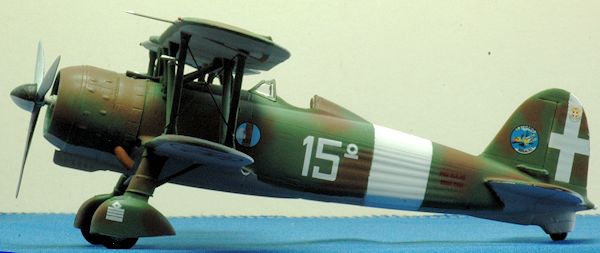
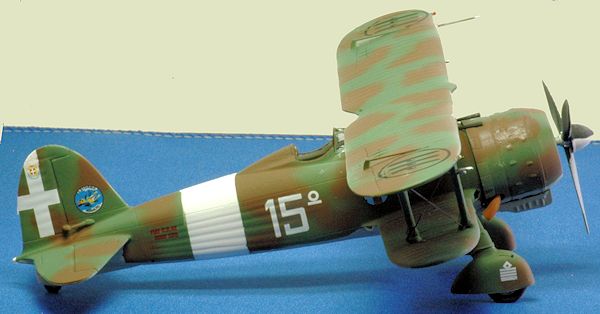
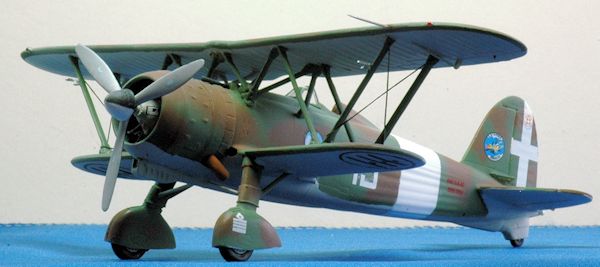
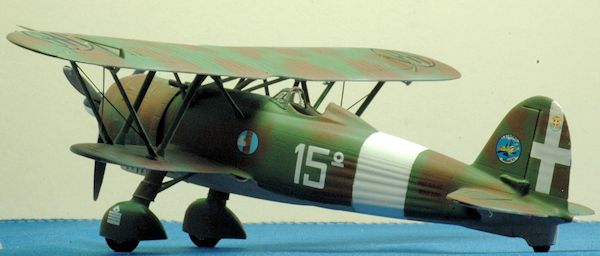
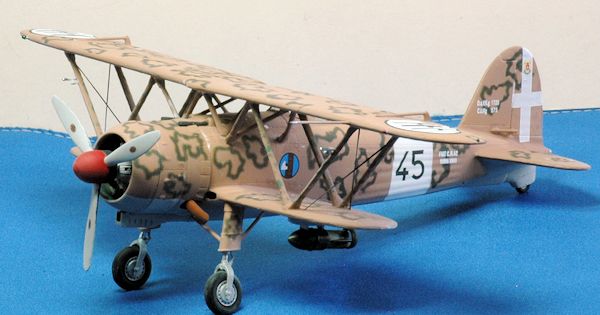
Markings are provided for four camouflaged aircraft, one representing the well
known smoke ring scheme and the others similarly colored overall green with
brown mottle serving in North Africa. The color box art also supplements the
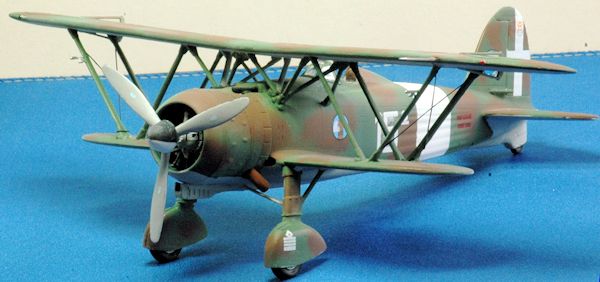
painting information. Three of the aircraft are similarly colored except for the
“smoke ring” version. They all have flat light gray undersides and overall dark
green with brown mottled upper surfaces. The kit decals are well printed, and
gloss finished so you will need some dull coating as a final finish. I was
surprised to see they were not done by Cartograph but they appear similar to
Cartograph quality. They are very thin, the printing is crisp, small details
such as stencils are clearly printed and are opaque and easy to work with. The
white paint used in the decal is not opaque enough and you might want to paint
those areas white before applying the kit decals. Perhaps the thinness of the
decal prevents the white from blocking a bleed-through of underlying colors.
| CONSTRUCTION |
The kit cockpit is a very simple assembly consisting of eight parts. I used the
kit decals for the instruments and Eduard etched for the restraining system
which added a lot especially providing the unique look of the restraining
chains, seat belts and seat cushion that is missing from the OOB Italeri kit.
The fuselage halves closed with some minor concerns coming from the cockpit
area. I did not attach the two cowl guns in step 2 preferring to leave them off
until the final, post painting detail step.
 others
moved about as I tried to glue them in place. It was not the highlight of
building this kit. It kept me from building a kit that I would enjoy sharing
with others in a contest setting. With better kit design and engineering it
could have been a more satisfying experience. The simple change of using square
or rectangular tips and rectangular/square mating insertion holes would have
provided a more secure and robust attachment point. I added the wing wires at
this point using E-Z line. The E-Z line was terrific and when I accidentally hit
it during the build it took the hits like the elastic material should, bouncing
back and maintaining a taut state. I drilled the holes for the rigging, use thin
cyano to secure them and when dry cut the E-Z line with a Xuron sprue cutter and
fill the hole with gap filling cyano followed by a thorough sanding.
others
moved about as I tried to glue them in place. It was not the highlight of
building this kit. It kept me from building a kit that I would enjoy sharing
with others in a contest setting. With better kit design and engineering it
could have been a more satisfying experience. The simple change of using square
or rectangular tips and rectangular/square mating insertion holes would have
provided a more secure and robust attachment point. I added the wing wires at
this point using E-Z line. The E-Z line was terrific and when I accidentally hit
it during the build it took the hits like the elastic material should, bouncing
back and maintaining a taut state. I drilled the holes for the rigging, use thin
cyano to secure them and when dry cut the E-Z line with a Xuron sprue cutter and
fill the hole with gap filling cyano followed by a thorough sanding.
By the fourth build I think I isolated what was causing the strut misalignment
problem. It all happens with step # 4! In
my opinion parts 12B and 14B throw off the alignment possibly because they are
the wrong length or the attachment points are poorly located. If they are glued
in place after the two inner cabane struts the wing will twist out of alignment
when viewed from above. This problem
will skew the top wing and then all the other struts will be short or not reach
their correct locations. I found by gluing parts 13B and 15B then attaching it
to the wings before the glue has set permits the first alignment to be usable
and sets the foundation for the next steps. I used the SRAM tool to hold the
wing in place (see photo) while attaching the upper wing to parts 13B and 15B.
Once dry I glued in place the outer braces, parts 8/9 and 18/19. Once they set
the rest were put in place and they were much easier to get into their assigned
locations. Doing it this way means parts 12/14 are the last struts to go into
place. It was a struggle to get them, parts 12/14,
to fit so there may be a better way. I
have yet to find a perfect way to get this step go smoothly. It is a big barrier
to creating a desire to build more of these aircraft. Also, I recommend not
attaching the pitot tube at this point as indicated in the instructions. I tried
this on the first build, much to my skepticism and yes it broke off. I replaced
it with a metal pin which was much more durable than plastic and it was added as
one of the final pre-painting steps. Some other web builds that I read had
photos of weighted objects used to force the struts into place while the glue
dried.
Step 5 has you assembling the engine and engine cowl. Part “B” of step 5 has you
cutting the exhaust ring into two parts and attaching it to the engine. I could
not understand why Italeri didn’t leave this as a one part unit and would have
you cut it into two parts. It is so much easier to work with as one part. The
alignment is also better. I followed their instructions in one CR.42 build and
in the other three CR.42 builds I left part 18A as one unit and found it much
easier to attach to the engine as a single part. The attachment, whether you use
the Italeri two part process or keep it as a uni-body assembly as I tried, is
not precise. It just did not properly line up and attach to the exhaust ports on
the Italeri engine.
Step 5 has you attaching the cowl rings and again there is some sloppy design or
misguided effort to open up the cowl. Breaking down this area into four parts
creates a troublesome area where it should be a quick painting and assembly
process. I inserted the engine, glued all the sections together and left the
cowl off the fuselage for painting. I did it this way to permit an easier
painting of the exhausts and insertion of the exhaust stacks as well as getting
the exterior paint coverage into the section at the nose that connects with the
front cowl. The disadvantage of this is the engine air intake does not properly
attach to the cowl without leaving a noticeable gap. Part 40, which is the
engine air intake is added in step
 6. This is
where having the cowl as a one or two part item with the intake portion (Part
40) under the cowl, that is moulded with it rather than as a separate part would
have been a better modeling solution. But, if you have a multi-piece cowl as
your design objective this causes potential alignment problems. My vote is for a
one piece crisply moulded cowl…
6. This is
where having the cowl as a one or two part item with the intake portion (Part
40) under the cowl, that is moulded with it rather than as a separate part would
have been a better modeling solution. But, if you have a multi-piece cowl as
your design objective this causes potential alignment problems. My vote is for a
one piece crisply moulded cowl…
Step 8 has you assemble and attach the spats and landing gear. No surprises here except for the above mentioned misalignment gaps requiring filler putty. The spats required filler and sanding before attachment. Step 9/10 is the attachment of the windshield, aileron and rudder horns plus the venturi tube on the fuselage. The aileron and rudder horn linkages are a tad thick. I thought about replacing the long rod segments with some guitar wire. Due to the many other inaccuracies I found as I built this kit I did not think it was worth my time investment to fix these on this build. The rudder and aileron related small parts are too large and the ones Classic airframes used which are in etched metal, are a better example of staying in scale with small parts but the etched is not as easy to apply. The Italeri horns are easy to work with though so it is a tradeoff between finesse, ease of assembly and injection moulding tolerances. Note, part 39A, a sway support brace connecting the two spats has a forward sweep. Since there is no attachment key aligning it or preventing you from gluing it in backwards be aware of this and dry fit because you could attach it backwards. If you overlook this concern the join results in braces that fail to connect with the spats. The brace also serves as a nice alignment tool to keep the landing gear correctly aligned.
| COLORS & MARKINGS |
The decals come on a well printed sheet with four options. I chose the markings
for a smoke ring version used in a fighter-bomber training school “Scuola Caccia
Assalto” based in Ravena, Italy during April 1942. There are some very clear
photos appearing in reference books for this aircraft. There may be a mismatch
of the wing markings used. The kit instructions do not match the kit box top art
nor a similar decal found in the Classic Airframes CR.42AS kit. Since there was
a transitional period when the white background was phased out and a low-viz
black only R.A. marking used perhaps it is not an error.
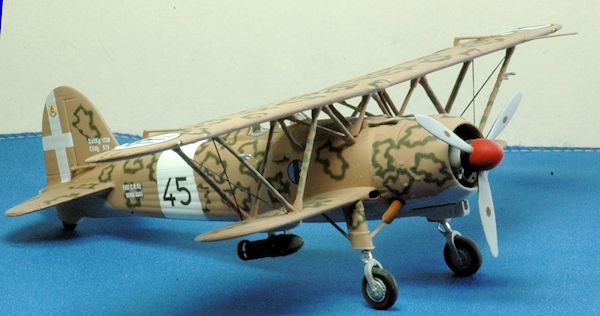
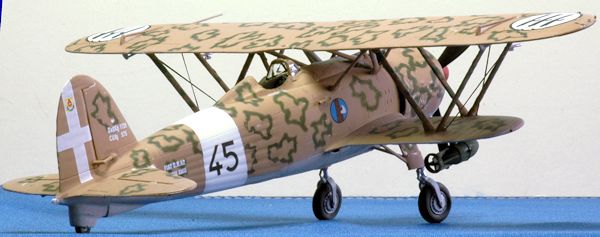
I built two of these at the same time in order to have the two different “AS”
landing gear variations so the second version represents an airframe from the
Regia Aeronautica, 387th Squadriglia, 158th Gruppo, 50th
Stormo Assaulto in Lybia during August 1942.
The colors used were Verde Mimetico 2, applied using Testors Model Master # 2112
Italian Olive Green, Model Master # 2111
Italian Dark Brown mottle over a base layer of Model Master # 2110 Italian Sand
enamels. The under surfaces and wing struts were over Flat Light Gray (FS.36495)
undersurfaces using
 Gunze H306
acrylic. I experienced some
problems applying the decals. They did not want to slide off the carrier sheet
and I had to pry them off with tweezers. Perhaps humidity during storage
activated the decal glue or I left them in the water too long or not long
enough?
Gunze H306
acrylic. I experienced some
problems applying the decals. They did not want to slide off the carrier sheet
and I had to pry them off with tweezers. Perhaps humidity during storage
activated the decal glue or I left them in the water too long or not long
enough?
Weathering and Final Coat – some pastel chalk and black/brown pin wash was used.
I sprayed on a Future coat used during the initial decal application and after
decaling was completed I used Future using a brush to seal all of the decals.
Testors Dull Cote was used during the final step to seal all of the decals and
give the correct flat finish.
The props had the correct decal stencil. The kit decal # 15 are the prop logos. They were supplied with the kit and look like the Hamilton Standard logo. It was so small I could not make out if the printing indicated a “FIAT” logo stencil on the prop since they are similar in shape and appearance the Hamilton Standard logo.
| FINAL CONSTRUCTION |
The kit looked decent once assembly was completed if you don’t look too closely.
I went over the kit to fix a number of
small gaps or incomplete joins with Tamiya putty and some Mr. Surfacer 500. One
of my biggest concerns was the gap between the fuselage cowl and engine air
intake. I had to use glue and clamps to mate these parts since they are separate
units. The intake should have been moulded as part of the cowl but that would
mean a loss of ease of manufacture since the other CR.42 versions have no dust
filter box at the tip of the intake. Classic Airframes took the same approach as
Italeri with this component. The CA kit has you cut off the tip and add a resin
dust filter box to the tip. That would have solved the gap problem I experienced
with Italeri.
The very last steps were attaching the wing bracing wires, the venturi and
engine with its cowl since I opted to paint the kit with the cowl off. That
allowed me to attach the exhausts after the cowl was painted
 and avoid
repainting them. I could do this because Italeri provided a keyed attachment
point for the engine to the fuselage. The only problem is the dust filter tunnel
and nose tip underneath the cowl does not get attached as closely as I would
like. Normally I would attach the cowl and paint everything at the same time but
I did it this way to avoid having paint getting in behind the cowl flaps. That
could have affected the aluminum engine or inside cowl green zinc chromate
paint.
and avoid
repainting them. I could do this because Italeri provided a keyed attachment
point for the engine to the fuselage. The only problem is the dust filter tunnel
and nose tip underneath the cowl does not get attached as closely as I would
like. Normally I would attach the cowl and paint everything at the same time but
I did it this way to avoid having paint getting in behind the cowl flaps. That
could have affected the aluminum engine or inside cowl green zinc chromate
paint.
The wing tip lights were painted Testors chrome silver. The lights needed some
filing and sanding because the upper and lower wing segments of the wing lights
failed to correctly align. The first time I thought it was my error, but by the
fourth kit it gave me an impression of weak quality in the moulds. If the lights
would have been one piece units and part of either the top or bottom wing half
this misalignment could have been avoided.
When it was dry I used Tamiya clear red and green over the lights and
the model was finished.
I am not sure that attaching the pitot tube on the wing is correct. It does not
appear on the Classic airframes instructions and they have proven to be a good,
reliable source e of details for the Cr.42. I tried searching for this component
on period pictures of the CR.42 but came up empty handed.
| CONCLUSIONS |
Italeri could have moulded their plastic
parts much better and improved the kit assembly process by doing so.
Some of the parts are somewhat crude,
especially compared to other major plastic kit manufacturers. Some parts were
not the crisply moulded plastic I would have expected from them.
I always try to be positive about a kit release since I truly appreciate
a manufacturer making the investment in new moulds, marketing and research.
I was really looking forward to Italeri’s release of this kit and to this
build. That makes me more kind and generous in my evaluation. As much as I like
the subject matter and trying as hard as I can, this is a situation where I
failed to be able to overlook the weak details and
 poor
engineering given its relatively high price.
poor
engineering given its relatively high price.
The overall shape and dimensions of the kit are correct so don’t lose hope since
you can build a very nice model from this kit with a lot of care and application
of modeling skills to overcome kit deficiencies. I encourage you to build one
because some of the problems can be seen as a challenge to apply some modeling
skills and it’s part of the hobby. I am very pleased to look at this CR.42 now
that it is completed. I will build a few more when I can get them for a more
reasonable price. My finished kit may not be a contest ready model but it is
satisfying to have one built sitting on my model shelf and there are other
CR.42’s I would like to model just because I like the colors and markings.
Despite the Italeri kit being an all styrene effort, I would say the Classic
Airframes CR.42 kit(s), second release series, is a competitive alternative to
Italeri in all respects. The CA kit has a much better cockpit with far more
accurate detail. You have to balance that with the inherent complexity of
working with mixed media including some thin and at times flimsy etched metal
bracing for the CA kit interior (in its first release), so be careful what you
wish for. The CA kit is more difficult to build with a far greater parts count 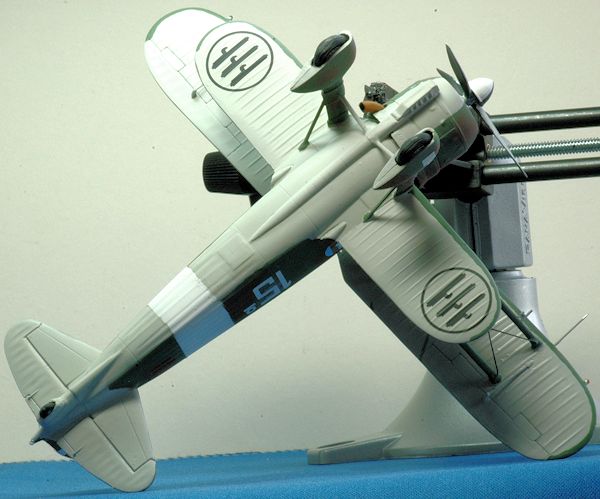
| REFERENCES |
Fiat CR 32/CR 42 In Action, # 1172 by George Punka, Squadron Signal Books 2000
Profile Publications No. 16 FIAT Cr.42
C.R. 42 Falco Italeri Kit # 2653 booklet, 2006
Fiat Cr.42 Ali e'Colori No. 1 La Bancarella Aeronautica
SKYmodels decal 'Fiat CR.42', # 48-036 and 48-037
Fiat CR 42, Ali D’Italia #1, La Bancarella Aeronautica, 1995
August 2013
If you would like your product reviewed fairly and fairly quickly, please contact the editor or see other details in the Note to Contributors.