Airfix 1/72 Fiat G.50
| KIT #: | ? |
| PRICE: | $9.95 NZ |
| DECALS: | One option |
| REVIEWER: | Mark Fordham |
| NOTES: | Converted to a series 1 |
| HISTORY |
Since Scott has already done a review of the Bis I will just point you towards his excellent review for a history of the G50
| THE KIT |
As I had already done a
couple of the Airfix G50 Bis kits in the past and I had just finished the
Frog G55 and it was an “E” month at the local model club meeting coming up
I decided to modify the G50 Bis back to the G50 with the full canopy and
lower tail profile. Let me just explain this letter of the Alphabet thing,
every month we pick a letter of the alphabet at random
 and bring along a
subject pertaining to that letter and do a show and tell on it, that month
the letter was “E” so I decided to take along the G50, G50 Bis and the G55
and show the evolution of the Fiat G50 series.
and bring along a
subject pertaining to that letter and do a show and tell on it, that month
the letter was “E” so I decided to take along the G50, G50 Bis and the G55
and show the evolution of the Fiat G50 series.
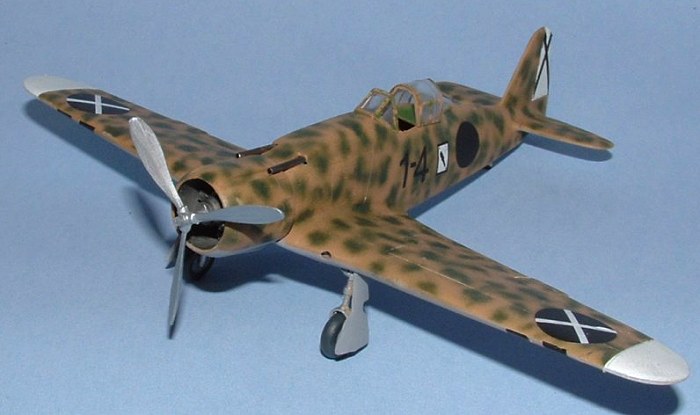
Another reason for doing this conversion was the fact that the profile I was basing the conversion on showed the G50 in Spanish Civil war markings which are easy for me to create on my laser printer. The first chore was to saw the rear cockpit hump off the fuselage and clean up the profile, next the cockpit was scratch-built using plastic card and the original Airfix seat, a rear decking was added behind the seat and the cockpit was given a sloppy coat of dark gray and closed up.
The rudder of the G50 is shorter and squatter in profile than the Bis so using the colour pics in the Fighter Aircraft of WWII as a guide the rudder was reshaped to the correct shape, superglue was used to fill the original lines so they could be re-scribed in the correct place. Tamiya filler was used to fill the odd gap along the fuselage and to fill the sink marks that all Airfix kits have.
| CONSTRUCTION |
Apart from the canopy and
rudder there isn’t a lot of physical differences between the two marks so
the rest of the construction just followed the instructions with the
exception of adding brass tube for the nose gun barrels, the diameter of
the gun barrels is a little big for 1/72nd scale and they are
closer to 20mm cannons in size, but I had run out of the really fine brass
tubing I normally use for machine guns and as it is only available in a
couple of shops in Auckland I will have to wait for my annual trip down
there to replenish my supply, the tubing I used this time is off the
printer refill bottles annulled so you can cut it with a Dremel tool.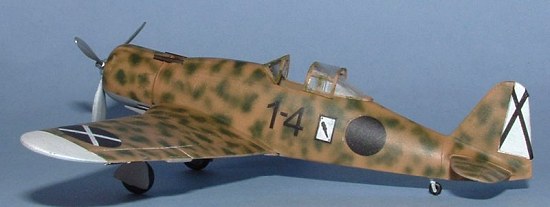
The rest of the kit goes together with little fuss and just a drop of filler along the wing joins is needed to clean things up. The raised panel lines such as they are were sanded off and re-scribed. The cowling was cleaned up and the cooling slots were re-scribed and glued in place, now the fit is rather vague here and it’s up to the Mk I eyeball to get the angle of dangle right.
The full canopy was made up from an old cut down FW 190 canopy, the Fw 190 is right in profile for shape up it’s too square in cross section, so to hide this fact I cut the center section out and made a rounder section from clear stock, I will replace the canopy with a homemade vacuformed one when I finally get the bugs (weta’s) out of the vacuform machine I have been building/experimenting with for the last few months.
| COLORS & MARKINGS |
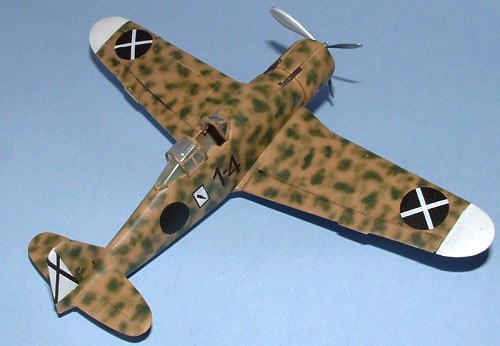
The Spanish Civil war G 50 did not look like they were repainted from the standard Italian light gray/sand/green mottle so I followed the usual Italian painting route, the light gray was sprayed on first and masked up, followed by the sand and finally the green mottle was added freehand, once dry the white areas were masked off and sprayed using Humbrols matt white, which is far better than the Tamyia white for covering properties baring in mind I’m trying to cover sand and green splotches with white!
 Once the painting was
complete a couple of coats of future were applied to in preparation of the
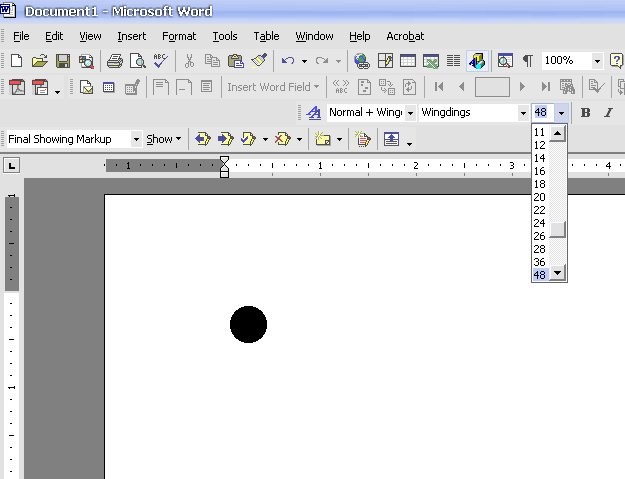
homemade decals, the first thing was to open Word (I have Office XP but
Word 97 will do the same thing) and select the Wingdings font and use the
“L” key, this gives you a round circle that is scalable (l) and because it
is a font it doesn’t suffer from the “jaggies” or softness when you resize
it. You can also scale it to different sizes by selecting the font size,
just remember that even though the default largest size is only 72 you can
manually make it bigger by typing in the size you wish, not every size
works (IE: 99 may not work but 100 will) just play around with it until you
get close to the size you require.
Once the painting was
complete a couple of coats of future were applied to in preparation of the
homemade decals, the first thing was to open Word (I have Office XP but
Word 97 will do the same thing) and select the Wingdings font and use the
“L” key, this gives you a round circle that is scalable (l) and because it
is a font it doesn’t suffer from the “jaggies” or softness when you resize
it. You can also scale it to different sizes by selecting the font size,
just remember that even though the default largest size is only 72 you can
manually make it bigger by typing in the size you wish, not every size
works (IE: 99 may not work but 100 will) just play around with it until you
get close to the size you require.
Once you are happy you can then print it out on a test sheet, I use a battered old laser printer that is down to single sheet feed now and jams 4 times out of 10 but for printing this sort of things it is perfect, now that I have the black “dots” printed on the paper I then cut out my clear decal paper slightly larger than the dots and carefully tape it OVER the printed paper, I then run the paper back through the printer again and the laser then prints the dots onto the clear decal paper, repeat until you have all the marking you need.
 I use cheap tacky
bathroom tile decals for my clear decal stock as desk jet decal paper is
impossible to get here in Whangarei, New Zealand; these tiles have a tiny
pattern in the center of its 4 inch square decal giving me enough usable
clear film to do markings and black lettering or codes. Unfortunately desk
jet ink will NOT dry on these types of decal.
I use cheap tacky
bathroom tile decals for my clear decal stock as desk jet decal paper is
impossible to get here in Whangarei, New Zealand; these tiles have a tiny
pattern in the center of its 4 inch square decal giving me enough usable
clear film to do markings and black lettering or codes. Unfortunately desk
jet ink will NOT dry on these types of decal.
 With
the custom made decals done it is a simple matter to use my home made decal
softener on the home printed markings, the tile decal is rather thick and
you will need to bump the acetic acid up to about 40% for these ones but
they will then snuggle down nicely. I originally used to coat the laser
printed markings with clear or liquid decal but I discovered that it’s not
really needed and water and decal softener doesn’t affect the toner on the
decals. The white
With
the custom made decals done it is a simple matter to use my home made decal
softener on the home printed markings, the tile decal is rather thick and
you will need to bump the acetic acid up to about 40% for these ones but
they will then snuggle down nicely. I originally used to coat the laser
printed markings with clear or liquid decal but I discovered that it’s not
really needed and water and decal softener doesn’t affect the toner on the
decals. The white
 crosses
on the black roundels are simply white decal strip cut and applied
separately. The black stripes are cut from printing a solid black box
over the patterned part of the tile decal and cutting them up into the
required width strips, this way nothing is wasted from the tile decal.
crosses
on the black roundels are simply white decal strip cut and applied
separately. The black stripes are cut from printing a solid black box
over the patterned part of the tile decal and cutting them up into the
required width strips, this way nothing is wasted from the tile decal.
Once all the markings are in place seal with your favorite matt coat and you are done.
| CONCLUSIONS |
 I really like these
series one Airfix kits as they give you a cheap medium to experiment with
new ideas, the kits are simple enough for the novice to slam together in
about 5 minutes but can give the more advanced modeler something that they
can add a fair amount of detail to or use as a basis for a conversion to a
non kitted version. As you can see I have been experimenting with homemade
decals lately and so what if they screw up and destroy the paint job, I’ve
only wreaked a $10.00 Airfix kit rather than a $30.00 Tamigawa masterpiece,
which incidentally I screw up just as well as a Airfix kit.
I really like these
series one Airfix kits as they give you a cheap medium to experiment with
new ideas, the kits are simple enough for the novice to slam together in
about 5 minutes but can give the more advanced modeler something that they
can add a fair amount of detail to or use as a basis for a conversion to a
non kitted version. As you can see I have been experimenting with homemade
decals lately and so what if they screw up and destroy the paint job, I’ve
only wreaked a $10.00 Airfix kit rather than a $30.00 Tamigawa masterpiece,
which incidentally I screw up just as well as a Airfix kit.
Long live Airfix and death to the heretics.
| REFERENCES |
Fighter Aircraft of WWII
September 2004
Copyright Modeling Madness.com. All rights reserved. No reproduction in part or in whole without express permission.
If you would like your product reviewed fairly and quickly, please contact the editor or see other details in the Note to Contributors.