
Mr. Kit 1/72 Fiat CR.42 Falco
|
KIT # |
PMK 72-01 |
|
PRICE: |
$29.95 |
|
DECALS: |
One aircraft |
|
REVIEW: |
Mark Fordham |
|
NOTES: |
Multi-media with a little bit of everything! |
|
HISTORY |
The Fiat C.R.42 "Falco" (Falcon) was the last biplane fighter to be made and see combat. It was fast for a biplane and was able to out manoeuvre almost anything in the air at that time including most of the new monoplanes just entering service. It first flew in 1939 and was ordered by the Regia Aeronautica (Italian Air Force) as a fighter and attack plane. The Falco first saw service with the Belgian Air Force in May 1940, when Germany attacked the Low Countries. The Belgian Fiats shot down several German planes, but almost half were lost on the ground. The Italians first used the Falco during the invasion of southern France, where they fought against second rate monoplanes. The Fiat was found to be inferior to the Morane Ms-406. Despite this the C.R.42 fought in North Africa, Malta, and the Balkans, and even in the opening stages of the Battle of Britain, even though better monoplane designs were available. From 1941 onward, the Falco was slowly regulated to ground attack work, while the Fiat G.50 replaced it as a fighter. The C.R.42CN night-fighter was the last model to be built in any large quantity, with a small generator on the top wing to power two spotlights under the lower wings and was still in service when the Italians finally surrendered.
|
THE KIT |
 Here we go. My very first multi-media Kit. Due to reasons that I wont bore you
with this review is being done by someone who has had NO experience with etched
brass or Resin before.
Here we go. My very first multi-media Kit. Due to reasons that I wont bore you
with this review is being done by someone who has had NO experience with etched
brass or Resin before.
Mister Kits’ CR42 consists of one sprue of limited run injection moulded components that have little flash and very finely engraved details, Upper and lower wings are moulded as one piece units.
One small bag of resin bits including nose cowling, engine and undercarriage. (Have to some research on this) A small etched brass fret and two vacuformed canopies and finally a nice little decal set comprising of One aircraft.
Here is a preview of this kit
|
CONSTRUCTION |
Starting with the cockpit I was confronted with seemingly dozens of small flat pieces of brass …hmmm now what? Mister Kit instructions show an exploded view of the cockpit and with a bit of head scratching I mated up the various flat bits with the built up parts. Next step after folding up the seat was how do you stick this stuff together? As I’m a "first timer" lets work through this step by step, Super Glue works well, but after gluing my fingers together twice it was time to ask the experts. Scott Van Aken came back with the suggestion of using Future as glue as the parts were not structural, sure enough all the etched bits finally stuck together without having to do any-more surgery on my fingers.
Scott- My fingers salute you.
 Once the cockpit was completed and painted it was time to move onto the
fuselage.
Once the cockpit was completed and painted it was time to move onto the
fuselage.
I added some sidewall details out of stretched sprue and together with the supplied resin and brass bits pretty much fill up the tiny cockpit. Interior colour is a light grey that has a slight blue tinge to it.
Being a limited run kit don’t expect the fit to be Tamiya class but the overall fit of the fuselage wasn’t too bad, plenty of sanding was needed on the upper fuselage but only a touch of filler was needed on the under fuselage wing joint.
Once the lower wing was fitted and cleaned up it was time for the struts. Now
bi-planes scare me as I never seem to be able to line up the struts properly,
and the CR 42 is no exception as the complex "W" strut system that the CR 42
uses are supplied as single pieces, some 12 pieces in all "Gulp!" Each strut was
removed from the sprue and reduced in thickness to bring them more "in- scale"
with the rest of the model, as supplied they look too heavy. I could have
replaced them with after-market struts or made new ones from plastic card, but
for this review preferred to build the CR 42 using only the kit supplied parts.
scale"
with the rest of the model, as supplied they look too heavy. I could have
replaced them with after-market struts or made new ones from plastic card, but
for this review preferred to build the CR 42 using only the kit supplied parts.
After numerous hours carefully checking the alignment of the struts using various jigs made from card I was finally satisfied that I had the struts in the right place? The Mister Kit has no marks or location holes to aid you in the location of the struts. So you have to do your measuring carefully.
Turning now to the resin bits. I did some reading up on this medium, for those of you like me that’s new to resin lets look at a couple of points, first Resin dust can be harmful to your health so when you sand resin parts either use a face mask or use wet and dry "Wet" to reduce the dust.
And secondly you need to wash all the parts carefully in HOT soapy water or paint "just ain’t going to stick" and finally Resin is a lot more brittle than plastic so be very careful removing the Moulding blocks from your resin pieces, use a fine razor saw and work very slowly or you could be like me and break bits!
 The Cowling on the CR 42 is cast out of tan resin and is superbly moulded,
and this single part shows off all the advantages of resin, as the detail is
beautiful.
The Cowling on the CR 42 is cast out of tan resin and is superbly moulded,
and this single part shows off all the advantages of resin, as the detail is
beautiful.
On mating up the engine however I discovered that I had to trim about ½ mm off the circumference of the Engine to get it to sit correctly in the cowling without distorting it. Once trimmed the engine was painted in my patient home-brewed dirty radial engine paint and given a wash of gloss black and dirty brown thinners to bring out the details.
Canopy was cut out and carefully trimmed to fit the contours of the fuselage, now vaccufomed canopies can be a bit daunting for the novice builder so Mister kit supplies two just in case you stuff the first one up. The most important point to remember measure twice, take a deep breath, measure again then cut out the basic shape, don’t worry about cutting it perfectly right the first time, once the canopy has been removed from the backing sheet trim to fit, checking the fit all the time remember. You can always take more plastic off but ya’ cant put it back on!
The last area of construction is the undercarriage and you have the choice of open wheels or full spatted legs and are supplied as Resin parts. I had to use the full spatted legs but on my example there was quite a few airholes on the right-hand leg and was noticeably thicker than the left one, I carefully reduced the thickness as much as I dared but it’s still wider.
Now I have a carpet that eats plastic model parts, and somehow one of the wheels became breakfast for the floor, so I was left with one wheel. After cleaning it up I decided that the quick fix to my problem was to chop the remaining wheel into two pieces and carefully fit them into the spats done and if I hadn’t said anything no one would have known.
The Kit gives you a choice of two different props, the one with a separate spinner is the better of the two and after cleaning up with painted matt Black on the back of the blades and Flat Aluminium on the front. The Spinner was painted Flat Red and added to the prop.
Bombs or smoke generators are supplied if you want your CR 42 to carry something but I preferred to leave these off.
|
PAINT & MARKINGS |
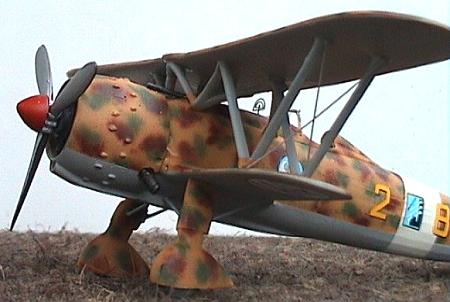
The Falco is depending on your outlook, an airbrusher’s dream or nightmare. The Italian camouflage consists of small green/brown splotches over a sand base.
 First step was to spray the White fuselage stripe, Once dry masked off and
the top surfaces were sprayed Humbrol 63 matt sand with a couple of drops of
white added. Then with my airbrush primed with Humbrols’ 105 randomly applied
green splotches over everything, I left the upper wing off to make painting
easier. Once dry I homebrewed the Brown as I couldn’t find anything in the
Humbrol or Tamiya range that was Red enough, I ended up using Tamiya XF-10 Flat
Brown mixed 70/30 with XF-7 Flat Red. The brown splotches were then applied and
left to dry for a day or two.
First step was to spray the White fuselage stripe, Once dry masked off and
the top surfaces were sprayed Humbrol 63 matt sand with a couple of drops of
white added. Then with my airbrush primed with Humbrols’ 105 randomly applied
green splotches over everything, I left the upper wing off to make painting
easier. Once dry I homebrewed the Brown as I couldn’t find anything in the
Humbrol or Tamiya range that was Red enough, I ended up using Tamiya XF-10 Flat
Brown mixed 70/30 with XF-7 Flat Red. The brown splotches were then applied and
left to dry for a day or two.
Finally the underside was masked off and sprayed with Tamiya XF-19 Sky Grey.
Masking tape was removed and the undercarriage was added, you have to scrachbuild the bracing struts out of wire or sprue. Upper wing was carefully lined up and glued using Kristal Klear, I prefer using this glue on pre-painted surfaces as it doesn’t mark the paint and is useful for filling the gaps between the struts and wing.
Struts were touched up here and there with grey and the plane was hit with a coat of future in preparation for the decals.
Only One aircraft is supplied on the decals Fiat CR 42 MM5668 but you have a choice of two points in it’s career. C.A.I Ursel, Belgium, 20th October 1940 and later in Lybia 25th January 1941, The only difference being the addition of white circles on the spats for Lybia.
The decals are nicely printed and are very glossy and went on with no problems, the white on the roundels didn’t discolour even on the multi coloured upper-wing.
I used Micro Sol on the first roundel but noticed that it started to dissolve around the edge of the roundel so stoped using it.
Finaly a coat of matt varnish was gunned on to finish the CR 42.
|
CONCLUSIONS |
 Well there you have it, A kit that incorporates almost all the mediums used
in kits today, Resin, Brass, etc
Well there you have it, A kit that incorporates almost all the mediums used
in kits today, Resin, Brass, etc
Accuracy? Sure looks the part and to me that’s all that matters, in fact. I had a ball with this model and it sure took away the drudgery of a long wet winter here in NZ.
I would definitely recommend it for your first multimedia kit, Sure the struts require a bit of work but if you work slowly and carefully you can add a very nice little CR 42 Falco to your collection. Far better than the old Revell CR42 offering .
|
REFERENCES |
Scale Aviation Modeller Vol 2 Issue 5 May 1996 "Rosatelli’s Falcon"
And the good old WWW.
If you would like your product reviewed fairly and fairly quickly, please contact the editor or see other details in the Note to Contributors.