Italeri 1/48 Re 2002 Ariete
| KIT #: | 2670 |
| PRICE: | $47.00 SRP |
| DECALS: | Six options |
| REVIEWER: | Lee Fogel |
| NOTES: | Yes, believe the hype… |
| HISTORY |
The
Re.2002 Ariete (Ram) was designed by Roberto Longhi and Antonio Alessio, who
took a modified and strengthened Re.2000 fuselage, mated to Re.2001 wings and a
more powerful radial engine, the Piaggio P.XIX R.C.45 Turbine (1,175 hp).
The
first prototype flew in October 1940, approximately three months after the
Re.2001. The evaluation period showed some reliability problems with the Piaggio
engine and therefore the aircraft served primarily as an attack aircraft
instead, as it could carry a considerable payload, by Italian standards.
 In
September 1941, the Italian Air Force ordered 200 aircraft, delivery of which
began in March 1942. The aircraft equipped the 5° Stormo and 50° Stormo,
although the engine problems hadn't been fully solved. The first batch of 100
aircraft were delivered by July 1943, but only part of the second batch was
delivered before the armistice with the Allies.
In
September 1941, the Italian Air Force ordered 200 aircraft, delivery of which
began in March 1942. The aircraft equipped the 5° Stormo and 50° Stormo,
although the engine problems hadn't been fully solved. The first batch of 100
aircraft were delivered by July 1943, but only part of the second batch was
delivered before the armistice with the Allies.
The
squadrons equipped with Re.2002s saw a great deal of action with the Allied
landings in Sicily although they also suffered many losses. During the first
four days, when the Italian Air Force tried to attack allied ships, 14 aircraft
were destroyed by British Spitfire Mk Vs. Allied bombing raids and strafing of
airfields destroyed many aircraft on the ground. Due to the lack of fuel, the
Re.2002s were only used sporadically, often equipped with three 250 kg or 100 kg
bombs.
The Germans had shown interest in buying 300 Re.2002s before the Armistice. They planned to use the German produced BMW 801 radial engine in order to eliminate the deficiencies with the Piaggio engine. However, Reggiane could not satisfy the demand, and none were delivered. However, some 40 "factory-fresh" Re.2002s along with 20 aircraft requisitioned from operational stocks were taken over by the Germans after the Italian armistice, and used against the French resistance
| THE KIT |
When this kit was released a few months back it garnered quite a bit of attention and none of it too flattering. A few weeks went by and I saw a fellow modeler and friend remark that he was going to trash his newly bought copy. He was pretty disgruntled and disappointed with it. So, we worked something out where he kept the book and art print but not the kit. Is this kit REALLY as bad as the naysayers claim? Follow along and see what the screaming and crying is all about.
My initial assessment is that what’s in the box
is underwhelming especially for $47 retail.
The quality of the molding reminds me of something we would have seen
about 25-30 years ago. The panel lines are lightly done and the rivet detail is
clean. But there are panel lines
that do not match up and a few others that are visibly off due to sloppy
measurements and the rivets were not present on the actual airframe as molded on
the kit surfaces. Plus there are rivets that just go off on their own with no
beginning or end. The plastic
itself is very soft with the feel and quality reminding me of the
| CONSTRUCTION |
 Starting
with the cockpit I painted it Model Master Pale Green and then picked out the
smaller details with various colors.
I did heat the back of the seat with a match and used a Testors brush
handle to make the prominent bulge for the pilot's parachute (as this is NOT
correctly molded by Italeri). I
then dry-brushed the cockpit with Testors Silver and then used various pastels
to add weathering to the entire area.
After this was done I place the individual instrument decals into their
respective positions. This makes
for a clean and sharp look. However
the instructions call out a repeated number (34) whereas the decal sheet has
each instrument with its own number.
So, the builder is left to guess where to place decals 32 thru 35!
Oh well, it’s not like we’re gonna go fly it after we finish, right?
Still, I had to wonder if this was a precursor of this being a
half-hearted attempt by Italeri with this kit.
Starting
with the cockpit I painted it Model Master Pale Green and then picked out the
smaller details with various colors.
I did heat the back of the seat with a match and used a Testors brush
handle to make the prominent bulge for the pilot's parachute (as this is NOT
correctly molded by Italeri). I
then dry-brushed the cockpit with Testors Silver and then used various pastels
to add weathering to the entire area.
After this was done I place the individual instrument decals into their
respective positions. This makes
for a clean and sharp look. However
the instructions call out a repeated number (34) whereas the decal sheet has
each instrument with its own number.
So, the builder is left to guess where to place decals 32 thru 35!
Oh well, it’s not like we’re gonna go fly it after we finish, right?
Still, I had to wonder if this was a precursor of this being a
half-hearted attempt by Italeri with this kit.
Moving to the wings I assembled the very plain
gear bays and then cut out the upper wing gun panels out and replaced them with
the kit supplied pieces. In all
seriousness I should have just scribed a panel as the kit parts lack any kind of
detail whatsoever. Truly this was
an exercise in how to waste time and was another “demerit” in my build.
At this time I glued the upper winger to the lower wing section and set
it aside to dry. There was small
step on the starboard side but otherwise the wings fit nicely with no fuss at
all. However the leading edge is
far too thick and looks out of scale.
I turned my attention to the fuselage.
The instructions call out to add the storage compartments on each side of
the fuselage. However, after seeing
how lousy the wing gun panels fit I decided to scribe the hatch doors instead of
opening them up. Also helping make
this decision for me was the fact that each compartment has a nasty ejector pin
mark right in the back of the compartment!
Anyhow, I assembled the tail wheel bulkhead (part 24A) and glued it and
the cockpit into the port side of the fuselage and then mated both halves
together. It’s at this moment that
I found out that the tail wheel bulkhead is slightly too small around and will
not fit in between both halves cleanly.
Argh! Small potatoes but
here we are with another (minor) boo-boo.
The fit of the halves is good with little fuss.
I did cut off the attachment peg on the bottom of the fuselage though as
it was messing up the fit in this area.
The two-piece plates (parts 21A & 26A) for the rear tail wheel have both
gap and fit issues that require sanding and filling to get a decent fit and
look. After this was done I set the
assembly aside and let it dry for the night.
The next day saw me mating the fuselage to the
wing section. The fit was tight but
so-so and there is some cleanup around the bottom near the cowling area.
The wing root fit is decent but can use a thin coat of filler to blend
the area in. Finally I added the
center piece that fits between the flaps.
It comes across as kind of an afterthought but it gets the job done.
I had to eyeball it as there is no location pin.
The main flaps require you to cut off a corner on each.
This is done by a sharp X-Acto blade.
I then glued the horizontal stabs in place.
The fit is very good and they are poseable.
The wing flaps can be dropped although nearly every picture I could find
of a Re 2002 had them in the up position.
Go figure. I decided to pose
mine dropped going with the rest of the emerging build theme of “something’s not
right here”.
-THE “DEAL BREAKER”-
The cowling is a real mess, folks. There is no
other way to put it. I can deal
with the funky rear faring hump (and
I'll get to it later on) but the cowl ring and gun troughs are just
a complete joke. If you mate the cowling ring (part 6A) to the cowling (parts 3A
& 4A) per the fit pins you will have a
major issue with the cowling scoop being
WAY off. I did my
best to "before and after" this. To try to correct the gun troughs I used a .7
drill bit and the Dremel on s-l-o-w to reshape them, add relief and an
actual hole. Then upon test-fitting
the cowl I had to trim and sand plenty of material off the inside of the cowl
where it mates to the fuselage. It
still did not fit quite right but I got tired of struggling with it after nearly
two hours of fuss. I just chose to
line things up the best I could and live with it. Then I test-fit the upper
cowling scoop (part 2A) and wound up with the piece being molded off-center.
I thought it was warped and tried to se hot water to correct it but that
did nothing. For me, this
cowling/scoop assembly is THE “deal
 breaker”
of this kit. Hands-down there is no
easy, simple or clean way to fix this particular issue.
I think that you could cut and section this area but even then you will
have the front of the air scoop being raised on one area of the cowl.
Without a complete scratch build/kit bash there is no real way to cleanly
fix this.
breaker”
of this kit. Hands-down there is no
easy, simple or clean way to fix this particular issue.
I think that you could cut and section this area but even then you will
have the front of the air scoop being raised on one area of the cowl.
Without a complete scratch build/kit bash there is no real way to cleanly
fix this.
Next I attached the rear faring hump that, for
some, is also a "deal breaker".
In all honesty a replacement piece would be the best and quickest route to fix
this. However I used one of my small sanding sticks and about 10 minutes of time
to get the results you see. Mainly just softening/eliminating the lower edge of
the concave area makes this look much better. Is it spot-on correct? Nope...but
it's much better than what Italeri molded.
The concave area is still too small and incorrectly shaped but it’s not
as severe with a bit of sanding.
Compared to the cowl fiasco this is a real piece of cake!
I then attached the bomb rack/lower intake scoop (part 7A). Sadly, it too suffers from the same “laziness” and warped molding issue that the upper intake suffers from. It’s not near as bad but you can clearly tell that it’s been molded off-center. Sigh. Plus there is a nasty gap between the edge of the cowling and the scoop/rack piece. Amazingly I did not manage to glue the swing arm for the bomb/torpedo when using copious amounts of glue to get this piece down. After this I cleaned up the rather plain looking landing gear and attached them per the instructions, glued the pitot tube on and replaced the very oversized gun sight with a smaller one. Assembly of the torpedo and the bomb is straightforward and I decided to use the bomb. However I do not recommend drilling out the mounting holes for the bomb as they will not line up with the small pegs on the sway braces. Not even close. Ask me how I know. And, with the bomb rack being molded warped the bomb does not sit straight on the sway braces.
| COLORS & MARKINGS |
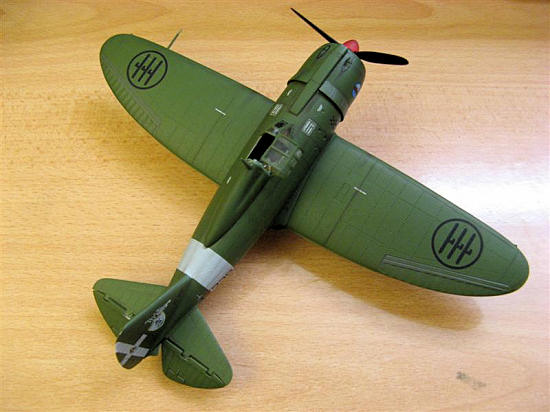
I masked the canopy with Bare Metal Foil and
attached it using 5 minute epoxy. I
then spray painted the bottom of the aircraft Floquil Italian Blue Grey and then
painted the topside Floquil Italian Olive Green.
I noticed that after drying for a day that the areas where I had glue
streaks on the plastic that it has a slightly darker area.
I tried repainting this but to no avail.
It’s as if the glue has bled through the paint.
And it’s only visible on the Olive Green.
It’s very strange and a first for me.
I wonder if the very soft plastic let the glue “burn” into it and some
how discolor it. I don’t know.
But it was disappointing to say the least.
Then, miraculously, the strange bleed thru disappeared after a few days!
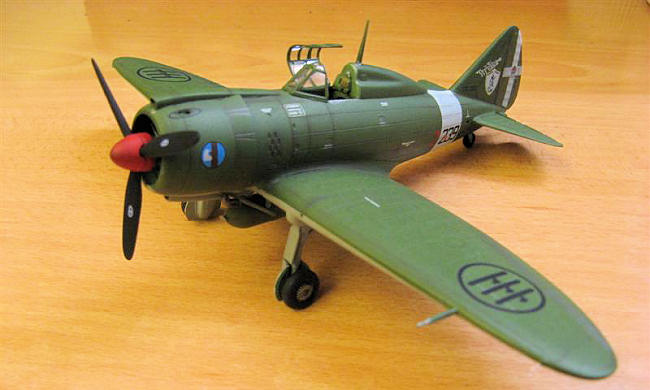
Anyhow, the prop was painted MM flat black and the spinner Testors flat
red.
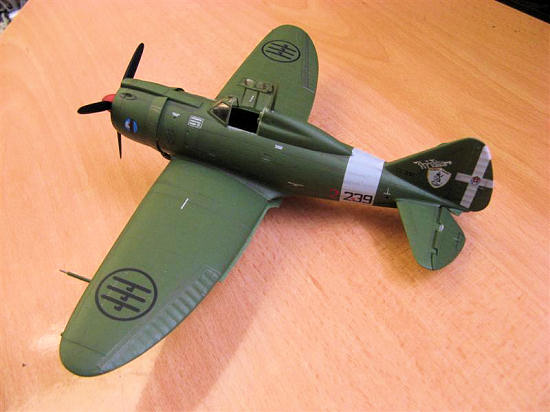
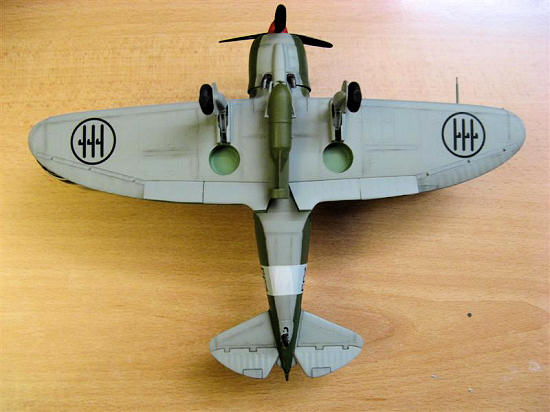 For the
markings I chose option 2. This is
for a plane based with the 102 Gruppo Reggio Emilia in Italy, 1943.
The decals went on very well and are resilient to any prodding and
shifting around on the model.
However the white for the tail band and rudder markings is somewhat translucent
both over the green and the grey colors.
Plus there are unaccounted for decals on the sheet that are not mentioned
in the instructions! As mentioned
before the Free French roundels are off-register making this option not
possible. Also, there is a small
addendum sheet that has the pair of ovals that go around the cowling gun ports.
I trimmed the clear middle film from the centers of these decals before
applying them.
For the
markings I chose option 2. This is
for a plane based with the 102 Gruppo Reggio Emilia in Italy, 1943.
The decals went on very well and are resilient to any prodding and
shifting around on the model.
However the white for the tail band and rudder markings is somewhat translucent
both over the green and the grey colors.
Plus there are unaccounted for decals on the sheet that are not mentioned
in the instructions! As mentioned
before the Free French roundels are off-register making this option not
possible. Also, there is a small
addendum sheet that has the pair of ovals that go around the cowling gun ports.
I trimmed the clear middle film from the centers of these decals before
applying them.
As for the decal directions they, quite
frankly, stink. There are seven
decals that have no placement or instructions on where to place them or if they
are even to be used at all. I wound
up having to surf the net in mid-application to find out where some of them
went. I found very little out there
and did my best to apply them to the proper spot.
Plus, either the white tail band is too wide or the artist who did the
scale drawings had his measurements wrong.
This messes up how the unit codes are placed.
So, best bet here is to use references and fall back on the instructions
as a last resort. Another demerit
but the kit is full of them so should I have been all that surprised?
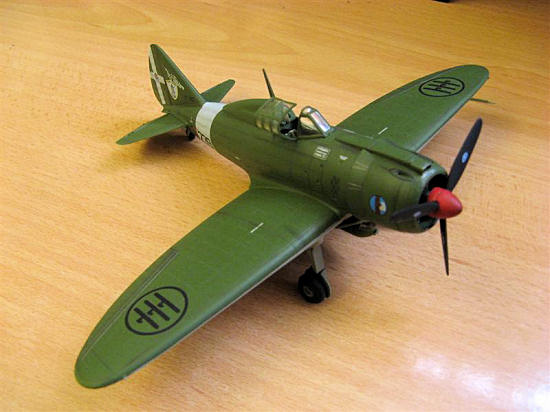
The prop blades were painted with mm FLAT BLACK and the hub detailed with
black and silver paints. The
spinner was painted Testors flat red and the props decals were added.
I used Solvaset to lay them down and then flat coated the entire
assembly. I then painted the bomb
olive green and attached it. The
last additions were to drill out the the gun ports.
The canopy was attached in the open position with 5-minute epoxy.
Weathering consisted of using Formula P3 Armor
Wash for an oily wash on the landing gear and inside of the cowling.
For panel lines, exhaust, gear bays, wheels and gun residue I used my
trusty set of chalk pastels and a .07 Pentel mechanical pencil.
The landing lights were painted using Tamiya clear red and green.
| CONCLUSIONS |
Postscript-Eduard has released three PE detail sets for this kit (48627, 49453 and FE 453) that do improve the appearance but do not address the glaring fit and dimensional errors.
| REFERENCES |
http://en.wikipedia.org/wiki/Reggiane_Re.2002
http://www.comandosupremo.com/Re2002.html
October 2009
Copyright ModelingMadness.com. All rights reserved. No reproduction in part or in whole without express permission from the editor.
If you would like your product reviewed fairly and quickly, please contact the editor or see other details in the Note to Contributors.