| KIT #: | 1402 |
| PRICE: | NZ$40.00 'used' |
| DECALS: | Yes |
| REVIEWER: | Michael Rohde |
| NOTES: | Reissue |
| HISTORY |
The Breda Ba 65 was designed with the intention to carry out the roles of interceptor fighter, light bomber or reconnaissance/ attack aircraft as required and the prototype made its first flight in September 1935. It was a cantilever low-wing monoplane with main landing gear units retracting rearwards into underwing fairings.
The basic structure of the fuselage and wings was of chrome molybdenum steel
alloy tubing, covered overall with duraluminium sheet ,except for the trailing
edges of the wings, which were fabric-covered. The wing incorporated trailing edge flaps and Handley Page leading-edge slats
and the single fin and rudder tail assembly was strut and wire braced. After successful trials with the prototype a initial order of 81 Ba.65’s was
placed in 1936. This batch was powered by the French Gnome & Rhone K-14 radial
engine delivering
 700 hp. The prototype initially was powered by the same type
of engine.
700 hp. The prototype initially was powered by the same type
of engine.
A batch of 13 aircraft was taken from the first production series and equipped No. 65A Squadraligia of the Aviazione Legionaria, the Italian air contingent to support Franco’s cause in the Spanish Civil War. This particular unit took part in operations at Santander in August 1937, then at Teruel ,and in the battles for the river Ebro. Like the prototype these were single seat versions with the pilot’s cockpit fully enclosed by a glazed canopy tapering off to the rear. Experience in Spain indicated that the Ba .65 was suited only to the ground attack role, and the type served thenceforth with most of the eight squadraligie attached to the two Regia Aeronautica assault stormi ( wings), the 5th and the 50th.
A second batch of 137 aircraft was built by Breda ( 80) and Caproni-Vizzola (57) before production ended in July 1939. These aircraft differed from the first production batch by having Fiat A 80 radial engines.
Following Italy’s entry into WW II in June 1940, Ba 65’s were deployed
against the British forces in North Africa. In the harsh desert conditions the Ba 65 had a low serviceability rate and
hence put up an unimpressive performance. The last serviceable aircraft was lost
during the British offensive in Cyrenaica in February 1941. A large number of the BA 65’s serving with Italian units were of the two
-seat configuration with an observer/gunner above the trailing edge of the wing. A smaller number of these two- seaters were equipped with a B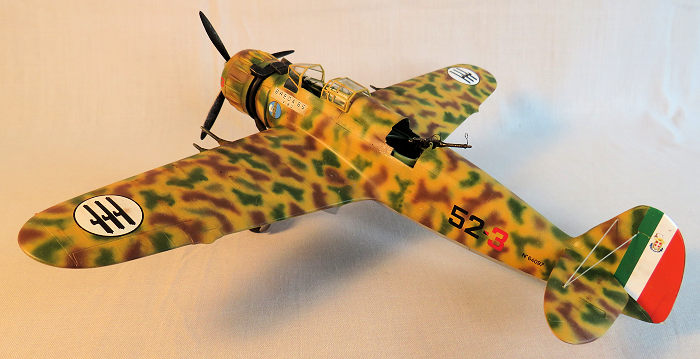 reda L type
turret and in both cases the observer/gunner operated a single Brada Safat 7.7
mm calibre machine gun.
reda L type
turret and in both cases the observer/gunner operated a single Brada Safat 7.7
mm calibre machine gun.
While offensive armament could theoretically consist of up to 1000 kg of bombs, the load usually carried was usually up to 300 kg in the fuselage bomb bay or , alternatively, up to 200 kg of bombs on underwing racks. Two 12,7 mm and two 7,7 mm machine guns were carried in the wings.
Exports included 25 Fiat powered Ba 65 two- seaters to Iraq in 1938, two of them being dual control trainers and the remainder with Breda L turrets.; 20 Ba 65’s with Piaggio P .XI C 40 engines to Chile later in the same year, 17 of these being single- seaters and 3 dual- control trainers. In 1939 a batch of 10 Fiat powered two- seaters with Bred L turrets was delivered to Portugal.
One production aircraft was tested with an American Pratt & Whitney R 1830 engine in June 1937 in anticipation of an order from the Chinese Nationalist Government, but this failed to materialise.
The Iraqi Ba 65’s saw limited action against the British during the 1941 insurrection in that country.
| THE KIT |
 This kit is a multi media kit consisting of three frames of light grey
plastic carrying 110 parts in total. One frame holding 9 clear parts.
Translucency is good . The resin parts come in a sealable plastic bag with a
total of 32. All parts are of good quality. A bit of flash around the cylinders.
The PE frame carries 33 parts in total.
This kit is a multi media kit consisting of three frames of light grey
plastic carrying 110 parts in total. One frame holding 9 clear parts.
Translucency is good . The resin parts come in a sealable plastic bag with a
total of 32. All parts are of good quality. A bit of flash around the cylinders.
The PE frame carries 33 parts in total.
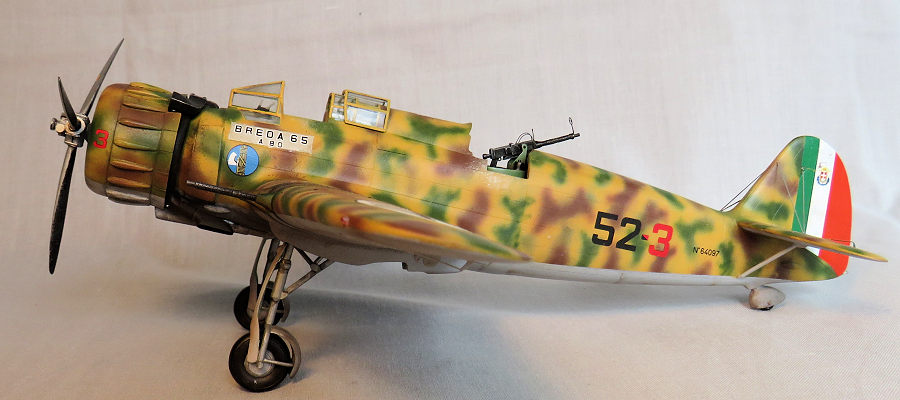
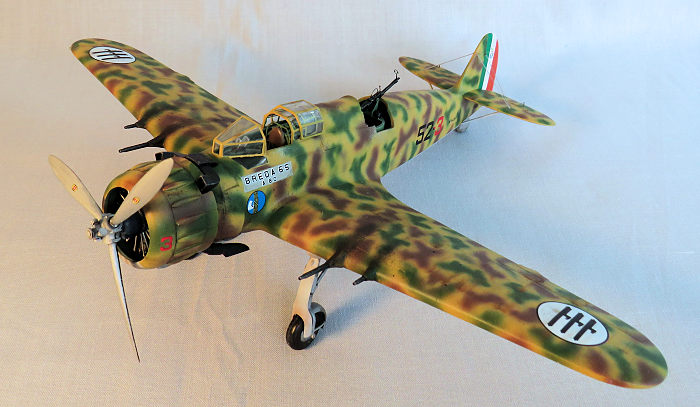
The decal sheet gives us three options: 118 RIAF 5 Squadron Al Rashid Airbase Iraq 1940-41, 101-5 101 Squadraligia 5th Stormo Regia Aeronautica Lonate Pozzolo, Italy 1939, and 555 Grupo de Bombardeo de Dia FAP, Sintra Airbase Portugal 1938-41. The quality of the decals is very good .They are very thin and do register well.
Instructions are arranged into 9 steps and drawings are well laid out.
| CONSTRUCTION |
As with all Special Hobby kits it is advisable to inspect all the bits , and this also requires to remove irregularities like flash and seams caused by mould shift. This I did and , after spending considerable time to do that, I used small bins to keep batches of parts together according to the steps in the instructions.
Due to the multitude of parts and complexity ( 72 in all incl PE and resin) I decided to assemble everything in the cockpit first and then move on to painting. The drawings in the instruction sheet are clear enough but in a case like this it would have been helpful to break down the process into more precise sub assembly drawings. In short, it is up to the modeller to figure out how best to go about this.
Start with the pilot’ station, then the large fuel tank and oil tank, moving to the tubular frame work with fire wall, rear bulk head, floor for the gunner/ observer compartment. The pilot’s station was carefully slotted in between the port and starboard frame and glued into place, followed by the tank.The supra structure combined with the PE internals and the observer’s seat with the PE harness came last.
 Tamiya cockpit green was airbrushed onto the structure and painting all the
details was not too difficult due to fairly easy access through the framing.
Wear and tear was achieved by using dry brushing pastels and Tamiya panel liner
black and brown. Please note : the instrument panel and gun sight is inserted
much later ( ie before the cockpit glazing is attached) due to the delicacy of
the PE parts.
Tamiya cockpit green was airbrushed onto the structure and painting all the
details was not too difficult due to fairly easy access through the framing.
Wear and tear was achieved by using dry brushing pastels and Tamiya panel liner
black and brown. Please note : the instrument panel and gun sight is inserted
much later ( ie before the cockpit glazing is attached) due to the delicacy of
the PE parts.
Before painting the complete section was dry fitted into the fuselage to ensure a perfect fit. This worked out really well and no major adjustments had to be made. Hence the mating of the fuselage shells was quickly done and the seams were cleaned up using minute amounts of putty and a bit of sanding and polishing. In places careful re- scribing of panel lines was necessary though.
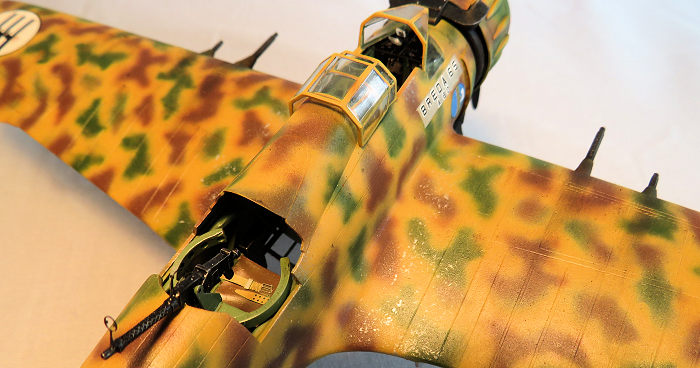
Fitting of the large resin fuselage decking for the gunner’s position was not a problem due to the good precision of this part and was glued into place with CA glue. ( the kit does provide the upper fuselage decking in 3 versions – turret – single seater or partially open gunner’s position with an extra resin cover if the machine gun is not displayed).
Next in line was the spatted tail wheel and the horizontal tail plane.No issues here either apart from the usual filliong and sanding of seams.
Wings were the next big item in the process. First of all a check of how the
shells go together , then moving on t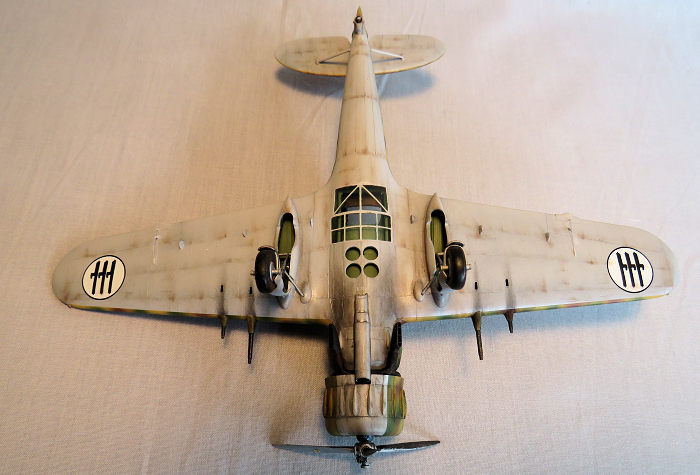 o the wheel well internals. That was, due
to the way how SH has designed this part of the kit, quite fiddly. It all starts
with the internal tubular and box shaped frame which has to be glued onto the
lower wing shell and painted. Part of this box like structure is actually a part
of the retracting mechanism of the landing gear, which means that the angle of
this part has to be correct in order to mate with the main landing gear leg. The
best way to go about this was to install the framework first ( sans the
retracting rod) and continue with putting together the landing gear legs and
their respective mudguards and stays, making sure that the wheels fit in nicely
, paint the whole lot and glue the main landing gear into place aligning these
at the same time with the retracting supports.
o the wheel well internals. That was, due
to the way how SH has designed this part of the kit, quite fiddly. It all starts
with the internal tubular and box shaped frame which has to be glued onto the
lower wing shell and painted. Part of this box like structure is actually a part
of the retracting mechanism of the landing gear, which means that the angle of
this part has to be correct in order to mate with the main landing gear leg. The
best way to go about this was to install the framework first ( sans the
retracting rod) and continue with putting together the landing gear legs and
their respective mudguards and stays, making sure that the wheels fit in nicely
, paint the whole lot and glue the main landing gear into place aligning these
at the same time with the retracting supports.
With that out of the way I took great care of fitting this large piece of glazing as good as possible into the fuselage floor and painted the interior frames with Tamiya cockpit green. To get a good fit small adjustments had to be made using a scalpel to remove excess material ( from both the clear part and the opening in the wing center). Then it was time to glue the wing shells onto the lower part of the wing. No locating pins there , dry fitting is recommended . The wheel well cages on both sides were a bit too high and I had to remove a bit of material there to ensure a good gap free contact of upper and lower wing parts.
Now it was time to attach the complete wing to the fuselage. Overall fit was satisfactory , but filling and sanding around the seams was necessary. During that process I masked off the large piece of fuselage glazing to avoid scratching or otherwise damaging the paint on the frame. The gun barrels were added as well.
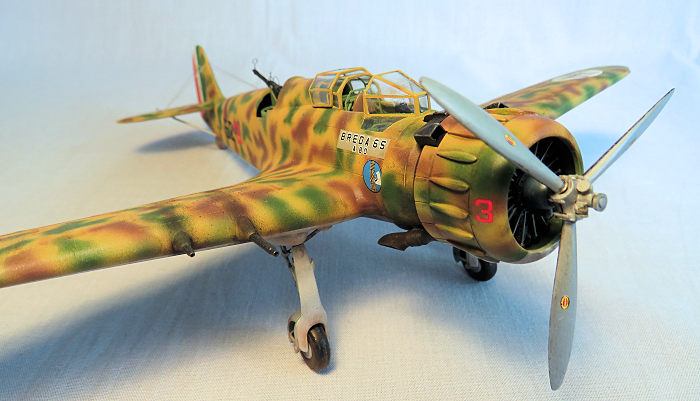
The engine, cowling, propeller, exhaust system and carburettor intakes aside from the collector were resin. The cylinders did need some attention by removing some flash but the other parts were actually very good in that respect. Before I assembled the engine I first painted the cylinders and then separated all the parts from their respective casting blocks. For this job I used a dental technicians electric hand piece and a .10mm serrated cutting disk. The openings in the crank case for placing the cylinder needed a tiny bit of reaming out to get the cylinders to slot in nice and easy and then I moved on to paint the crank case. Assembly was very straight forward.
Dry fitting of the complete engine into the cowling showed that small adjustments had to be made by removing a bit of material from the top of the cylinders to achieve a light interference fit inside the cowling. The exhaust collector ring was attached to the fuselage front with a bit of masking tape and the actual exhaust pipes were the superglued onto the ring to get an even gap between the exhaust and the bottom of the fuselage.
A test fit was necessary to see how good the alignment of carburettor intakes and the oil cooler with the provisionally assembled engine and cowling were. Being satisfied with the alignment I glued the oil cooler intake into place and left to set for a while. The engine alignment was checked once more with the completed propeller in place and a few small drops of super glue fixed the engine inside the cowling.
Test fitting is essential to assure the best possible fit of the canopy on the fuselage. Some minor work was needed to achieve this. The instructions show that the gunsight and the PE support frame should be installed before the wind shield section is glued into place. I decided not to do this because I was worried that I might bend the rather delicate PE frame while preparing the model for the airbrushing stage. I usually use not only masking tape but also bits of flexible sponges to fill the cockpit cavity. To do that one needs to carefully push this spongy material into position to make sure that no spray mist can enter, hence the risk to put pressure onto the PE. Once in place the wind shield portion and rear part of the cockpit glazing was painted free hand in two stages. One in cockpit green , the second layer in Humbrol 63 (sand). The complete canopies were masked off for the airbrushing stage.
Small items like the navigation lights ,the machine gun plus mounting ring ,the PE for the trim tabs, landing gear covers and the horizontal tail plane rigging were added after the airbrushing of the model was done.
| COLORS & MARKINGS |
 The engine and cowling were painted as a separate item.
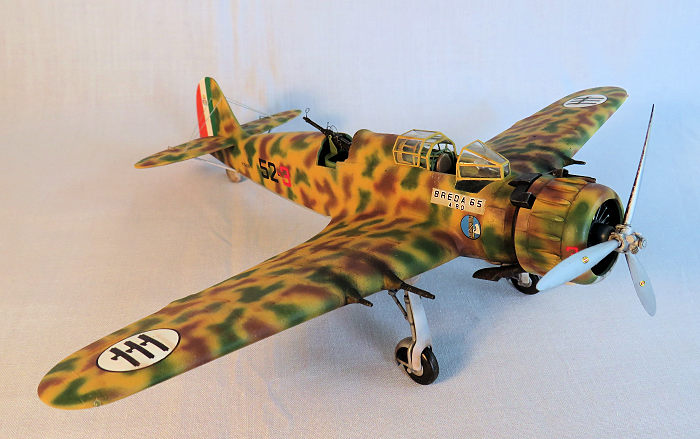
Italian camo schemes are somewhat elaborate to do and I started with painting the undersides of the model with Tamiya sky grey. The undersides were then masked off and the top side of the model was painted with Humbrol 63. The mottling was done with Humbrol 160( red- brown) and Tamiya XF 5 flat green. To achieve a nice pattern , overspray had to be corrected using the smallest setting on the airbrush. Before the decals were applied the entire model received a coat of Tamiya gloss clear.
The decals are very thin and hence very delicate. I did not need to use much Microsol setting solution at all to get the decals to settle. Humbrol 135 satin clear was applied as a final overall coating. Weathering effects were achieved using pastels and Tamiya Panel Line Accent colours brown and black.
| CONCLUSIONS |
I always liked building Special Hobby kits, even if they sometimes can be quite challenging. With a bit of work we can get a very nice model of a lesser known Italian WW II aircraft. This particular kit is suited for the more experienced modeller .
Michael Rohde
20 July 2020 Copyright ModelingMadness.com If you would like your product reviewed fairly and fairly quickly, please
contact
the editor or see other details in the
Note to
Contributors. Back to the Main Page
Back to the Review
Index Page
Back to the Previews Index Page