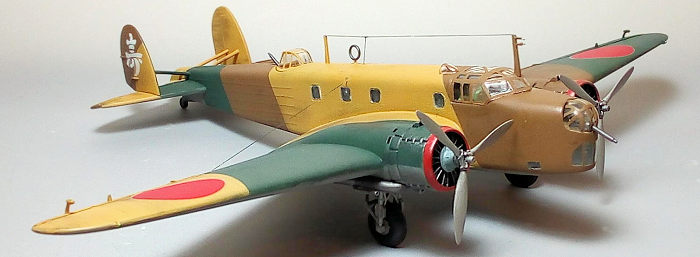
Italeri 1/72 Fiat BR.20 'Cicogna'
| KIT #: | 1143 |
| PRICE: | Around € 15 in 2005 |
| DECALS: | Five options |
| REVIEWER: | Spiros Pendedekas |
| NOTES: | Still the only mainstream kit of this plane |
| HISTORY |
The BR.20 Cicogna
(stork) was a low-wing twin-engine medium bomber that was developed and
manufactured by Italian aircraft company Fiat Aviazione. Being the first
all-metal Italian bomber to enter service, it was regarded, upon its maiden
flight in 1936, as one of the most modern medium bombers in the world.
Receiving its baptism of fire in 1937, when a number were operated by the
Aviazione Legionaria during the Spanish Civil War, it was also later used with
relative success by the Japanese during the Second Sino-Japanese War. During
1939, a modified long-range BR.20 version (designated BR.20L) performed a highly
publicized non-stop flight from Rome to Addis Ababa, Ethiopia.
 Despite the
fact that it was approaching obsolescence upon the entry of Italy into WWII, it
did serve as the standard medium bomber of the Regia Aeronautica, gradually
undertaking maritime patrol and operational training for bomber crews. A total
of 509 were produced.
Despite the
fact that it was approaching obsolescence upon the entry of Italy into WWII, it
did serve as the standard medium bomber of the Regia Aeronautica, gradually
undertaking maritime patrol and operational training for bomber crews. A total
of 509 were produced.
The BR.20s in Japan
Pending the delivery of the Mitsubishi Ki-21 “Sally”, which was undergoing
prototype trials at the time, the Japanese Army Air Force found themselves short
of modern long-range bombers, when, in July 1937, Japan entered into full-scale
war with China (the Second Sino-Japanese War).
Having acquired a positive reputation as a relatively fast and durable aircraft
in combat during the Spanish Civil War, and with a willing Italy to give
priority to any Japanese orders over its own requirements, Japan soon acquired
82 BR.20s
Designated the I-Type (Yi-shiki), the JAAF BR.20s were heavily deployed on
long-range bombing missions against Chinese cities and supply centers during the
winter of 1938–39. Operating with no fighter cover at the extremes of their
range, they consequently incurred heavy losses from Chinese fighters, as did the
early Ki-21s that shared the long-range bombing tasks. All JAAF BR.20s were
phased out from operational service, before Japan entered WWII.
| THE KIT |
Introduced by the
then Italaerei in 1972, this venerable kit is regularly reboxed by the now
Italeri. The molds are completely unchanged (and look in good condition
after all this time!), the only thing changing through the years is boxing,
decals and (updated / more thorough) instructions. So, although not getting a
“modern” kit here, you will be surprised to find out what a nice kit Italaerei
created back then.
My copy was the 2005 “Limited Edition” (whatever that means), coming in a side
opening box, carrying a nice boxart of a Regia Aeronautica BR.20 having just
performed a bombing mission. You can read Scott’s thorough preview of this exact
reissue here.
| CONSTRUCTION |
 I started
by attaching the cabin windows from the insides of the fuselage halves. I then
attached the cabin floor, instrument panel and two bulkheads to the starboard
fuselage half, painted all innards Hu120 (for the Italian interior green) and
finally joined the two fuselage halves. I had to trim the cabin floor a tad, in
order to have a positive fit at the front. The seats were painted interior color
with leather cushions and had seat belts added from masking tape. Control yokes
and instrument panel were painted black. The latter received silver dry brushing
and some tiny red/yellow/white blobs of paint, to represent various switches.
The down looking floor transparency was attached at this stage, as well.
I started
by attaching the cabin windows from the insides of the fuselage halves. I then
attached the cabin floor, instrument panel and two bulkheads to the starboard
fuselage half, painted all innards Hu120 (for the Italian interior green) and
finally joined the two fuselage halves. I had to trim the cabin floor a tad, in
order to have a positive fit at the front. The seats were painted interior color
with leather cushions and had seat belts added from masking tape. Control yokes
and instrument panel were painted black. The latter received silver dry brushing
and some tiny red/yellow/white blobs of paint, to represent various switches.
The down looking floor transparency was attached at this stage, as well.
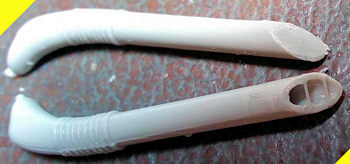
I then went on to assemble the nose, which is supplied in the form of two transparent halves, with the front turret trapped between them. Reminiscent of the kit origins, all sprue gates are thick and short, very close to the parts themselves, requiring careful detaching, it being especially true for the clear parts. I thus carefully detached the two nose clear halves with my #11 knife, assembled them, filled and sanded the seams, polished the windows areas and finally painted its structural innards interior color. Of note is that two massive symmetrical sink marks were present at the clear nose halves, exactly outwards of the thick inner molded turret base, possibly due to premature sprue removal from the mold. The better news was that they did not affect the "window" areas of the nose. They were then filled and sanded smooth.
Still indecisive on whether or not attaching the clear nose to the fuselage at early stages (so it could be nicely blended and painted - which, anyway, is the “correct” thing to do – only requires tedious masking), I went on doing some subassemblies. I thus assembled the wings, horizontal stabilizers and fins and attached them onto the fuselage. Fit was good, with only a few gaps here and there. The joints were then coarse sanded, filled and finally sanded smooth.
 Per
Editor’s recommendation, all fabric moving surfaces were sanded a tad, in order
to lessen the heavy fabric effect and look more “scale”. They were consequently
attached in position (ailerons and rudders “neutral” and elevators “drooped”,
as, to my joy, I found a couple of pics showing them with this more lively
posture).
Per
Editor’s recommendation, all fabric moving surfaces were sanded a tad, in order
to lessen the heavy fabric effect and look more “scale”. They were consequently
attached in position (ailerons and rudders “neutral” and elevators “drooped”,
as, to my joy, I found a couple of pics showing them with this more lively
posture).
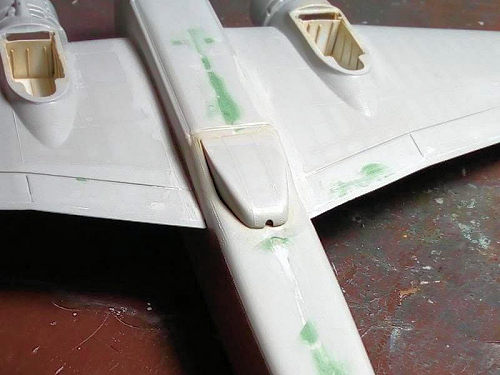
I then went on to add some interest to the totally void main wheel wells, by partially boxing them. Since the surrounding area had a complicated shape with weird curves, I resorted to adding a “Π” shaped piece of thin sheet styrene, which formed the well floor and sidewalls. I then attached a suitably cut piece to create the front wall and secured the whole flimsy assembly by adding tiny amounts of liquefied styrene at judicious places. “Ribbing”, made of stretched sprue pieces, was added, to liven the bland walls, the net result looking busier than before. The wells aft parts were left unboxed, since it was too much work to box them. Truth is that the emptiness is not that obvious at that area, with a good portion of it hidden by the aft gear strut. As an interesting note, I could not find any pics of the Cicogna bays, being highly likely not to exist at all!
The main landing gear struts were also assembled, as also the 2-piece main wheels, which were consequently flattened with a file, in order to look weighted. I added brake lines (of stretched sprue) that run along the rear brace struts. All landing gear parts, including wheel wells and tail wheel, were painted Testors Steel. Tires were painted black, oleos were highlighted with my extrafine silver pen.
The two piece Fiat A.80 nice engines were assembled, painted black and dry brushed silver. Instructions want you to paint the crankcases black as well, however contemporary shots depict them in medium gray, which is how they were painted. Cowling innards were painted black.
 The
good looking kit supplied exhausts were hollowed with my micro drills and had
two tiny pieces of stretched sprue attached at their exits, as per reality. The
two exhaust-mounted fresh air inlet tubes were also hollowed and attached onto
the main tubes. The completed exhausts were painted Testors burned metal, with
their middle part Testors steel, as per reference pics. The exhausts are a
prominent feature of the Cicogna and any extra detailing done there boosts the
model looks.
The
good looking kit supplied exhausts were hollowed with my micro drills and had
two tiny pieces of stretched sprue attached at their exits, as per reality. The
two exhaust-mounted fresh air inlet tubes were also hollowed and attached onto
the main tubes. The completed exhausts were painted Testors burned metal, with
their middle part Testors steel, as per reference pics. The exhausts are a
prominent feature of the Cicogna and any extra detailing done there boosts the
model looks.
Deciding to attach the clear nose at this early stage, I went on and hand-painted the front bulbous turret’s external farming dark brown (which is the fuselage color at that area for my chosen camo), and carefully inserted it in position from the inside of the clear nose, securing it with tiny amounts of glue. The front gun was painted gun metal and attached in its resting (nose down) position. The clear nose was then attached to the fuselage front, with the joint gaps filled and sanded smooth. I masked the nose windows with masking tape, covered the whole front turret and side windows with Maskol, stuffed wet tissue in all fuselage openings and headed to the paint shop!
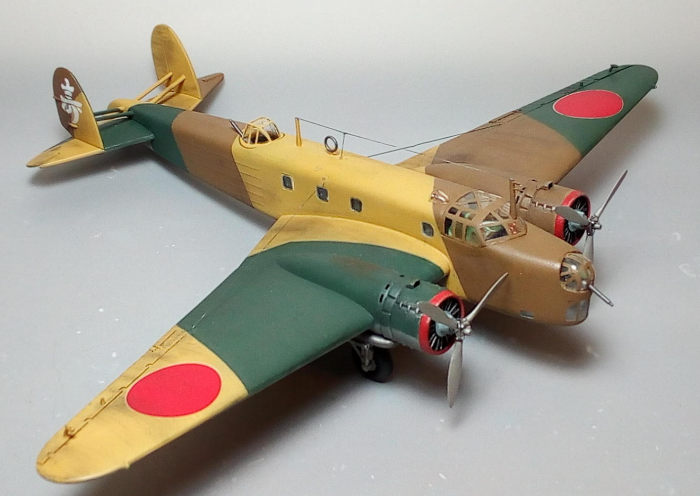
| COLORS & MARKINGS |
 I first
applied a leftover Molak 36251 light gray enamel at all undersides, which dried
to a nice shade, and masked it off. I then proceeded to apply the top
splinter-like camo: first was the brown (hu29), which was masked off, then the
green (Hu149), also masked off, and last was the sand (Hu63). Upon removing the
masks, I did all necessary touch ups and corrections, then gave the model a coat
of Future, in order to proceed to decals application.
I first
applied a leftover Molak 36251 light gray enamel at all undersides, which dried
to a nice shade, and masked it off. I then proceeded to apply the top
splinter-like camo: first was the brown (hu29), which was masked off, then the
green (Hu149), also masked off, and last was the sand (Hu63). Upon removing the
masks, I did all necessary touch ups and corrections, then gave the model a coat
of Future, in order to proceed to decals application.
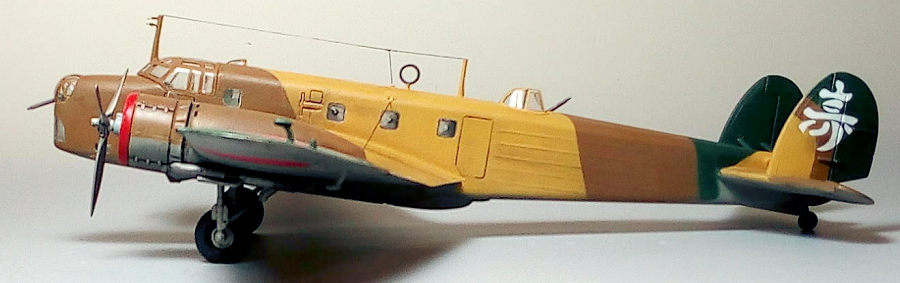
I used the kit decals to represent a 12th Sentai Cicogna, as it seemingly stood
in China, 1939. Only the basic Hinomarus and fin emblem are provided, no
stencils whatsoever (which might have very well been the case in reality). The
Zanchetti Buccinasco printed decals were simply great: well registered, good
adherence, no silvering, with Mr Mark Softer taking the responsibility of their
final snuggling down. A coat of Future sealed them.
| FINAL BITS |
I attached the 4
characteristic fin supporting struts, which I had to trim at angle, in order to
fit positively. They were hand painted per the surrounding camo. The two engines
were then attached, followed by the cowling lips (which had beforehand been
painted red). Fit was tight and not extremely positive there: I had to
circumferentially trim the engines and fiddle around a bit, in order for them to
rest at the correct depth.
The complete landing gear was consequently attached in position. General fit was
very positive and the Cicogna stood proudly on her legs! The tail wheel was not
attached in the hole provided, as it stood too far aft; instead, the hole was
filled and a new hole was opened, in order for the tail wheel to be attached a
tad to the front, so its strut would almost touch the fore aerodynamic fairing,
as shown at reference pics and drawings. The four aileron mass balances were at
this time also attached and accordingly painted.
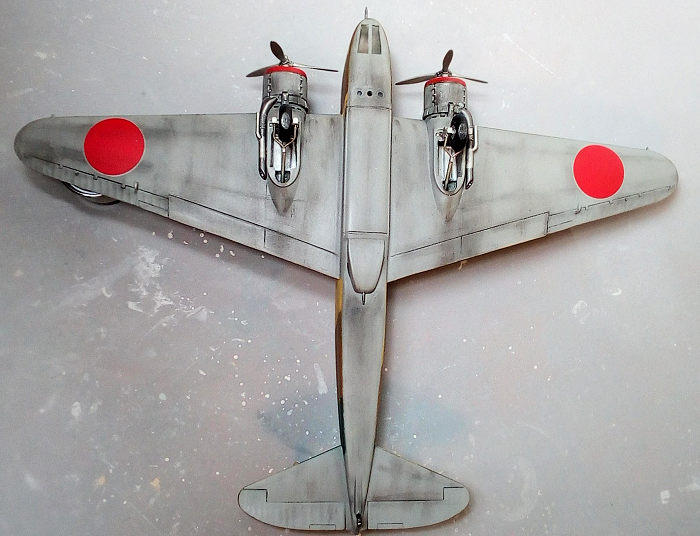 I then
went to apply some weathering. This included engine staining, oil/grease
leaking, mud staining and the like, all done with dry pastels of suitable
colors. Some chipping was “dry brushed” with silver onto the cowling lips.
Conditions in China back then should have been harsher than harsh, so an almost
matt, uneven coat was applied, to give the plane its final heavily used
operational look.
I then
went to apply some weathering. This included engine staining, oil/grease
leaking, mud staining and the like, all done with dry pastels of suitable
colors. Some chipping was “dry brushed” with silver onto the cowling lips.
Conditions in China back then should have been harsher than harsh, so an almost
matt, uneven coat was applied, to give the plane its final heavily used
operational look.
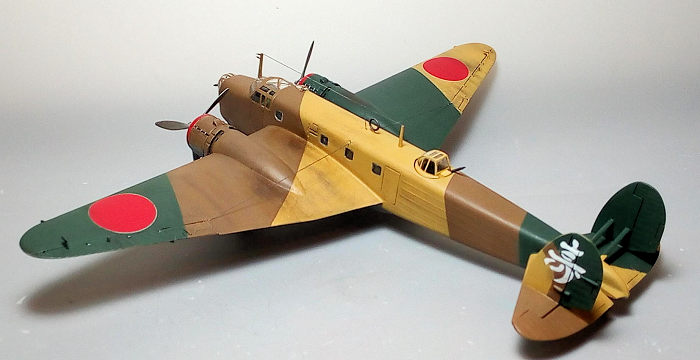
The canopy had its frames carefully painted with a 10/0 brush, and the
characteristic front mast with the simplified top mounted pitots was attached
onto the canopy. In reality, this mast featured two “dual barrel looking” pitots.
To kind of replicate this, I added a small piece of stretched sprue under each
pitot. The canopy was then affixed into place, with the resulting gaps faired by
white glue.
I then went on to attach the rear antenna mast,
with a loop antenna just in front of it. After studying net pics and the
detailed 1/48 Special Hobby Cicogna instructions, I attached three main (and a
fourth “interconnecting”) antenna wires, per the drawings pattern. The aerials
were tightened with hot air from a hairdryer and all masts and were
accordingly painted.
The rear turret transparency had its frames hand painted and its gun attached.
After carefully snipping its base lugs, it was press fitted into position. By
the way, the rear turret’s shape might not be exactly correct: it is
“symmetrical”, whereas, in most drawings, it has its top glazing offset to the
side. By studying as many net pics as I came into, I could not come to a solid
conclusion. Maybe different types of turrets were implemented…oh well, the kit
supplied turret looks more or less the part…
The characteristic Cicogna wing tip lights, merely provided as plastic
protrusions, had their edges touched with my extra fine silver pen and red/green
blobs of clear paint added on. The small “astrodome type” transparency had its
frames hand painted and attached in place. The front and ventral gun barrels
were carefully affixed in position, and this interesting splinter camo-ed plane
with Italian shades and big Hinomarus was called done!
| CONCLUSIONS |
Since the only other BR.20 available is the limited
run multimedia 1/48 Special Hobby, if you want a 1/72 or a “mainstream” kit of
this important, iconic and produced in respectable quantities twin engine
bomber, this very old Italeri is, interestingly, still (as of 2021) your only
option. That said, apart from the fact that detail is all raised and a tad on
the heavy side (and, regarding innards and wheel wells, not that much -
 which is
perfectly understandable for a 1972 mold), this is not a bad kit at all: general
shape looks good, as well as the provided structural details. Fit is not bad,
with some more attention needed at places such as the clear nose. Decals are
superb.
which is
perfectly understandable for a 1972 mold), this is not a bad kit at all: general
shape looks good, as well as the provided structural details. Fit is not bad,
with some more attention needed at places such as the clear nose. Decals are
superb.
Due to the complexity of the clear nose attachment, novice modelers should
tackle a few “simpler - easier” twin-engine models, before putting their hands
on this one. The resulting model is of respectable size for the scale. Not often
seen built, with its “uncommon” looks and many interesting, colorful camo
options, it will definitely be a head turner when displayed in your showcase.
The kit is regularly re-issued by Italeri, with nice, refreshing schemes and the
usual excellent decals. It is offered at a sensible (towards cheap) price, so,
if you are inclined in building this iconic plane, you may consider tackling
this oldie but beauty of a kit.
Happy modeling!
22 February 2022
Copyright ModelingMadness.com. All rights reserved.
No reproduction in part or in whole without express permission.
If you would like your product reviewed fairly and fairly
quickly, please
contact
the editor
or see other details in the
Note to
Contributors.