Revell
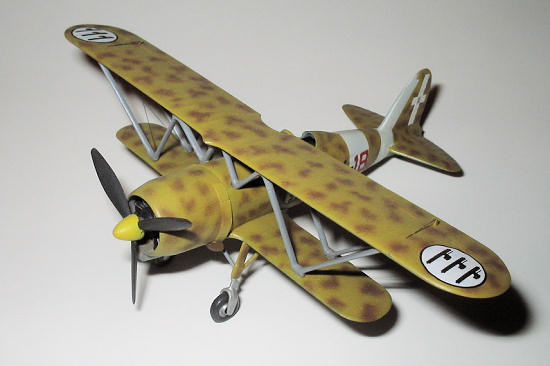
1/72 Fiat CR 42
| KIT #: | H-648 |
| PRICE: | Can be found for $3 to $6 at swap meets. |
| DECALS: | One Option |
| REVIEWER: | Brian Baker |
| NOTES: | Old kit, but still useful. |
| HISTORY |
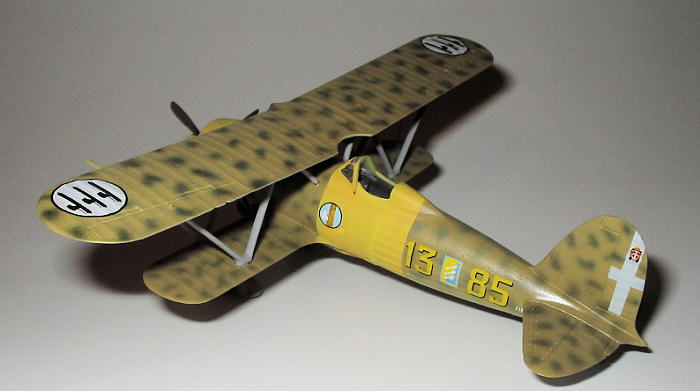
The Fiat CR 42 was the last in a long line of biplane fighters from the
design bureau of Celistino Rosatelli. It was preceded by the CR 32
fighter, which earned fame in the Spanish Civil War, and remained in
Regia Aeronautica service at the outbreak of World War II.
After t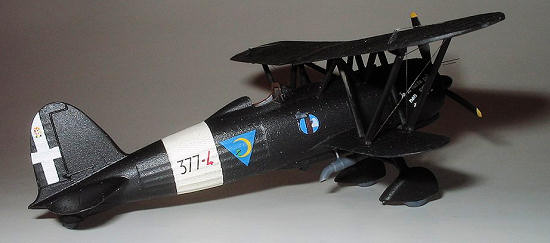 he CR 32, a number of developments culminated in the CR
42, which featured a Fiat A.74 radial engine, rated at 846 hp., and
equipped with a three bladed
Hamilton-Fiat propeller.
The CR 42 was mainly fabric covered with an open cockpit, and was armed
with two 12.7 mm
he CR 32, a number of developments culminated in the CR
42, which featured a Fiat A.74 radial engine, rated at 846 hp., and
equipped with a three bladed
Hamilton-Fiat propeller.
The CR 42 was mainly fabric covered with an open cockpit, and was armed
with two 12.7 mm
I recently reviewed the Italeri CR 42 kit for the IPMS website, but decided to do a companion model using the old Revell kit for comparison, and this review is a result of that research. Obviously, a new issue at $22.00 is a much better kit, but the question arises, “What do I do with the Revell kits I bought when they were so cheap?” Well, don’t throw them away just yet, as there is hope.
| THE KIT |
 The kit contains about 28 parts, including the clear plastic canopy and
a pilot figure that can be melted down for sprue stretching.
The color is either
desert sand or pale grey, depending on the particular issue you have.
For a kit of this vintage, probably mid sixties, it is pretty
well detailed, although the fabric texture is slightly overdone.
However, this can be partially rectified by the painting process.
The wings are cast in single pieces, and are quite thin, although
the tips are slightly too blunt and need trimming down to get the proper
contour.
I’ll go through
the assembly process and explain which parts need the most work.
The kit is basically accurate and useful, but there are some
things you should do to bring it up to modern day standards.
I’ve seen some on-line reviews that offer some suggestions, but
on this one, I followed my own instincts, and I think the result was an
acceptable model, even if I didn’t have to spend $22.00. By the way,
get several of the Italeri kits when you can, as there are a lot
of extra parts and decals that can be used on the Revell kits, and it is
a great kit in its own right.
So much for interchangeability of parts.
The kit contains about 28 parts, including the clear plastic canopy and
a pilot figure that can be melted down for sprue stretching.
The color is either
desert sand or pale grey, depending on the particular issue you have.
For a kit of this vintage, probably mid sixties, it is pretty
well detailed, although the fabric texture is slightly overdone.
However, this can be partially rectified by the painting process.
The wings are cast in single pieces, and are quite thin, although
the tips are slightly too blunt and need trimming down to get the proper
contour.
I’ll go through
the assembly process and explain which parts need the most work.
The kit is basically accurate and useful, but there are some
things you should do to bring it up to modern day standards.
I’ve seen some on-line reviews that offer some suggestions, but
on this one, I followed my own instincts, and I think the result was an
acceptable model, even if I didn’t have to spend $22.00. By the way,
get several of the Italeri kits when you can, as there are a lot
of extra parts and decals that can be used on the Revell kits, and it is
a great kit in its own right.
So much for interchangeability of parts.
| CONSTRUCTION |
There is no interior to speak of in this kit, so you have to trim off
the seat stubs not quite to the sidewall, and construct your own. Strip
plastic is all that is needed, and you do need to do this, as the
cockpit is quite visible when the model is completed.
I made a
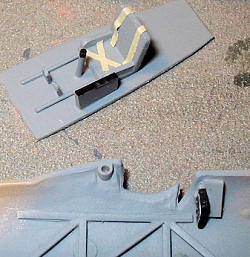 cockpit floor out of card, and mounted it just below the
seat stubs.
I used the seat
provided in the kit, but added some pieces to make it more accurate,
although the seat back on the real airplane was curved, and this one is
flat.
There is some seat
mounting structure underneath and ahead of the seat that can be made
from thin rod, and, of course, rudder pedals must be added.
The instrument panel is made up in two panels, one on each side,
and these can be mounted before the fuselage halves are joined.
A control stick and some side panel details complete the
interior, so after these are painted and detailed, you can join the
fuselage halves and attach the lower mainplane. Another problem is the
gun mounting troughs, which are too shallow. I just reamed them out with
a file, and they then held the machine gun barrels in the proper
position. Also, drill a small hole wher
cockpit floor out of card, and mounted it just below the
seat stubs.
I used the seat
provided in the kit, but added some pieces to make it more accurate,
although the seat back on the real airplane was curved, and this one is
flat.
There is some seat
mounting structure underneath and ahead of the seat that can be made
from thin rod, and, of course, rudder pedals must be added.
The instrument panel is made up in two panels, one on each side,
and these can be mounted before the fuselage halves are joined.
A control stick and some side panel details complete the
interior, so after these are painted and detailed, you can join the
fuselage halves and attach the lower mainplane. Another problem is the
gun mounting troughs, which are too shallow. I just reamed them out with
a file, and they then held the machine gun barrels in the proper
position. Also, drill a small hole wher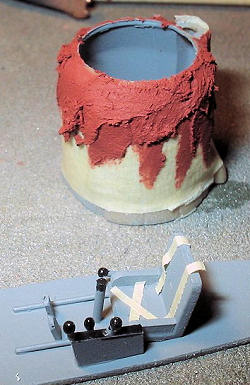 e the venture tube is located on
the right side of the fuselage just below the windshield.
This will have to be
scratchbuilt or found in the spares box, and can be mounted when the
model is almost completed.
e the venture tube is located on
the right side of the fuselage just below the windshield.
This will have to be
scratchbuilt or found in the spares box, and can be mounted when the
model is almost completed.
Most of the problems in this kit are firewall forward.
The prop is hopeless, and should be replaced by one having the
right outline. The spinner, however, is OK. The cowling has two problems
which need addressing.
The
stubs which are supposed to be the exhaust stacks need to be removed,
with holes drilled and correct units either scratchbuilt of scrounged
from another kit. I used some scrap plastic which amounted to curved rod
in the right diameter. I think it came from the Williams Brothers Martin
B-10B kit. Anyway, it was bright blue.
The second problem is the shape of the forward cowling, which
takes a downward slope rather than the curved form on the real airplane.
I just masked off the front of the cowling and added putty,
sanding it down to get the correct shape.
I’ve never done this on a CR 42 kit before, but I was satisfied
with the result. The engine is fine, except that there are a couple of
small protrusions on the lower forward crankcase that could be added for
more realism.
Hold off on
installing the prop until the model is just about completed.
The wingtips and fin and rudder are too blunt, and need to be sanded
down somewhat. The drawings in the Ali E Colori book appear to be
accurate, so use those as a guide.
While you’re at it, remove the little protruding rod on the left
wing leading edge.
I think
it’s supposed to be a pitot tube, but the CR 42 had TWO pitot tubes, one
on each forward wing strut, a common feature on Italian aircraft.
That way, the pilot could know the difference in airspeed at each
wingtip during a turn, a fact that amused Royal Navy test pilot Eric
Brown when he test flew Italian aircraft during World War II. This
required two airspeed indicators.
I
drilled out the locations for the aileron horns, mainly because I wanted
them to line up when I installed them after painting.
The landing gear struts and wheels are pretty accurate, although the
wheels seem to sit a little high inside the wheel pants, higher
that
most
photographs show.
In fact,
the tires are the only things
that show, so the wheels need not be painted, as they are entirely
inside of the wheel pants.The rear of the bottom of the wheel pants
should probably be covered over, but I neglected to do this.
The tailwheel
is
recessed, and just needs painting.
 I
would suggest painting the model before the upper wings are mounted.
The struts need a bit of
trimming, and are a little “bulky” looking, especially where the “V”
struts join the wings, but the result is not that bad, and I found it
acceptable.
A little
trimming and filing in the “V” joint would probably have helped, but it
would also weaken the structure. Maybe I’ll try that next time. The
windshield can also be installed before exterior painting is done, as
long as it is masked properly.
Incidentally, the kit’s windshield does not show the separated
section where the gunsight shows through. This can be masked easily,
though.
I
would suggest painting the model before the upper wings are mounted.
The struts need a bit of
trimming, and are a little “bulky” looking, especially where the “V”
struts join the wings, but the result is not that bad, and I found it
acceptable.
A little
trimming and filing in the “V” joint would probably have helped, but it
would also weaken the structure. Maybe I’ll try that next time. The
windshield can also be installed before exterior painting is done, as
long as it is masked properly.
Incidentally, the kit’s windshield does not show the separated
section where the gunsight shows through. This can be masked easily,
though.
Mounting the upper wing can be a challenge, but it really is quite simple. There is very little stagger on this biplane, so the struts can be set almost vertical. Chcek the angles in the drawings. I attached the cabane struts first and set them at the right outward angle. I then attached the forward struts to the upper wing. The little attachment pegs on the struts are slightly too big, so I would suggest trimming them down. I even trimmed some of them off, and used by trusty Tenax to attach the wings to the struts. I attached the forward struts first, and after they were dry, I glued the rear struts in place. This worked well for the one color (black) model I was doing, but it might make painting a multi-colored camouflage scheme a little difficult to trim up. Any modeler with more than basic skills should be able to do this, however. As biplanes go, this one is a snap.
| COLORS & MARKINGS |
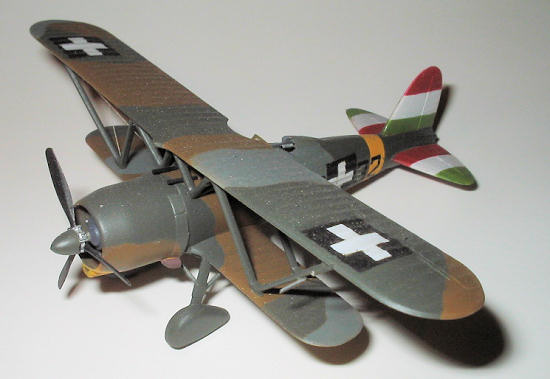
Once the model was together and painted, it was decal time. I decided to
do a CR 42 night fighter from the 377th
Squadrilia, operating
from Palermo, Italy, during 1942. The Italeri kit provides these
markings in its decal sheet, and they are excellent. With a liberal coat
of Glosscote, the decals went on easily.
I used a set from the Italeri kit, as there are enough for
several models and you’ll still have decals left over. The Revell decals
are long disintegrated, as the kit I built was at least 40 years old.
With the decals and all paint in place, and after a coat of Dulcote,
detailing could begin.
I added aileron and rudder horns (the drawings do not
 show
elevator horns) and attached fine wire to simulate control cables.
Also, the outer wing struts only had crossbracing wires, and
these were done the same way.
I made the small pitot tubes on the wingstruts with the same kit
of wire, bent in a “U” shape and white glued to the front of the strut.
I also used the long exhaust stacks from the Italeri kit for the long
flame hiders carried by this aircraft. I trimmed the cockpit with
leather paint, as this shows in photos.
show
elevator horns) and attached fine wire to simulate control cables.
Also, the outer wing struts only had crossbracing wires, and
these were done the same way.
I made the small pitot tubes on the wingstruts with the same kit
of wire, bent in a “U” shape and white glued to the front of the strut.
I also used the long exhaust stacks from the Italeri kit for the long
flame hiders carried by this aircraft. I trimmed the cockpit with
leather paint, as this shows in photos.
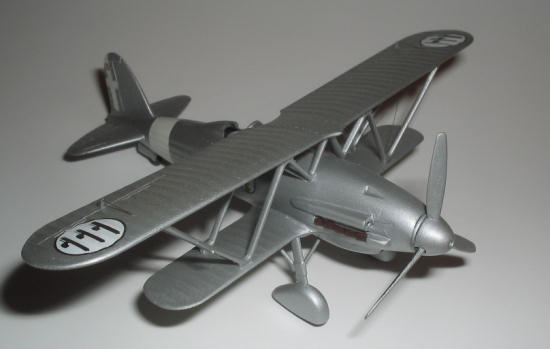
The propeller is the last hurdle you’ll face with this kit. I have used several props on this kit over the years. Many years ago, I had a couple of props from a 1/100 scale DC-3 kit, and these were perfect. However, I ran out of these, so I tried the prop and spinner from the Revell Macchi C.200 kit, and these are pretty good, but not perfect. The prop from the Airfix FM-2 Wildcat kit is the right shape, but the hub assembly is too big, so I’ll save those for another model. I ended up using a spare prop from an old Hasegawa Mitsubishi A6M2 Zero, which has no hub detail at all, but which also is exactly the right shape. The spinner covers the hub anyway, so the end result is acceptable. You have to trim the shaft down, and the prop is not going to spin, but it looks good, and that is the whole idea.
| CONCLUSIONS |
 Frankly, this kit is somewhat outdated, and the Italeri kit is much
better overall.
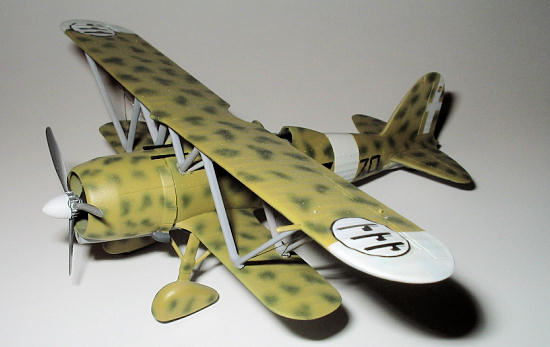
However, if
you have several of these around, or don’t want to spend the big bucks
for the Italeri kit, they are still buildable, and with a little
ingenuity and resourcefulness, a very nice model can be made of this
famous Italian biplane fighter.
Why waste a good old model when it is really salvageable?
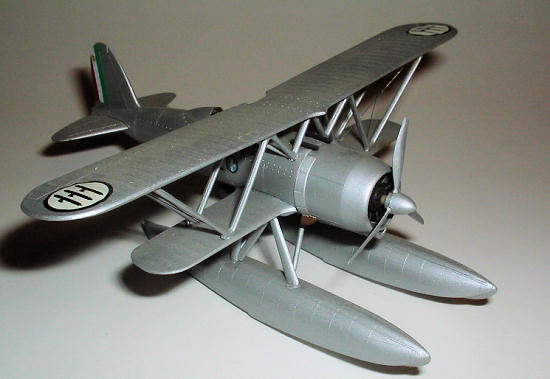
In fact, it can be the basis for the kit conversion to the
floatplane fighter (ICR .42) and the 1010 hp.
DB-601E powered
CR
42DB.
Try one. Even
so, get a couple of the Italeri kits.
They are really great,
the
extra parts are useful, and the booklet in the original issue is almost
worth the price of the kit. Get ‘em both.
Call it your Model Stimulus Program.
Frankly, this kit is somewhat outdated, and the Italeri kit is much
better overall.
However, if
you have several of these around, or don’t want to spend the big bucks
for the Italeri kit, they are still buildable, and with a little
ingenuity and resourcefulness, a very nice model can be made of this
famous Italian biplane fighter.
Why waste a good old model when it is really salvageable?
In fact, it can be the basis for the kit conversion to the
floatplane fighter (ICR .42) and the 1010 hp.
DB-601E powered
CR
42DB.
Try one. Even
so, get a couple of the Italeri kits.
They are really great,
the
extra parts are useful, and the booklet in the original issue is almost
worth the price of the kit. Get ‘em both.
Call it your Model Stimulus Program.
| REFERENCES |
There are
several good references on the CR 42, including the old Profile series, the
Squadron “In-Action” series (#172), and a recent Italian publication from Ali E
Colori, which provides a lot of color schemes and good 1/72 and 1/48 three view
drawings. .
Another excellent
source of information is the pamphlet that accompanies the
original Italeri CR 42 kit. This has a
short history, some factory drawings, and detailed photos of the recently
restored CR 42 in an Italian museum.
 Brian Baker
November 2009
Copyright ModelingMadness.com. All rights reserved. No reproduction in part or in whole without express permission. If you would like your product reviewed fairly and quickly, please
contact
me or see other details in the
Note to
Contributors.