| KIT #: | ? |
| PRICE: |
£32.99 |
| DECALS: | Two options |
| REVIEWER: | Carmel J. Attard |
| NOTES: | Short run with resin detail parts |
| HISTORY |
 es.
These were remote operated from two sighting domes atop the mid fuselage
section. Two additional 12.7 mm guns were mounted in the nose and semi
retractable ventral turret while two more guns were operated from lateral
hatches bringing a total of eight weapons, extremely heavy by Italian standard.
es.
These were remote operated from two sighting domes atop the mid fuselage
section. Two additional 12.7 mm guns were mounted in the nose and semi
retractable ventral turret while two more guns were operated from lateral
hatches bringing a total of eight weapons, extremely heavy by Italian standard.
After the
success of the initial batch of 12 pre-production machines it was followed by a
substantial order bringing the total to 163 aircraft produced. The first
delivery to the Regia Aeronautica went to form the 247th
Squadriglia Bombardiera at Grande Reggio which was entitled to use the
name Bruno Mussolini, son of the dictator Benito Mussolini, who lost his life
during the trials of the bomber. The unit employed mainly on night bombing
missions and was active in the Mediterranean making several raids against the
fortress of Gibraltar as well as Algerian and Tunisian ports. At the end of the
war only three P-108 Bs remained with the Mussolini squadriglia, based at
Foligno. Large number of these bombers was lost during the wartime operations.
One aircraft did fall in the hands of the US Army Air Force for evaluation
trials after which it was scrapped. Apart from operations over the North Africa
the P-108Bs also served in the Russian theatre.
| THE KIT |
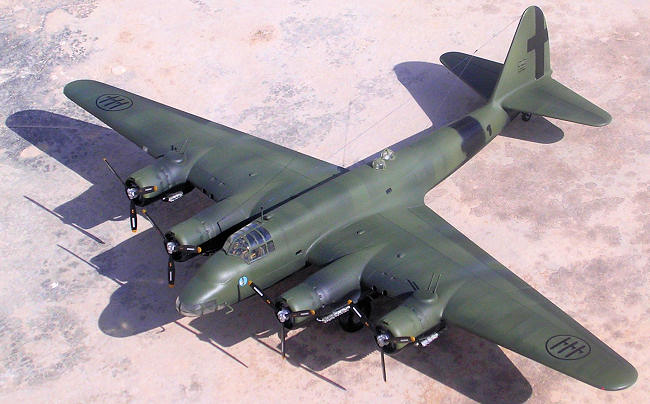
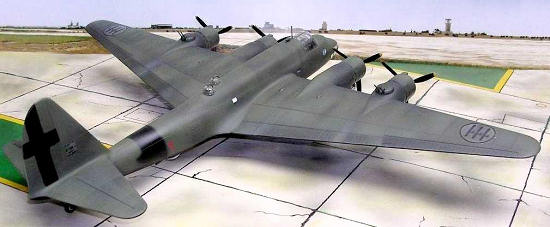
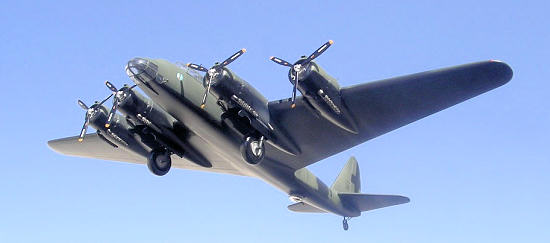
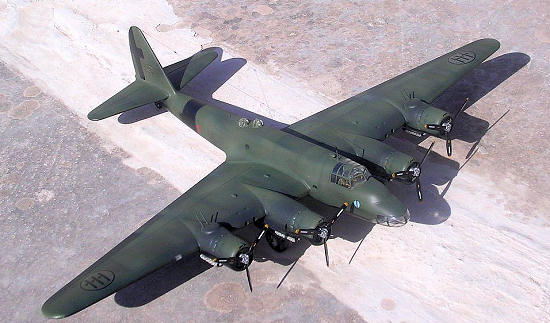
In my view this is one
of the largest 1/72-scale models of WWII bombers and I have never in my
wildest dreams expected the release of the Piaggio P-108 in kit form. Yet
considering that there are not many operational bombers left represented in
kit form it
 stands
to reason that it was the turn for the P-108. So here it is a high quality
injection moulded product coming out of Special Hobby. Obviously its size
makes one think twice upon starting on it as is going to take some
considerable space when complete.
stands
to reason that it was the turn for the P-108. So here it is a high quality
injection moulded product coming out of Special Hobby. Obviously its size
makes one think twice upon starting on it as is going to take some
considerable space when complete.
The kit contains 85
medium grey injection moulded parts, 13exceptionally clear, thin plastic
parts, as well as 33 resin parts. The instructions are in the form of a
comprehensive three and a half, double-sided pages and one may suggest that
it would be wise to go through it thoroughly before starting to assemble the
kit. Painting detail in Gunze Sangyo tones is also provided and is indicated
on every item. The kit provides a choice of two aircraft colour schemes. One
of these represents a P-108 B (MM 22004)
 bomber
in toned down Regia Aeronautica markings as depicted also on the box cover.
This is the type that carried bombing missions on
bomber
in toned down Regia Aeronautica markings as depicted also on the box cover.
This is the type that carried bombing missions on
| CONSTRUCTION |
 intervals
and this makes the task of guiding and mating the two halves together so
much simpler especially when one considers that we are dealing with large
fuselage parts. The internal fuselage bulkheads fit very nicely and also
assist with the alignment of the long fuselage halves. One of these
bulkheads has an extended internal wing spar, centrally positioned. This
helps to obtain a secure fit of the rather large wings. It also gives the
wings the correct dihedral when slotted together. The fit of the tail planes
is a different matter as they are butt jointed. I have made some
observations which worth mentioning.
intervals
and this makes the task of guiding and mating the two halves together so
much simpler especially when one considers that we are dealing with large
fuselage parts. The internal fuselage bulkheads fit very nicely and also
assist with the alignment of the long fuselage halves. One of these
bulkheads has an extended internal wing spar, centrally positioned. This
helps to obtain a secure fit of the rather large wings. It also gives the
wings the correct dihedral when slotted together. The fit of the tail planes
is a different matter as they are butt jointed. I have made some
observations which worth mentioning.
The portholes on the fuselage would require cleaning from flash and this may somehow enlarge the opening to a tiny amount that the clear part to fit in them will be loose. This is remedied by discarding the clear part and use Kristal Kleer instead. The slot cut vertically in the fuselage where the wing parts meet should be cleared from flash as these create an obstacle when it comes to fit the main wing spar D10. Half way down the fuselage there are two gun positions which are open and also have rectangular covers. As no detail interior is provided and there are no gun position parts one would preferably select to close these for good unless one makes his own interior decorations and details as can be seen in the photo of the real thing. The nacelle mounted gun turrets are resin parts and fit tightly into their circular location. These should be fitted from underneath the upper wing half and should protrude by 1mm above the cowling upper surface.
When it comes to fit the aft resin bulkhead of the engine nacelles (Part
pur4) it is best to remove all the excess resin at the back of this
component as there will not be enough space to allow the plastic part D5 to
fit in place. The rectangular floor square piece D7 which has to stick
partly at the front fuselage floor and half inside the nose perspex, I found
it is better to fit it first inside the perspex nose floor. When this is dry
then the protruding floor piece along with the nose is then glued to the
fuselage. When positioning the tiny air intake under the cowling it is best
to make reference to the side views at the end of the instruction sheet to
 find
the exact position from the front end of the cowling. One final item is that
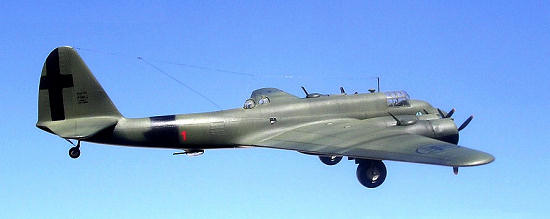
careful study of the instruction sheet is necessary when fitting the
propellers because two sets of propellers on one wing turn in a different
rotation to those of the other wing. The starboard one rotates clockwise and
the port propeller rotates anticlockwise. This means that care is taken when
joining the blades to the propeller boss making sure that the leading edge
of each blade is placed at the correct angle as per instruction sheet and
photos of the real aircraft.
find
the exact position from the front end of the cowling. One final item is that
careful study of the instruction sheet is necessary when fitting the
propellers because two sets of propellers on one wing turn in a different
rotation to those of the other wing. The starboard one rotates clockwise and
the port propeller rotates anticlockwise. This means that care is taken when
joining the blades to the propeller boss making sure that the leading edge
of each blade is placed at the correct angle as per instruction sheet and
photos of the real aircraft.
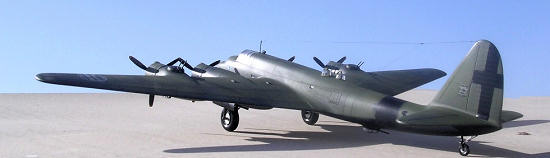
Each engine inner cowling consists of 15 different pieces and contains tiny
air intakes and detailed exhaust manifolds. Careful step by step assembly
will produce a clean and accurately aligned assembly.
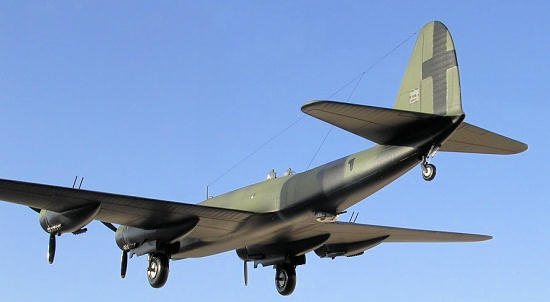
The wheel assembly was left off until a later
stage in order to ease painting. There is one item, which is missing from
the kit, which is the landing light installed on the leading edge of the
starboard wing. This is very clearly indicated on the box artwork. I made
this by filing a slot of the correct dimension then drilled through a 2mm
hole so that when the perspex is fixed in placed the see through effect will
show the detail. (See photo). Another item which needs to be added and which
is always shown prominent when observing the tailwheel is the leg struts
fitted to the rear of the tail-wheel. I made these out of surgical needle
and thin steel wire that is passed through and both cut to size. This
represented what appears to be a hydraulic or spring-loaded pair of struts.
I also preferred to replace the resin nacelle mounted guns with lengths from
a surgical hollow syringe of same diameter and cut to the required length.
| COLORS & MARKINGS |
 clean
job that they do on ID markings, insignia and camouflage colour patterns. In any
case this did not only apply to the Italians who were short of time to tone down
the colours but may also apply to the artist who made the otherwise fantastic
artwork on the kit box. This is so because the "Fascio Littorio" motif, which is
elaborately printed on the nose area, is painted the wrong way round. The silver
axehead should have the blade pointing forward on both sides of the fuselage.
This was obviously displayed on the forward fuselage
which was otherwise missing on aircraft of foreign origin that operated with
Regia Aeronautica. The reason for this appears to be that these particular
fascist decals were applied to the aeronautical firms and SRAM units but not to
the units. Since most of these aircraft went directly to units, only the main
markings were painted on over those of previous owner. These markings have
obviously disappeared from all combat aircraft with the fall of fascism on
clean
job that they do on ID markings, insignia and camouflage colour patterns. In any
case this did not only apply to the Italians who were short of time to tone down
the colours but may also apply to the artist who made the otherwise fantastic
artwork on the kit box. This is so because the "Fascio Littorio" motif, which is
elaborately printed on the nose area, is painted the wrong way round. The silver
axehead should have the blade pointing forward on both sides of the fuselage.
This was obviously displayed on the forward fuselage
which was otherwise missing on aircraft of foreign origin that operated with
Regia Aeronautica. The reason for this appears to be that these particular
fascist decals were applied to the aeronautical firms and SRAM units but not to
the units. Since most of these aircraft went directly to units, only the main
markings were painted on over those of previous owner. These markings have
obviously disappeared from all combat aircraft with the fall of fascism on
| CONCLUSIONS |
Copyright ModelingMadness.com. All rights reserved. No reproduction in part or in whole without express permission from the editor.
If you would like your product reviewed fairly and quickly, please contact the editor or see other details in the Note to Contributors.