Eduard 1/48 A6M2 Model 11
| KIT #: | 82211 |
| PRICE: | $52.98 |
| DECALS: | Five options |
| REVIEWER: | Tom Cleaver |
| NOTES: | Profipack |
| HISTORY |
The first two A6M1 prototypes were completed in March 1939, powered by the 780hp Mitsubishi Zuisei 13 engine. The first flew on April 1, 1939 and the two passed testing within a remarkably short period. The Imperial Navy accepted the prototypes in September as the A6M1 Type 0 Carrier Fighter.
While the navy was testing the first two prototypes, they suggested the third be fitted with the 940hp Nakajima Sakae 12 engine. Mitsubishi was reluctant to do this since they had their own engine of this class in the Kinsei. However, when the third prototype, now designate A6M2, was completed in January 1940, the Sakae's extra power pushed the performance of the Zero well past the original specifications.
The new version, the A6M2a Type 0 Model 11, was so promising in testing that the Navy ordered 15 be built and shipped to China before they had completed tests. These aircraft did not feature wing folding or tail hooks and were not equipped with radio direction finding.
 The
15 fighters arrived in China in July 1940, assigned to the 12th Kōkūtai (Naval
Air Group). They first entered combat on September 13, 1940, with 13 Zeros
claiming 27 I-16s and I-153s that had been such a problem for the A5Ms in under
three minutes without loss.
The
15 fighters arrived in China in July 1940, assigned to the 12th Kōkūtai (Naval
Air Group). They first entered combat on September 13, 1940, with 13 Zeros
claiming 27 I-16s and I-153s that had been such a problem for the A5Ms in under
three minutes without loss.
After receiving this report, the Navy immediately ordered the A6M2 Model 11 into full-scale production. A further 50 A6M2a Model 11s were completed by Mitsubishi by November 1940. There were three distinct production sub-types, differing from each other in minor details, with the changes dictated by combat reports. The second production batch was sent to the 14th Kōkūtai based at Hanoi in French Indochina.
By September 1941, the 65 Zeros of both units had established effective air supremacy over southeastern China, shooting down a total 103 aircraft and destroying a further 165 on the ground. Three were lost to anti-aircraft fire over the first 12 months of combat.
Reports of the Zero's performance filtered slowly back to the US, including an overall performance examination of one of the shot-down Zeros, which revealed everything about the fighter’s performance that would be confirmed in 1942 with the capture of the Akutan Zero. Unfortunately for many Allied airmen who would know nothing about the fighter when they met it in combat after December 1941, these reports were dismissed by USAAF and USN intelligence, on the grounds it was impossible for the Japanese to build such an aircraft, since the reported performance was better than any U.S. or British fighter then in service.
| THE KIT |
 Eduard
began releasing their A6M Zero series this past January with the A6M2 Model 21,
first in a “Tora Tora Tora’ Pearl Harbor release, then as a double kit “Zero!
Zero!” with Mdel 21s used between 1941-44, then as a second single Profipack
concentrating on Zeros in the Midway-Guadalcanal campaign. This Model 11 was
released this past August.
Eduard
began releasing their A6M Zero series this past January with the A6M2 Model 21,
first in a “Tora Tora Tora’ Pearl Harbor release, then as a double kit “Zero!
Zero!” with Mdel 21s used between 1941-44, then as a second single Profipack
concentrating on Zeros in the Midway-Guadalcanal campaign. This Model 11 was
released this past August.
The A6M kits are Eduard’s most advanced yet in terms of quality of surface detail; the rivet effect is closer to “scale” than any other 1/48 single-engine fighter featuring such detail. I can say from having been around the Planes of Fame A6M5 for the past 40 years that the surface detail of this kit is the closest to the real thing I have ever seen in a model.
This kit is essentially the same as the others, with the modeler directed to use the different canopies already on the clear sprue, the different under-cowling intake, and if one chooses to do the earliest Model 11, a different set of flaps for the exhausts that are in a higher position. Also, one is directed to fill the arresting hook well, since the Model 11 was not carrier-capable.
Decals are provided for four early and mid-production Model 11s used by the 12th Kōkūtai, the first Zero-equipped unit and the one that saw the most combat, and one from the 14th Kōkūtai.
| CONSTRUCTION |
 The
design of this kit is good enough that if you make absolutely certain to clean
off all sprue nubs on mating surfaces, and then read and heed the instructions,
it will be difficult to get a bad result. Make certain to follow the
instructions as to which of the various detail parts you will use for the
specific markings option you choose, which means you have to decide what option
you want at the outset.
The
design of this kit is good enough that if you make absolutely certain to clean
off all sprue nubs on mating surfaces, and then read and heed the instructions,
it will be difficult to get a bad result. Make certain to follow the
instructions as to which of the various detail parts you will use for the
specific markings option you choose, which means you have to decide what option
you want at the outset.
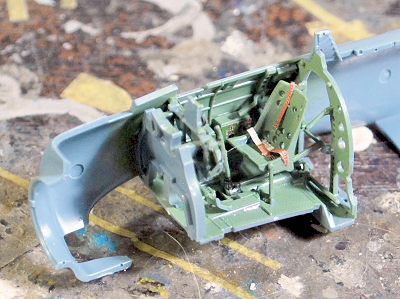
I used the mixed green for the cockpit interior to match the color Eduard used on the photoetch instrument panel I created for the first kit.
From my experience, I only used photo-etch for the instrument panel and the faces of the various “black boxes,” and the seatbelts. The rest are the kind of detail you need a penlight to see once the cockpit is assembled. Once again, those who want to make an ant pile into Mount Everest are free to do so, and the rest of us are free to leave them to it.
The rest of the cockpit goes together without problems. I compared the
injection-molded kit seat with the Brassin resin seat that I received for the
review, and I really can’t see a serious difference once the model is assembled.
This kit really doesn’t need the expensive aftermarket resin stuff; save your mo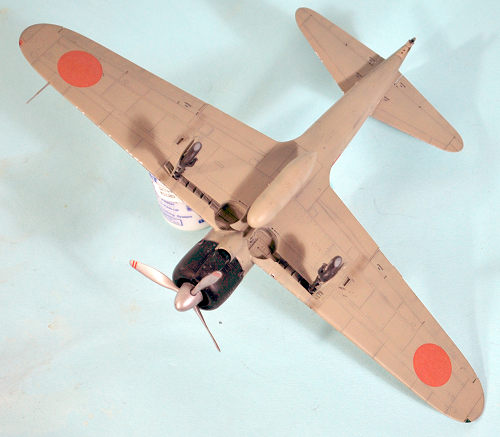 ney
on all that and get a second kit. Or buy it and use it; I subscribe to the Al
Superczynski Rule. However, all the various bottles that fit into the rear of
the cockpit behind the seat are invisible once the model is assembled, so if you
- like me - subscribe to “If you can’t see it, I didn’t do it,” you can save
time there.
ney
on all that and get a second kit. Or buy it and use it; I subscribe to the Al
Superczynski Rule. However, all the various bottles that fit into the rear of
the cockpit behind the seat are invisible once the model is assembled, so if you
- like me - subscribe to “If you can’t see it, I didn’t do it,” you can save
time there.
Glue all the “plug in” parts for the wing before assembly, so you can apply the glue from the inside and avoid any glue messes on the beautiful surface detail of the exterior.
I only needed to scrape down the centerline seam of the fuselage once assembled to get rid of the seam. I used my pounce wheel to rescribe the rivet lines that cross that seam.
The only potentially-tricky aspect of the entire construction process is the attachment of the main gear. It fits a bit loose, which can easily lead to misalignment. I ended up attaching the gear with CA glue. Be sure that the gear legs angle in when viewed from ahead, so that the wheels are vertical. The leg should angle forward so that when you look down at the wing from above, the axle of the main gear is just visible ahead of the wing’s leading edge, and you have it right.
| COLORS & MARKINGS |
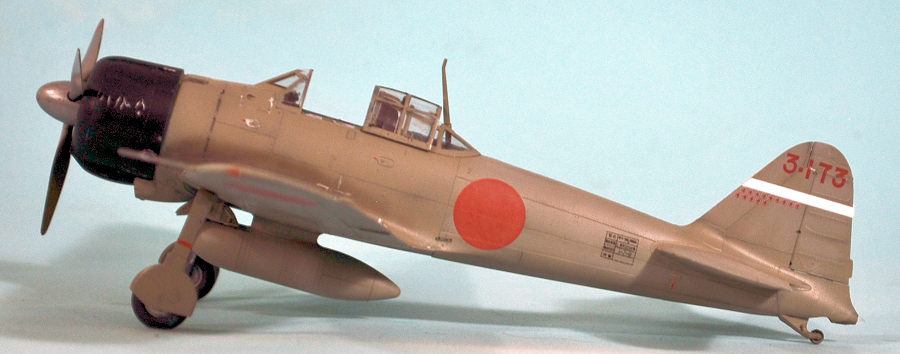
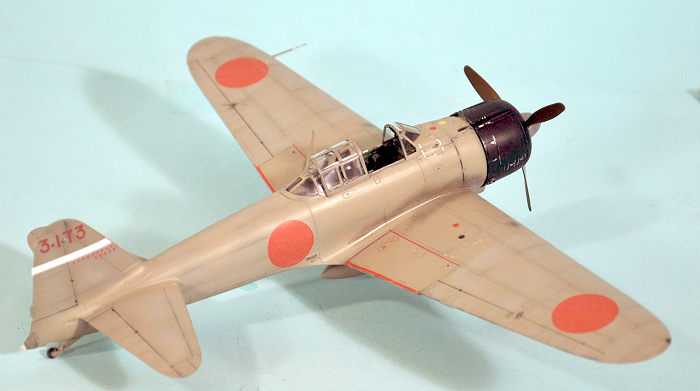
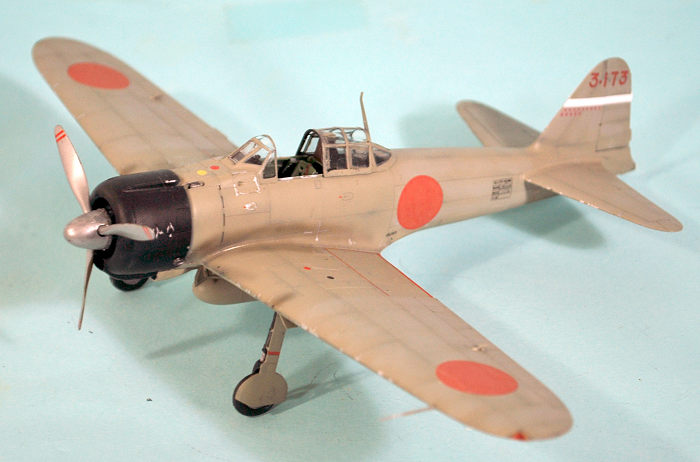
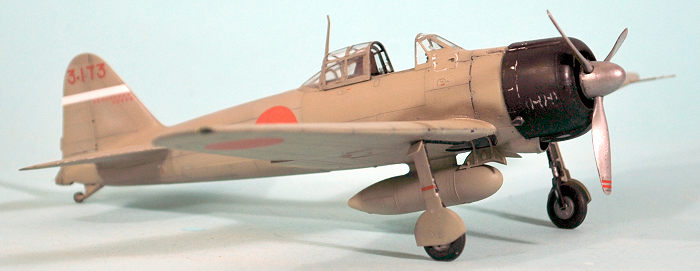
I chose Markings Option C for this model, primarily to do the different faded scheme. I first painted the cowling in the “dark cobalt blue” color that I mixed with Tamiya X-4 Blue and X-18 Semi-Gloss Black, then masked that off when dry. I pre-shaded the model ith black along panel lines, then painted it overall with the “Mitsubishi” ameriro color I had mixed for the earlier model. I then added in some light grey and did the “fading” of the upper outer wings and upper rear fuselage and horizontal stabilizers.
 I use
the Eduard decals in the standard way, not being that interested in the
possibility of ripping a decal by removing its clear backing after doing all the
earlier work for a specific markings option. Eduard’s decals act just like all
the decals we have known from the beginning of our involvement with the hobby,
going down and melting into the surface under an application of Solvaset.
I use
the Eduard decals in the standard way, not being that interested in the
possibility of ripping a decal by removing its clear backing after doing all the
earlier work for a specific markings option. Eduard’s decals act just like all
the decals we have known from the beginning of our involvement with the hobby,
going down and melting into the surface under an application of Solvaset.
I gave the model an oveall coat of semi-matt clear, since this airplane had been out in the weather for six months in China. I did some “dings” of the airframe with Vallejo aluminum and a 00000 brush, then applied exhaust and gunfire staining with Tamiya “Smoke.”
I then unmasked the canopy and installed it in the open position, then attached the landing gear and prop and called it finished.
| CONCLUSIONS |
Eduard’s Zero series are far less “fiddly” than their others, as simple to assemble as the new Fw-190As. The detail level is far beyond either Tamiya’s or Hasegawa’s Zeros. On the basis of the two I have now done, I can call the kit the best Zero in 1/48 scale and a serious contender with the Tamiya 1/32 Zeros for Best In Any Scale. If you follow the instructions,you will have a great result. Highly recommended. I am definitely looking forward to the A6M3 Model 32 coming in October and the Model 22 coming in January.
28 September 2022 Copyright ModelingMadness.com. All rights reserved. No
reproduction in part or in whole without express permission. Review kit courtesy of Eduard If you would like your product reviewed fairly and
fairly quickly, please
contact
the editor or see other details in the
Note to
Contributors.