Zvezda 1/48 Bf-109F-2
| KIT #: | 4802 |
| PRICE: |
2,240 Yen at
HobbyLink |
| DECALS: | Five Options |
| REVIEWER: | Tom Cleaver |
| NOTES: | Lifelike Decals 48-016 “Messerschmitt Me-109 Part 2" |
| HISTORY |
The Bf‑109F, or Friedrich,
is commonly considered the
First
appearing in limited numbers on the Channel Front in November 1940, the
Friedrich canceled the performance edge of the new Spitfire V over the Bf‑109E,
allowing the Luftwaffe to maintain air superiority against the RAF over the
Channel and Northern France during the “Non‑Stop Offensive” of 1941.
The Bf‑109F was clearly the best fighter operational
over the Eastern Front after the opening of Operation Barbarossa in June 1941.

Knight's Cross of
the Iron Cross (Ritterkreuz des Eisernen Kreuzes)
for 20 victories on
JG 54 was assigned to the Northern Front in Operation
Barbarossa, the invasion of the

On
In 500 missions between
| THE KIT |

| CONSTRUCTION |
Due to the number of parts, the kit is very fiddly.
This is exacerbated by the fact there is no
identification letter on any of the three sprues, while the instructions
indicate one should be dealing with “Sprue A” and “Sprue B.”
Fortunately, the guesswork
 does not include the
individual parts, which are correctly numbered.
Once one can identify which sprue is which, the process
becomes easier.
It is also important to determine if you are doing “Version 1",
which is an early-production Bf-109F-2, or “Version 2" which is the
later-production version, since this determines which of all the alternative
parts you will be using throughout the construction.
does not include the
individual parts, which are correctly numbered.
Once one can identify which sprue is which, the process
becomes easier.
It is also important to determine if you are doing “Version 1",
which is an early-production Bf-109F-2, or “Version 2" which is the
later-production version, since this determines which of all the alternative
parts you will be using throughout the construction.
Parts fit is very good.
Test fit carefully and you will not need to use putty or
filler.
I should point out that the landing gear is designed so that it cannot
be placed incorrectly, which can be problematic with other Bf-109 kits, to get
the angle of forward rake and spread right; this is a very nice touch.
My initial plan was to build the model with the engine
compartment open.
In 1/48 scale, this is pretty easily done since it is
not big enough to require lots of small additional detail, as is the case with a
1/32 kit.
I assembled all the interior, and then managed to drop and step
on the left engine mount.
(I am sure you heard the wail around the planet last
week) At that point I had to disassemble a lot of the interior to allow proper
fit of the cowling closed up, which did make a whole lot of mess.
To top it off, once I had the model finally assembled
this way, I made the discovery that there are two alternative left engine
mounts, and that the one I had stepped on was the wrong one for the version I
was doing, and that the correct part was still on the sprue!
ARRGGHHHHH!!!!
 I can however tell you that all the parts fit very
nicely for whichever way you wish to go, and that the parts provided in the kit
for the engine and other interior parts are far superior to the resin parts that
have been the only other way to do a Bf-109 “opened up.”
I may just get another one of these to finally do that
right.
I can however tell you that all the parts fit very
nicely for whichever way you wish to go, and that the parts provided in the kit
for the engine and other interior parts are far superior to the resin parts that
have been the only other way to do a Bf-109 “opened up.”
I may just get another one of these to finally do that
right.
The cockpit provides the best detail of any 1/48 Bf-109
kit; of course it’s all very small and as such it is Optivisor Time when it
comes to assembly.
I only used Eduard photoetch seat belts to put that
final bit to the cockpit.
So, take your time, identify the sprues, identify the
parts cporrectly, identify the particular sub-type of Bf-109F-2 you intend to
build, and you will have a very nice model when it comes time for paint and
decals.
| COLORS & MARKINGS |
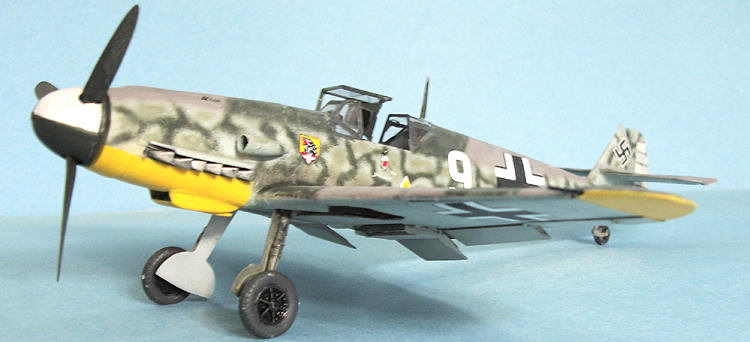
I’ve always been attracted to the airplanes of JG 54 on
the Eastern Front.
The unit was in the positions it would maintain for the
next two and a half years by the fall of 1941, and took the time to repaint the
aircraft to give the best camouflage for combat over the great dark northern
forests of the  pp’s
airplane from October 1941, when he had 46 victories.
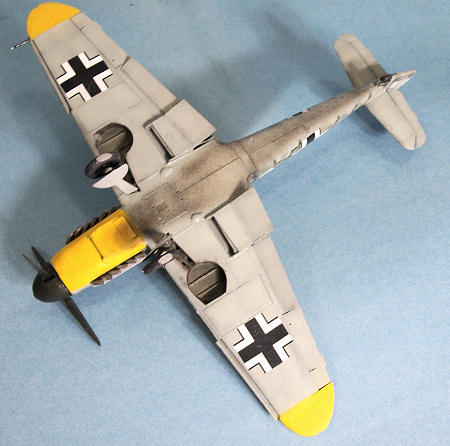
After pre-shading the model and then applying the yellow
tactical markings that I masked off, I freehanded the 74/75/76 scheme with the
“lizard skin” done with RLM74 and RLM02, using mixed paints created from Tamiya
acrylics.
Lifelike Decals provides comprehensive color painting guides with
the decals.
When all that was done, I gave the model a coat of Future and it
was time for the decals.
pp’s
airplane from October 1941, when he had 46 victories.
After pre-shading the model and then applying the yellow
tactical markings that I masked off, I freehanded the 74/75/76 scheme with the
“lizard skin” done with RLM74 and RLM02, using mixed paints created from Tamiya
acrylics.
Lifelike Decals provides comprehensive color painting guides with
the decals.
When all that was done, I gave the model a coat of Future and it
was time for the decals.
As Lifelike points out in their instructions, there has
been controversy over whether or not Phillipp’s airplane would have been
“White-9" or “Yellow-9"; Lifelike comes down on the side of white on the point
that this is the proper color for the 4th
Staffel in Luftwaffe color coding instructions.
The decals are very thin and go down under a coat of
Micro-Sol without difficulty.
| FINAL ASSEMBLY |
| CONCLUSIONS |
Review kit courtesy
of HobbyLink
March 2011
My thanks to www.dragonmodelsusa.com for the review kit. Get yours at your favorite shop or ask them to order it for you.
If you would like your product reviewed fairly and quickly, please contact me or see other details in the Note to Contributors.