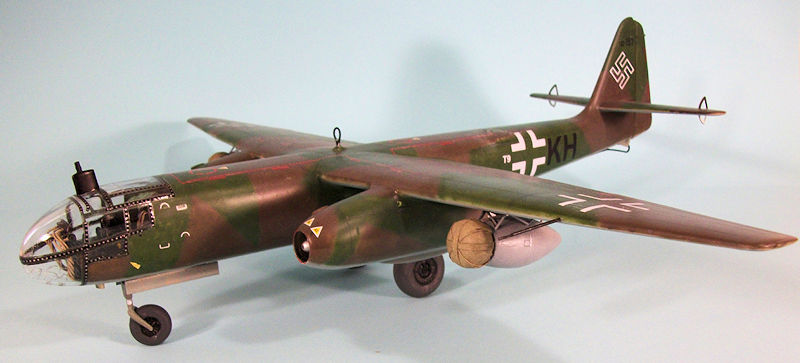
Fly 1/32 Ar-234B-2
| KIT #: | 32003 |
| PRICE: | $78.00 |
| DECALS: | Four options |
| REVIEWER: | Tom Cleaver |
| NOTES: | Short run kit with resin parts |
| HISTORY |
Of all the German jets, the Arado Ar 234 had the easiest transition and least change from prototype to operational aircraft. Once the decision was made to equip the airframe with a standard tricycle undercarriage, which required the widening of the fuselage. There was little if any change onward.
In July 1944,
1.Staffel/Versuchsverband
Ob.d.L.
took delivery of the Ar 234 V5 and V7 at Juvincourt, near Rheims. These were
essentially A series aircraft, using the trolley and skids system for takeoff
and landing. The unit used the Rauchgerate (RATO) units for takeoff and the
braking parachute for landing. By mid August, the Staffel had flown several
successful reconnaissance missions including missions over the
Normandy beachhead and Great Britain and experienced no difficulty
eluding Allied fighters at an operational altitude of 29 30,000 feet. In late
August, the unit took delivery of two Ar 234B 1s, the
 production
recon only sub type. That September, they took two more Ar 234B 1s and returned
the V5 and V7 to the RLM, as they became the
Sonderkommando Goetz.
By November, two other reconnaissance units, the Sonderkommandos Hecht and
Sperling,
were formed with four Ar 234B 1s each. Also in November, the first Ar 234B 2
bombers were delivered to
II/KG 76
at Achmer, with the pilots receiving transition training in time to take part in
pinpoint attacks in the Ardennes the next month as the Germans smashed though
American lines in what became The Battle of the Bulge.
production
recon only sub type. That September, they took two more Ar 234B 1s and returned
the V5 and V7 to the RLM, as they became the
Sonderkommando Goetz.
By November, two other reconnaissance units, the Sonderkommandos Hecht and
Sperling,
were formed with four Ar 234B 1s each. Also in November, the first Ar 234B 2
bombers were delivered to
II/KG 76
at Achmer, with the pilots receiving transition training in time to take part in
pinpoint attacks in the Ardennes the next month as the Germans smashed though
American lines in what became The Battle of the Bulge.
The recon Sonderkommanos were disbanded at the end of the year, with the crews going on to 1/FernAufklarensGruppe 100, a long range reconnaissance unit. At the same time, I and III Gruppen of KG 76 began reequipping with the Ar 234B 2, though neither unit would ever achieve full strength on the type and their operations would be hindered by the severe fuel shortage the Luftwaffe faced after the successful Allied bombing campaign against the synthetic fuel industry in the previous summer and fall.
By early March, 1945, improvements in fuel supplies allowed the Ar 234B 2s of III/KG 76 to undertake missions against the Ludendorff Bridge at Remagen, which the American Army had seized before it could be destroyed and was using to rush Allied forces across the Rhine into central Germany. The bridge was taken March 7, and survived over 100 attacks by Ar-234B 2s using the 2,205 lb SD 1000 bomb before finally collapsing on March 17.
 Three Ar 234B 1s
of
FAGr 100
were sent as a
Sonderkommando
to Udine, Italy, in mid March as a result of the constant complaints from the
German forces in Italy that they were unable to obtain useful
photo reconnaissance with the aircraft available. The three Ar 234s, operating
at 29 39,000 feet, radically changed the situation as they operated regularly
over the Ancona and Leghorn sectors of the front. Unfortunately, it was again a
case of too little too late, as the German forces rapidly collapsed in northern
Italy in April.
Three Ar 234B 1s
of
FAGr 100
were sent as a
Sonderkommando
to Udine, Italy, in mid March as a result of the constant complaints from the
German forces in Italy that they were unable to obtain useful
photo reconnaissance with the aircraft available. The three Ar 234s, operating
at 29 39,000 feet, radically changed the situation as they operated regularly
over the Ancona and Leghorn sectors of the front. Unfortunately, it was again a
case of too little too late, as the German forces rapidly collapsed in northern
Italy in April.
By the end of March, the Ar 234B 2s of III/KG 76 were immobilized for lack of fuel at Oldenburg, while the remnant of I/KG 76 was at Leck, with II/KG 76 at Scheppern. In the meantime, 1./FAGr.123 and 1./FAGr.33 had received some Ar 234Bs and were based in Denmark. Following the end of the war on May 8, these aircraft were rapidly taken over by British and American forces.
A total of 210 Ar 234Bs were produced during the war. Due to fuel shortages and the confusion that reigned in Germany during the final year of the war, less than two thirds of them were actually delivered to combat units, and less than half were used on operations due to fuel shortages and Allied air domination over the bases they flew from.
On Ar-234B-2 survived
to become an exhibit at the National Air and Space Museum.
| THE KIT |
.Previous to this kit, the only large scale Ar-234 was a full resin kit designed by Radu Brinzan and marketed by MDC. It is accurate and pricey. The announcement by Fly that the Ar-234B-2 bomber and Ar-234BN nightfighter would be released gave large scale jet modelers hope of a kit they could afford. The Ar-234B-2 was released in the fall of 2014.
 Opening the
box, the first thing one notices are the large number of resin parts. The
plastic parts are limited run so there is a little bit of flash around the
corners and no locating pins. This is not a Tamigawa shake’n’bake kit. Careful
test fitting is needed with lots of Mr. Surfacer on all joints. The plastic is
hard and sturdy, but is easy to work with. Plastic parts include the fuselage
halves, RATO rockets, gear doors and nose wheel. Wing are in upper and lower
parts as are the horizontal stabilizer, with a separate rudder. The engine
nacelles are in halves, with the rear exhaust body also in plastic halves. The
clear parts benefit from being dipped in Future.
Opening the
box, the first thing one notices are the large number of resin parts. The
plastic parts are limited run so there is a little bit of flash around the
corners and no locating pins. This is not a Tamigawa shake’n’bake kit. Careful
test fitting is needed with lots of Mr. Surfacer on all joints. The plastic is
hard and sturdy, but is easy to work with. Plastic parts include the fuselage
halves, RATO rockets, gear doors and nose wheel. Wing are in upper and lower
parts as are the horizontal stabilizer, with a separate rudder. The engine
nacelles are in halves, with the rear exhaust body also in plastic halves. The
clear parts benefit from being dipped in Future.
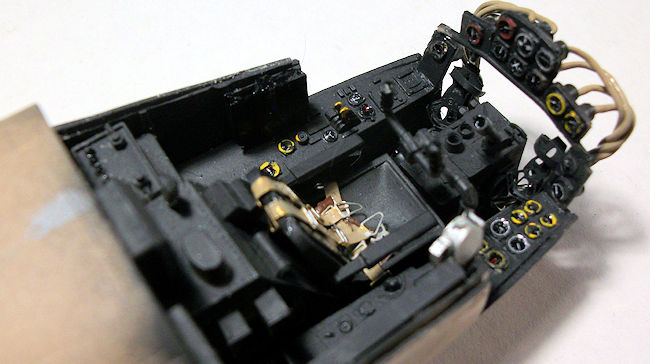
The cockpit comes with plastic side consoles and resin rear bulkhead, seat, control yoke, bomb sight, and side panel and oxygen control. The instrument panel is in plastic. The seat belts and rudder pedals are photo-etch.
The gear wells are resin, while the gear doors and the landing gear itself is plastic with some resin and photoetch parts for the nose wheel. The wheels are each two-part plastic pieces. The resin parts are really excellent and include the parachute packs for the RATO units.
Decals are by Bodecek Agency, which is known for good airliner decals. Decals are provided for four aircraft. One from a test unit, one from KG 76 and one each as tested by the US and Britain post-war.
| CONSTRUCTION |
I began construction starting with the assembly of wings and horizontal stabilizers. I then assembled the engine nacelles, which have a resin intake part for each. The small intakes on the nacelle are separate plastic parts. I attached the nacelles to the wings and applied Mr. Surfacer to the wing-nacelle joints.
 I then cut
the main gear wells which are resin off their backing, cleaned them up and
attached them in each fusleage half after test-fitting in insure they would
allow the fuselage to close up. I also attached the bomb holder, then glued the
fuselage together and set it aside.
I then cut
the main gear wells which are resin off their backing, cleaned them up and
attached them in each fusleage half after test-fitting in insure they would
allow the fuselage to close up. I also attached the bomb holder, then glued the
fuselage together and set it aside.
The cockpit parts were painted Tamiya German Grey and then detailed, with the separate instrument decals provided, and some highlighting done with a Prismacolor silver pencil. I painted the seat belts, assembled them and attached them to the seat. I then assembled the rest of the cockpit in accordance with the instructions and glued that separate assembly together. I attached the resin nosewheel well in position and then taped the wings in position and glued in sufficient fish weights to insure nose sitting, then glued the cockpit to the fuselage. The join again required Mr. Surfacer.
 After sanding
the joints smooth and rescribing the petite panel detail where necessary, I
attached the wing and stabilizers. These also required Mr. Surfacer for the
joints.
After sanding
the joints smooth and rescribing the petite panel detail where necessary, I
attached the wing and stabilizers. These also required Mr. Surfacer for the
joints.
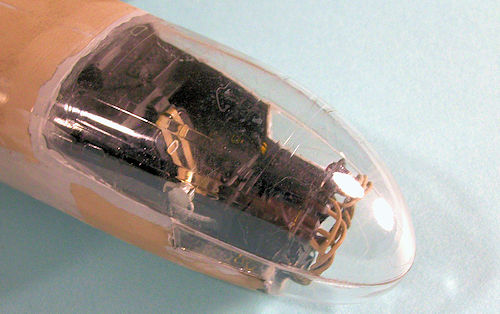
The instrument panel has separate resin instrument cans. I drilled the back of these and then glue pieces of solder to them, to use for the wiring. Rather than have the wiring going everywhere as was often the case, I wrapped the wires together, as I found in one photograph of an Ar-234. I then attached the instrument panel and then glued the clear parts in place. Again, Mr. Surfacer would be needed for the joins, but I waited to apply that until I had masked the canopy, then carefully applied the filler and sanded it smooth.
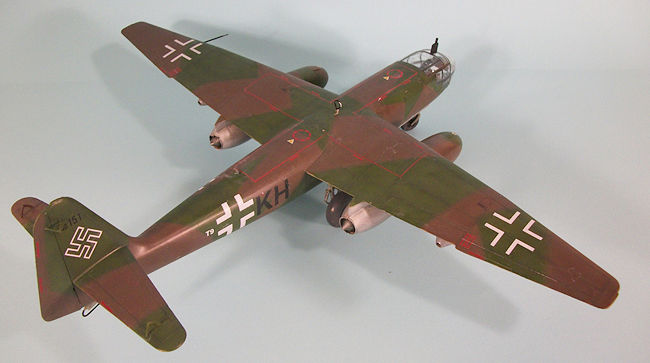
| COLORS & MARKINGS |
 I painted
the canopy framing black, then masked all that. I preshaded panel lines, then
painted the jet exhaust with Alclad Steel, which I then masked. The model was
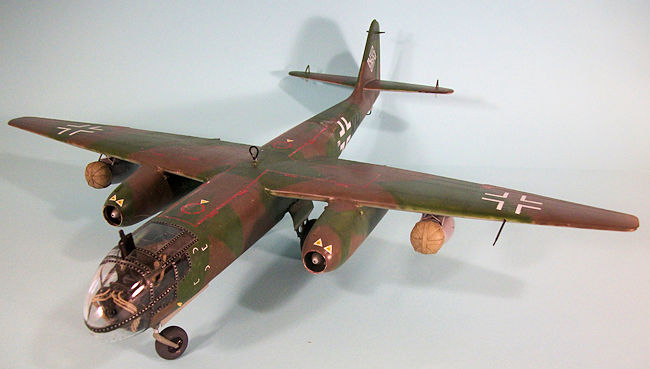
camouflaged per the painting diagram, using Tamiya paints mixed to be RLM
81/82/76.
I painted
the canopy framing black, then masked all that. I preshaded panel lines, then
painted the jet exhaust with Alclad Steel, which I then masked. The model was
camouflaged per the painting diagram, using Tamiya paints mixed to be RLM
81/82/76.
When it was finished, I gave the model a coat of Future.
The kit decals were used throughout, other than the “F1" to do a III/KG 76 airplane, which came from an Xtradecals sheet. The decals gave no trouble under an application of Micro-Sol.
| FINAL CONSTRUCTION |
I assembled the
landing gear and painted it RLM02, then attached each in its respective gear
well, then attached the gear doors after attaching the wheels to the gear legs.
With the model on its feet, I unm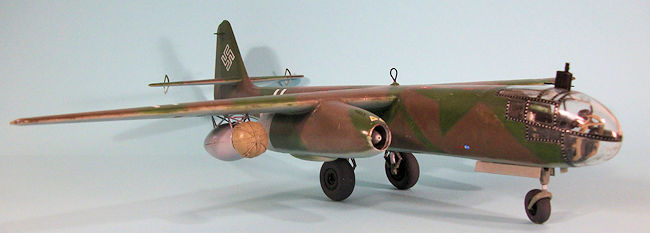 asked
the canopy and applied the decals that have the attachment screws.
asked
the canopy and applied the decals that have the attachment screws.
The RATO units were assembled. Rather than fit the resin parachute pack to the unit, I opened up the front of each unit so that the packs could be glued on without filler. The packs themselves were painted Tamiya Deck Tan with a wash of Tamiya Smoke to pop out the detail. The RATO units were painted Vallejo Dull Aluminum. They were assembled and then attached to the wings.
The kit does not include any ordnance. I decided not to use the drop tanks. One could use the SC1000 bomb from a Hasegawa Ju-87D, or an SC250 or SC500 from other kits.
| CONCLUSIONS |
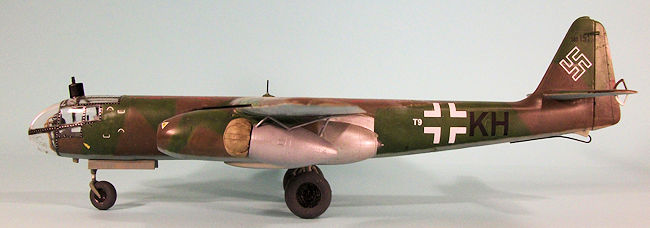
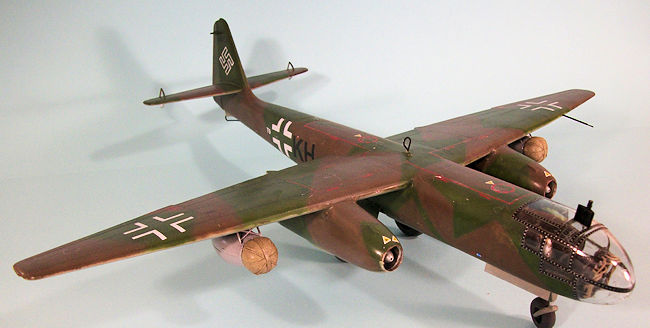
The Ar-234 is a handsome airplane, and this kit catches the shapes and look correctly. A modeler could really “go to town” in superdetailing the kit in this scale. There is nothing out of the ordinary in difficulty of assembly and anyone with experience of short run kits should have no problem with it.
December 2015 Copyright
ModelingMadness.com
Thanks to Fly Models
for the review kit. If you would like your product reviewed fairly and
fairly quickly, please
contact
the editor
or see other details in the
Note to
Contributors.