Eduard 1/48 Bf-109G-6
| KIT #: | 8368 |
| PRICE: | 3,300 yen at HLJ |
| DECALS: | Five options |
| REVIEWER: | Tom Cleaver |
| NOTES: | Profipak version. Lifelike Decals 48-034 “Messerschmitt Me-109 Part 6". |
| HISTORY |
The most-produced single variant of the Bf-109 series was the Bf-109G-6,
which first appeared in February 1943 and featured heavier armament than the
previous versions, with the 7.62mm machine guns replaced by 13mm machine guns,
which necessitated a large fairing over the gun breaches, known as the 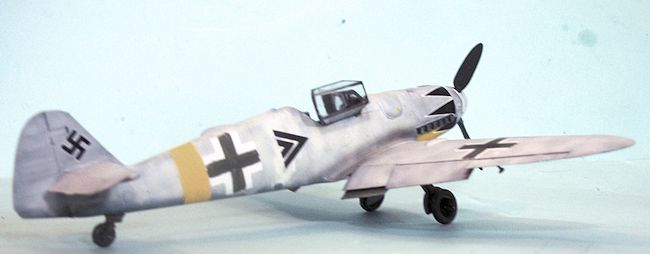
Anyone who is not familiar with the life and career of Erich Hartmann,
history’s top-scoring fighter pilot, is hereby required to terminate their
membership in the 109Nutz Association.
 painted
with a variation of the black tulip insignia as a morale-builder for the other
pilots in the recently-decimated unit.
During his time with I/JG 53, he scored his 337th victory on
February 4, 1945, during a freie jagd flown with Obergefreiter Erich
Sommavilla as wingman. Sommavilla’s
109 experienced mechanical trouble and he aborted the mission; Hartmann spotted
a formation of Il-2s on his way back to base and took out one with his famous
tactic of approaching from below and waiting until the enemy aircraft “filled
the windscreen.” Hartmann was replaced as Kommandeur of I/JG 53 on Fevbruary 14
by Hauptmann Helmut Lipfert. After
a leave at home that would be the last time he saw his wife for ten years,
Hartmann attended Me-262 training after being asked a second time by Adolf
Galland to join JV 44. At the end
of March, he returned to JG 52 at the request of Geschwader Kommodore Hermann
Graf, and assumed command of I/JG 52, which he led until the end of the war.
painted
with a variation of the black tulip insignia as a morale-builder for the other
pilots in the recently-decimated unit.
During his time with I/JG 53, he scored his 337th victory on
February 4, 1945, during a freie jagd flown with Obergefreiter Erich
Sommavilla as wingman. Sommavilla’s
109 experienced mechanical trouble and he aborted the mission; Hartmann spotted
a formation of Il-2s on his way back to base and took out one with his famous
tactic of approaching from below and waiting until the enemy aircraft “filled
the windscreen.” Hartmann was replaced as Kommandeur of I/JG 53 on Fevbruary 14
by Hauptmann Helmut Lipfert. After
a leave at home that would be the last time he saw his wife for ten years,
Hartmann attended Me-262 training after being asked a second time by Adolf
Galland to join JV 44. At the end
of March, he returned to JG 52 at the request of Geschwader Kommodore Hermann
Graf, and assumed command of I/JG 52, which he led until the end of the war.
| THE KIT |
Eduard’s Bf-109G-6 was eagerly awaited by modelers, who expected the kit
to become the “definitive” Gustav in 148, in the way their Spitfire IX took that
position for Spitfire kits after its release.
Unfortunately, Eduard managed to make some mistakes in measurements,
which resulted in a internet firestorm as the disappointed and jilted lovers
expressed their dismay and anger.
Things became so extreme that some Very Well Known Serious Modelers made what
can only be called Damn Fools Of Themselves, with ridiculous claims that the kit
was “over-scale” by anything from 1/47 to 1/45, depending on the level of what
must have been alcoholic stupor the complainer was in when they pulled out their
measuring sticks.
 In fact, the kit is 1/48, and Eduard is guilty of using plans and
drawings that were as accurate for the 109 as were the “marvelous” Aero Detail
plans used by Hasegawa for their 1/48 Spitfire IX kit back in 2001.
Outside of wingspan (4mm too much) and fuselage length (2mm too long) all
other measurements of all other parts are exactly the same as the 1/48 Zvezda
Bf-109F kit, commonly considered the “gold standard” in the 109Nutz Association.
Comparing the Eduard kit with the Zvezda kit, cooler heads have noted
that the extra fuselage length appears to be in the area between the rear of the
cockpit and the leading edge of the vertical fin, while the 2mm difference in
each wing is found in the center of the wing in the area of the wing flaps.
In fact, the kit is 1/48, and Eduard is guilty of using plans and
drawings that were as accurate for the 109 as were the “marvelous” Aero Detail
plans used by Hasegawa for their 1/48 Spitfire IX kit back in 2001.
Outside of wingspan (4mm too much) and fuselage length (2mm too long) all
other measurements of all other parts are exactly the same as the 1/48 Zvezda
Bf-109F kit, commonly considered the “gold standard” in the 109Nutz Association.
Comparing the Eduard kit with the Zvezda kit, cooler heads have noted
that the extra fuselage length appears to be in the area between the rear of the
cockpit and the leading edge of the vertical fin, while the 2mm difference in
each wing is found in the center of the wing in the area of the wing flaps.
When I first built a review model of this kit, I found that I could cut
off 2mm from the outer end of each wing and then attach the wingtip, having only
to clip the aileron and the leading edge slat by the same amount.
Doing so lets the model sit next to other 109s from other manufacturers
without the wing calling attention to itself.
Technically, this isn’t right since the aileron and the slat are the
correct span, and the additional span is in the flap.
However, as one noted Experte pointed out, one cannot cut the wing in
that area successfully. Most
modelers appear to be leaving the wing alone, or clipping the end as I did in
the name of “visual accuracy” even if it isn’t technically accurate.
The final decision of cut or don’t cut is for the modeler to decide.
The surface detail of this kit is as nice and petite as that found on the Spitfire IX kit, and is certainly the best of any 109 kit in any scale. All control surfaces are molded separately, so they can be posed dynamically. The cockpit is the best and most-accurate kit cockpit of any 1/48 Bf-109 model. The kit provides only the Messerschmitt and WNF “Beules.” The Profipack version includes the usual photoetch frets that provide extra detail for the cockpit and such items as the wing radiators. The kit provides decals for five different airplanes. Unfortunately, the most colorful option is for an Erla-built Bf-109G-6, which requires a modeler to either replace the right side “Beule” with an Erla Beule from a Hasegawa kit (it’s a drop fit) or to make the little “tongue” from plastic.
| CONSTRUCTION |
I first started with the wing sub-assembly, since I planned to make that
2mm cut on each end and modify the ailerons and slats in the name if “visual
look”. Once I did that I proceeded
to assemble the multi-part wheel wells (which aren’t as fiddly as those of the
Spitfire), then assemble the wing and attach
 the
radiator flaps and wing flaps in the down position.
I didn’t waste my time on adding the photoetch additional radiator
detail, since you can’t see anything in there anyway.
the
radiator flaps and wing flaps in the down position.
I didn’t waste my time on adding the photoetch additional radiator
detail, since you can’t see anything in there anyway.
I then proceeded to paint the cockpit parts with Tamiya “German Grey”
which is “close enough” to RLM66 for my liking, then to attach the various
photoetch detail parts after assembling all the plastic parts.
I opted not to use the photoetch rudder pedals since my experience is
they are easily knocked off after being attached with CA glue, and besides there
is not a lot of opportunity for even the most determined member of the Penlight
Brigade to see anything in there once the cockpit is assembled.
I did use the photoetch instrument panel and the seatbelts.
I then attached the cockpit to the right fuselage half, and proceeded to
assemble the fuselage. Since I was
doing a Bf-109G-6/U2, I used the tall vertical fin parts and tall rudder.
With the fuselage all assembled, I attached the wing sub-assembly and the
horizontal stabilizers with elevators in the down position.
| COLORS & MARKINGS |
 in various
places. I then took a 1/4 inch flat
brush and applied even-thinner Gloss White over that while the paint was still
curing, in order to get light “brush strokes” into the finish.
When done, I applied a black “7" decal on the fuselage and then “brushed
it out” with that quarter-inch brush and thinned Gloss White, so that it could
still be seen through the paint.
in various
places. I then took a 1/4 inch flat
brush and applied even-thinner Gloss White over that while the paint was still
curing, in order to get light “brush strokes” into the finish.
When done, I applied a black “7" decal on the fuselage and then “brushed
it out” with that quarter-inch brush and thinned Gloss White, so that it could
still be seen through the paint.
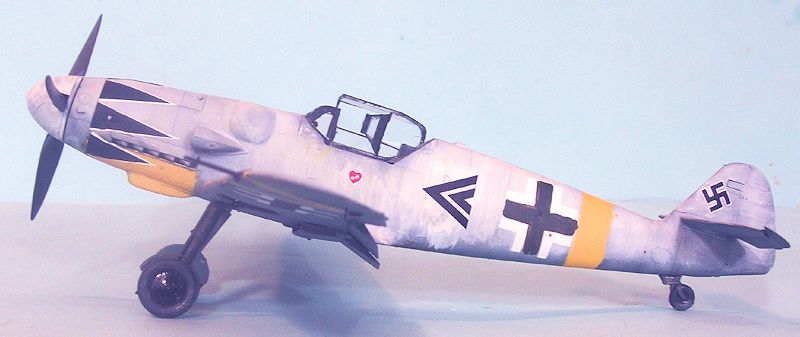
The Lifelike decals provide the best set of markings for this airplane, since they supply the correct number of tulip petals for the lower cowling. The decals went on with no problem and snugged down under a coat of Micro-Sol. I then painted the interiors of the fuselage and wing crosses with Xtracrylix RLM74 as called for in the kit instructions. When all was complete, I gave the model several coats of Xtracrylix Clear Flat varnish. I finished the painting by applying Tamiya “Smoke” for the exhaust and oil cooler stains.
| FINAL BITS |
 Eduard has the angle of the landing gear wrong, so that it looks more
like a Bf-109E when finished. I
shaved the attachment plugs of the gear legs and installed them at the correct
angle. I then attached the wheels
and gear doors, and the tailwheel. I
finished by unmasking the canopy and attaching the Erlahaube canopy in the open
position. The photos of this
airplane don’t show a lot of weathering since the winter camo covered any of
that.
Eduard has the angle of the landing gear wrong, so that it looks more
like a Bf-109E when finished. I
shaved the attachment plugs of the gear legs and installed them at the correct
angle. I then attached the wheels
and gear doors, and the tailwheel. I
finished by unmasking the canopy and attaching the Erlahaube canopy in the open
position. The photos of this
airplane don’t show a lot of weathering since the winter camo covered any of
that.
| CONCLUSIONS |
Thanks to HobbyLink Japan for the review kit. Order yours at this link.
Thanks to Lifelike Decals for the decal sheet.
If you would like your product reviewed fairly and fairly quickly, please contact the editor or see other details in the Note to Contributors.