Hobby Boss 1/48 Me-262A-1a/U3
| KIT #: | 80371 |
| PRICE: | $29.99 |
| DECALS: | Two options |
| REVIEWER: | Tom Cleaver |
| NOTES: |
| HISTORY |
The prime requirement for most photo-reconnaissance aircraft has been a high speed, which allowed the usually-unarmed aircraft to outrun and evade an opponent. Once the Me-262 achieved flight test status and its high speed was confirmed, it was obvious that an aircraft modified to carry cameras would be an excellent photo reconnaissance type, particularly since all other German photo recon aircraft had lost whatever performance edge over their opponents they had possessed when they entered service.
 Accordingly, a photo recon adaptation with two Rb 20/30(Rb – Reihenbildner –
series-picture, topographic camera) cameras mounted in the nose, or
alternatively one Rb 20/20 and one Rb 75/30 was developed in 1944 and Me-262A-1a
Schwalbe fighter airframes were modified to the “U3" (Umrustbausatz) st andard
in late 1944 and early 1945 and were used in battlefield photo reconnaissance by
NauAufklärungsGruppe NAG-6.
Accordingly, a photo recon adaptation with two Rb 20/30(Rb – Reihenbildner –
series-picture, topographic camera) cameras mounted in the nose, or
alternatively one Rb 20/20 and one Rb 75/30 was developed in 1944 and Me-262A-1a
Schwalbe fighter airframes were modified to the “U3" (Umrustbausatz) st andard
in late 1944 and early 1945 and were used in battlefield photo reconnaissance by
NauAufklärungsGruppe NAG-6.
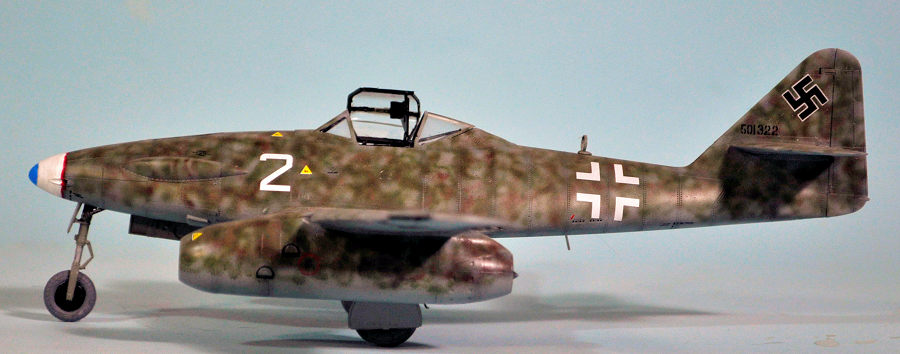
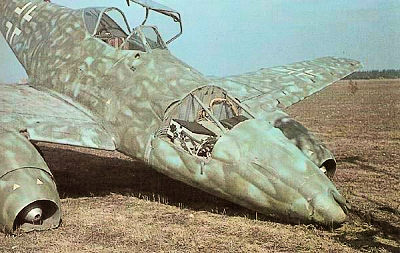
The most distinguishing feature of the Me-262A-1a/U3 was the bulges over the gun bay area which were necessary to provide clearance for the cameras mounted in the gunbay. A glass window located in the cockpit floor allowed the pilot to view what was being photographed. A few Me262A-1a/U3s were fitted with a single 30mm MK 108 cannon, but most were unarmed.
On
Me-262A-1a/U3 was among the Me-262s gathered in Germany in the immediate postwar
period by “Watson’s Whizzers” andbrought to the US. It was fitted with a fighter
nose in the US and used for high speed tests that were cut short by the lack of
engine reliability. It was purchased by Howard Hughes, who planned to enter it
in the 1947 Thompson Trophy jet race; the fact that the Me-262 outperformed the
USAAF P-80 Shooting Stars led to the Air Force threatening to not show up if it
was there. Hughes lost interest in the airplane and it ended up being given to
the mechanics school at the Glendale Grand Central Air Terminal. Wh en the
airport was closed in 1954 to make way for the construction of the I-5 freeway
through Los Angeles, the Me-262, along with a P-47G, P-51A, and A6M5 Zero that
were at the school as instructional airframes were scheduled for scrapping.
However, Ed Maloney, who was known in southern California aviation circles at
the time as a probably-crazy person who wanted to create an air museum of World
War II airplanes, was offered the airplanes if he would transport them away from
the airport.
en the
airport was closed in 1954 to make way for the construction of the I-5 freeway
through Los Angeles, the Me-262, along with a P-47G, P-51A, and A6M5 Zero that
were at the school as instructional airframes were scheduled for scrapping.
However, Ed Maloney, who was known in southern California aviation circles at
the time as a probably-crazy person who wanted to create an air museum of World
War II airplanes, was offered the airplanes if he would transport them away from
the airport.
That Me-262A-1a/U3 was restored to non-flying status at the Planes of Fame Air Museum once it moved to Chino Airport. In 2000, it was sold to Paul Allen for restoration to flight status, since it was the only original Me-262 airframe that had not had its main spar cut when the Air Force sold it to Howard Hughes back in 1947. The airplane has been restored over the past 15 years with its original Jumo 003 turbojets rebuilt with modern materials, and was ready for flight testing by Steve Hinton in 2020, an event delayed by the outbreak of the Covid-19 pandemic.
| THE KIT |
 The first
Me-262 plastic model in 1/48 was released by Lindberg in 1958. It is about as
accurate as most of the other Lindberg kits of that era are, in other words, not
that much. Monogram was next to bring out an Me-262 in 1978, which has been re-releassed
many times over the past 40 years. In the early 1990s, Trimaster released a
series of Me-262s, including the -1a fighter, the -2a bomber, and the U2, U3, U4
and U5 prototypes, as well as the two seat Me-262B night fighter. Dragon picked
these up after Trimaster went broke and has released most of them in the late
90s. Tamiya released an Me-262A-1a in 2002.
The first
Me-262 plastic model in 1/48 was released by Lindberg in 1958. It is about as
accurate as most of the other Lindberg kits of that era are, in other words, not
that much. Monogram was next to bring out an Me-262 in 1978, which has been re-releassed
many times over the past 40 years. In the early 1990s, Trimaster released a
series of Me-262s, including the -1a fighter, the -2a bomber, and the U2, U3, U4
and U5 prototypes, as well as the two seat Me-262B night fighter. Dragon picked
these up after Trimaster went broke and has released most of them in the late
90s. Tamiya released an Me-262A-1a in 2002.
Hobby Boss released an me-262A-1a in 2011, following that with the Me-262A-2a bomber, and the me-262B trainer, and then modified the A-1a kit to do the U3 recon jet and the U4 bomber destroyer with the 50mm cannon. These kits are well-designed, following Trumpeter’s very accurate Me-262A-1a. A-2a and Me-262B in 1/32.
I hadn’t built a 1/48 Me-262 kit since the Tamiya kits came out, but when a fellow modeler over at iModeler posted a work-in-progress of the Me-262A-1a/U3, I was sufficiently intrigued to pick one up for “an offer I could not refuse” on eBay.
| CONSTRUCTION |
As with most Hobby Boss kits, the parts are well-molded and things fit. It’s also nice to note that with these Me-262s, they are also accurate, something that isn’t always the case. Overall fit on this kit was so good that I only used any Mr. Surfacer on the lower rear fuselage centerline, and that was more the result of a Modeler-Induced Problem (MIP)in gluing the fuselage halves together than anything with the kit.
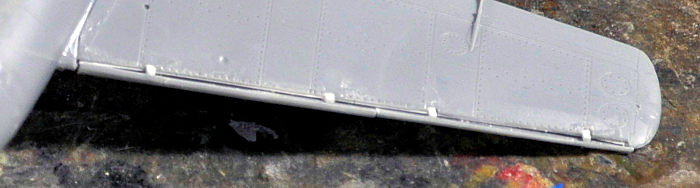
With this kit, I decided to start with the wings, since I had decided I would drop the slats. There are several resin sets for this that are available; back in 2002 when I built two Tamiya Me-262s, I used the Cutting Edge sets. It struck me that doing the slats myself wasn’t such a big problem, so I decided to do them from the kit. I’ve always been surprised that manufacturers don’t do 1/48 Me-262 kits with the slats dropped, since they have no trouble producing Bf-109 kits with the slats dropped.
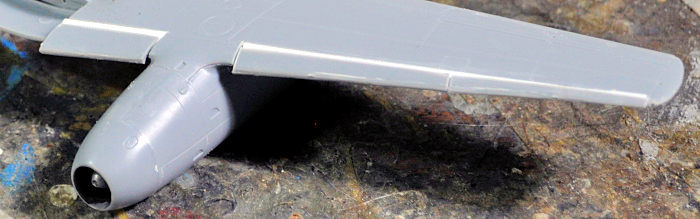 To do this,
I cut off the slats on the upper wing. The parts of the slats on the lower wing
are very narrow, so I decided it would be better to glue the upper parts to
these before cutting them out, which turned out to be the right idea. Once I had
the parts cut out, I took a sanding stick and sanded them out on the inside to
the approximate correct shape. This took no time at all and was easy. I then
assembled the wings. I scraped back the are of the flaps on the lower wing to a
40-45-degree angle. I took some Evergreen sheet and cut it to fit the openings
as regards length. I curled the plastic over a paintbrush to get the curved
airfoil surface. I glued it to the upper wing, then to the lower wing. When it
was set, I trimmed the plastic along the lower wing, and - voila! - I had the
wings done.
To do this,
I cut off the slats on the upper wing. The parts of the slats on the lower wing
are very narrow, so I decided it would be better to glue the upper parts to
these before cutting them out, which turned out to be the right idea. Once I had
the parts cut out, I took a sanding stick and sanded them out on the inside to
the approximate correct shape. This took no time at all and was easy. I then
assembled the wings. I scraped back the are of the flaps on the lower wing to a
40-45-degree angle. I took some Evergreen sheet and cut it to fit the openings
as regards length. I curled the plastic over a paintbrush to get the curved
airfoil surface. I glued it to the upper wing, then to the lower wing. When it
was set, I trimmed the plastic along the lower wing, and - voila! - I had the
wings done.
 After
assembling the turbojet nacelles and attaching them to the wings, I glued some
Evergreen sheet inside the slats, then attached them so they were extended about
1/16 inch, and made certain the slats were free of the wing surface on the upper
side. Overall, this is an easy modification to the kit, something anyone
experienced in modifying a kit should have no trouble with. I will do it on all
other Me-262 kits I may do in the future.
After
assembling the turbojet nacelles and attaching them to the wings, I glued some
Evergreen sheet inside the slats, then attached them so they were extended about
1/16 inch, and made certain the slats were free of the wing surface on the upper
side. Overall, this is an easy modification to the kit, something anyone
experienced in modifying a kit should have no trouble with. I will do it on all
other Me-262 kits I may do in the future.
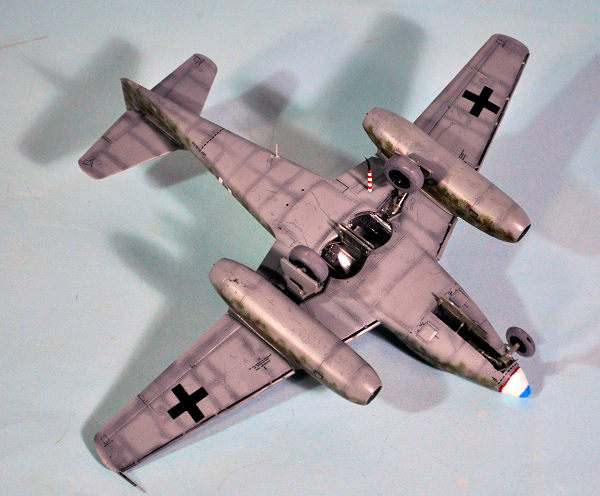
I then turned to the fuselage, which presented no problems. The first thing I did was glue the camera bay doors in the closed position, so I could work on them from inside and outside and get them positioned accurately. After that I assembled and painted the cockpit tub, where I deviated from an OOB by using Eduard photoetch seatbelts. I painted the exterior of the tub and the interior of the main gear well area of the fuselage with Vallejo aluminum, having decided this was a late war Me-262 that did not have the wheel well painted. Hobby Boss provides a metal part for the nosewheel well, which provides sufficient weight to avoid nose sitting, but I also dropped a fishweight inside the nose ahead of the camera bay as extra insurance.
The fuselage and wing subassemblies fit together without problems and the fit was so good that once again I needed no filler anywhere. I finished off by attaching the horizontal stabilizers.
| COLORS & MARKINGS |
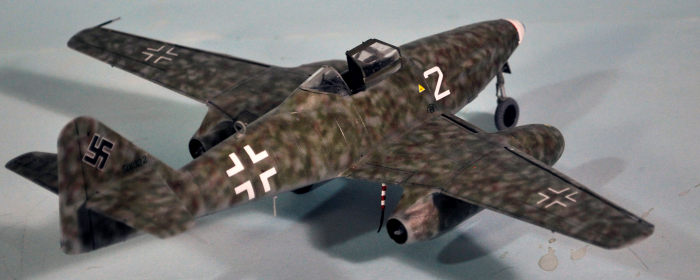
 The
photo-recon Me-262s had a different camouflage from the fighters and bombers.
They were delivered painted overall RLM 76, and were then painted in a random
“scribble” pattern, probably using RLM 81, 82 and 83. The scribble varied from a
simple “open” pattern to a very dense pattern. I ended up doing a pattern I
thought at first might be too dense, before another member of
The
photo-recon Me-262s had a different camouflage from the fighters and bombers.
They were delivered painted overall RLM 76, and were then painted in a random
“scribble” pattern, probably using RLM 81, 82 and 83. The scribble varied from a
simple “open” pattern to a very dense pattern. I ended up doing a pattern I
thought at first might be too dense, before another member of
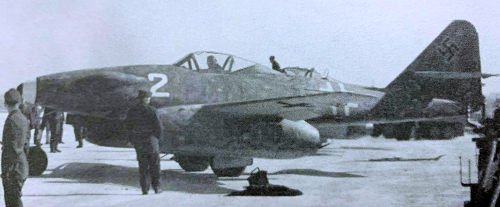
 iModeler posted
the color photo I am using in this review, which showed an airplane with a dense
scheme. Another iModeler member then posted a photo of “White 2,” the airplane
for which markings are provided in the kit decals, that showed it too wore a
similar dense scribble. I had lucked into “doing it right” by serendipity and
coincidence.
iModeler posted
the color photo I am using in this review, which showed an airplane with a dense
scheme. Another iModeler member then posted a photo of “White 2,” the airplane
for which markings are provided in the kit decals, that showed it too wore a
similar dense scribble. I had lucked into “doing it right” by serendipity and
coincidence.
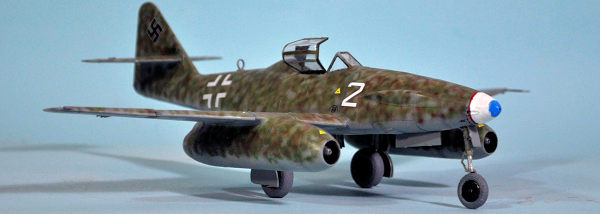
I used the kit decals, which went on without problem. The swastikas are done in halves, to get around the ban on the swastika in Europe, but they fit together on the model without difficulty.
I gave the model an overall coat of Clear Flat varnish, then attached the landing gear, unmasked the clear parts, and attached the canopy open.
| CONCLUSIONS |
Having built the Monogram, Trimaster/Dragon and Tamiya Me-262s, I think the Hobby Boss version is the best for fit and ease of assembly, combined with accuracy. I am already planning to do the Me-262B, having spotted the kit up at the LHS for less than it goes for at eBay when shipping is added in. I recommend these Hobby Boss Me-262s to anyone who wants a model of the world’s first successful jet fighter in their collection.
| REFERENCES |
March 2015
Copyright ModelingMadness.com
Review kit courtesy of my wallet.
If you would like your product reviewed fairly and fairly quickly, please contact the editor or see other details in the Note to Contributors.
Back to the Main Page Back to the Review Index Page Back to the Previews Index Page