
Airfix 1/48 Bf-109E-1
| KIT #: | A01520 |
| PRICE: | $24.99 |
| DECALS: | Two options |
| REVIEWER: | Tom Cleaver |
| NOTES: | Cutting Edge |
| HISTORY |
The Bf-109E series was developed in 1938, to take advantage of the DB 600-series engine, which gave the aircraft a performance enhancement of 50 percent more power over the previous Jumo-powered sub-types. Most importantly, the DB 601A had direct fuel injection rather than a carburetor, so that negative-g maneuvers presented no problem and allowed the airplane to out-maneuver adversaries such as the Spitfire or Hurricane that were equipped with float-type carburetors.
The first true Bf-109E prototype was the Bf-109 V15, powered by the DB
601A-1 rated at 1,050 h.p. With the engine proven during tests in 1938, the
Bf-109E-1 was approved for production in late 1938, armed with four 7.62mm
machine guns, and began rolling off the production lines in January 1939 at the
Regensburg plant.
 As
originally produced, the Bf-109E-1 provided no armor protection for the pilot,
though later during the Battle of Britain pilots did attach armored headrests
from the Bf-109E-3 and some had the external armored windscreen. 1,183
Bf-109E-1s were built during 1939, with production tapering off in 1940.
Operationally, the lightweight Bf-109E-1 was generally flown by junior enlisted
men serving as wingmen to flight leaders in the cannon-armed Bf-109E-3.
As
originally produced, the Bf-109E-1 provided no armor protection for the pilot,
though later during the Battle of Britain pilots did attach armored headrests
from the Bf-109E-3 and some had the external armored windscreen. 1,183
Bf-109E-1s were built during 1939, with production tapering off in 1940.
Operationally, the lightweight Bf-109E-1 was generally flown by junior enlisted
men serving as wingmen to flight leaders in the cannon-armed Bf-109E-3.
Appearing in Luftwaffe Jadgruppen in February, 1939, the Bf-109E-1 was also sent to Jagdgruppe 88 of the Legion Condor in Spain, with 2/Staffel converting from the Bf-109B in late February/early March 1939, just prior to the end of the Civil War.
Many Bf-109E-1s were upgraded in their armament during overhauls. When armed with the MG-FF cannon, they became E-3s. The Bf-109E under restoration at Planes of Fame Air Museum that was recovered from Russia originally began service as an E-1, being later upgraded to an E-3, as revealed by the different gun ports in the outer wing.
| THE KIT |
I’ll admit that when Airfix announced they would release a 1/48 Bf-109E, my first thought was “why?”, given that the Emil is well served by 1/48 kits released by Hasegawa beginning in 1987 and Tamiya in 1995. While both companies’ products were originally incorrect in outline, both have been modified over the years and cover all versions except the Bf-109E-1 (Hasegawa did a limited-release Bf-109E-1 with resin parts to fill in the hole after the underwing cannon bulge was removed).
But it turns out this kit does fill a niche: at around $25, it is modestly-priced compared to the competition, and it does provide the necessary parts to do all versions of the Emil, from Bf-109E-1 to Bf-109E-7 (Trop). Additionally, it has the most accurate overall shape of any 1/48 Bf-109E kit.
Additionally, all control surfaces are provided
separately and display appropriate petite detail for fabric-covered surfaces.
All are commendably thin with sharp trailing edges. Perhaps most importantly,
the kit is very well engineered. All the parts fit so tightly that it is not
necessary to utilize such “advanced” modeling techniques as
 putty or
filler, which makes this a very good modeler for a beginner who has some
experience of snap-tite kits to build as first “real” model with the expectation
of a good result. Experienced modelers are also assured of a good model for a
modest effort; given the plethora of marking possibilities for the
Emil, this kit allows one to add multiple models to
the collection without recomputing the national debt to do so.
putty or
filler, which makes this a very good modeler for a beginner who has some
experience of snap-tite kits to build as first “real” model with the expectation
of a good result. Experienced modelers are also assured of a good model for a
modest effort; given the plethora of marking possibilities for the
Emil, this kit allows one to add multiple models to
the collection without recomputing the national debt to do so.
The main parts are thicker than one is used to with other manufacturers, which is good for the beginner, while the surfaces have petite panel line detail and there is no “clunkiness” to the final result. The clear parts are very thin and clear, and all versions of windscreen and canopy are provided, though you may want to consider a vac canopy for the E-4 and E-7 versions, since the kit canopy is more correct for a Gustav than an Emil.
The only complaint modelers have had about the kit is that the propeller blades are too thin. If you have the Eduard Bf-109F or 109G kit in your stash, the problem can be easily solved by using the early prop provided in those kits, which is properly shaped. The only modification needed is to sand down the prop hubs so they fit within the Airfix spinner.
| CONSTRUCTION |
I started by painting the cockpit parts RLM02 while still on the sprues. While al that was drying, I assembled the wing, leaving flaps and ailerons off. I then assembled the cockpit. I used photo-etch seatbelts from an Eduard Luftwaffe set, and the kit decal for the instrument panel. I posed the control stick leaning forward, since I planned to droop the elevators.
 I
attached this assembly to the fuselage half and then assembled the fuselage. I
found that the kit does not provide the noticeable “sill” around the top of the
cockpit, so I used some Evergreen strip to create that. The only place I had any
sort of a visible seam was that area of the forward fuselage between the
windscreen and the cowling, which only needed a light scraping with an X-acto
blade for it to disappear. I also used Evergreen strip to create the adjustable
opening of the oil cooler, which I posed in the neutral position.
I
attached this assembly to the fuselage half and then assembled the fuselage. I
found that the kit does not provide the noticeable “sill” around the top of the
cockpit, so I used some Evergreen strip to create that. The only place I had any
sort of a visible seam was that area of the forward fuselage between the
windscreen and the cowling, which only needed a light scraping with an X-acto
blade for it to disappear. I also used Evergreen strip to create the adjustable
opening of the oil cooler, which I posed in the neutral position.
I attached the wing, then the horizontal stabilizers. With all the basic airframe assembled, I attached the flaps in the down position, the ailerons in the “down” position they took when the flaps were lowered, and the elevators were “drooped.” The model was now ready to go to the paint shop.
| COLORS & MARKINGS |
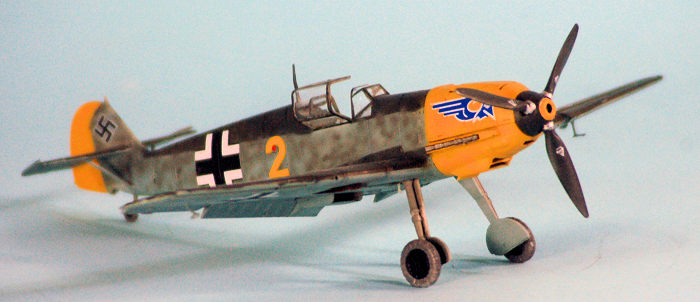
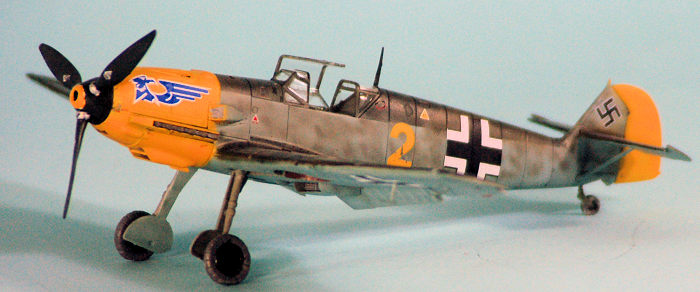
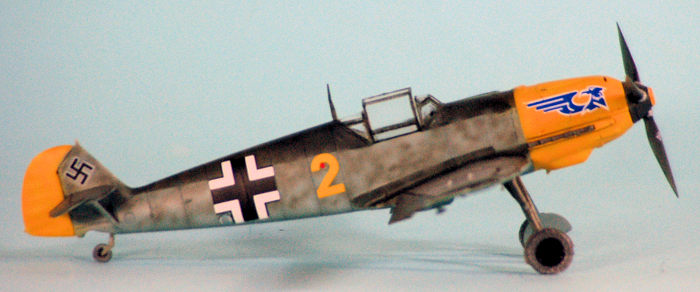
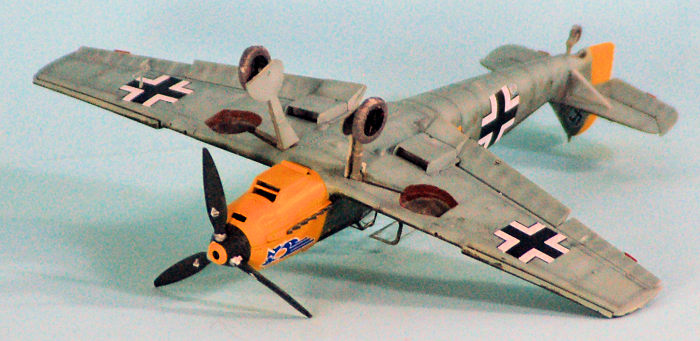 After
pre-shading the model, I painted the nose and rudder yellow, then masked them
off. The airplane I was modeling was repainted during service in the Battle of
Britain, to lighten the colors from the original 70/71/65, by raising the
demarcation line of the fuselage with RLM 65, after which the fuselage was
“blotched” with RLM 02. I used an old Cutting Edge sheet to do a JG 52 airplane
from the Battle of Britain. The decals went on with no problems.
After
pre-shading the model, I painted the nose and rudder yellow, then masked them
off. The airplane I was modeling was repainted during service in the Battle of
Britain, to lighten the colors from the original 70/71/65, by raising the
demarcation line of the fuselage with RLM 65, after which the fuselage was
“blotched” with RLM 02. I used an old Cutting Edge sheet to do a JG 52 airplane
from the Battle of Britain. The decals went on with no problems.
I attached the prop and landing gear, and positioned the early canopy in the open position.
| CONCLUSIONS |
Using the Eduard prop was all it took to fix the only problem associated with this kit. The end result is one of the best-looking Bf-109E models one can get, at a price that is half what you’ll spend for any other Emil model. Assembly is easy. Highly recommended.
Tom Cleaver
6 September 2018
Review kit courtesy of my wallet.
Copyright ModelingMadness.com
If you would like your product reviewed fairly and fairly quickly, please contact the editor or see other details in the Note to Contributors.
Back to the Main Page Back to the Review Index Page Back to the Previews Index Page